User Guide
Page 2
Contents About Your New Label Maker 5 Product Registration 5 Getting Started 5 Connecting the Power 5 Inserting the Batteries 5 Connecting the Optional Power Adapter 6 Inserting the Tape Cassette 6 Using the Label Maker for the First Time 7 Getting to Know the Label Maker 7 Power ...7 LCD Display ...8 Format ...8 Insert ...8 Settings ...8 CAPS ...
Contents About Your New Label Maker 5 Product Registration 5 Getting Started 5 Connecting the Power 5 Inserting the Batteries 5 Connecting the Optional Power Adapter 6 Inserting the Tape Cassette 6 Using the Label Maker for the First Time 7 Getting to Know the Label Maker 7 Power ...7 LCD Display ...8 Format ...8 Insert ...8 Settings ...8 CAPS ...
User Guide
Page 5
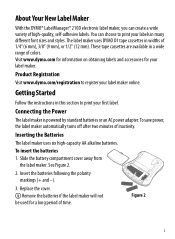
About Your New Label Maker With the DYMO® LabelManager® 210D electronic label maker, you can choose to register your label maker online. The label maker uses DYMO D1 tape cassettes in many different font sizes and styles. Inserting the Batteries The label maker uses six high-capacity AA ... in widths of high-quality, self-adhesive labels. Connecting the Power The label maker is powered by standard batteries or an AC power adapter. Slide the battery compartment cover away from the label maker. To save power, the label maker automatically turns off after two minutes of...
About Your New Label Maker With the DYMO® LabelManager® 210D electronic label maker, you can choose to register your label maker online. The label maker uses DYMO D1 tape cassettes in many different font sizes and styles. Inserting the Batteries The label maker uses six high-capacity AA ... in widths of high-quality, self-adhesive labels. Connecting the Power The label maker is powered by standard batteries or an AC power adapter. Slide the battery compartment cover away from the label maker. To save power, the label maker automatically turns off after two minutes of...

User Guide
Page 6
... top, left side of the label maker. 2. Remove cardboard insert Figure 4 To insert the tape cassette 1. See Figure 5. Connecting the AC adapter to open the tape compartment. Visit www.dymo.com for the first time, remove the protective cardboard insert from the main power source. Click! See Figure 3. Press firmly until cassette...
... top, left side of the label maker. 2. Remove cardboard insert Figure 4 To insert the tape cassette 1. See Figure 5. Connecting the AC adapter to open the tape compartment. Visit www.dymo.com for the first time, remove the protective cardboard insert from the main power source. Click! See Figure 3. Press firmly until cassette...
User Guide
Page 17
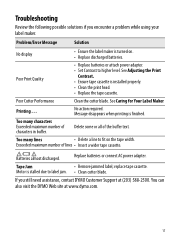
...; Replace the tape cassette. Poor Print Quality • Replace batteries or attach power adapter. • Set Contrast to fit on . • Replace discharged batteries. Replace batteries or connect AC power adapter. Motor is finished. Message disappears when printing is stalled due to label jam. &#...Ensure tape cassette is turned on the tape width. Printing . . . Tape Jam • Remove jammed label; You can also visit the DYMO Web site at (203) 588-2500. Exceeded maximum number of the buffer text. If you encounter a problem while using your label maker. ...
...; Replace the tape cassette. Poor Print Quality • Replace batteries or attach power adapter. • Set Contrast to fit on . • Replace discharged batteries. Replace batteries or connect AC power adapter. Motor is finished. Message disappears when printing is stalled due to label jam. &#...Ensure tape cassette is turned on the tape width. Printing . . . Tape Jam • Remove jammed label; You can also visit the DYMO Web site at (203) 588-2500. Exceeded maximum number of the buffer text. If you encounter a problem while using your label maker. ...
