
User Guide 1
Page 2
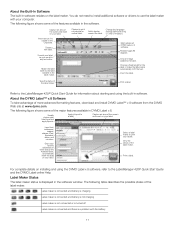
17 18 19 20 21 22 16 15 14 13 12 Insert . , - -+ Shift % 1 2 3 4 5 6 7 8 1 Print 2 Preview 3 Save 4 Settings 5 Symbols 6 Shift 7 Backspace 8 Return 11 10 9 Figure 1DYMO LabelManager 420P label maker 9 Accented characters 10 Space bar 11 Caps 12 Numeric keys 13 Insert 14 Font Size 15 New label/Clear 16 On/Off 17 Format 18 LCD display 19 Cancel 20 Navigation 21 OK 22 Open
17 18 19 20 21 22 16 15 14 13 12 Insert . , - -+ Shift % 1 2 3 4 5 6 7 8 1 Print 2 Preview 3 Save 4 Settings 5 Symbols 6 Shift 7 Backspace 8 Return 11 10 9 Figure 1DYMO LabelManager 420P label maker 9 Accented characters 10 Space bar 11 Caps 12 Numeric keys 13 Insert 14 Font Size 15 New label/Clear 16 On/Off 17 Format 18 LCD display 19 Cancel 20 Navigation 21 OK 22 Open

User Guide 1
Page 3
...Font Size 6 Font Styles 6 Adding Borders 7 Using Mirror Text 7 Vertical Text 7 Aligning the Text 7 Creating Fixed-Length Labels 7 Creating Multi-Line Labels 7 Using Clip Art, Symbols, and Special Characters 8 Adding Clip Art 8 Adding Symbols 8 Adding International Characters 9 Using the ...Label Maker Memory 10 Saving a Label 10 Opening Saved Labels 10 Inserting Saved Text 10 Caring for Your Label Maker 10 Using Your Label Maker with Your Computer 10 Connecting the Label Maker to your Computer 10 About the Built-In Software 11 About the DYMO Label™ v.8 Software 11 Label...
...Font Size 6 Font Styles 6 Adding Borders 7 Using Mirror Text 7 Vertical Text 7 Aligning the Text 7 Creating Fixed-Length Labels 7 Creating Multi-Line Labels 7 Using Clip Art, Symbols, and Special Characters 8 Adding Clip Art 8 Adding Symbols 8 Adding International Characters 9 Using the ...Label Maker Memory 10 Saving a Label 10 Opening Saved Labels 10 Inserting Saved Text 10 Caring for Your Label Maker 10 Using Your Label Maker with Your Computer 10 Connecting the Label Maker to your Computer 10 About the Built-In Software 11 About the DYMO Label™ v.8 Software 11 Label...
User Guide 1
Page 4
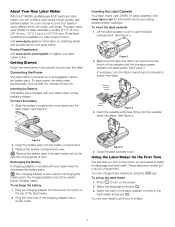
... the battery 1 Plug the charging adapter into the power connector on obtaining labels and accessories for recharging the battery pack; About Your New Label Maker With the DYMO® LabelManager 420P electronic label maker, you can create a wide variety of inactivity. Ribbon rewind spool Label guides Figure 4 3 Insert the cassette and press firmly until you change these...
... the battery 1 Plug the charging adapter into the power connector on obtaining labels and accessories for recharging the battery pack; About Your New Label Maker With the DYMO® LabelManager 420P electronic label maker, you can create a wide variety of inactivity. Ribbon rewind spool Label guides Figure 4 3 Insert the cassette and press firmly until you change these...

User Guide 1
Page 5
...when a feature is used to create a simple label. 2 Press . You can also use the key to exit from the label to clear all letters appear in the display; You can show four lines of the formatting you add is off . With DYMO's exclusive graphical display, most of text at a ...time. Cancel The key allows you to let you press , the number 8 appears in lowercase. Refer to cancel an action. Split backing 3 Press the cutter button to cut the label. 4 Remove the paper backing from...
...when a feature is used to create a simple label. 2 Press . You can also use the key to exit from the label to clear all letters appear in the display; You can show four lines of the formatting you add is off . With DYMO's exclusive graphical display, most of text at a ...time. Cancel The key allows you to let you press , the number 8 appears in lowercase. Refer to cancel an action. Split backing 3 Press the cutter button to cut the label. 4 Remove the paper backing from...

User Guide 1
Page 6
..., 20, 24, 32, 40 point ♦ Use the left and right navigation keys to your labels: The font sizes available depend on multi-line labels, each line is underlined. 6 Formatting Your Label You can choose from 12 different font styles: Normal Bold Italic Outline Shadow Italic + Bold Normal +...+ Underline Outline + Underline Shadow + Underline Italic + Bold + Underline ♦ Use the up and down navigation keys to all characters on a label. The font size applies to select the font style. When using the Font Size shortcut key, . Font Size Eight font sizes are available for your...
..., 20, 24, 32, 40 point ♦ Use the left and right navigation keys to your labels: The font sizes available depend on multi-line labels, each line is underlined. 6 Formatting Your Label You can choose from 12 different font styles: Normal Bold Italic Outline Shadow Italic + Bold Normal +...+ Underline Outline + Underline Shadow + Underline Italic + Bold + Underline ♦ Use the up and down navigation keys to all characters on a label. The font size applies to select the font style. When using the Font Size shortcut key, . Font Size Eight font sizes are available for your...

User Guide 1
Page 7
... text by the length of the text. When using vertical text with an underline style, the underline will print as you can choose a fixed length label up and down navigation keys to select the fixed option. ♦ Use the left and right navigation keys to print. 7 You can print on... the text running vertically. The number of text will not print. 2 Use the up and down navigation keys to select the label length. Aligning the Text You can print labels with multiple lines of lines you would see the text in a mirror. ♦ Use the left and right navigation keys to select...
... text by the length of the text. When using vertical text with an underline style, the underline will print as you can choose a fixed length label up and down navigation keys to select the fixed option. ♦ Use the left and right navigation keys to print. 7 You can print on... the text running vertically. The number of text will not print. 2 Use the up and down navigation keys to select the label length. Aligning the Text You can print labels with multiple lines of lines you would see the text in a mirror. ♦ Use the left and right navigation keys to select...
User Guide 1
Page 8
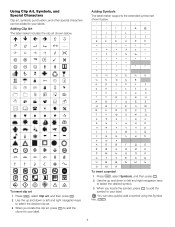
You can be added to your label. Adding Clip Art The label maker includes the clip art shown below . ' " , . ; ' : / \ | & @ ! ¡ ? ¿ _ • ( ) { } [ ] € £ $ ¢ ¥ # + - * ÷ √ ^ ~ ≈ = ≠ ± < > ≤ ... right navigation keys to select the desired clip art. 3 When you locate the symbol, press symbol to your label. to your labels. to add the Adding Symbols The label maker supports the extended symbol set shown below . ↔L © ®™ ☺ ! ...
You can be added to your label. Adding Clip Art The label maker includes the clip art shown below . ' " , . ; ' : / \ | & @ ! ¡ ? ¿ _ • ( ) { } [ ] € £ $ ¢ ¥ # + - * ÷ √ ^ ~ ≈ = ≠ ± < > ≤ ... right navigation keys to select the desired clip art. 3 When you locate the symbol, press symbol to your label. to your labels. to add the Adding Symbols The label maker supports the extended symbol set shown below . ↔L © ®™ ☺ ! ...
User Guide 1
Page 9
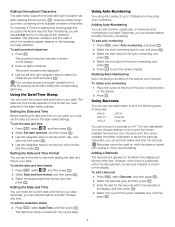
... Using Auto-Numbering You can also access the accent variations for the barcode within the barcode text, the barcode indicator is shown on the label in the label maker settings. Using Barcodes You can use , and press . 3 Select the start value for the auto-numbering, and press . 4 ...3 Enter the text for a letter by pressing and briefly holding the corresponding alpha key. After pressing the Accent key, , pressing a letter brings up to 10 labels at a time using auto-numbering. To set the date and time 1 Press , select , and then press . 2 Select Set date and time, and then...
... Using Auto-Numbering You can also access the accent variations for the barcode within the barcode text, the barcode indicator is shown on the label in the label maker settings. Using Barcodes You can use , and press . 3 Select the start value for the auto-numbering, and press . 4 ...3 Enter the text for a letter by pressing and briefly holding the corresponding alpha key. After pressing the Accent key, , pressing a letter brings up to 10 labels at a time using auto-numbering. To set the date and time 1 Press , select , and then press . 2 Select Set date and time, and then...

User Guide 1
Page 10
...A barcode is entered on the label as a standalone label printer or you can save the text of the barcode text on your computer using the built-in memory to use at a later time. Inserting Saved Text You can easily open labels saved in software or DYMO Label v.8 software. The text is inserted... in the label where you want to insert. 4 Press . Cleaning tool Print head Press and hold the cutter button to...
...A barcode is entered on the label as a standalone label printer or you can save the text of the barcode text on your computer using the built-in memory to use at a later time. Inserting Saved Text You can easily open labels saved in software or DYMO Label v.8 software. The text is inserted... in the label where you want to insert. 4 Press . Cleaning tool Print head Press and hold the cutter button to...
User Guide 1
Page 11
... advanced formatting features, download and install DYMO Label™ v.8 software from the DYMO Web site at www.dymo.com. Print a label. Select a label maker to the LabelManager 420P Quick Start Guide and the DYMO Label online Help. Insert text you would in DYMO Label v.8. Choose to the Clipboard. Zoom the label. Store your label type and apply layouts. Print a label. Crop an image added to...
... advanced formatting features, download and install DYMO Label™ v.8 software from the DYMO Web site at www.dymo.com. Print a label. Select a label maker to the LabelManager 420P Quick Start Guide and the DYMO Label online Help. Insert text you would in DYMO Label v.8. Choose to the Clipboard. Zoom the label. Store your label type and apply layouts. Print a label. Crop an image added to...

User Guide 1
Page 12
...the battery pack. Environmental Information The equipment that this product, please contact your label maker. No action required. Attach the charging adapter to the label maker to : documentation@dymo.com Please keep in the documentation. See "Recharging the Battery". • Ensure... the battery pack is turned on 3/4" wide labels. Charge Battery! Solution • Ensure the label maker is inserted correctly. ...
...the battery pack. Environmental Information The equipment that this product, please contact your label maker. No action required. Attach the charging adapter to the label maker to : documentation@dymo.com Please keep in the documentation. See "Recharging the Battery". • Ensure... the battery pack is turned on 3/4" wide labels. Charge Battery! Solution • Ensure the label maker is inserted correctly. ...


