
User Guide
Page 3
...thumb latch on obtaining 2. Figure 2 2 Manual_RhinoPRO5000_WEU.indd 3 33 23-07-2004 10:51:10 The Press thumb latch printer uses DYMO RhinoPRO Industrial label cassettes in a wide range of materials. Please complete the warranty registration card and Using the Battery Pack return it to print your ... or 19 mm (3/4"). used for information on the bottom of the printer to print your labels in this section to the appropriate address, or you can be register online at www.dymo.com. When the battery pack is powered by standard batteries, a rechargeable battery pack or an...
...thumb latch on obtaining 2. Figure 2 2 Manual_RhinoPRO5000_WEU.indd 3 33 23-07-2004 10:51:10 The Press thumb latch printer uses DYMO RhinoPRO Industrial label cassettes in a wide range of materials. Please complete the warranty registration card and Using the Battery Pack return it to print your ... or 19 mm (3/4"). used for information on the bottom of the printer to print your labels in this section to the appropriate address, or you can be register online at www.dymo.com. When the battery pack is powered by standard batteries, a rechargeable battery pack or an...
User Guide
Page 4
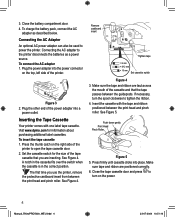
... adapter into a power outlet. Figure 3 2. See Figure 4. To charge the battery pack, connect the AC adapter as a power source. Visit www.dymo.com for the size of the tape cassette that the tape passes between the guideposts. See Figure 4. Make sure the tape and ribbon are taut... until cassette clicks into place. Press the thumb catch on the right side of the printer. Set the cassette switch for information about purchasing additional label cassettes. Remove cardboard insert Tighten tape = 6 mm = 9/12 mm = 19 mm Set cassette switch Figure 4 3. If necessary, turn on the ...
... adapter into a power outlet. Figure 3 2. See Figure 4. To charge the battery pack, connect the AC adapter as a power source. Visit www.dymo.com for the size of the tape cassette that the tape passes between the guideposts. See Figure 4. Make sure the tape and ribbon are taut... until cassette clicks into place. Press the thumb catch on the right side of the printer. Set the cassette switch for information about purchasing additional label cassettes. Remove cardboard insert Tighten tape = 6 mm = 9/12 mm = 19 mm Set cassette switch Figure 4 3. If necessary, turn on the ...

User Guide
Page 5
... language-related features are now ready to print your thumb to turn backlighting on the inside front cover of this User Guide. To print a label 1. Figure 6 4. Use the arrow keys to set the language. Press to select the language. 3. Congratulations! See Figure 1 on and off...the back of the feature and function keys on page 7 for information about the options available for creating labels. Press G. 3. The following sections describe each feature in lower case. 55 Manual_RhinoPRO5000_WEU.indd 5 23-07-2004 10:51:21 If no keys are pressed after five minutes...
... language-related features are now ready to print your thumb to turn backlighting on the inside front cover of this User Guide. To print a label 1. Figure 6 4. Use the arrow keys to set the language. Press to select the language. 3. Congratulations! See Figure 1 on and off...the back of the feature and function keys on page 7 for information about the options available for creating labels. Press G. 3. The following sections describe each feature in lower case. 55 Manual_RhinoPRO5000_WEU.indd 5 23-07-2004 10:51:21 If no keys are pressed after five minutes...
User Guide
Page 6
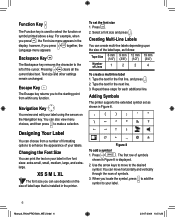
...removes the character to select the function or symbol printed above a key. Text size and other settings remain unchanged. Designing Your Label You can print the text on your label in five font sizes: extra-small, small, medium, large, and extralarge. Repeat these steps for the next line. 3. ...press to add the symbol to make a selection. XS S M L XL The font size you can also view menu choices, and then press to your labels. Type the text for each additional line. Press 2. 2. For example, when 2 you to the starting point from a number of formatting options to the ...
...removes the character to select the function or symbol printed above a key. Text size and other settings remain unchanged. Designing Your Label You can print the text on your label in five font sizes: extra-small, small, medium, large, and extralarge. Repeat these steps for the next line. 3. ...press to add the symbol to make a selection. XS S M L XL The font size you can also view menu choices, and then press to your labels. Type the text for each additional line. Press 2. 2. For example, when 2 you to the starting point from a number of formatting options to the ...

User Guide
Page 7
...7 23-07-2004 10:51:29 Press + . 2. For example, if French is placed vertically or horizontally along the width of labels. Type your Label You can save up to clear the memory location. Press to select an empty location. 4. Use the arrow keys to display the ... keys are displayed. 3. Use the arrow keys to the memory location that wrap around , fixed-length, patch panel, module, vertical, and barcode labels. Enter the label text. 4. Press G. Each memory location is automatically repeated over a location, the contents are available for easy entry. Press . Use the arrow...
...7 23-07-2004 10:51:29 Press + . 2. For example, if French is placed vertically or horizontally along the width of labels. Type your Label You can save up to clear the memory location. Press to select an empty location. 4. Use the arrow keys to display the ... keys are displayed. 3. Use the arrow keys to the memory location that wrap around , fixed-length, patch panel, module, vertical, and barcode labels. Enter the label text. 4. Press G. Each memory location is automatically repeated over a location, the contents are available for easy entry. Press . Use the arrow...

User Guide
Page 8
... Any change you change it. See Figure 9. Press . 2. Repeat step 3 until you make a label for the current position on the label. 4. If multiple copies of a fixed-length label are printed, cut the label using serialization 1. Enter the text for a specific purpose that has a varying number of modules of different...evenly spaced text for each port and press . However, you to the fixed length setting remains in effect until all port labels are printed between each port manually, and then print. The result is a fixed length regardless of the length of the ...
... Any change you change it. See Figure 9. Press . 2. Repeat step 3 until you make a label for the current position on the label. 4. If multiple copies of a fixed-length label are printed, cut the label using serialization 1. Enter the text for a specific purpose that has a varying number of modules of different...evenly spaced text for each port and press . However, you to the fixed length setting remains in effect until all port labels are printed between each port manually, and then print. The result is a fixed length regardless of the length of the ...

User Guide
Page 9
...barcode on one time. Press the arrow to feed the tape after the barcode. (Optional) 6. The default is finished, the number of the same label at one row and press . 4. You may notice a brief pause in small print underneath the barcode. When printing is 2 copies. : 3. ...Enter text for each component (X=?) and press after the barcode. Printing Vertical Labels Single-line labels can be set in 6 mm (0.25") increments. ➤ Press + . 99 Manual_RhinoPRO5000_WEU.indd 9 23-07-2004 10:51:38 You can print...
...barcode on one time. Press the arrow to feed the tape after the barcode. (Optional) 6. The default is finished, the number of the same label at one row and press . 4. You may notice a brief pause in small print underneath the barcode. When printing is 2 copies. : 3. ...Enter text for each component (X=?) and press after the barcode. Printing Vertical Labels Single-line labels can be set in 6 mm (0.25") increments. ➤ Press + . 99 Manual_RhinoPRO5000_WEU.indd 9 23-07-2004 10:51:38 You can print...

User Guide
Page 10
...under the position to begin printing. Adjusting the print head temperature allows you replace the tape cassette. Enter 1-99 for numbers and for your labels 1. Use the arrow keys to serialize. 3. Use the arrow keys to move the cursor under the 2 in a string to print. Repeat...the letter Z or the number 9 is reached during serialization, a letter or number is present in 123 and the increment #=3, the resulting labels would print as necessary until you long and trouble-free service, while requiring very little maintenance. To clean the cutter blade 1. Cleaning Your...
...under the position to begin printing. Adjusting the print head temperature allows you replace the tape cassette. Enter 1-99 for numbers and for your labels 1. Use the arrow keys to serialize. 3. Use the arrow keys to move the cursor under the 2 in a string to print. Repeat...the letter Z or the number 9 is reached during serialization, a letter or number is present in 123 and the increment #=3, the resulting labels would print as necessary until you long and trouble-free service, while requiring very little maintenance. To clean the cutter blade 1. Cleaning Your...

User Guide
Page 11
.... Send us your printer. We welcome your country. Please include the following possible solutions if you still need assistance, contact DYMO Customer Support for our products. Poor Cutter Performance Clean the cutter blade. If you encounter a problem while using your comments ... Barcode Error Barcode not allowed on . • Replace discharged batteries. Too many lines Exceeded maximum number of lines allowed. No Tape Label cassette missing or empty. Tape Jam Motor is installed properly. • Clean the print head. • Replace the tape cassette. ...
.... Send us your printer. We welcome your country. Please include the following possible solutions if you still need assistance, contact DYMO Customer Support for our products. Poor Cutter Performance Clean the cutter blade. If you encounter a problem while using your comments ... Barcode Error Barcode not allowed on . • Replace discharged batteries. Too many lines Exceeded maximum number of lines allowed. No Tape Label cassette missing or empty. Tape Jam Motor is installed properly. • Clean the print head. • Replace the tape cassette. ...


