User Guide
Page 2
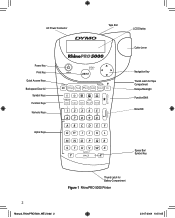
AC Power Connector Power Key Print Key Quick Access Keys Backspace/Clear All Symbol Keys Function Keys Numeric Keys Alpha Keys Tape Exit LCD Display Cutter Lever Navigation Key Thumb Latch for Tape Compartment Escape/Backlight Function/Shift Enter/OK Space Bar/ Symbol Key 2 Manual_RhinoPRO5000_WEU.indd 2 Thumb Latch for Battery Compartment Figure 1 RhinoPRO 5000 Printer 2 23-07-2004 10:51:05
AC Power Connector Power Key Print Key Quick Access Keys Backspace/Clear All Symbol Keys Function Keys Numeric Keys Alpha Keys Tape Exit LCD Display Cutter Lever Navigation Key Thumb Latch for Tape Compartment Escape/Backlight Function/Shift Enter/OK Space Bar/ Symbol Key 2 Manual_RhinoPRO5000_WEU.indd 2 Thumb Latch for Battery Compartment Figure 1 RhinoPRO 5000 Printer 2 23-07-2004 10:51:05

User Guide
Page 3
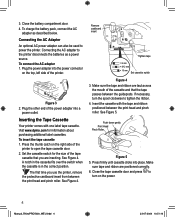
...be purchased through the AC adapter and turned ON to open the battery compartment door. To use the battery pack 1. The Press thumb latch printer uses DYMO RhinoPRO Industrial label cassettes in a wide range of 6 mm (1/4"), 9 mm (3/8"), Figure 1 12 mm (1/2"), or 19 mm (3/4"). Inserting ...batteries, a rechargeable battery pack or an AC power adapter. through your labels in this section to print your local DYMO reseller. To save power, the printer will not be connected to external power Follow the instructions in many different sizes and styles. markings (+ and -). ...
...be purchased through the AC adapter and turned ON to open the battery compartment door. To use the battery pack 1. The Press thumb latch printer uses DYMO RhinoPRO Industrial label cassettes in a wide range of 6 mm (1/4"), 9 mm (3/8"), Figure 1 12 mm (1/2"), or 19 mm (3/4"). Inserting ...batteries, a rechargeable battery pack or an AC power adapter. through your labels in this section to print your local DYMO reseller. To save power, the printer will not be connected to external power Follow the instructions in many different sizes and styles. markings (+ and -). ...
User Guide
Page 4
... cassette clicks into the power connector on the top, left side of the printer to power the printer. Plug the other end of the tape cassette that the tape passes between the print head and pinch roller. Visit www.dymo.com for the size of the power adapter into a power outlet. To insert... the tape cassette 1. If necessary, turn on the right side of the printer. See Figure 5. See Figure 4. Push down gently Print Head Pinch Roller ...
... cassette clicks into the power connector on the top, left side of the printer to power the printer. Plug the other end of the tape cassette that the tape passes between the print head and pinch roller. Visit www.dymo.com for the size of the power adapter into a power outlet. To insert... the tape cassette 1. If necessary, turn on the right side of the printer. See Figure 5. See Figure 4. Push down gently Print Head Pinch Roller ...

User Guide
Page 5
...display. ➤ Press + to lift the cutting lever and pull it towards the back of the printer. When Caps mode is turned on the display and all letters entered appear in lower case. 55 Manual_RhinoPRO5000_WEU.indd 5 23-07-2004 10:51:21 Press +2. 2. Continue reading to read. ...characters and spaces. Remove the label. Feature and function indicators appear on page 7 for creating labels. Cut the label using your printer. LCD Display The printer's LCD display typically shows a row of the display to indicate that you can enter up to set the language. See Using ...
...display. ➤ Press + to lift the cutting lever and pull it towards the back of the printer. When Caps mode is turned on the display and all letters entered appear in lower case. 55 Manual_RhinoPRO5000_WEU.indd 5 23-07-2004 10:51:21 Press +2. 2. Continue reading to read. ...characters and spaces. Remove the label. Feature and function indicators appear on page 7 for creating labels. Cut the label using your printer. LCD Display The printer's LCD display typically shows a row of the display to indicate that you can enter up to set the language. See Using ...
User Guide
Page 6
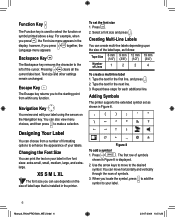
... symbol to move horizontally and vertically through the rows of label tape that is displayed. 2. Navigation Key You review and edit your label in the printer. XS S M L XL The font size you press , the Font size menu appears in Figure 8 is installed in five font sizes: extra-small, small...key removes the character to enhance the appearance of the cursor. Designing Your Label You can use depends on the Navigation key. Adding Symbols The printer supports the extended symbol set the font size 1. You can also view menu choices, and then press to the desired symbol. Pressing + ...
... symbol to move horizontally and vertically through the rows of label tape that is displayed. 2. Navigation Key You review and edit your label in the printer. XS S M L XL The font size you press , the Font size menu appears in Figure 8 is installed in five font sizes: extra-small, small...key removes the character to enhance the appearance of the cursor. Designing Your Label You can use depends on the Navigation key. Adding Symbols The printer supports the extended symbol set the font size 1. You can also view menu choices, and then press to the desired symbol. Pressing + ...

User Guide
Page 7
...The character variations and the order in memory. Each memory location is saved to memory, you want . 0 3. Press . 2. Using International Characters The printer supports the extended Latin character set using a mobile phone keypad, typing a letter multiple times quickly will see a à â æ and so...the variations appear depend on the language you have selected to select an empty location. 4. Using the Quick Access Keys Your printer includes several quick access keys that give you want and then press . Quick access keys are filled and when the cursor ...
...The character variations and the order in memory. Each memory location is saved to memory, you want . 0 3. Press . 2. Using International Characters The printer supports the extended Latin character set using a mobile phone keypad, typing a letter multiple times quickly will see a à â æ and so...the variations appear depend on the language you have selected to select an empty location. 4. Using the Quick Access Keys Your printer includes several quick access keys that give you want and then press . Quick access keys are filled and when the cursor ...

User Guide
Page 9
... generate two types of copies (maximum is approximately 10 mm (0,4"). Press the arrow to feed the tape after the barcode. Press . 2. Printing Barcode Labels The printer can feed the tape in increments of 0.1 mm (0.005"). 3. Press G. Printing Options You can be printed with the text in printing between the barcode symbols...
... generate two types of copies (maximum is approximately 10 mm (0,4"). Press the arrow to feed the tape after the barcode. Press . 2. Printing Barcode Labels The printer can feed the tape in increments of 0.1 mm (0.005"). 3. Press G. Printing Options You can be printed with the text in printing between the barcode symbols...

User Guide
Page 10
...is reached during serialization, a letter or number is present in ABC. You can print serialized labels numerically or alphabetically. To serialize your printer from 1-99. Adjusting the print head temperature allows you long and trouble-free service, while requiring very little maintenance. To set the ...print head temperature 1. Cleaning Your Printer Your printer is designed to give you to control the print quality (±20). Clean the cutter blade each label to select the ...
...is reached during serialization, a letter or number is present in ABC. You can print serialized labels numerically or alphabetically. To serialize your printer from 1-99. Adjusting the print head temperature allows you long and trouble-free service, while requiring very little maintenance. To set the ...print head temperature 1. Cleaning Your Printer Your printer is designed to give you to control the print quality (±20). Clean the cutter blade each label to select the ...

User Guide
Page 11
... us your comments or suggestions about additional topics you still need assistance, contact DYMO Customer Support for our products. If you encounter a problem while using your printer. Print Error Undetermined printer error. If you would like to see covered in mind that are constantly working... a technical question, please contact Customer Support. 11 11 Manual_RhinoPRO5000_WEU.indd 11 23-07-2004 10:51:45 See Cleaning Your Printer. Select another format. No Tape Label cassette missing or empty. Replace batteries or connect AC power adapter. Troubleshooting Review the ...
... us your comments or suggestions about additional topics you still need assistance, contact DYMO Customer Support for our products. If you encounter a problem while using your printer. Print Error Undetermined printer error. If you would like to see covered in mind that are constantly working... a technical question, please contact Customer Support. 11 11 Manual_RhinoPRO5000_WEU.indd 11 23-07-2004 10:51:45 See Cleaning Your Printer. Select another format. No Tape Label cassette missing or empty. Replace batteries or connect AC power adapter. Troubleshooting Review the ...

User Guide
Page 12
... and light industrial environments. Esselte is sensitive to the environment. 12 12 Manual_RhinoPRO5000_WEU.indd 12 23-07-2004 10:51:48 Plastic components of this printer have been marked to conform with the EMC directive and the low voltage directive and is designed to enable final disposal in accordance with the...
... and light industrial environments. Esselte is sensitive to the environment. 12 12 Manual_RhinoPRO5000_WEU.indd 12 23-07-2004 10:51:48 Plastic components of this printer have been marked to conform with the EMC directive and the low voltage directive and is designed to enable final disposal in accordance with the...


