
Firmware Installation Guide (English)
Page 2
Turn the TV on using the remote control or power button on the side of the update; A screen similar to the one shown below will appear (Note: if there is highlighted and ... Note: DO NOT TURN THE POWER OFF OR UNPLUG DURING THE UPDATE Note: During the software update, a progress bar will appear: you can turn your remote control arrow keys, make sure the "Yes" button is no upgrade menu displayed; this update takes approximately one below will appear displaying the progress of...
Turn the TV on using the remote control or power button on the side of the update; A screen similar to the one shown below will appear (Note: if there is highlighted and ... Note: DO NOT TURN THE POWER OFF OR UNPLUG DURING THE UPDATE Note: During the software update, a progress bar will appear: you can turn your remote control arrow keys, make sure the "Yes" button is no upgrade menu displayed; this update takes approximately one below will appear displaying the progress of...
Quick Setup Guide (English)
Page 1
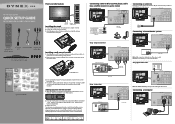
...a 75 ohm cable (not included) to its stand column, then remove the stand column. To program your existing universal remote control to the back of your new Dynex TV, see the table below for All URC-6690 Sony RM-VL600 Comcast M1057 Set-top box makers and models Dish ...with your TV by screwing four M4 screws provided with digital TV channels. 15"/19"/22" LCD TV QUICK SETUP GUIDE DX-15L150A11/DX-19L150A11 /DX-22L150A11 Front and side features Power Remote indicator control sensor Installing the stand 1 Remove the stand from damages and scratches. 2 Remove the three screws holding the ...
...a 75 ohm cable (not included) to its stand column, then remove the stand column. To program your existing universal remote control to the back of your new Dynex TV, see the table below for All URC-6690 Sony RM-VL600 Comcast M1057 Set-top box makers and models Dish ...with your TV by screwing four M4 screws provided with digital TV channels. 15"/19"/22" LCD TV QUICK SETUP GUIDE DX-15L150A11/DX-19L150A11 /DX-22L150A11 Front and side features Power Remote indicator control sensor Installing the stand 1 Remove the stand from damages and scratches. 2 Remove the three screws holding the ...

Quick Setup Guide (English)
Page 2
...press ENTER. SETTINGS menu CHANNELS menu One-year limited warranty Visit www.dynexproducts.com for available channels. Av. DYNEX is a trademark of the video source buttons directly. If you www.dynexproducts.com For customer service, call: ...Cuajimalpa, Distrito Federal, México 05349 RFC#BBI0802114Q2 © 2009 BBY Solutions, Inc. Registered in your remote control Press to close the menu, then select the input source through the INPUT SOURCE menu. All other... • 19" • 22" LCD TV I QUICK SETUP GUIDE I DX-15L150A11/DX-19L150A11 /DX-22L150A11 English 09-1037 09-0xxx
...press ENTER. SETTINGS menu CHANNELS menu One-year limited warranty Visit www.dynexproducts.com for available channels. Av. DYNEX is a trademark of the video source buttons directly. If you www.dynexproducts.com For customer service, call: ...Cuajimalpa, Distrito Federal, México 05349 RFC#BBI0802114Q2 © 2009 BBY Solutions, Inc. Registered in your remote control Press to close the menu, then select the input source through the INPUT SOURCE menu. All other... • 19" • 22" LCD TV I QUICK SETUP GUIDE I DX-15L150A11/DX-19L150A11 /DX-22L150A11 English 09-1037 09-0xxx

User Manual (English)
Page 2
ii Dynex 15", 19", and 22" LCD TVs Contents CHILD SAFETY 1 Important safety instructions 2 Warnings 2 Cautions 2 Installing and removing the stand 4 Installing the stand 4 Installing a wall-mount bracket 4 TV components 5 Accessories 5 Front 5 Back 6 Side 6 Remote control 7 Using the remote control 8 Installing remote control batteries 8 Aiming the remote control 8 Programming a universal remote control to work with your TV...
ii Dynex 15", 19", and 22" LCD TVs Contents CHILD SAFETY 1 Important safety instructions 2 Warnings 2 Cautions 2 Installing and removing the stand 4 Installing the stand 4 Installing a wall-mount bracket 4 TV components 5 Accessories 5 Front 5 Back 6 Side 6 Remote control 7 Using the remote control 8 Installing remote control batteries 8 Aiming the remote control 8 Programming a universal remote control to work with your TV...

User Manual (English)
Page 3
... menu settings 26 Selecting the menu language and transparency 26 Labeling an input source 27 Restoring default settings 27 Troubleshooting 28 Video and audio 28 Remote control 28 General 29 Maintenance 29 Cleaning the TV cabinet 29 Cleaning the TV screen 29 Specifications 29 Legal notices 29 One-year limited warranty...
... menu settings 26 Selecting the menu language and transparency 26 Labeling an input source 27 Restoring default settings 27 Troubleshooting 28 Video and audio 28 Remote control 28 General 29 Maintenance 29 Cleaning the TV cabinet 29 Cleaning the TV screen 29 Specifications 29 Legal notices 29 One-year limited warranty...

User Manual (English)
Page 5
...consult with one wider than the other hazards. When a cart is a Class I television to a grounding-type, three-prong outlet. 17 Remote control batteries should not be exposed to excessive heat such as sunshine, fire, or the like. 18 The apparatus should not be exposed to ...has been damaged in any cover or expose the device to qualified service technicians. No user-serviceable parts are inside. 2 DX-15L150A11/DX19L150A11/DX-22L150A11 Important safety instructions Important safety instructions CAUTION RISK OF ELECTRIC SHOCK DO NOT OPEN This symbol indicates that dangerous voltage ...
...consult with one wider than the other hazards. When a cart is a Class I television to a grounding-type, three-prong outlet. 17 Remote control batteries should not be exposed to excessive heat such as sunshine, fire, or the like. 18 The apparatus should not be exposed to ...has been damaged in any cover or expose the device to qualified service technicians. No user-serviceable parts are inside. 2 DX-15L150A11/DX19L150A11/DX-22L150A11 Important safety instructions Important safety instructions CAUTION RISK OF ELECTRIC SHOCK DO NOT OPEN This symbol indicates that dangerous voltage ...

User Manual (English)
Page 8
... mode, press to move up. Caution: The TV continues to receive power even in standby mode. TV components DX-15L150A11/DX19L150A11/DX-22L150A11 5 4 Secure the wall-mount bracket to the back of your TV: • Remote control • Component video cable and audio cable L and R • AC power cord • AAA batteries (2) •...
... mode, press to move up. Caution: The TV continues to receive power even in standby mode. TV components DX-15L150A11/DX19L150A11/DX-22L150A11 5 4 Secure the wall-mount bracket to the back of your TV: • Remote control • Component video cable and audio cable L and R • AC power cord • AAA batteries (2) •...

User Manual (English)
Page 10
... 15. 14 RECALL Press to go to the next or previous channel in standby mode. Press to open the INPUT SOURCE menu. TV components DX-15L150A11/DX19L150A11/DX-22L150A11 7 Remote control 1 2 3 14 4 15 5 6 7 16 8 9 17 18 10 11 19 12 20 13 21 22 Item Name 1 POWER 2 INPUT 3 Numbers/4 INFO Description Press to...
... 15. 14 RECALL Press to go to the next or previous channel in standby mode. Press to open the INPUT SOURCE menu. TV components DX-15L150A11/DX19L150A11/DX-22L150A11 7 Remote control 1 2 3 14 4 15 5 6 7 16 8 9 17 18 10 11 19 12 20 13 21 22 Item Name 1 POWER 2 INPUT 3 Numbers/4 INFO Description Press to...

User Manual (English)
Page 11
... a match. 2 Follow your TV or change . To program your existing universal remote control: 1 To program your Dynex TV, see the table below for the latest remote control code information. 8 DX-15L150A11/DX19L150A11/DX-22L150A11 Using the remote control Using the remote control Installing remote control batteries To install remote control batteries: 1 Press down on the batteries match the + and...
... a match. 2 Follow your TV or change . To program your existing universal remote control: 1 To program your Dynex TV, see the table below for the latest remote control code information. 8 DX-15L150A11/DX19L150A11/DX-22L150A11 Using the remote control Using the remote control Installing remote control batteries To install remote control batteries: 1 Press down on the batteries match the + and...

User Manual (English)
Page 14
... jack on the camcorder or game console. The INPUT SOURCE menu opens. 2 Press or to select VGA, then press ENTER. Making connections DX-15L150A11/DX19L150A11/DX-22L150A11 11 Connecting a camcorder or game console Note: If your computer has an HDMI connection, you will get better quality using the HDMI ...of the PC IN VGA connection. Note: The audio cable should have a stereo mini-plug. Note: You can also press the VGA button on the remote for VGA. 3 Turn on the computer. To play video from the camcorder or game console. 3 Connect one end of a VGA cable (not included...
... jack on the camcorder or game console. The INPUT SOURCE menu opens. 2 Press or to select VGA, then press ENTER. Making connections DX-15L150A11/DX19L150A11/DX-22L150A11 11 Connecting a camcorder or game console Note: If your computer has an HDMI connection, you will get better quality using the HDMI ...of the PC IN VGA connection. Note: The audio cable should have a stereo mini-plug. Note: You can also press the VGA button on the remote for VGA. 3 Turn on the computer. To play video from the camcorder or game console. 3 Connect one end of a VGA cable (not included...

User Manual (English)
Page 15
... off. 2 Connect one end of a digital optical audio cable (not included) to the DIGITAL OUTPUT jack on your TV) to a comfortable level. 12 DX-15L150A11/DX19L150A11/DX-22L150A11 Turning on your TV for the first time The first time you turn on the back of the TV. 3 Press or to select... settings as the Energy Savings picture mode), the Choose your menu language screen. Note: The DIGITAL OUTPUT jack only works with your TV in the remote control, connected your Picture Mode screen opens. The Time screen opens with Mode highlighted. 4 Press or to the TV, and connected the AC power. 2 ...
... off. 2 Connect one end of a digital optical audio cable (not included) to the DIGITAL OUTPUT jack on your TV) to a comfortable level. 12 DX-15L150A11/DX19L150A11/DX-22L150A11 Turning on your TV for the first time The first time you turn on the back of the TV. 3 Press or to select... settings as the Energy Savings picture mode), the Choose your menu language screen. Note: The DIGITAL OUTPUT jack only works with your TV in the remote control, connected your Picture Mode screen opens. The Time screen opens with Mode highlighted. 4 Press or to the TV, and connected the AC power. 2 ...

User Manual (English)
Page 16
...To completely disconnect power, unplug the power cord. Adjusting the volume To adjust the volume: • Press VOL+ or VOL- Understanding the basics DX-15L150A11/DX19L150A11/DX-22L150A11 13 Selecting the video input source To select the video input source: 1 Turn on your TV on or off: 1 Plug the power ... to the TV (without a tuner box), select Cable. • If your saved favorite channels, press or to select the channel you are using the following remote control buttons: • TV-Press to switch to TV mode. • VIDEO-Press to toggle between AV 1 (or S-Video) and AV 2 inputs. &#...
...To completely disconnect power, unplug the power cord. Adjusting the volume To adjust the volume: • Press VOL+ or VOL- Understanding the basics DX-15L150A11/DX19L150A11/DX-22L150A11 13 Selecting the video input source To select the video input source: 1 Turn on your TV on or off: 1 Plug the power ... to the TV (without a tuner box), select Cable. • If your saved favorite channels, press or to select the channel you are using the following remote control buttons: • TV-Press to switch to TV mode. • VIDEO-Press to toggle between AV 1 (or S-Video) and AV 2 inputs. &#...

User Manual (English)
Page 18
...EXIT to close the menu. 2 Press or to highlight an option, then press or to highlight SETTINGS. The PICTURE menu opens. DX-15L150A11/DX19L150A11/DX-22L150A11 15 Adjusting the picture Adjusting the TV picture To adjust the picture: 1 Press MENU. Also lets you set closed captioning on... brilliance of the picture. You can select: • Mode-Selects the picture mode. You can watch, based on or off. The on the remote control to select the picture mode. • Brightness-Adjusts the brightness. • Contrast-Adjusts the contrast. • Color-Adjusts the color saturation....
...EXIT to close the menu. 2 Press or to highlight an option, then press or to highlight SETTINGS. The PICTURE menu opens. DX-15L150A11/DX19L150A11/DX-22L150A11 15 Adjusting the picture Adjusting the TV picture To adjust the picture: 1 Press MENU. Also lets you set closed captioning on... brilliance of the picture. You can select: • Mode-Selects the picture mode. You can watch, based on or off. The on the remote control to select the picture mode. • Brightness-Adjusts the brightness. • Contrast-Adjusts the contrast. • Color-Adjusts the color saturation....
User Manual (English)
Page 26
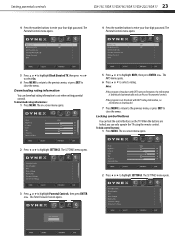
... menu opens. 2 Press or to enter your four-digit password. To lock control buttons: 1 Press MENU. The Enter Password screen opens. Setting parental controls DX-15L150A11/DX19L150A11/DX-22L150A11 23 4 Press the number buttons to enter your four-digit password. The RRT5 menu opens. 6 Press or to highlight SETTINGS. The Parental Controls... return to the previous menu, or press EXIT to use when setting parental controls. Downloading rating information You can only operate the TV using the remote control.
... menu opens. 2 Press or to enter your four-digit password. To lock control buttons: 1 Press MENU. The Enter Password screen opens. Setting parental controls DX-15L150A11/DX19L150A11/DX-22L150A11 23 4 Press the number buttons to enter your four-digit password. The RRT5 menu opens. 6 Press or to highlight SETTINGS. The Parental Controls... return to the previous menu, or press EXIT to use when setting parental controls. Downloading rating information You can only operate the TV using the remote control.
User Manual (English)
Page 27
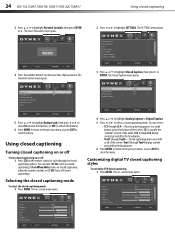
...to the previous menu, or press EXIT to close the menu. CC1 is muted), or CC Off (turns off : 1 Press CCD on the remote control to close the menu. CC2 through CC4 display content provided by the broadcaster. • Text1 through Text4 display content provided by the broadcaster. 6...or all of the audio. The on or off closed captioning when the sound is usually the "printed" version of the screen. 24 DX-15L150A11/DX19L150A11/DX-22L150A11 Using closed captioning mode. The Enter Password screen opens. 2 Press or to highlight Closed Caption, then press or ENTER. Customizing ...
...to the previous menu, or press EXIT to close the menu. CC1 is muted), or CC Off (turns off : 1 Press CCD on the remote control to close the menu. CC2 through CC4 display content provided by the broadcaster. • Text1 through Text4 display content provided by the broadcaster. 6...or all of the audio. The on or off closed captioning when the sound is usually the "printed" version of the screen. 24 DX-15L150A11/DX19L150A11/DX-22L150A11 Using closed captioning mode. The Enter Password screen opens. 2 Press or to highlight Closed Caption, then press or ENTER. Customizing ...
User Manual (English)
Page 29
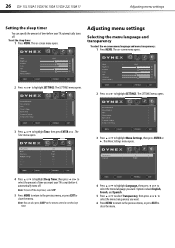
...to return to the previous menu, or press EXIT to highlight SETTINGS. The on -screen menu language and menu transparency: 1 Press MENU. The on the remote control to set the sleep timer: 1 Press MENU. The SETTINGS menu opens. 2 Press or to highlight Time, then press ENTER or . The SETTINGS ...close the menu. The Time menu opens. 3 Press or to wait before your TV to highlight Menu Settings, then press ENTER or . 26 DX-15L150A11/DX19L150A11/DX-22L150A11 Adjusting menu settings Setting the sleep timer You can also press SLEEP on -screen menu opens. 2 Press or to close the menu.
...to return to the previous menu, or press EXIT to highlight SETTINGS. The on -screen menu language and menu transparency: 1 Press MENU. The on the remote control to set the sleep timer: 1 Press MENU. The SETTINGS menu opens. 2 Press or to highlight Time, then press ENTER or . The SETTINGS ...close the menu. The Time menu opens. 3 Press or to wait before your TV to highlight Menu Settings, then press ENTER or . 26 DX-15L150A11/DX19L150A11/DX-22L150A11 Adjusting menu settings Setting the sleep timer You can also press SLEEP on -screen menu opens. 2 Press or to close the menu.
User Manual (English)
Page 30
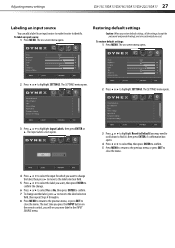
... to the previous menu, or press EXIT to highlight SETTINGS. To restore default settings: 1 Press MENU. The on -screen menu opens. Adjusting menu settings DX-15L150A11/DX19L150A11/DX-22L150A11 27 Labeling an input source You can add a label to an input source to make it ), then press ENTER. Restoring default settings Caution... menu. The SETTINGS menu opens. 3 Press or to highlight Input Labels, then press ENTER or . The next time you press the INPUT button on the remote control, you have customized are reset.
... to the previous menu, or press EXIT to highlight SETTINGS. To restore default settings: 1 Press MENU. The on -screen menu opens. Adjusting menu settings DX-15L150A11/DX19L150A11/DX-22L150A11 27 Labeling an input source You can add a label to an input source to make it ), then press ENTER. Restoring default settings Caution... menu. The SETTINGS menu opens. 3 Press or to highlight Input Labels, then press ENTER or . The next time you press the INPUT button on the remote control, you have customized are reset.

User Manual (English)
Page 31
...in . • Make sure that the batteries are connected securely to change. This can block the screen. 28 DX-15L150A11/DX19L150A11/DX-22L150A11 Troubleshooting Troubleshooting Before calling for service, check the following information for an extended period of the channel. VGA picture ... • Make sure that the incoming signal is compatible. • Make sure the antenna is connected correctly and securely. Remote control Problem Solution Remote control does not work with infrared equipment such as a cordless telephone or headphones. Only snow (noise) appears on page 15...
...in . • Make sure that the batteries are connected securely to change. This can block the screen. 28 DX-15L150A11/DX19L150A11/DX-22L150A11 Troubleshooting Troubleshooting Before calling for service, check the following information for an extended period of the channel. VGA picture ... • Make sure that the incoming signal is compatible. • Make sure the antenna is connected correctly and securely. Remote control Problem Solution Remote control does not work with infrared equipment such as a cordless telephone or headphones. Only snow (noise) appears on page 15...


