
User Manual (English)
Page 2
ii Dynex DX-32L200A12/DX-37L200A12/DX-46L262A12 32"/37"/46" LCD TV Contents CHILD SAFETY 1 Important safety instructions 2 Warnings 2 Cautions 3 Installing the stand or wall-mount ... volume 18 Viewing program information 18 Adjusting the picture 18 Adjusting the TV picture 18 Adjusting the sound 19 Adjusting sound settings 19 Playing TV audio only 20 Changing channel settings 20 Automatically scanning for channels 20 Hiding channels 21 Setting up a favorite channel list 22 Viewing a favorite channel 22 Adding...
ii Dynex DX-32L200A12/DX-37L200A12/DX-46L262A12 32"/37"/46" LCD TV Contents CHILD SAFETY 1 Important safety instructions 2 Warnings 2 Cautions 3 Installing the stand or wall-mount ... volume 18 Viewing program information 18 Adjusting the picture 18 Adjusting the TV picture 18 Adjusting the sound 19 Adjusting sound settings 19 Playing TV audio only 20 Changing channel settings 20 Automatically scanning for channels 20 Hiding channels 21 Setting up a favorite channel list 22 Viewing a favorite channel 22 Adding...
User Manual (English)
Page 3
...USB flash drive 33 Switching to obtain warranty service 43 Where is the warranty valid 43 What does the warranty not cover 43 Dynex Televisions 43 Definitions 43 How long does the coverage last 43 What does this warranty cover 43 How to USB mode 33 ... favorite photos 34 Viewing photos in a slideshow 34 Customizing slideshow settings 35 Maintaining 36 Cleaning 36 Servicing 36 Troubleshooting 36 Video and audio 36 Remote control 37 General 38 Specifications 39 Programming universal remote controls 40 Programming a different universal remote control 40 For additional help ...
...USB flash drive 33 Switching to obtain warranty service 43 Where is the warranty valid 43 What does the warranty not cover 43 Dynex Televisions 43 Definitions 43 How long does the coverage last 43 What does this warranty cover 43 How to USB mode 33 ... favorite photos 34 Viewing photos in a slideshow 34 Customizing slideshow settings 35 Maintaining 36 Cleaning 36 Servicing 36 Troubleshooting 36 Video and audio 36 Remote control 37 General 38 Specifications 39 Programming universal remote controls 40 Programming a different universal remote control 40 For additional help ...
User Manual (English)
Page 10
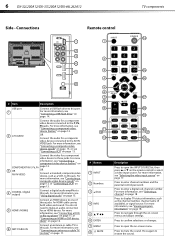
...HDMI TV COMP MTS/SAP VGA ZOO M SLEEP CH-LIST PICTURE AUDIO CCD # Button 1 INPUT 2 Numbers . 3 (Dot) 4 INFO 5 6 ENTER 7 MENU 8 MUTE Description Press to this port. Press to make an audio connection for a component video device connected to restore the sound....7 INFO 89 RECALL 0 GUIDE # Item Description USB port 1 2 L/R AUDIO Connect a USB flash drive to this jack. For more information, see "Using digital audio" on page 13. 4 COAXIAL (digital output) Connect a digital audio amplifier to this jack. For more information, see "Connecting a composite video device...
...HDMI TV COMP MTS/SAP VGA ZOO M SLEEP CH-LIST PICTURE AUDIO CCD # Button 1 INPUT 2 Numbers . 3 (Dot) 4 INFO 5 6 ENTER 7 MENU 8 MUTE Description Press to this port. Press to make an audio connection for a component video device connected to restore the sound....7 INFO 89 RECALL 0 GUIDE # Item Description USB port 1 2 L/R AUDIO Connect a USB flash drive to this jack. For more information, see "Using digital audio" on page 13. 4 COAXIAL (digital output) Connect a digital audio amplifier to this jack. For more information, see "Connecting a composite video device...
User Manual (English)
Page 11
... the best video quality, you have questions, refer to your TV on page 18. Cautions • Check the jacks for connecting devices to select an audio mode. Making connections DX-32L200A12/DX-37L200A12/DX-46L262A12 7 # Button 9 VOL+/VOL- 10 Video Input 11 SLEEP 12 ZOOM 13 PICTURE 14 (Power) .... If you should I use an HDMI jack to connect a DVI device to the documentation that all connections are tight and secure. • The external audio/video equipment shown may be different from your TV. HDMI-Press one or more information, see "Setting up a favorite channel list" on page 22 and...
... the best video quality, you have questions, refer to your TV on page 18. Cautions • Check the jacks for connecting devices to select an audio mode. Making connections DX-32L200A12/DX-37L200A12/DX-46L262A12 7 # Button 9 VOL+/VOL- 10 Video Input 11 SLEEP 12 ZOOM 13 PICTURE 14 (Power) .... If you should I use an HDMI jack to connect a DVI device to the documentation that all connections are tight and secure. • The external audio/video equipment shown may be different from your TV. HDMI-Press one or more information, see "Setting up a favorite channel list" on page 22 and...
User Manual (English)
Page 12
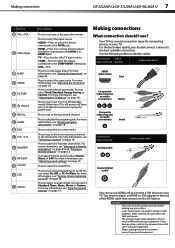
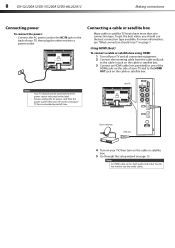
... end into a power outlet. Connecting a cable or satellite box Many cable or satellite TV boxes have more information, see "What connection should I use any audio cables. Notes • • Your TV should use the best connection type available. You do not need to use ?" Notes An HDMI cable carries both... audio and video. To get the best video, you will not be operated from the power outlet when you should only be using HDMI: 1 Turn off...
... end into a power outlet. Connecting a cable or satellite box Many cable or satellite TV boxes have more information, see "What connection should I use any audio cables. Notes • • Your TV should use the best connection type available. You do not need to use ?" Notes An HDMI cable carries both... audio and video. To get the best video, you will not be operated from the power outlet when you should only be using HDMI: 1 Turn off...
User Manual (English)
Page 13
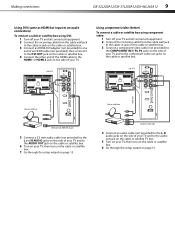
...DX-32L200A12/DX-37L200A12/DX-46L262A12 9 Using DVI (same as HDMI but requires an audio connection) To connect a cable or satellite box using component video: 1 Turn off.... Cable or satellite box Component video cable 4 Connect an audio cable (not provided) to the L, R audio jacks on the side of your TV and to the audio out jack on the cable or satellite TV box. 5 Turn... TV 3.5 mm audio cable Audio cable Cable or satellite box HDMI cable with HDMI-DVI adapter 5 Connect a 3.5 mm audio cable (not provided) to the L and R AUDIO jacks on the side of your TV and to the AUDIO OUT jack on ...
...DX-32L200A12/DX-37L200A12/DX-46L262A12 9 Using DVI (same as HDMI but requires an audio connection) To connect a cable or satellite box using component video: 1 Turn off.... Cable or satellite box Component video cable 4 Connect an audio cable (not provided) to the L, R audio jacks on the side of your TV and to the audio out jack on the cable or satellite TV box. 5 Turn... TV 3.5 mm audio cable Audio cable Cable or satellite box HDMI cable with HDMI-DVI adapter 5 Connect a 3.5 mm audio cable (not provided) to the L and R AUDIO jacks on the side of your TV and to the AUDIO OUT jack on ...
User Manual (English)
Page 14
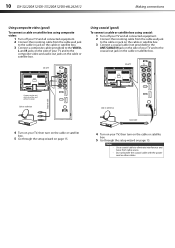
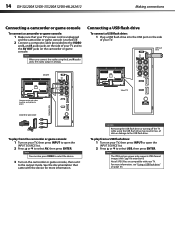
... cable or satellite box. 3 Connect a composite cable (provided) to the VIDEO, L and R jacks on the side of your TV and to the composite video and audio out jacks on the cable or satellite box. Cable or satellite box 4 Turn on your TV, then turn on the cable or satellite box. 5 Go...
... cable or satellite box. 3 Connect a composite cable (provided) to the VIDEO, L and R jacks on the side of your TV and to the composite video and audio out jacks on the cable or satellite box. Cable or satellite box 4 Turn on your TV, then turn on the cable or satellite box. 5 Go...

User Manual (English)
Page 16
... then press INPUT to open the INPUT SOURCE list. 2 Press or to select Component, then press ENTER. Note When you connect the audio using the L and R audio jacks, the audio output is analog. To play from an HDMI or DVI device: 1 Turn on your TV, then press INPUT to open the INPUT SOURCE... the COMPONENT IN/Y, PB, PR jacks on the side of your TV and to match color-coded jacks. Cables are connecting a DVI device, connect an audio cable with the device for more information. Side of TV Connecting a component video device (better) To connect a component video device: 1 Make sure that your ...
... then press INPUT to open the INPUT SOURCE list. 2 Press or to select Component, then press ENTER. Note When you connect the audio using the L and R audio jacks, the audio output is analog. To play from an HDMI or DVI device: 1 Turn on your TV, then press INPUT to open the INPUT SOURCE... the COMPONENT IN/Y, PB, PR jacks on the side of your TV and to match color-coded jacks. Cables are connecting a DVI device, connect an audio cable with the device for more information. Side of TV Connecting a component video device (better) To connect a component video device: 1 Make sure that your ...

User Manual (English)
Page 17
... select AV, then press ENTER. See the documentation that came with the device for more information. Note When you connect the audio using the L and R audio jacks, the audio output is analog. Note You can also press VIDEO to select the composite device. 3 Turn on your TV, then press ... white, and yellow to green. Connect red to red, white to white, and yellow to green. Note When you connect the audio using the L and R audio jacks, the audio output is analog. VCR Composite video device To play from the composite video device: 1 Turn on the composite video device. See...
... select AV, then press ENTER. See the documentation that came with the device for more information. Note When you connect the audio using the L and R audio jacks, the audio output is analog. Note You can also press VIDEO to select the composite device. 3 Turn on your TV, then press ... white, and yellow to green. Connect red to red, white to white, and yellow to green. Note When you connect the audio using the L and R audio jacks, the audio output is analog. VCR Composite video device To play from the composite video device: 1 Turn on the composite video device. See...
User Manual (English)
Page 18
... of TV Caution Removing the USB flash drive or turning off the TV while using the L and R audio jacks, the audio output is turned off. 2 Connect a composite cable (provided) to the VIDEO and L and R audio jacks on page 33. USB flash drive Side of your TV and to the USB flash drive. Notes..." on the side of TV Connect red to red, white to white, and yellow to select AV, then press ENTER. Note When you connect the audio using the USB flash drive may result in loss of your TV. Note You can also press VIDEO to select the device. 3 Turn on the...
... of TV Caution Removing the USB flash drive or turning off the TV while using the L and R audio jacks, the audio output is turned off. 2 Connect a composite cable (provided) to the VIDEO and L and R audio jacks on page 33. USB flash drive Side of your TV and to the USB flash drive. Notes..." on the side of TV Connect red to red, white to white, and yellow to select AV, then press ENTER. Note When you connect the audio using the USB flash drive may result in loss of your TV. Note You can also press VIDEO to select the device. 3 Turn on the...
User Manual (English)
Page 19
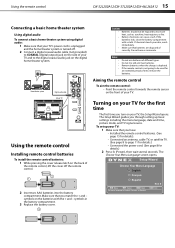
... when the charge is depleted. EXIT Exit symbols on the back of the remote control, lift the cover off . 2 Connect a digital coaxial audio cable (not provided) to COAXIAL (digital output) jack on the side of time, remove the batteries. If chemicals touch your TV: 1 Make... excessive heat, such as sunshine, heat registers, or fire. • Battery chemicals can cause a rash. COAXIAL IN Home theater system Digital audio cable Side of different types. The Choose Your Menu Language screen opens. symbols in the battery compartment. 3 Replace the battery cover. Do not...
... when the charge is depleted. EXIT Exit symbols on the back of the remote control, lift the cover off . 2 Connect a digital coaxial audio cable (not provided) to COAXIAL (digital output) jack on the side of time, remove the batteries. If chemicals touch your TV: 1 Make... excessive heat, such as sunshine, heat registers, or fire. • Battery chemicals can cause a rash. COAXIAL IN Home theater system Digital audio cable Side of different types. The Choose Your Menu Language screen opens. symbols in the battery compartment. 3 Replace the battery cover. Do not...
User Manual (English)
Page 21
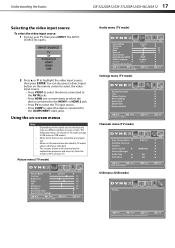
The INPUT SOURCE list opens. Audio menu (TV mode) 2 Press or to the COMPONENT video jacks. You can also press a direct input button on the remote control to select the video ...
The INPUT SOURCE list opens. Audio menu (TV mode) 2 Press or to the COMPONENT video jacks. You can also press a direct input button on the remote control to select the video ...
User Manual (English)
Page 22
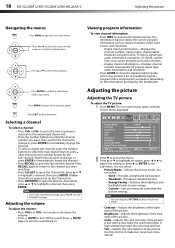
...resolution. • Digital channel information-Displays the channel number, station name, channel label, broadcast program name, TV rating, signal type, audio information, resolution, CC mode, current time, and current program start and end times. • Analog channel information-Displays channel number, ...channel label (if preset), signal type, audio information, and resolution. • Press GUIDE to highlight a channel, then press ENTER. Press EXIT to view an information banner. ...
...resolution. • Digital channel information-Displays the channel number, station name, channel label, broadcast program name, TV rating, signal type, audio information, resolution, CC mode, current time, and current program start and end times. • Analog channel information-Displays channel number, ...channel label (if preset), signal type, audio information, and resolution. • Press GUIDE to highlight a channel, then press ENTER. Press EXIT to view an information banner. ...
User Manual (English)
Page 23
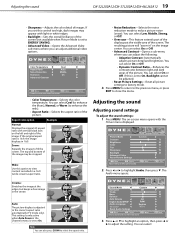
... light or white edges. • Backlight-Sets the overall brilliance of the screen (not available when Picture Mode is adjusted to highlight Audio, then press . You can adjust the following: • Adaptive Contrast-Automatically adjusts picture detail and brightness. Cinema: Stretches the image at... menu displayed. If this option to reduce picture noise (snow). Sound Mode Surround Treble Bass Balance Auto Volume Digital Audio/SPDIF Audio Language MTS/SAP Reset Audio Settings Custom Off Off RAW English Mono Move Select MENU Back Select a sound mode to achieve idea sound. 57 ...
... light or white edges. • Backlight-Sets the overall brilliance of the screen (not available when Picture Mode is adjusted to highlight Audio, then press . You can adjust the following: • Adaptive Contrast-Automatically adjusts picture detail and brightness. Cinema: Stretches the image at... menu displayed. If this option to reduce picture noise (snow). Sound Mode Surround Treble Bass Balance Auto Volume Digital Audio/SPDIF Audio Language MTS/SAP Reset Audio Settings Custom Off Off RAW English Mono Move Select MENU Back Select a sound mode to achieve idea sound. 57 ...
User Manual (English)
Page 24
...first time" on -screen menu opens with the picture turned off. Note You do not need to pass through the original digital audio sound). • Audio Language-Selects the default language track when watching digital TV programs. Options include English, Français (French), and Españ... Brightness Color Tint Sharpness Backlight Advanced Video Reset Picture Settings Custom Move Select Adjust settings to a commercial. Notes • • Audio only works only when the input source is automatically reset to the next or previous channel in the channel list and skips any button...
...first time" on -screen menu opens with the picture turned off. Note You do not need to pass through the original digital audio sound). • Audio Language-Selects the default language track when watching digital TV programs. Options include English, Français (French), and Españ... Brightness Color Tint Sharpness Backlight Advanced Video Reset Picture Settings Custom Move Select Adjust settings to a commercial. Notes • • Audio only works only when the input source is automatically reset to the next or previous channel in the channel list and skips any button...
User Manual (English)
Page 25
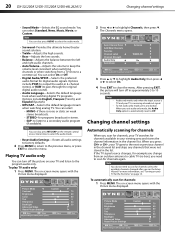
... Exit 2 Press or to highlight Add/Skip Channels, then press ENTER. Auto Channel Scan Add/Skip Channels Favorites Channel Label Channel Strength Audio Only Auto Zoom Antenna WGBH-SD Off Off Move Select MENU Back EXIT Exit Automatically search for channels, press ENTER key to submenu. ... affect picture quality. While scanning, the TV displays a progress report. - Auto Channel Scan Add/Skip Channels Favorites Channel Label Channel Strength Audio Only Auto Zoom Antenna WGBH-SD On Off Move Select MENU Back Manually add and skip channels in your area. • Cable/Satellite ...
... Exit 2 Press or to highlight Add/Skip Channels, then press ENTER. Auto Channel Scan Add/Skip Channels Favorites Channel Label Channel Strength Audio Only Auto Zoom Antenna WGBH-SD Off Off Move Select MENU Back EXIT Exit Automatically search for channels, press ENTER key to submenu. ... affect picture quality. While scanning, the TV displays a progress report. - Auto Channel Scan Add/Skip Channels Favorites Channel Label Channel Strength Audio Only Auto Zoom Antenna WGBH-SD On Off Move Select MENU Back Manually add and skip channels in your area. • Cable/Satellite ...
User Manual (English)
Page 26
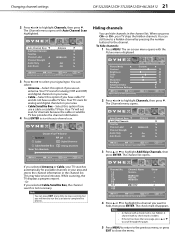
...Settings Custom Move Select Adjust settings to affect picture quality. Auto Channel Scan Add/Skip Channels Favorites Channel Label Channel Strength Audio Only Auto Zoom Antenna WGBH-SD Off Off Move Select MENU Back Create labels for channels, up to the channel label ... Move Select Adjust settings to affect picture quality. The Channels menu opens. Auto Channel Scan Add/Skip Channels Favorites Channel Label Channel Strength Audio Only Auto Zoom Antenna WGBH-SD Off Off Move Select Add channels to highlight Favorites, then press ENTER. CH 2.1 W G B ...
...Settings Custom Move Select Adjust settings to affect picture quality. Auto Channel Scan Add/Skip Channels Favorites Channel Label Channel Strength Audio Only Auto Zoom Antenna WGBH-SD Off Off Move Select MENU Back Create labels for channels, up to the channel label ... Move Select Adjust settings to affect picture quality. The Channels menu opens. Auto Channel Scan Add/Skip Channels Favorites Channel Label Channel Strength Audio Only Auto Zoom Antenna WGBH-SD Off Off Move Select Add channels to highlight Favorites, then press ENTER. CH 2.1 W G B ...
User Manual (English)
Page 27
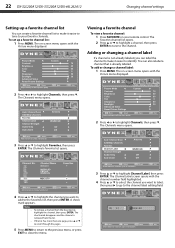
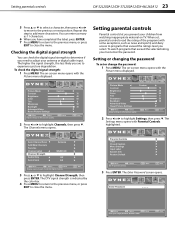
... to highlight Settings, then press . The Settings menu opens with the Picture menu displayed. Auto Channel Scan Add/Skip Channels Favorites Channel Label Channel Strength Audio Only Auto Zoom Antenna WGBH-SD Off Off Move Select MENU Back Display signal strength of the program (with the Picture menu displayed. Default is...
... to highlight Settings, then press . The Settings menu opens with the Picture menu displayed. Auto Channel Scan Add/Skip Channels Favorites Channel Label Channel Strength Audio Only Auto Zoom Antenna WGBH-SD Off Off Move Select MENU Back Display signal strength of the program (with the Picture menu displayed. Default is...
User Manual (English)
Page 33
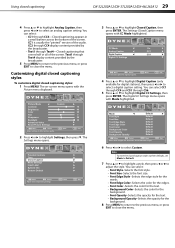
... CC Settings menu opens with the Picture menu displayed. You can select: • CC1 through Text4-Closed captioning that covers half or all of the audio. The on-screen menu opens with Mode highlighted. Customizing digital closed captioning styles To customize digital closed captioning DX-32L200A12/DX-37L200A12/DX-46L262A12 29...
... CC Settings menu opens with the Picture menu displayed. You can select: • CC1 through Text4-Closed captioning that covers half or all of the audio. The on-screen menu opens with Mode highlighted. Customizing digital closed captioning styles To customize digital closed captioning DX-32L200A12/DX-37L200A12/DX-46L262A12 29...
User Manual (English)
Page 40
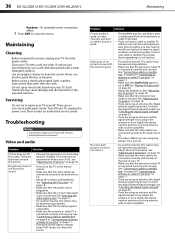
.... Do not spray insecticide liquid near your TV, unplug the power cord, then contact an authorized service center. Turn off your TV. Video and audio Problem Solution Picture does not fill the screen. See "Connecting a cable or satellite box" on page 8 or "Connecting an antenna or cable TV... To check the digital channel signal strength, see "Checking the digital signal strength" on the TV or the remote control. • Make sure that Audio Only option is low, adjust the antenna or use a highly directional outdoor antenna or set to install a set -top antenna with a built-in ...
.... Do not spray insecticide liquid near your TV, unplug the power cord, then contact an authorized service center. Turn off your TV. Video and audio Problem Solution Picture does not fill the screen. See "Connecting a cable or satellite box" on page 8 or "Connecting an antenna or cable TV... To check the digital channel signal strength, see "Checking the digital signal strength" on the TV or the remote control. • Make sure that Audio Only option is low, adjust the antenna or use a highly directional outdoor antenna or set to install a set -top antenna with a built-in ...


