
Quick Install Guide
Page 6
This will open the access point's web management interface, which allows you to configure the functions and settings of how to set the access point to the user manual for more information about configuration; Please refer to "Universal Repeater" mode. 5 the following username and password: Username: admin Password: 1234 Click "Log In". 11. Open your internet browser and enter http://192.168.2.1 in the address box. In the pop up window, enter the following is an example of the access point. 10.
This will open the access point's web management interface, which allows you to configure the functions and settings of how to set the access point to the user manual for more information about configuration; Please refer to "Universal Repeater" mode. 5 the following username and password: Username: admin Password: 1234 Click "Log In". 11. Open your internet browser and enter http://192.168.2.1 in the address box. In the pop up window, enter the following is an example of the access point. 10.
Manual
Page 3
...Bridge-Point to Multi-Point Mode 40 III-2-5. Advanced Setting ...48 III-5. Disable ...52 III-5-2. Management IP...60 III-7-3. Windows XP ...68 3 Windows ...14 II-3. Basic Settings ...33 III-2-1. AP Bridge-Point to Point Mode 38 III-2-4. AP Bridge-WDS...41 III-2-6.... WPA Radius ...56 III-6. Reset ...65 IV. Package Contents...5 I -3. Quick Installation ...10 II-1. Security ...51 III-5-1. Upgrade ...64 III-10. WEP...53 ...
...Bridge-Point to Multi-Point Mode 40 III-2-5. Advanced Setting ...48 III-5. Disable ...52 III-5-2. Management IP...60 III-7-3. Windows XP ...68 3 Windows ...14 II-3. Basic Settings ...33 III-2-1. AP Bridge-Point to Point Mode 38 III-2-4. AP Bridge-WDS...41 III-2-6.... WPA Radius ...56 III-6. Reset ...65 IV. Package Contents...5 I -3. Quick Installation ...10 II-1. Security ...51 III-5-1. Upgrade ...64 III-10. WEP...53 ...

Manual
Page 31
...'s IP and MAC address. 31 WPS Setting - III-4. III-7. III-2. Security - Configuration Tool - MAC Filtering - III-1. III-1. III-5. III-6. Upgrade - Home The Home page displays 10 categories in the main window. III-8. III-3. System Utility - Home - III...
...'s IP and MAC address. 31 WPS Setting - III-4. III-7. III-2. Security - Configuration Tool - MAC Filtering - III-1. III-1. III-5. III-6. Upgrade - Home The Home page displays 10 categories in the main window. III-8. III-3. System Utility - Home - III...
Manual
Page 64
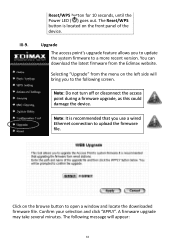
...use a wired Ethernet connection to the following message will bring you to update the system firmware to open a window and locate the downloaded firmware file. You can download the latest firmware from the menu on the front panel of... the device. Confirm your selection and click "APPLY". Reset/WPS button for 10 seconds, until the Power LED ( ) goes out. Upgrade The access point's upgrade feature allows you to upload the...damage the device. A firmware upgrade may take several minutes. III-9. Selecting "Upgrade" from the Edimax website.
...use a wired Ethernet connection to the following message will bring you to update the system firmware to open a window and locate the downloaded firmware file. You can download the latest firmware from the menu on the front panel of... the device. Confirm your selection and click "APPLY". Reset/WPS button for 10 seconds, until the Power LED ( ) goes out. Upgrade The access point's upgrade feature allows you to upload the...damage the device. A firmware upgrade may take several minutes. III-9. Selecting "Upgrade" from the Edimax website.

Manual
Page 68
...within the same IP address subnet of your network; After you access the browser based configuration interface, you need to 192.168.2.10. please follow the appropriate guide: - IV-1-3. So if it isn't already, then you can change the IP address of ...Network and Internet Connections" icon, followed by "Network Connections" and then double-click "Local Area Connection". The "Local Area Connection Status" window will not have to access the browser based configuration interface. APPENDIX IV-1. The procedure for doing so varies across different operating systems; IV...
...within the same IP address subnet of your network; After you access the browser based configuration interface, you need to 192.168.2.10. please follow the appropriate guide: - IV-1-3. So if it isn't already, then you can change the IP address of ...Network and Internet Connections" icon, followed by "Network Connections" and then double-click "Local Area Connection". The "Local Area Connection Status" window will not have to access the browser based configuration interface. APPENDIX IV-1. The procedure for doing so varies across different operating systems; IV...

Manual
Page 70
IV-1-2. Right-click "Local Area Network", and select "Properties". The "Local Area Connection Properties" window will appear, select "Internet Protocol Version 4 (TCP / IPv4)", and click "Properties". 2. Windows Vista 1. Click "View Network Status and Tasks" and then click "Manage Network Connections". Select "Use the following IP address", and input the following values: IP address: 192.168.2.10 Subnet Mask: 255.255.255.0 Click 'OK' when finished. 70 Click the "Start" button, located in the lower-left corner of your computer, and then click "Control Panel".
IV-1-2. Right-click "Local Area Network", and select "Properties". The "Local Area Connection Properties" window will appear, select "Internet Protocol Version 4 (TCP / IPv4)", and click "Properties". 2. Windows Vista 1. Click "View Network Status and Tasks" and then click "Manage Network Connections". Select "Use the following IP address", and input the following values: IP address: 192.168.2.10 Subnet Mask: 255.255.255.0 Click 'OK' when finished. 70 Click the "Start" button, located in the lower-left corner of your computer, and then click "Control Panel".
