Datasheet
Page 3
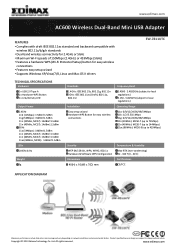
...Wi-Fi Protected Setup) button for easy wireless connections • Features easy setup wizard • Supports Windows XP/Vista/7/8, Linux and Mac OS X drivers EW-7811UTC TECHNICAL SPECIFICATIONS Hardware 1 x USB 2.0 Type A 1 x Hardware WPS Button 1 x Link/Activity LED Output Power 2.4GHz 11b (11Mbps): 17dBm±... 11n (40MHz): MCS0-7 (up to 144Mbps) 11ac (80MHz): MCS0-9 (up to change without notice. All rights reserved. Ltd. www.edimax.com Product specifications and design are subject to 433Mbps) Security WEP 64/128-bit, WPA, WPA2, 802.1x Hardware & Software WPS Configuration ...
...Wi-Fi Protected Setup) button for easy wireless connections • Features easy setup wizard • Supports Windows XP/Vista/7/8, Linux and Mac OS X drivers EW-7811UTC TECHNICAL SPECIFICATIONS Hardware 1 x USB 2.0 Type A 1 x Hardware WPS Button 1 x Link/Activity LED Output Power 2.4GHz 11b (11Mbps): 17dBm±... 11n (40MHz): MCS0-7 (up to 144Mbps) 11ac (80MHz): MCS0-9 (up to change without notice. All rights reserved. Ltd. www.edimax.com Product specifications and design are subject to 433Mbps) Security WEP 64/128-bit, WPA, WPA2, 802.1x Hardware & Software WPS Configuration ...

Quick Install Guide
Page 2
... OS 12 IV-1. Mac ...24 VII. Product Information 4 I -4. LED Status ...4 I-3. Driver Uninstallation...17 V. Windows 8 ...23 VI-5. Windows ...25 VII-2. Safety ...5 II. Installation 6 III. Windows 8 III-1. III-2-2. Driver Installation ...8 Driver Uninstallation...11 Windows XP/Vista/7 ...11 Windows 8 ...11 IV. Driver Installation ...12 IV-2. Driver Installation ...18 V-2. Driver Uninstallation...21 VI. Using The Adapter 25 VII-1. Mac: Connect...
... OS 12 IV-1. Mac ...24 VII. Product Information 4 I -4. LED Status ...4 I-3. Driver Uninstallation...17 V. Windows 8 ...23 VI-5. Windows ...25 VII-2. Safety ...5 II. Installation 6 III. Windows 8 III-1. III-2-2. Driver Installation ...8 Driver Uninstallation...11 Windows XP/Vista/7 ...11 Windows 8 ...11 IV. Driver Installation ...12 IV-2. Driver Installation ...18 V-2. Driver Uninstallation...21 VI. Using The Adapter 25 VII-1. Mac: Connect...

Quick Install Guide
Page 6
II. Installation 1. Never use force to the left, please click "Cancel" or "Close". 6 Switch on your computer and insert the USB adapter into an available USB port of your computer. If a Hardware Wizard/Driver Installation window opens as shown to insert the USB adapter. 2.
II. Installation 1. Never use force to the left, please click "Cancel" or "Close". 6 Switch on your computer and insert the USB adapter into an available USB port of your computer. If a Hardware Wizard/Driver Installation window opens as shown to insert the USB adapter. 2.
Quick Install Guide
Page 7
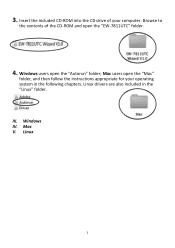
Windows users open the "EW-7811UTC" folder. 4. Mac V. Linux 7 Browse to the contents of your operating system in the "Linux" folder. Mac users open the "Mac" folder, and then follow the instructions appropriate for your computer. 3. Linux drivers are also included in the following chapters. Insert the included CD-ROM into the CD drive of the CD-ROM and open the "Autorun" folder; III. Windows IV.
Windows users open the "EW-7811UTC" folder. 4. Mac V. Linux 7 Browse to the contents of your operating system in the "Linux" folder. Mac users open the "Mac" folder, and then follow the instructions appropriate for your computer. 3. Linux drivers are also included in the following chapters. Insert the included CD-ROM into the CD drive of the CD-ROM and open the "Autorun" folder; III. Windows IV.
Quick Install Guide
Page 8
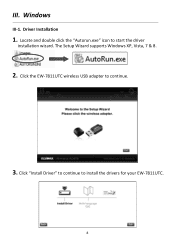
Click the EW-7811UTC wireless USB adapter to install the drivers for your EW-7811UTC. 8 Click "Install Driver" to continue to continue. 3. The Setup Wizard supports Windows XP, Vista, 7 & 8. 2. Driver Installation 1. Locate and double click the "Autorun.exe" icon to start the driver installation wizard. III. Windows III-1.
Click the EW-7811UTC wireless USB adapter to install the drivers for your EW-7811UTC. 8 Click "Install Driver" to continue to continue. 3. The Setup Wizard supports Windows XP, Vista, 7 & 8. 2. Driver Installation 1. Locate and double click the "Autorun.exe" icon to start the driver installation wizard. III. Windows III-1.

Quick Install Guide
Page 9
4. The installation wizard will install the necessary drivers, please wait. 9 For Windows 7 & 8 users, if a "User Account Control" window opens, please select "Yes" to allow the wizard to make changes to continue. 6. Please wait until the installation wizard is ready and then click "Next" to your computer. 5.
4. The installation wizard will install the necessary drivers, please wait. 9 For Windows 7 & 8 users, if a "User Account Control" window opens, please select "Yes" to allow the wizard to make changes to continue. 6. Please wait until the installation wizard is ready and then click "Next" to your computer. 5.

Quick Install Guide
Page 11
Go to Start > Programs > Edimax Wireless LAN > Uninstall 2. An uninstall wizard will guide you through the process. III-2-2. Locate the Edimax Wireless LAN category, select "Uninstall" and follow the on screen instructions. Driver Uninstallation III-2-1. screen instructions. 11 Windows XP/Vista/7 1. Follow the on - Right click anywhere on the "Start" screen and then click the "All apps" icon in the bottom right corner. 2. Windows 8 1. III-2.
Go to Start > Programs > Edimax Wireless LAN > Uninstall 2. An uninstall wizard will guide you through the process. III-2-2. Locate the Edimax Wireless LAN category, select "Uninstall" and follow the on screen instructions. Driver Uninstallation III-2-1. screen instructions. 11 Windows XP/Vista/7 1. Follow the on - Right click anywhere on the "Start" screen and then click the "All apps" icon in the bottom right corner. 2. Windows 8 1. III-2.

Quick Install Guide
Page 12
... adapter in the top left corner of your version of Mac OS X (10.4 - 10.8) and double click the "Installer.pkg" file to continue. 12 Driver Installation Ensure you select the correct folder for your version of Mac OS. The next screen displays important information, please read it carefully (after the... installed, you are repeated in Step. 13) Click "Continue" when you need , or the instructions are ready to open the driver installation wizard. 2. To check your version of Mac OS, click the Apple logo in "System Preferences Network". Mac OS IV-1. IV. Open the "Wlan_11ac_USB...
... adapter in the top left corner of your version of Mac OS X (10.4 - 10.8) and double click the "Installer.pkg" file to continue. 12 Driver Installation Ensure you select the correct folder for your version of Mac OS. The next screen displays important information, please read it carefully (after the... installed, you are repeated in Step. 13) Click "Continue" when you need , or the instructions are ready to open the driver installation wizard. 2. To check your version of Mac OS, click the Apple logo in "System Preferences Network". Mac OS IV-1. IV. Open the "Wlan_11ac_USB...

Quick Install Guide
Page 13
Select a language (the default language is English) and click "Continue" to confirm you continue. 4. If you have already have an older version of the software installed on your computer, please uninstall it before you agree to the terms. You must agree to the terms to continue installing the software. 13 To read the software license click "Read License" and then click "Agree" to install the driver. 5.
Select a language (the default language is English) and click "Continue" to confirm you continue. 4. If you have already have an older version of the software installed on your computer, please uninstall it before you agree to the terms. You must agree to the terms to continue installing the software. 13 To read the software license click "Read License" and then click "Agree" to install the driver. 5.

Quick Install Guide
Page 14
Click "Install" to install the software for and click "Continue". 7. If prompted, select which user to install the driver. 14 6.
Click "Install" to install the software for and click "Continue". 7. If prompted, select which user to install the driver. 14 6.

Quick Install Guide
Page 15
You may be prompted that you must restart your computer when the installation is installing. 15 You will be prompted to proceed. 10. Click "Continue Installation" to enter your password and click "Install Software". 9. Please wait while the driver is complete. Enter your system/administrative password before the installation can begin. 8.
You may be prompted that you must restart your computer when the installation is installing. 15 You will be prompted to proceed. 10. Click "Continue Installation" to enter your password and click "Install Software". 9. Please wait while the driver is complete. Enter your system/administrative password before the installation can begin. 8.

Quick Install Guide
Page 16
... Preferences Network" as mentioned previously in your computer. 12. When the adapter is complete, you will open it from the "Applications" menu in IV-1. Driver Installation Step 3.
... Preferences Network" as mentioned previously in your computer. 12. When the adapter is complete, you will open it from the "Applications" menu in IV-1. Driver Installation Step 3.

Quick Install Guide
Page 17
IV-2. folder for your version of Mac OS. For guidance on -screen instructions. 17 Driver Uninstallation Ensure you select the correct folder for your version of Mac OS X (10.4 - 10.8). 2. Disabling Network Adapters. Double click the "Uninstall.command" file and ...
IV-2. folder for your version of Mac OS. For guidance on -screen instructions. 17 Driver Uninstallation Ensure you select the correct folder for your version of Mac OS X (10.4 - 10.8). 2. Disabling Network Adapters. Double click the "Uninstall.command" file and ...

Quick Install Guide
Page 18
Ensure that your computer is required for the administrator, and then type "y" to build the driver. V-1. Click the "terminal" icon. 3. Driver Installation An active Internet connection is connected to your login username): cd /home/test 18 Click on "Dash Home" and then type "terminal...". sudo apt-get install build-essential Type the password for Linux driver installation. 1. Change to the "Home" directory and type the command below to download the packet which is your operating system. The process may ...
Ensure that your computer is required for the administrator, and then type "y" to build the driver. V-1. Click the "terminal" icon. 3. Driver Installation An active Internet connection is connected to your login username): cd /home/test 18 Click on "Dash Home" and then type "terminal...". sudo apt-get install build-essential Type the password for Linux driver installation. 1. Change to the "Home" directory and type the command below to download the packet which is your operating system. The process may ...
Quick Install Guide
Page 19
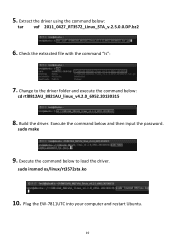
Execute the command below to the driver folder and execute the command below: cd rtl8812AU_8821AU_linux_v4.2.0_6952.20130315 8. Check the extracted file with the command "Is": 7. Change to load the driver. Build the driver. sudo insmod os/linux/rt3572sta.ko 10. Plug the EW-7811UTC into your computer and restart Ubuntu. 19 Execute the command below : tar vxf 2011_0427_RT3572_Linux_STA_v.2.5.0.0.DP.bz2 6. Extract the driver using the command below and then input the password. sudo make 9. 5.
Execute the command below to the driver folder and execute the command below: cd rtl8812AU_8821AU_linux_v4.2.0_6952.20130315 8. Check the extracted file with the command "Is": 7. Change to load the driver. Build the driver. sudo insmod os/linux/rt3572sta.ko 10. Plug the EW-7811UTC into your computer and restart Ubuntu. 19 Execute the command below : tar vxf 2011_0427_RT3572_Linux_STA_v.2.5.0.0.DP.bz2 6. Extract the driver using the command below and then input the password. sudo make 9. 5.

Quick Install Guide
Page 21
Click on "Wireless" and then click the icon to the directory: cd /home/test/rtl8812AU_8821AU_linux_v4.2.0_6952.20130315/ 3. Click on "Dash Home" and then type "terminal". Switch to open the drop-down menu labeled "Network Name". Driver Uninstallation 1. Execute the following command to and enter the necessary security information. Select the network you wish to connect to uninstall the driver: sudo make clean 21 Click the "terminal" icon. 2. V-2. 13.
Click on "Wireless" and then click the icon to the directory: cd /home/test/rtl8812AU_8821AU_linux_v4.2.0_6952.20130315/ 3. Click on "Dash Home" and then type "terminal". Switch to open the drop-down menu labeled "Network Name". Driver Uninstallation 1. Execute the following command to and enter the necessary security information. Select the network you wish to connect to uninstall the driver: sudo make clean 21 Click the "terminal" icon. 2. V-2. 13.

Quick Install Guide
Page 25
... below ) in VI-5. Using The Adapter After you will then be successfully connected to a network". 2. Mac. After correctly entering your password, you have installed the driver and if necessary disabled other versions of your Wi-Fi network. 25 VII-1. VII.
... below ) in VI-5. Using The Adapter After you will then be successfully connected to a network". 2. Mac. After correctly entering your password, you have installed the driver and if necessary disabled other versions of your Wi-Fi network. 25 VII-1. VII.

Quick Install Guide
Page 31
VII-3-5. Information The "Information" screen displays various information such as wireless utility version and driver version. 31 PBC Activate Push Button Configuration (PBC) WPS on the wireless extender. The PIN code is displayed next to complete PIN code WPS. Scan ...
VII-3-5. Information The "Information" screen displays various information such as wireless utility version and driver version. 31 PBC Activate Push Button Configuration (PBC) WPS on the wireless extender. The PIN code is displayed next to complete PIN code WPS. Scan ...
