
Datasheet
Page 2
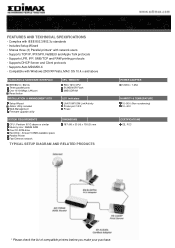
...; Compatible with Windows 2000/XP/Vista, MAC OS 10.4.x and above STANDARDS & HARDWARE INTERFACE IEEE802.3 / 802.3u Three parallel ports One 10/100Mbps LAN port Reset button INSTALLATION & MANAGEMENT KITS Setup Wizard Admin Utility included Web Management Firmware upgrade utility CPU / MEMORY RDC 1610 CPU 512KB NOR Flash 2MB SDRAM LED...
...; Compatible with Windows 2000/XP/Vista, MAC OS 10.4.x and above STANDARDS & HARDWARE INTERFACE IEEE802.3 / 802.3u Three parallel ports One 10/100Mbps LAN port Reset button INSTALLATION & MANAGEMENT KITS Setup Wizard Admin Utility included Web Management Firmware upgrade utility CPU / MEMORY RDC 1610 CPU 512KB NOR Flash 2MB SDRAM LED...
Manual
Page 63
NOTE: If the print server you may create multiple print queues and printer objects. Your print server should be ready to have is with multiple printer connectors, you have the changes take effect. Repeatedly press Escape to your print server using a CAPTURE command such as the one shown in the previous section. 56 16. Reset the print server to use. You should now be able to redirect printing to exit the PCONSOLE program. 17.
NOTE: If the print server you may create multiple print queues and printer objects. Your print server should be ready to have is with multiple printer connectors, you have the changes take effect. Repeatedly press Escape to your print server using a CAPTURE command such as the one shown in the previous section. 56 16. Reset the print server to use. You should now be able to redirect printing to exit the PCONSOLE program. 17.
Manual
Page 92
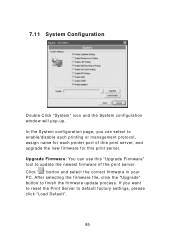
... for this print server, and upgrade the new firmware for each printer port of the print server. In the System configuration page, you want to reset the Print Server to finish the firmware update process. After selecting the firmware file, click the "Upgrade" button to default factory settings, please click "Load...
... for this print server, and upgrade the new firmware for each printer port of the print server. In the System configuration page, you want to reset the Print Server to finish the firmware update process. After selecting the firmware file, click the "Upgrade" button to default factory settings, please click "Load...

Manual
Page 108
Re-type new password, confirm the new password. Change password button: save the new password to let the changes take effect. 101 Make sure to reset the print server (described in section 8.13) to the print server. The print server will verify your password (it will ignore the User Name item) when you save the configuration. Type new password, change to the print server. Save to Print Server button: save the configuration to new password.
Re-type new password, confirm the new password. Change password button: save the new password to let the changes take effect. 101 Make sure to reset the print server (described in section 8.13) to the print server. The print server will verify your password (it will ignore the User Name item) when you save the configuration. Type new password, change to the print server. Save to Print Server button: save the configuration to new password.

Manual
Page 109
Click Save to print server button to save the configuration. Make sure to reset the print server (described in section 8.13) to the print server. The print server will ignore the User Name item) when you configure the IP address as Automatic. The print server will verify your password (it will obtain its IP address automatically by the protocol DHCP, BOOTP, RARP if you save the configuration to let the changes take effect. 102 8.7 Setting IP Address The IP Cfg page allows you to configure the IP address where the print server is to be located.
Click Save to print server button to save the configuration. Make sure to reset the print server (described in section 8.13) to the print server. The print server will ignore the User Name item) when you configure the IP address as Automatic. The print server will verify your password (it will obtain its IP address automatically by the protocol DHCP, BOOTP, RARP if you save the configuration to let the changes take effect. 102 8.7 Setting IP Address The IP Cfg page allows you to configure the IP address where the print server is to be located.
Manual
Page 111
IP range: specifies how many IP addresses are available to the print server. Save to Print Server button: save the configuration to DHCP clients. otherwise you will configure the following parameters: Starting IP: specifies the starting IP address for assigning to have the changes take effect. 104 Gateway IP: gives the IP address of the domain name server. Make sure to reset the print server (described in section 8.13) to DHCP clients. DNS server: gives the IP address of the default gateway. Net mask: gives the network mask. automatically;
IP range: specifies how many IP addresses are available to the print server. Save to Print Server button: save the configuration to DHCP clients. otherwise you will configure the following parameters: Starting IP: specifies the starting IP address for assigning to have the changes take effect. 104 Gateway IP: gives the IP address of the domain name server. Make sure to reset the print server (described in section 8.13) to DHCP clients. DNS server: gives the IP address of the default gateway. Net mask: gives the network mask. automatically;
Manual
Page 114
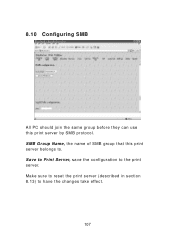
Make sure to reset the print server (described in section 8.13) to . 8.10 Configuring SMB All PC should join the same group before they can use this print server belongs to have the changes take effect. 107 SMB Group Name, the name of SMB group that this print server by SMB protocol. Save to Print Server, save the configuration to the print server.
Make sure to reset the print server (described in section 8.13) to . 8.10 Configuring SMB All PC should join the same group before they can use this print server belongs to have the changes take effect. 107 SMB Group Name, the name of SMB group that this print server by SMB protocol. Save to Print Server, save the configuration to the print server.

Manual
Page 117
... determines whether or not to the default configuration the print server had when it was shipped from this Utilities page, as described below: The Software reset: which determines whether or not to print a diagnostic page to an attached printer connected at either LPT1, LPT2 or LPT3 of the print server's setting...
... determines whether or not to the default configuration the print server had when it was shipped from this Utilities page, as described below: The Software reset: which determines whether or not to print a diagnostic page to an attached printer connected at either LPT1, LPT2 or LPT3 of the print server's setting...