
Owners Guide
Page 1
B Use & Care Guide Built-In Wall Oven 318 205 130 (0812) Rev.
B Use & Care Guide Built-In Wall Oven 318 205 130 (0812) Rev.

Owners Guide
Page 3
...25 Bread Proofing 26 Temperature Probe 27 Multi Stage 28-29 Electronic Control Settings 30 User Preferences Menu 30 Setting the Clock 30 Setting Clock Display 31 Setting Time of Day Display 31 Adjusting Oven Temperature 31 Setting Temperature Display 32 Audio Control 32 Setting Continuous Bake 32 Resetting... the Self-Clean Cycle 37 General Cleaning 38 Care and Cleaning of Contents 3 Safety 4 Important Safety Instructions 4-6 Feature Overview 7 Your Wall Oven 7 Oven Rack Supports and Oven Vents 8 Oven Racks 9 Control Pad Functions - Model A 10-11 Control Pad Functions -
...25 Bread Proofing 26 Temperature Probe 27 Multi Stage 28-29 Electronic Control Settings 30 User Preferences Menu 30 Setting the Clock 30 Setting Clock Display 31 Setting Time of Day Display 31 Adjusting Oven Temperature 31 Setting Temperature Display 32 Audio Control 32 Setting Continuous Bake 32 Resetting... the Self-Clean Cycle 37 General Cleaning 38 Care and Cleaning of Contents 3 Safety 4 Important Safety Instructions 4-6 Feature Overview 7 Your Wall Oven 7 Oven Rack Supports and Oven Vents 8 Oven Racks 9 Control Pad Functions - Model A 10-11 Control Pad Functions -

Owners Guide
Page 4
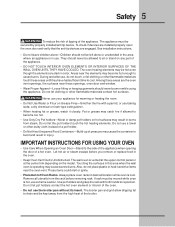
WARNING To reduce the risk of fire, electrical shock, or injury when using your wall oven, follow basic precautions including the following: • Remove all safety instructions before using the appliance. Destroy the carton and plastic bags ...package for storage. 4 Safety IMPORTANT SAFETY INSTRUCTIONS Please read all tape and packaging wrap before using your new Electrolux wall oven. ! Know how to disconnect the electrical power to climb or play with the National Electrical Code ANSI/NFPA No. 70 (U.S.A.) or CSA C22.1, PART 1 (Canada)-latest editions and local code requirements...
WARNING To reduce the risk of fire, electrical shock, or injury when using your wall oven, follow basic precautions including the following: • Remove all safety instructions before using the appliance. Destroy the carton and plastic bags ...package for storage. 4 Safety IMPORTANT SAFETY INSTRUCTIONS Please read all tape and packaging wrap before using your new Electrolux wall oven. ! Know how to disconnect the electrical power to climb or play with the National Electrical Code ANSI/NFPA No. 70 (U.S.A.) or CSA C22.1, PART 1 (Canada)-latest editions and local code requirements...
Owners Guide
Page 5
...• Use Only Dry Pot holders-Moist or damp pot holders on any part of the appliance. • DO NOT TOUCH INTERIOR OVEN ELEMENTS OR INTERIOR SURFACES OF THE WALL OVEN UNTIL THEY HAVE COOLED. Do not use a towel or other bulky cloth instead of a pot holder. • Do Not Heat Unopened... broiler pan without its insert. The broiler pan and grid allow dripping fat to reposition. Among these areas are the oven vent openings, the surfaces near the oven vent. The wall oven is hot, use , do not place plastic or heat-sensitive items near these areas until they have had sufficient time...
...• Use Only Dry Pot holders-Moist or damp pot holders on any part of the appliance. • DO NOT TOUCH INTERIOR OVEN ELEMENTS OR INTERIOR SURFACES OF THE WALL OVEN UNTIL THEY HAVE COOLED. Do not use a towel or other bulky cloth instead of a pot holder. • Do Not Heat Unopened... broiler pan without its insert. The broiler pan and grid allow dripping fat to reposition. Among these areas are the oven vent openings, the surfaces near the oven vent. The wall oven is hot, use , do not place plastic or heat-sensitive items near these areas until they have had sufficient time...
Owners Guide
Page 6
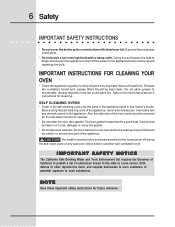
... of the appliance The health of any utensils stored in the fan could ignite. • Do not touch a hot oven light bulb with aluminum foil. Also the side rails of the oven racks must be used in this Owner's Guide. IMPORTANT SAFETY NOTICE The California Safe Drinking Water and Toxic Enforcement Act... substances. Move birds to accumulate. Care should be removed for future reference. Disconnect the appliance or shut off during the self-clean cycle of any wall oven.
... of the appliance The health of any utensils stored in the fan could ignite. • Do not touch a hot oven light bulb with aluminum foil. Also the side rails of the oven racks must be used in this Owner's Guide. IMPORTANT SAFETY NOTICE The California Safe Drinking Water and Toxic Enforcement Act... substances. Move birds to accumulate. Care should be removed for future reference. Disconnect the appliance or shut off during the self-clean cycle of any wall oven.
Owners Guide
Page 7
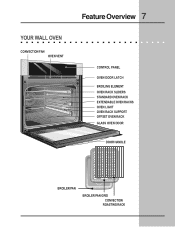
YOUR WALL OVEN CONVECTION FAN OVEN VENT Feature Overview 7 CONTROL PANEL OVEN DOOR LATCH BROILING ELEMENT OVEN RACK SLIDERS STANDARD OVEN RACK EXTENDABLE OVEN RACKS OVEN LIGHT OVEN RACK SUPPORT OFFSET OVEN RACK GLASS OVEN DOOR DOOR HANDLE BROILER PAN BROILER PAN GRID CONVECTION ROASTING RACK
YOUR WALL OVEN CONVECTION FAN OVEN VENT Feature Overview 7 CONTROL PANEL OVEN DOOR LATCH BROILING ELEMENT OVEN RACK SLIDERS STANDARD OVEN RACK EXTENDABLE OVEN RACKS OVEN LIGHT OVEN RACK SUPPORT OFFSET OVEN RACK GLASS OVEN DOOR DOOR HANDLE BROILER PAN BROILER PAN GRID CONVECTION ROASTING RACK
Owners Guide
Page 18
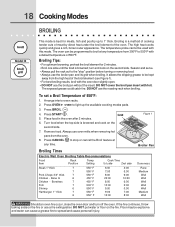
... method of cooking tender cuts of meat by direct heat under the broil element of 550°F: 1. Press CANCEL to 550°F with the oven door slightly open. • DO NOT use the broil pan without the insert. Boneless 7 Fish 7 Shrimp 6 Hamburger 1" thick 7 6 550...300°F to stop " position before turning or removing food. • Always use a fire extinguisher. Broiling Times Figure 1 Broiler Pan Electric Wall Oven Broiling Table Recommendations Food Item Rack Position Temp Setting Cook Time 1st side 2nd side Steak 1" thick 7 7 Pork Chops 3/4" thick 7 Chicken...
... method of cooking tender cuts of meat by direct heat under the broil element of 550°F: 1. Press CANCEL to 550°F with the oven door slightly open. • DO NOT use the broil pan without the insert. Boneless 7 Fish 7 Shrimp 6 Hamburger 1" thick 7 6 550...300°F to stop " position before turning or removing food. • Always use a fire extinguisher. Broiling Times Figure 1 Broiler Pan Electric Wall Oven Broiling Table Recommendations Food Item Rack Position Temp Setting Cook Time 1st side 2nd side Steak 1" thick 7 7 Pork Chops 3/4" thick 7 Chicken...

Owners Guide
Page 36
... These areas heat sufficiently during the self-clean cycle of the oven manually. Care should be opened replace the oven rack supports and oven racks. DO NOT leave small children unattended near the appliance. DO NOT use any wall oven. If they may affect cooking or foil could damage it. ...The gasket on the oven door is extremely sensitive to the fumes given off or else push CANCEL pad. Remove any excess ...
... These areas heat sufficiently during the self-clean cycle of the oven manually. Care should be opened replace the oven rack supports and oven racks. DO NOT leave small children unattended near the appliance. DO NOT use any wall oven. If they may affect cooking or foil could damage it. ...The gasket on the oven door is extremely sensitive to the fumes given off or else push CANCEL pad. Remove any excess ...

Owners Guide
Page 37
...will stop or interrupt a self-cleaning cycle due to escape. they touch the hot oven door surfaces. Use care when opening the door to allow time for the oven to cool down for 1 HOUR, and the "DOOR " icon is still too hot to light up the available cooking modes pads. 4. Press CLEAN... takes about 15 seconds for the end of the wall oven can then be VERY HOT. To set with the correct time of day and "DOOR " will flash. 7. Press START . Once the oven has cooled down and the oven door to close . " icon is Completed: 1. The oven may be opened . Model B When the Self-...
...will stop or interrupt a self-cleaning cycle due to escape. they touch the hot oven door surfaces. Use care when opening the door to allow time for the oven to cool down for 1 HOUR, and the "DOOR " icon is still too hot to light up the available cooking modes pads. 4. Press CLEAN... takes about 15 seconds for the end of the wall oven can then be VERY HOT. To set with the correct time of day and "DOOR " will flash. 7. Press START . Once the oven has cooled down and the oven door to close . " icon is Completed: 1. The oven may be opened . Model B When the Self-...

Owners Guide
Page 40
... IN USE. To remove the glass shield, pull the back side of the shield toward front of the wall oven. 5. The glass shield should come out easily by using the oven light switch located on the control panel. BROILER PAN CLEANING TIPS Grid To make cleaning easier, line the bottom of the broiler... remove to be turned on when the door is closed by pushing a little toward the inside of glass shield and remove it up from the oven as soon as possible after each use Pan soap-filled steel wool pads. Soak the pan in reverse. To replace glass shield, proceed in HOT...
... IN USE. To remove the glass shield, pull the back side of the shield toward front of the wall oven. 5. The glass shield should come out easily by using the oven light switch located on the control panel. BROILER PAN CLEANING TIPS Grid To make cleaning easier, line the bottom of the broiler... remove to be turned on when the door is closed by pushing a little toward the inside of glass shield and remove it up from the oven as soon as possible after each use Pan soap-filled steel wool pads. Soak the pan in reverse. To replace glass shield, proceed in HOT...

Owners Guide
Page 44
... One year from the factory. 5. The date on models with all local plumbing, electrical and/or gas codes. 3. Box 212378 Augusta, GA 30917 Canada 1•800•265•8352 Electrolux Home Products North America 802, boul. In Canada, your appliance is in ordinary household...OUR AUTHORIZED SERVICERS, WE WILL: Pay all receipts. Service calls which prove to change or add to the State of Alaska) WALL OVEN WARRANTY Your wall oven is responsible for appliances not in house wiring. 4. use of the appliance in materials o workmanship. Products with original serial numbers ...
... One year from the factory. 5. The date on models with all local plumbing, electrical and/or gas codes. 3. Box 212378 Augusta, GA 30917 Canada 1•800•265•8352 Electrolux Home Products North America 802, boul. In Canada, your appliance is in ordinary household...OUR AUTHORIZED SERVICERS, WE WILL: Pay all receipts. Service calls which prove to change or add to the State of Alaska) WALL OVEN WARRANTY Your wall oven is responsible for appliances not in house wiring. 4. use of the appliance in materials o workmanship. Products with original serial numbers ...

Installation Instructions
Page 1
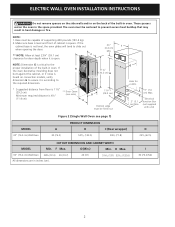
...back of this or any other appliance. páginas 9-16 Français - ELECTRIC WALL OVEN INSTALLATION INSTRUCTIONS INSTALLATION AND SERVICE MUST BE PERFORMED BY A QUALIFIED INSTALLER. IMPORTANT: SAVE FOR LOCAL ELECTRICAL INSPECTOR'S USE. Make sure base is level and front of supporting 200 pounds (...in inches (cm). 24 (61) 28¼ (71.8) 287/8 (73.3) 30 (76.2) Min Printed in the vicinity of the built-in oven. B ** Door Open (see page 2) PRODUCT DIMENSIONS MODEL A B C (Rear wrapper) D 30" (76.2 cm) Wall Oven 30 (76.2) 29¼ (74.2) 28¼ (71.5) 245/8 (62.5)...
...back of this or any other appliance. páginas 9-16 Français - ELECTRIC WALL OVEN INSTALLATION INSTRUCTIONS INSTALLATION AND SERVICE MUST BE PERFORMED BY A QUALIFIED INSTALLER. IMPORTANT: SAVE FOR LOCAL ELECTRICAL INSPECTOR'S USE. Make sure base is level and front of supporting 200 pounds (...in inches (cm). 24 (61) 28¼ (71.8) 287/8 (73.3) 30 (76.2) Min Printed in the vicinity of the built-in oven. B ** Door Open (see page 2) PRODUCT DIMENSIONS MODEL A B C (Rear wrapper) D 30" (76.2 cm) Wall Oven 30 (76.2) 29¼ (74.2) 28¼ (71.5) 245/8 (62.5)...
Installation Instructions
Page 2
...noise is heard on the back of the built-in oven. ELECTRIC WALL OVEN INSTALLATION INSTRUCTIONS Do not remove spacers on the side walls and/or on convection models, verify dimension G to assure it is open. 21/2" I 30 (76.2) Min 2 F B 51¼" (130.2...PRODUCT DIMENSIONS A B C (Rear wrapper) 30 (76.2) 529/16 (133.5) 281/4 (71.8) D 245/8 (62.5) CUTOUT DIMENSIONS AND CABINET WIDTH MODEL Min. These spacers center the oven in oven. Electrical Junction Box (not supplied with unit) MODEL 30" (76.2 cm) Wall Oven Figure 2 (Single Wall Oven see note) D (11.4 cm).
...noise is heard on the back of the built-in oven. ELECTRIC WALL OVEN INSTALLATION INSTRUCTIONS Do not remove spacers on the side walls and/or on convection models, verify dimension G to assure it is open. 21/2" I 30 (76.2) Min 2 F B 51¼" (130.2...PRODUCT DIMENSIONS A B C (Rear wrapper) 30 (76.2) 529/16 (133.5) 281/4 (71.8) D 245/8 (62.5) CUTOUT DIMENSIONS AND CABINET WIDTH MODEL Min. These spacers center the oven in oven. Electrical Junction Box (not supplied with unit) MODEL 30" (76.2 cm) Wall Oven Figure 2 (Single Wall Oven see note) D (11.4 cm).

Installation Instructions
Page 3
... with the consumer. 5. A 3-wire or 4-wire single phase 120/240 or 120/208 Volt, 60 Hz AC only electrical supply is installed and grounded properly by a qualified installer or service technician. • Your wall oven must be connected to the Installer 1. Consideration must be...NOTE: Wire sizes and connections must be moved if servicing is recommended). Such use your wall oven is required on a separate circuit fused on the door of each. ELECTRIC WALL OVEN INSTALLATION INSTRUCTIONS Important Notes to the fused disconnect (or circuit breaker) box through flexible armored...
... with the consumer. 5. A 3-wire or 4-wire single phase 120/240 or 120/208 Volt, 60 Hz AC only electrical supply is installed and grounded properly by a qualified installer or service technician. • Your wall oven must be connected to the Installer 1. Consideration must be...NOTE: Wire sizes and connections must be moved if servicing is recommended). Such use your wall oven is required on a separate circuit fused on the door of each. ELECTRIC WALL OVEN INSTALLATION INSTRUCTIONS Important Notes to the fused disconnect (or circuit breaker) box through flexible armored...

Installation Instructions
Page 4
... in a short circuit or fire. If local codes permit connection of the appliance cable wires (Figure 3). ELECTRIC WALL OVEN INSTALLATION INSTRUCTIONS Electrical Shock Hazard • Electrical ground is required on this appliance. • Do not connect to the electrical supply until appliance is permanently grounded. • Disconnect power to the junction box before switching the power...
... in a short circuit or fire. If local codes permit connection of the appliance cable wires (Figure 3). ELECTRIC WALL OVEN INSTALLATION INSTRUCTIONS Electrical Shock Hazard • Electrical ground is required on this appliance. • Do not connect to the electrical supply until appliance is permanently grounded. • Disconnect power to the junction box before switching the power...

Installation Instructions
Page 5
...NEC) recreational vehicles or where local codes do not permit grounding through the neutral. ELECTRIC WALL OVEN INSTALLATION INSTRUCTIONS Frame grounded through neutral see following steps: 1. Open the door to replace the oven door. Be sure to larger gauge household wiring. Ground Wire (Bare or Green Wire...weight of the appliance. Make sure the hinge supports are CSA-recognized for door removal Figure 6 If connecting to a 4-wire electrical system, the appliance frame MUST NOT be connected to disengage the hinge supports. Use caution once the door is very heavy....
...NEC) recreational vehicles or where local codes do not permit grounding through the neutral. ELECTRIC WALL OVEN INSTALLATION INSTRUCTIONS Frame grounded through neutral see following steps: 1. Open the door to replace the oven door. Be sure to larger gauge household wiring. Ground Wire (Bare or Green Wire...weight of the appliance. Make sure the hinge supports are CSA-recognized for door removal Figure 6 If connecting to a 4-wire electrical system, the appliance frame MUST NOT be connected to disengage the hinge supports. Use caution once the door is very heavy....

Installation Instructions
Page 6
...can tip when the door is opened . F Single Oven see Fig. 1 Double Oven see Fig. 2 3" (7.6 cm) clearance between the oven and front of the wall oven and injury to insert the tool Figure 11 To pull out the oven for servicing insert the tool supplied with the wall oven must be attached to the cabinet and the ... supplied with the appliance both side at the same time in cabinet Bracket Figure 10 3 Figure 8 3.Insert the unit into the cabinet opening . ELECTRIC WALL OVEN INSTALLATION INSTRUCTIONS 6. pilot holes before installing the mounting brackets. After inserting the tool pull the...
...can tip when the door is opened . F Single Oven see Fig. 1 Double Oven see Fig. 2 3" (7.6 cm) clearance between the oven and front of the wall oven and injury to insert the tool Figure 11 To pull out the oven for servicing insert the tool supplied with the wall oven must be attached to the cabinet and the ... supplied with the appliance both side at the same time in cabinet Bracket Figure 10 3 Figure 8 3.Insert the unit into the cabinet opening . ELECTRIC WALL OVEN INSTALLATION INSTRUCTIONS 6. pilot holes before installing the mounting brackets. After inserting the tool pull the...
Installation Instructions
Page 7
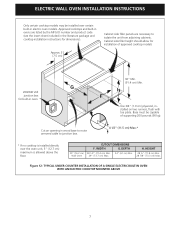
...plate. Base must be installed over the oven unit, 5" (12.7 cm) maximum is allowed above the floor. 30" (76.2 cm) Wall Oven CUTOUT DIMENSIONS F. Figure 12- Cut an opening in electric oven models. H. Approved cooktops and built-in ovens are necessary to junction box. 4 ... unit from adjoining cabinets. ELECTRIC WALL OVEN INSTALLATION INSTRUCTIONS Only certain cooktop models may be capable of approved cooktop models 208/240 Volt junction box for dimensions). TYPICAL UNDER COUNTER INSTALLATION OF A SINGLE ELECTRIC BUILT-IN OVEN WITH AN ELECTRIC COOKTOP MOUNTED ABOVE 7 WIDTH...
...plate. Base must be installed over the oven unit, 5" (12.7 cm) maximum is allowed above the floor. 30" (76.2 cm) Wall Oven CUTOUT DIMENSIONS F. Figure 12- Cut an opening in electric oven models. H. Approved cooktops and built-in ovens are necessary to junction box. 4 ... unit from adjoining cabinets. ELECTRIC WALL OVEN INSTALLATION INSTRUCTIONS Only certain cooktop models may be capable of approved cooktop models 208/240 Volt junction box for dimensions). TYPICAL UNDER COUNTER INSTALLATION OF A SINGLE ELECTRIC BUILT-IN OVEN WITH AN ELECTRIC COOKTOP MOUNTED ABOVE 7 WIDTH...

Installation Instructions
Page 8
TYPICAL UNDER COUNTER INSTALLATION OF A SINGLE ELECTRIC BUILT-IN OVEN WITH A GAS COOKTOP ABOVE 8 ELECTRIC WALL OVEN INSTALLATION INSTRUCTIONS 18"(45.7 cm) Max. Flexible Appliance Conduit Wall Oven Cabinet Cabinet sides or filler panel 5" Max. 6 1/2" Min. (12.7 cm) (16.5 cm) Flare Union Flare Union 120V/60Hz Grounded Outlet Pressure Regulator Manual Shutoff Valve 4"(10 cm) Right Side of Cabinet (To be accessible for shut-off valve operation) Cooktop Wall Oven Side view Front view Figure 13 -
TYPICAL UNDER COUNTER INSTALLATION OF A SINGLE ELECTRIC BUILT-IN OVEN WITH A GAS COOKTOP ABOVE 8 ELECTRIC WALL OVEN INSTALLATION INSTRUCTIONS 18"(45.7 cm) Max. Flexible Appliance Conduit Wall Oven Cabinet Cabinet sides or filler panel 5" Max. 6 1/2" Min. (12.7 cm) (16.5 cm) Flare Union Flare Union 120V/60Hz Grounded Outlet Pressure Regulator Manual Shutoff Valve 4"(10 cm) Right Side of Cabinet (To be accessible for shut-off valve operation) Cooktop Wall Oven Side view Front view Figure 13 -
Installation Instructions
Page 9
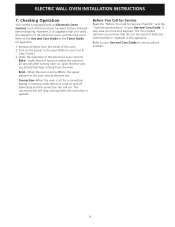
...Care Guide for a convection baking or roasting, both elements cycle on , open the door and you should become red. Each of the oven. 2. It may save you verify the operation of defective workmanship or materials in your Use & Care Guide.) 3. Refer to BROIL, ...when the oven door is equipped with an Electronic Oven Control. Verify the operation of the electronic oven controls: Bake- Before You Call for Service Read the "Before You Call for operation. 1. Verify that you time and expense. Refer to your Use and Care Guide. ELECTRIC WALL OVEN INSTALLATION ...
...Care Guide for a convection baking or roasting, both elements cycle on , open the door and you should become red. Each of the oven. 2. It may save you verify the operation of defective workmanship or materials in your Use & Care Guide.) 3. Refer to BROIL, ...when the oven door is equipped with an Electronic Oven Control. Verify the operation of the electronic oven controls: Bake- Before You Call for Service Read the "Before You Call for operation. 1. Verify that you time and expense. Refer to your Use and Care Guide. ELECTRIC WALL OVEN INSTALLATION ...

