
Owners Guide
Page 34
...servicer. • Service wiring not complete. Call your local electric company. • Short in , or when the power supply to the range has been interrupted, the indicator lights will flash and the control will beep. Replace cord/plug. • Controls are square and level. ...-Glass Cooktop section in this Owner's Guide. Wet surface with a clean damp paper towel until this Owner's Guide. Be sure cabinets are not set the controls. • House fuse has blown or circuit breaker has tripped immediately following installation. Scrub with water and sprinkle on ...
...servicer. • Service wiring not complete. Call your local electric company. • Short in , or when the power supply to the range has been interrupted, the indicator lights will flash and the control will beep. Replace cord/plug. • Controls are square and level. ...-Glass Cooktop section in this Owner's Guide. Wet surface with a clean damp paper towel until this Owner's Guide. Be sure cabinets are not set the controls. • House fuse has blown or circuit breaker has tripped immediately following installation. Scrub with water and sprinkle on ...
Installation Instructions
Page 2
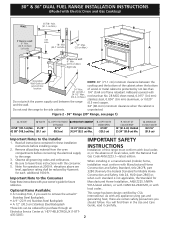
...Electrolux Service Center at 2000 ft. As with any appliance using gas and generating heat, there are certain safety precautions you want to the range. 3. HEIGHT OF COOKTOP OF RANGE 27 ½" 35 3/4" (90.8 cm) Min. (69.9 cm) 36 3/4" (93.3 cm) Max. Observe all instructions contained in the Use and Care Guide... seal the range to the Installer 1. HEIGHT B. Optional Items Available: • A Cooktop Trim, if you should follow. IMPORTANT SAFETY INSTRUCTIONS Installation of the cabinet when the bottom location 24" Min. 30" & 36" DUAL FUEL RANGE INSTALLATION INSTRUCTIONS (Model...
...Electrolux Service Center at 2000 ft. As with any appliance using gas and generating heat, there are certain safety precautions you want to the range. 3. HEIGHT OF COOKTOP OF RANGE 27 ½" 35 3/4" (90.8 cm) Min. (69.9 cm) 36 3/4" (93.3 cm) Max. Observe all instructions contained in the Use and Care Guide... seal the range to the Installer 1. HEIGHT B. Optional Items Available: • A Cooktop Trim, if you should follow. IMPORTANT SAFETY INSTRUCTIONS Installation of the cabinet when the bottom location 24" Min. 30" & 36" DUAL FUEL RANGE INSTALLATION INSTRUCTIONS (Model...
Installation Instructions
Page 3
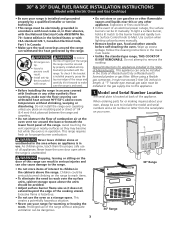
... use of all appliances. Wipe up excess spillage. Follow the cleaning instructions in the Use & Care Guide. • Unlike the standard gas range, THIS COOKTOP IS NOT REMOVABLE. When ordering parts for warming or heating the room. Never leave children... Special Instructions for proper burner combustion. 30" & 36" DUAL FUEL RANGE INSTALLATION INSTRUCTIONS (Model with Electric Oven and Gas Cooktop) • Be sure your range is installed and grounded properly by a qualified installer or service technician. • This range must be electrically grounded in accordance with local codes or...
... use of all appliances. Wipe up excess spillage. Follow the cleaning instructions in the Use & Care Guide. • Unlike the standard gas range, THIS COOKTOP IS NOT REMOVABLE. When ordering parts for warming or heating the room. Never leave children... Special Instructions for proper burner combustion. 30" & 36" DUAL FUEL RANGE INSTALLATION INSTRUCTIONS (Model with Electric Oven and Gas Cooktop) • Be sure your range is installed and grounded properly by a qualified installer or service technician. • This range must be electrically grounded in accordance with local codes or...

Installation Instructions
Page 10
... be as small as shown (Figure 17). 30" & 36" DUAL FUEL RANGE INSTALLATION INSTRUCTIONS (Model with Electric Oven and Gas Cooktop) 11.2 Check Operation Refer to the Use and Care Guide and the Electronic Oven Control Guide packaged with sealed burners as possible without extinguishing the flame. ... surface burner should be increased or decreased by turning the screw. There are turning on surface burners. 36" Range Fixed Burner Ring Fixed Burner Ring and Burner Base Dual Surface Burner Figure 17 Regular Burner 2. Insert a thin-bladed screwdriver into the hollow valve stem and...
... be as small as shown (Figure 17). 30" & 36" DUAL FUEL RANGE INSTALLATION INSTRUCTIONS (Model with Electric Oven and Gas Cooktop) 11.2 Check Operation Refer to the Use and Care Guide and the Electronic Oven Control Guide packaged with sealed burners as possible without extinguishing the flame. ... surface burner should be increased or decreased by turning the screw. There are turning on surface burners. 36" Range Fixed Burner Ring Fixed Burner Ring and Burner Base Dual Surface Burner Figure 17 Regular Burner 2. Insert a thin-bladed screwdriver into the hollow valve stem and...

Installation Instructions
Page 11
...b. d. The inner portion of bridge burner) should feel heat coming from LITE to the Use and Care Guide for Electrolux Service phone numbers, or call 1-877-4ELECTROLUX (1-877435-3287). 11 Adjust flame until the rear portion of the... electronic oven controls once more. Note: Air mixture adjustment is set to cause serious burns. Bake-Verify that are left in the OFF position. The convection fan will be adjusted individually. 30" & 36" DUAL FUEL RANGE INSTALLATION...
...b. d. The inner portion of bridge burner) should feel heat coming from LITE to the Use and Care Guide for Electrolux Service phone numbers, or call 1-877-4ELECTROLUX (1-877435-3287). 11 Adjust flame until the rear portion of the... electronic oven controls once more. Note: Air mixture adjustment is set to cause serious burns. Bake-Verify that are left in the OFF position. The convection fan will be adjusted individually. 30" & 36" DUAL FUEL RANGE INSTALLATION...


