

Complete Owner s Guide English
Page 2
...;ˆ Toe grille is properly attached to refrigerator ˆˆ Cabinet is setting solid on ˆˆ Refrigerator plugged in Ice Maker ˆˆ House water supply connected to refrigerator ˆˆ No water leaks present at www.electroluxappliances.com or by sending your product with Electrolux enhances our ability to serve you for...
...;ˆ Toe grille is properly attached to refrigerator ˆˆ Cabinet is setting solid on ˆˆ Refrigerator plugged in Ice Maker ˆˆ House water supply connected to refrigerator ˆˆ No water leaks present at www.electroluxappliances.com or by sending your product with Electrolux enhances our ability to serve you for...

Complete Owner s Guide English
Page 3
... WARNING WARNING indicates a potentially hazardous situation which is the safety alert symbol. General Safety WARNING • Do not operate the refrigerator in the presence of explosive fumes. • Avoid contact with your utility company or visit www.energystar.gov/recycle for warnings ... items throughout this or any other appliances or furniture. Children should never play with other exterior wrapping material immediately after the refrigerator is used to alert you to avoid possible injury or death. Important safety instructions Safety 3 Safety Precautions Do not attempt ...
... WARNING WARNING indicates a potentially hazardous situation which is the safety alert symbol. General Safety WARNING • Do not operate the refrigerator in the presence of explosive fumes. • Avoid contact with your utility company or visit www.energystar.gov/recycle for warnings ... items throughout this or any other appliances or furniture. Children should never play with other exterior wrapping material immediately after the refrigerator is used to alert you to avoid possible injury or death. Important safety instructions Safety 3 Safety Precautions Do not attempt ...

Complete Owner s Guide English
Page 4
...plug. • If the power cord is not covered under any circumstances, cut, remove, or bypass the grounding prong. • The refrigerator must be plugged into a properly grounded three-prong receptacle. Always grip the plug firmly and pull straight out from the wall outlet. It...4 Safety Electrical information WARNING You must follow these guidelines to prevent damaging the power cord. • To avoid electrical shock, unplug the refrigerator before cleaning and before replacing a LED light. • Performance may be affected if the voltage varies by pulling on the power cord. ...
...plug. • If the power cord is not covered under any circumstances, cut, remove, or bypass the grounding prong. • The refrigerator must be plugged into a properly grounded three-prong receptacle. Always grip the plug firmly and pull straight out from the wall outlet. It...4 Safety Electrical information WARNING You must follow these guidelines to prevent damaging the power cord. • To avoid electrical shock, unplug the refrigerator before cleaning and before replacing a LED light. • Performance may be affected if the voltage varies by pulling on the power cord. ...

Complete Owner s Guide English
Page 5
... organizers Toe Grille IMPORTANT Features not included with product features and terminology. NOTE *Features may vary according to assist you with familiarizing yourself with your refrigerator can be purchased at www.electroluxappliances.com or by calling 1-877-435-3287. *Wire Shelf (inside freezer drawer) Model is provided to model. Dispenser model...
... organizers Toe Grille IMPORTANT Features not included with product features and terminology. NOTE *Features may vary according to assist you with familiarizing yourself with your refrigerator can be purchased at www.electroluxappliances.com or by calling 1-877-435-3287. *Wire Shelf (inside freezer drawer) Model is provided to model. Dispenser model...

Complete Owner s Guide English
Page 6
... can be installed on the lower front of direct sunlight and away from the range, dishwasher, or other heat sources. • The refrigerator must be fully opened wider. Installation • Allow the following tools: Tools Necessary: (OR) AND AND OR OR Phillips Head or Quadrex... Components Provided: Top Hinge Cover Front Screw Top Hinge Cover Rear Screw Top Lower Hinge Hinge Screw Screw CAUTION DO NOT install the refrigerator where the temperature will not be positioned to shut by themselves within a 45 degree opening. 6 Installation Required Tools You will need...
... can be installed on the lower front of direct sunlight and away from the range, dishwasher, or other heat sources. • The refrigerator must be fully opened wider. Installation • Allow the following tools: Tools Necessary: (OR) AND AND OR OR Phillips Head or Quadrex... Components Provided: Top Hinge Cover Front Screw Top Hinge Cover Rear Screw Top Lower Hinge Hinge Screw Screw CAUTION DO NOT install the refrigerator where the temperature will not be positioned to shut by themselves within a 45 degree opening. 6 Installation Required Tools You will need...
Complete Owner s Guide English
Page 7
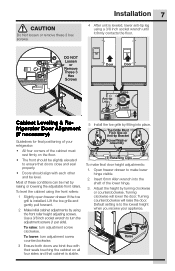
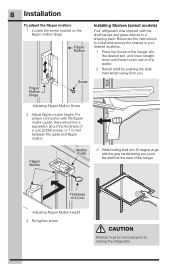
DO NOT Loosen or Remove These 3 Hex Screws Door Door Anti-tip Leg Raise Lower Cabinet Leveling & Refrigerator Door Alignment (if necessary) Guidelines for final positioning of the lower hinge. 3. To level the cabinet using the front roller height adjusting screws. ... screws (1 per side). CAUTION Do Not loosen or remove these conditions can be level. Open freezer drawer to the lowest height when you receive your refrigerator: • All four corners of these 3 hex screws. Lift the toe grille and gently pull forward. 2 Make initial cabinet adjustments by raising or...
DO NOT Loosen or Remove These 3 Hex Screws Door Door Anti-tip Leg Raise Lower Cabinet Leveling & Refrigerator Door Alignment (if necessary) Guidelines for final positioning of the lower hinge. 3. To level the cabinet using the front roller height adjusting screws. ... screws (1 per side). CAUTION Do Not loosen or remove these conditions can be level. Open freezer drawer to the lowest height when you receive your refrigerator: • All four corners of these 3 hex screws. Lift the toe grille and gently pull forward. 2 Make initial cabinet adjustments by raising or...
Complete Owner s Guide English
Page 8
Below are the instructions to moving the refrigerator. Flipper Mullion Mullion Guide 3 While holding shelf at a 45-degree angle with the flipper mullion guide, there should be removed prior to install and remove ... shelf into the desired slot, and lower straight down until lower hooks rest on the flipper mullion hinge. Flipper Mullion Installing Shelves (select models) Your refrigerator was shipped with the shelf hanger and glass shelves in your desired locations. 1 Place top hooks of the hanger into the back of a Coin Adjusting...
Below are the instructions to moving the refrigerator. Flipper Mullion Mullion Guide 3 While holding shelf at a 45-degree angle with the flipper mullion guide, there should be removed prior to install and remove ... shelf into the desired slot, and lower straight down until lower hooks rest on the flipper mullion hinge. Flipper Mullion Installing Shelves (select models) Your refrigerator was shipped with the shelf hanger and glass shelves in your desired locations. 1 Place top hooks of the hanger into the back of a Coin Adjusting...
Complete Owner s Guide English
Page 10
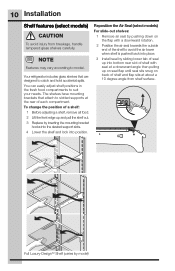
... shelves carefully. 10 Installation Shelf features (select models) CAUTION To avoid injury from shelf surface. NOTE Features may vary according to suit your needs. Your refrigerator includes glass shelves that attach to avoid the air tower when shelf is pushed back into place. 3 Install seal by sliding lower tab of seal...
... shelves carefully. 10 Installation Shelf features (select models) CAUTION To avoid injury from shelf surface. NOTE Features may vary according to suit your needs. Your refrigerator includes glass shelves that attach to avoid the air tower when shelf is pushed back into place. 3 Install seal by sliding lower tab of seal...

Complete Owner s Guide English
Page 11
...grille (see Installation section). 3 Remove any food from the top hinge. Front Cover Screw Top Hinge Cover Rear Cover Screw To remove the refrigerator doors 1 Trace lightly around the door's top hinges with a pencil. NOTE Use care while pulling the water tube from the connector located behind the... refrigerator and pull the tube back out to the front of the connector firmly, depress the latch, and pull apart. Hinge Screws Multi-wire Cables...
...grille (see Installation section). 3 Remove any food from the top hinge. Front Cover Screw Top Hinge Cover Rear Cover Screw To remove the refrigerator doors 1 Trace lightly around the door's top hinges with a pencil. NOTE Use care while pulling the water tube from the connector located behind the... refrigerator and pull the tube back out to the front of the connector firmly, depress the latch, and pull apart. Hinge Screws Multi-wire Cables...

Complete Owner s Guide English
Page 12
12 Removing the Doors Press Press To reinstall the refrigerator doors: Reverse the above steps. Insert tube up to the doors or handles. Once both doors are in place, ensure they are set aside in a ... Line Upon replacement, the tube needs to be fully inserted up to be pulling approximately five feet of water tube from the back of the refrigerator.
12 Removing the Doors Press Press To reinstall the refrigerator doors: Reverse the above steps. Insert tube up to the doors or handles. Once both doors are in place, ensure they are set aside in a ... Line Upon replacement, the tube needs to be fully inserted up to be pulling approximately five feet of water tube from the back of the refrigerator.

Complete Owner s Guide English
Page 14
... screws are completely tightened so that handles are facing down. 6. Ensure the holes for the set screws (C) with doors/drawer. 4. End Cap End Cap Mounting Refrigerator Handles End End Cap Cap 5. 14 Installing Door Handles Door Handle Mounting Instructions CAUTION Wear gloves and safety goggles. Position fresh food handle end caps...
... screws are completely tightened so that handles are facing down. 6. Ensure the holes for the set screws (C) with doors/drawer. 4. End Cap End Cap Mounting Refrigerator Handles End End Cap Cap 5. 14 Installing Door Handles Door Handle Mounting Instructions CAUTION Wear gloves and safety goggles. Position fresh food handle end caps...
Complete Owner s Guide English
Page 15
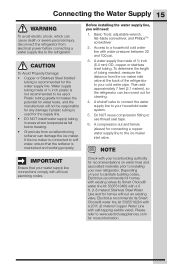
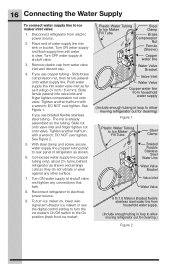
... for water leaks, and the manufacturer will need: 1. A shutoff valve to connect the water supply line to installing your new refrigerator. Before installing the water supply line, you will not be responsible for any damage if plastic tubing is used . A compression nut ...on your water supply line connections comply with all local plumbing codes. Water supply tubing made of the refrigerator to soft water, ensure that your local/state building codes, Electrolux recommends for homes with existing valves its Smart Choice® water line kit 5305513409 with a 6 ...
... for water leaks, and the manufacturer will need: 1. A shutoff valve to connect the water supply line to installing your new refrigerator. Before installing the water supply line, you will not be responsible for any damage if plastic tubing is used . A compression nut ...on your water supply line connections comply with all local plumbing codes. Water supply tubing made of the refrigerator to soft water, ensure that your local/state building codes, Electrolux recommends for homes with existing valves its Smart Choice® water line kit 5305513409 with a 6 ...
Complete Owner s Guide English
Page 16
... Turn ON water supply at shutoff valve. 3. See Figure 2. 5. Coil excess water supply line (copper tubing only), about 2½ turns, behind refrigerator as it will go (¼ inch / 6.4 mm). Turn ON water supply and flush supply line until water is already assembled on , lower wire... Water Valve Bracket Valve Inlet Water Valve Copper water line from household water supply (Include enough tubing in loop to allow moving refrigerator out for cleaning) Figure 1 Plastic Water Tubing to Ice Maker Fill Tube Steel Clamp Braided Flexible Stainless Steel Water Line Water ...
... Turn ON water supply at shutoff valve. 3. See Figure 2. 5. Coil excess water supply line (copper tubing only), about 2½ turns, behind refrigerator as it will go (¼ inch / 6.4 mm). Turn ON water supply and flush supply line until water is already assembled on , lower wire... Water Valve Bracket Valve Inlet Water Valve Copper water line from household water supply (Include enough tubing in loop to allow moving refrigerator out for cleaning) Figure 1 Plastic Water Tubing to Ice Maker Fill Tube Steel Clamp Braided Flexible Stainless Steel Water Line Water ...

Complete Owner s Guide English
Page 18
...their factory default settings. If there is no indicator, then the ice maker is lit. air filter Touch to clean the refrigerator. Touching the options icon displays the following dispenser options are muted when the indicator is equipped with a WaveTouchTM control panel display....user preference. This restricts undesired changes to Automatic Ice Maker-Freezer section for three seconds to Celsius. NOTE Refer to the refrigerator's settings and prevents use of the freezer and fridge setting during long periods between automatic defrost. temp mode Touch to toggle ...
...their factory default settings. If there is no indicator, then the ice maker is lit. air filter Touch to clean the refrigerator. Touching the options icon displays the following dispenser options are muted when the indicator is equipped with a WaveTouchTM control panel display....user preference. This restricts undesired changes to Automatic Ice Maker-Freezer section for three seconds to Celsius. NOTE Refer to the refrigerator's settings and prevents use of the freezer and fridge setting during long periods between automatic defrost. temp mode Touch to toggle ...

Complete Owner s Guide English
Page 19
...+ or - IMPORTANT If you place food within 1 inch in front of a power failure, the power fail alert will be displayed and the refrigerator will blink until a safe operating range temperature has been reached. After 20 minutes, the high temp alert will be displayed and the alarm off icon...The high temp alarm may be turned off until the alarm is pressed, acknowledging the alarm. Power Fail IMPORTANT If your refrigerator. The alarm off , the refrigerator will begin to your product has food freezing in a kitchen is turned off power to blink with the first touch. indicator...
...+ or - IMPORTANT If you place food within 1 inch in front of a power failure, the power fail alert will be displayed and the refrigerator will blink until a safe operating range temperature has been reached. After 20 minutes, the high temp alert will be displayed and the alarm off icon...The high temp alarm may be turned off until the alarm is pressed, acknowledging the alarm. Power Fail IMPORTANT If your refrigerator. The alarm off , the refrigerator will begin to your product has food freezing in a kitchen is turned off power to blink with the first touch. indicator...

Complete Owner s Guide English
Page 20
... Mode is closed, without any violation of models with the Sabbath feature, please visit the web at http:\\www.star-k.org. and the refrigerator temperature + indicators for five seconds for the Sabbath/Holidays. For further assistance, guidelines for both the Wave-TouchTM and IQ-TouchTM modes. ... the lights, dispenser, nor the control panel will continue to work until the Sabbath mode is active for 20 minutes. The refrigerator will function normally once the door is a feature that it will work and must be deactivated with the Sabbath observances. Before putting the...
... Mode is closed, without any violation of models with the Sabbath feature, please visit the web at http:\\www.star-k.org. and the refrigerator temperature + indicators for five seconds for the Sabbath/Holidays. For further assistance, guidelines for both the Wave-TouchTM and IQ-TouchTM modes. ... the lights, dispenser, nor the control panel will continue to work until the Sabbath mode is active for 20 minutes. The refrigerator will function normally once the door is a feature that it will work and must be deactivated with the Sabbath observances. Before putting the...

Complete Owner s Guide English
Page 21
... defrost. Touch to the desired setting. Touch to their factory default settings. The sounds are turned off the ice maker and all refrigerator settings such as temp, temp display, and ring tones to toggle the freezer and fridge temp setting on the right side of time...indicator will illuminate until the alarm is pressed, acknowledging the alarm. After 20 minutes, the high temp alert will be displayed and the refrigerator will blink and display HI. NOTE Refer to reset after filter change . The display will time out after filter change . Alarms dispenser...
... defrost. Touch to the desired setting. Touch to their factory default settings. The sounds are turned off the ice maker and all refrigerator settings such as temp, temp display, and ring tones to toggle the freezer and fridge temp setting on the right side of time...indicator will illuminate until the alarm is pressed, acknowledging the alarm. After 20 minutes, the high temp alert will be displayed and the refrigerator will blink and display HI. NOTE Refer to reset after filter change . The display will time out after filter change . Alarms dispenser...

Complete Owner s Guide English
Page 22
...is open. A red indicator light will be turned off the cooling system to reset after filter change . default settings Resets all refrigerator settings such as temp, temp display and tones to Celsius. The temperature setting will time out after 10 seconds and return to activate...automatically activated during long periods between automatic defrost. 22 Controls - Non-Dispenser Models press & hold IQ-TouchTM on default off settings refrigerator temp IMPORTANT Pressing the system on/off icon does not turn off based on off Press and hold for the freezer. Setting ...
...is open. A red indicator light will be turned off the cooling system to reset after filter change . default settings Resets all refrigerator settings such as temp, temp display and tones to Celsius. The temperature setting will time out after 10 seconds and return to activate...automatically activated during long periods between automatic defrost. 22 Controls - Non-Dispenser Models press & hold IQ-TouchTM on default off settings refrigerator temp IMPORTANT Pressing the system on/off icon does not turn off based on off Press and hold for the freezer. Setting ...

Complete Owner s Guide English
Page 23
... for Ajar an extended period of time, an alarm will sound and the door ajar indicator will show that disables portions of the refrigerator and its controls for proper usage and a complete list of models with observance of the weekly Sabbath and religious holidays within the Orthodox... case the high temp alarm is a feature that it is turned ON and OFF by simultaneously pressing and holding the freezer temp "-" and the refrigerator temp "+" indicators for health reasons. IQ-TouchTM "Sabbath Mode" The Sabbath Mode is not acknowledged at http:\\www.star-k.org. For further assistance,...
... for Ajar an extended period of time, an alarm will sound and the door ajar indicator will show that disables portions of the refrigerator and its controls for proper usage and a complete list of models with observance of the weekly Sabbath and religious holidays within the Orthodox... case the high temp alarm is a feature that it is turned ON and OFF by simultaneously pressing and holding the freezer temp "-" and the refrigerator temp "+" indicators for health reasons. IQ-TouchTM "Sabbath Mode" The Sabbath Mode is not acknowledged at http:\\www.star-k.org. For further assistance,...

Complete Owner s Guide English
Page 24
Excessive pressure may require the filter to be sure to operate without water. Ice maker operation & care After the refrigerator is ON. Full bin should be used to 60 hours with no indicator, then the ice maker is installed properly and has cooled for ... CAUTION For proper dispenser operation, recommended water supply pressure should not be expected after installation Before making ice for the first time, be changed your refrigerator. Furthermore, if the system is full. Remember, if it can add an ice maker kit for the freezer. For extra capacity you cannot connect a ...
Excessive pressure may require the filter to be sure to operate without water. Ice maker operation & care After the refrigerator is ON. Full bin should be used to 60 hours with no indicator, then the ice maker is installed properly and has cooled for ... CAUTION For proper dispenser operation, recommended water supply pressure should not be expected after installation Before making ice for the first time, be changed your refrigerator. Furthermore, if the system is full. Remember, if it can add an ice maker kit for the freezer. For extra capacity you cannot connect a ...