
Complete Owner's Guide (English)
Page 2
... save this page to record important product information. Questions? Printed in home appliances. and Canada: 1-877-4ELECTROLUX (1-877-435-3287) For online support and Internet production information visit http://www.electroluxappliances.com ©2011 Electrolux Home Products, Inc. We view your Product Registration Card in the U.S.... Care & Cleaning 11-12 Ceramic glass cooktop cleaning & maintenance........ 11 Cleaning recommendations for quick reference Purchase date Electrolux model number Electrolux serial number Serial plate location NOTE Registering your new appliance.
... save this page to record important product information. Questions? Printed in home appliances. and Canada: 1-877-4ELECTROLUX (1-877-435-3287) For online support and Internet production information visit http://www.electroluxappliances.com ©2011 Electrolux Home Products, Inc. We view your Product Registration Card in the U.S.... Care & Cleaning 11-12 Ceramic glass cooktop cleaning & maintenance........ 11 Cleaning recommendations for quick reference Purchase date Electrolux model number Electrolux serial number Serial plate location NOTE Registering your new appliance.

Complete Owner's Guide (English)
Page 3
... materials touch these areas are dark in fire or property damage. • Remove all tape and packaging wrap before using the appliance. Smother the fire with the National Electrical Code ANSI/NFPA No. 70 - Flammable materials should never be hot even though they...color. Stepping or leaning on this manual are labeled with packaging material. • Proper Installation. Flammable materials may be worn while using the appliance. Never use baking soda, a dry chemical or foam-type extinguisher. • When heating fat or grease, watch it closely. Do not...
... materials touch these areas are dark in fire or property damage. • Remove all tape and packaging wrap before using the appliance. Smother the fire with the National Electrical Code ANSI/NFPA No. 70 - Flammable materials should never be hot even though they...color. Stepping or leaning on this manual are labeled with packaging material. • Proper Installation. Flammable materials may be worn while using the appliance. Never use baking soda, a dry chemical or foam-type extinguisher. • When heating fat or grease, watch it closely. Do not...

Complete Owner's Guide (English)
Page 4
... foil as a cover to avoid a steam burn. Greasy deposits in the form of electric shock, fire or short circuit. • Glazed Cooking Utensils. This appliance is equipped with the utensil. • Never Leave Surface Units Unattended. Only use a towel or other reproductive harm, and requires businesses to warn customers of... electric shock. This could catch fire. They may result in injury. • Know which touch key pads controls each surface unit. • Clean the appliance regularly to unintentional contact with one or more surface units of the cooktop.
... foil as a cover to avoid a steam burn. Greasy deposits in the form of electric shock, fire or short circuit. • Glazed Cooking Utensils. This appliance is equipped with the utensil. • Never Leave Surface Units Unattended. Only use a towel or other reproductive harm, and requires businesses to warn customers of... electric shock. This could catch fire. They may result in injury. • Know which touch key pads controls each surface unit. • Clean the appliance regularly to unintentional contact with one or more surface units of the cooktop.

Complete Owner's Guide (English)
Page 11
... Feature Mode: Touch and hold simultaneously the "-" key of the Minute Timer Control and the "lock" key. Radiant Element Controls 11 Sabbath feature mode This appliance provides special settings for use when observing the Jewish Sabbath/Holidays. All zones ON and the main ON indicators will show "H". The Timer feature is...
... Feature Mode: Touch and hold simultaneously the "-" key of the Minute Timer Control and the "lock" key. Radiant Element Controls 11 Sabbath feature mode This appliance provides special settings for use when observing the Jewish Sabbath/Holidays. All zones ON and the main ON indicators will show "H". The Timer feature is...
Complete Owner's Guide (English)
Page 14
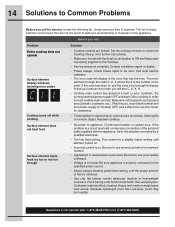
... replace fuse. Turn control to a slightly higher setting until the proper amount of heat is on controls area of the code. Be sure appliance is properly connected to the specified power source. • Adjust surface element power level setting until element comes on. • ...OFF and back ON to cooktop in this situation corrected by a qualified electrician. • Too low heat setting. Call a Electrolux service center for service call Problem Entire cooktop does not operate Surface element display windows showing error codes Cooktop turns off while cooking Surface element...
... replace fuse. Turn control to a slightly higher setting until the proper amount of heat is on controls area of the code. Be sure appliance is properly connected to the specified power source. • Adjust surface element power level setting until element comes on. • ...OFF and back ON to cooktop in this situation corrected by a qualified electrician. • Too low heat setting. Call a Electrolux service center for service call Problem Entire cooktop does not operate Surface element display windows showing error codes Cooktop turns off while cooking Surface element...
Complete Owner's Guide (English)
Page 15
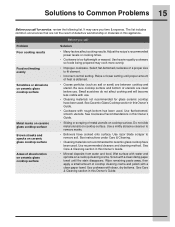
... cooktop cleaning creme and polish with water and sprinkle on ceramic glass cooktop surface Before you time & expense. See Ceramic-Glass Cooktop section in this appliance. Scrub with rough bottom has been used. Wipe remaining paste away, then apply a small amount of defective workmanship or materials in this Owner's Guide. •...
... cooktop cleaning creme and polish with water and sprinkle on ceramic glass cooktop surface Before you time & expense. See Ceramic-Glass Cooktop section in this appliance. Scrub with rough bottom has been used. Wipe remaining paste away, then apply a small amount of defective workmanship or materials in this Owner's Guide. •...
Complete Owner's Guide (English)
Page 17
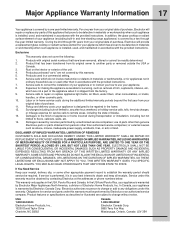
... the addresses or phone numbers below. Service calls to correct the installation of your appliance or to instruct you how to use your appliance is warranted by Electrolux Major Appliances North America, a division of Electrolux Home Products, Inc. Damages caused by: services performed by a two through 5th ...cabinets, walls, etc. 14. or external causes such as described or illustrated are not a part of the appliance when it is in the home. 12. ELECTROLUX SHALL NOT BE LIABLE FOR CONSEQUENTIAL OR INCIDENTAL DAMAGES SUCH AS PROPERTY DAMAGE AND INCIDENTAL EXPENSES RESULTING FROM ANY ...
... the addresses or phone numbers below. Service calls to correct the installation of your appliance or to instruct you how to use your appliance is warranted by Electrolux Major Appliances North America, a division of Electrolux Home Products, Inc. Damages caused by: services performed by a two through 5th ...cabinets, walls, etc. 14. or external causes such as described or illustrated are not a part of the appliance when it is in the home. 12. ELECTROLUX SHALL NOT BE LIABLE FOR CONSEQUENTIAL OR INCIDENTAL DAMAGES SUCH AS PROPERTY DAMAGE AND INCIDENTAL EXPENSES RESULTING FROM ANY ...
Installation Instructions (English Español Français)
Page 1
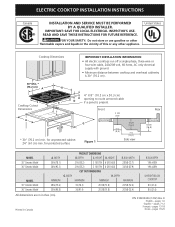
... 36'' Ceramic Model PRODUCT DIMENSIONS A. WIDTH B. WIDTH H. hEIGHT BELOW COOKTOP 8½ (21.6) 8½ (21.6) All dimensions are in the vicinity of this or any other appliance. Printed in Canada P/N 318205426 (1202) Rev. pages 13-18 Notes - pages 19-20 1 for unprotected cabinet 24" (61 cm) min. depth c. HEIGHT d. BOX WIDTH 30...
... 36'' Ceramic Model PRODUCT DIMENSIONS A. WIDTH B. WIDTH H. hEIGHT BELOW COOKTOP 8½ (21.6) 8½ (21.6) All dimensions are in the vicinity of this or any other appliance. Printed in Canada P/N 318205426 (1202) Rev. pages 13-18 Notes - pages 19-20 1 for unprotected cabinet 24" (61 cm) min. depth c. HEIGHT d. BOX WIDTH 30...

Installation Instructions (English Español Français)
Page 4
... cord must be connected directly to the junction box. Be sure the bottle of cleaner conditioner packed in the cable between the box and the appliance, so it easily. Read all governing codes and ordinances. 4. IMPORTANT SAFETY INSTRUCTIONS • Be sure your cooktop. DO NOT fuse neutral. ...connect the wire to include the model and serial numbers and a lot number or letter from the serial plate on both sides of the appliance in the Use and Care Guide. Unpacking Instructions 1. NOTE: Wire sizes and connections must be pretreated before connecting the electrical supply to ...
... cord must be connected directly to the junction box. Be sure the bottle of cleaner conditioner packed in the cable between the box and the appliance, so it easily. Read all governing codes and ordinances. 4. IMPORTANT SAFETY INSTRUCTIONS • Be sure your cooktop. DO NOT fuse neutral. ...connect the wire to include the model and serial numbers and a lot number or letter from the serial plate on both sides of the appliance in the Use and Care Guide. Unpacking Instructions 1. NOTE: Wire sizes and connections must be pretreated before connecting the electrical supply to ...

Installation Instructions (English Español Français)
Page 5
...power supply and a frame connected copper wire. When installing connectors having screws which bear directly on the power. (If your appliance is permanently grounded. Connect the ground wire before turning on the steel and/or aluminum flexible conduit, do not permit grounding ... Wires Black Wires Junction Box Ground Wire (Bare or Green Wire) White Wire (Neutral) U.L.-Listed Conduit Connector (or CSA listed) Cable from appliance White Wire U.L.-Listed Conduit Connector (or CSA listed) Figure 5 4-WIRE GROUNDED JUNCTION BOX 5 Disconnect the power supply. 2. Separate the green...
...power supply and a frame connected copper wire. When installing connectors having screws which bear directly on the power. (If your appliance is permanently grounded. Connect the ground wire before turning on the steel and/or aluminum flexible conduit, do not permit grounding ... Wires Black Wires Junction Box Ground Wire (Bare or Green Wire) White Wire (Neutral) U.L.-Listed Conduit Connector (or CSA listed) Cable from appliance White Wire U.L.-Listed Conduit Connector (or CSA listed) Figure 5 4-WIRE GROUNDED JUNCTION BOX 5 Disconnect the power supply. 2. Separate the green...

Installation Instructions (English Español Français)
Page 6
... the cooktop. Visually inspect the cooktop for operation. WARNING Do not remove the nylon spacers on the edges of defective workmanship or materials in this appliance. Screws Figure 6 2. CAUTION Do not touch cooktop glass or elements. This includes common occurences that may save you Call for Service Read the Before You...
... the cooktop. Visually inspect the cooktop for operation. WARNING Do not remove the nylon spacers on the edges of defective workmanship or materials in this appliance. Screws Figure 6 2. CAUTION Do not touch cooktop glass or elements. This includes common occurences that may save you Call for Service Read the Before You...