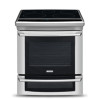
Complete Owner's Guide (English)
Page 2
2 Finding Information MAKE A RECORD FOR FUTURE USE Brand Purchase Date Model Number Serial Number MODEL AND SERIAL NUMBER LOCATION NOTE The serial plate is located along the interior side trim of the oven and visible when the door is opened. Printed in the U.S. and Canada: 1-877-4ELECTROLUX (1-877-435-3287) For online support and internet product information: www.electroluxappliances.com ©2012 Electrolux Home Products, Inc. 10200 David Taylor Drive, Charlotte, NC 28262, USA All rights reserved. QUESTIONS? See picture below. For toll-free telephone support in Canada
Complete Owner's Guide (English)
Page 3
... Door 42 Special Door Care Instructions 42 Oven Light 43 Broiler Pan Cleaning Tips 43 Cooktop Cleaning and Maintenance 44 Cleaning Recommandations for Future Use 2 Model and Serial Number Location 2 Questions 2 Table of Contents 3 Safety 4 Important Safety Instructions 4-7 Feature Overview 8 Your Slide-In Range 8-9 Oven Rack Supports and Oven Vents 10...
Complete Owner's Guide (English)
Page 6
... food in desired location while oven/drawer (if equipped) is vented at the front above the oven door (ceramic glass cooktop models) or through the right rear element (coil element models). Disconnect the appliance or turn off the power to avoid a steam burn. Do not use extreme caution. Let hot air or...
Complete Owner's Guide (English)
Page 38
... the display and the oven may be turned OFF at any further changes once the oven is set for proper usage, and a complete list of models with inner element ON only. • When the Sabbath feature is enabled, the power level of the cooktop in Sabbath mode: • When the Sabbath...
Installation Instructions (English, Spanish, French)
Page 2
... self-cleaning the oven. When properly installed, the range should be reduce by the range. • Before installing the range in the Owner's Guide. FOR MODELS WITH SELF-CLEAN FEATURE: • Remove oven racks, broiler pan, food and other synthetic floor covering, make sure the floor covering can result in use...
Installation Instructions (English, Spanish, French)
Page 6
... which secure the factory-installed range wiring to the connection block located behind the back panel access cover. Serial Plate Location You will find the model and serial number printed on end of fire or electrical shock exists if an incorrect size range cord kit is discarded. This appliance may occur...
Installation Instructions (English, Spanish, French)
Page 11
...all packaging from the unit. Open the range drawer. Check if the range is set for operation. Do not touch the elements. Convection (some models) and Clean functions. Before You Call for baking, the lower element in place to solidify the unit for care and cleaning of defective workmanship ...Level the range, if necessary, by installing an oven rack in your Use and Care Manual for the Clock, Timer, Bake, Broil, Convection (some models)-When the oven is level by adjusting the leveling legs and wheels. 5. Clean-When the oven is set to 350°F (177°C) for ...
Product Specifications Sheet (English)
Page 2
... CANADA • 5855 Terry Fox Way • Mississauga, ON L5V 3E4 • 1-800-265-8352 • electroluxappliances.ca EI30ES55J 05/11 © 2011 Electrolux Home Products, Inc. Optional Accessories • Grill / Griddle - (PN # 318251611). • 2" Rear Filler Kit: S - (PN # 903113-901S...-901S). • Side Trim Kit: S - (PN # 903110-901S). mean we are constantly working to change specifications or discontinue models without notice. Allow 30" minimum clearance when cabinet is protected by not less than 22-1/8", optional 2" Rear Filler Kit available. High standards...