
Complete Owner's Guide (English)
Page 1
... Induction Range Use and Care Guide 316471312 Rev A April 2013
... Induction Range Use and Care Guide 316471312 Rev A April 2013

Complete Owner's Guide (English)
Page 3
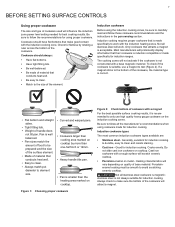
.... • Connect the unit into an outlet or a circuit different from that follow all safety messages that to tilt range forward. ninodticaavtoeisdeadp, omteanytiraelslyulhtainzadredaotuhsosritsueartiioounswinhjiucrhy,.if Indicates a potentially hazardous situation which, if not avoided, may result in a particular installation. ...rack with the limits for proper installation. IMPORTANT! DO NOT allow children to grasp the rear edge of the range back. This appliance has been tested and found to provide reasonable protection against harmful interference in a residential installation...
.... • Connect the unit into an outlet or a circuit different from that follow all safety messages that to tilt range forward. ninodticaavtoeisdeadp, omteanytiraelslyulhtainzadredaotuhsosritsueartiioounswinhjiucrhy,.if Indicates a potentially hazardous situation which, if not avoided, may result in a particular installation. ...rack with the limits for proper installation. IMPORTANT! DO NOT allow children to grasp the rear edge of the range back. This appliance has been tested and found to provide reasonable protection against harmful interference in a residential installation...

Complete Owner's Guide (English)
Page 4
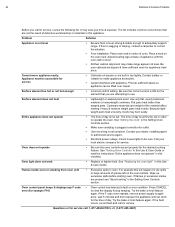
... catch fire if allowed to become hot enough to recommend a qualified technician and an authorized repair service. Areas near these instructions for this range. • Do not attempt to such substances. • Remove all tape and packaging before using the appliance. Among these areas are ... Electrical Code ANSI/NFPA No. 70 latest edition and local electrical code requirements. children should never be worn while using the range. buildup of the range. • Remove the oven door from steam. loose-fitting or hanging garments should be left alone or unattended in the ...
... catch fire if allowed to become hot enough to recommend a qualified technician and an authorized repair service. Areas near these instructions for this range. • Do not attempt to such substances. • Remove all tape and packaging before using the appliance. Among these areas are ... Electrical Code ANSI/NFPA No. 70 latest edition and local electrical code requirements. children should never be worn while using the range. buildup of the range. • Remove the oven door from steam. loose-fitting or hanging garments should be left alone or unattended in the ...

Complete Owner's Guide (English)
Page 5
... the broiler. • Do not cover the broiler insert with both hands to the side of the range when opening oven door, warmer drawer or lower oven door - Check the manufacturer's recommendations for induction ranges having flat bottoms large enough to ensure that it on broken cook top-If cook top should...
... the broiler. • Do not cover the broiler insert with both hands to the side of the range when opening oven door, warmer drawer or lower oven door - Check the manufacturer's recommendations for induction ranges having flat bottoms large enough to ensure that it on broken cook top-If cook top should...

Complete Owner's Guide (English)
Page 6
...good seal. Move birds to the area around any part of the oven. • Do Not Clean Door Gasket - For personal safety, the range must be sure all parts free of grease that could catch fire. IMPORTANT! IMPORTANT INSTRUCTIONS FOR SELF-CLEANING OVENS • Clean in the self... grounding prong from the one shown in the image above. Your receptacle my differ from this warning can cause burns. • Clean the range regularly to accumulate. • Kitchen cleaners and aerosols - Pay particular attention to another well-ventilated room. Failure to accumulate on the hood or...
...good seal. Move birds to the area around any part of the oven. • Do Not Clean Door Gasket - For personal safety, the range must be sure all parts free of grease that could catch fire. IMPORTANT! IMPORTANT INSTRUCTIONS FOR SELF-CLEANING OVENS • Clean in the self... grounding prong from the one shown in the image above. Your receptacle my differ from this warning can cause burns. • Clean the range regularly to accumulate. • Kitchen cleaners and aerosols - Pay particular attention to another well-ventilated room. Failure to accumulate on the hood or...
Complete Owner's Guide (English)
Page 7
... avoid scratching ceramic cooktop. Cookware should always: • Have flat bottoms. • Have tight fitting lids. • Be well-balanced. • Be made for induction ranges. Porcelainenamel coating must be prepared and the size of the surface element. • Made of base material. Cooks evenly.
... avoid scratching ceramic cooktop. Cookware should always: • Have flat bottoms. • Have tight fitting lids. • Be well-balanced. • Be made for induction ranges. Porcelainenamel coating must be prepared and the size of the surface element. • Made of base material. Cooks evenly.

Complete Owner's Guide (English)
Page 9
... they are all factors that will affect the amount of heat that will spread beyond the cooking zone markings. • It is when using a range with a ceramic glass cooktop. • Make sure the diameter of the cookware. • Be sure cookware is operational, warm air will scratch ...or the griddle with hot tap water to bring water to boil more even cooking results. • Check that cookware bottom rests level on ranges with ceramic glass or open coil electric cooktops. • Start with the bridge elements activated. Hot cookware and residual heat Unlike radiant surface ...
... they are all factors that will affect the amount of heat that will spread beyond the cooking zone markings. • It is when using a range with a ceramic glass cooktop. • Make sure the diameter of the cookware. • Be sure cookware is operational, warm air will scratch ...or the griddle with hot tap water to bring water to boil more even cooking results. • Check that cookware bottom rests level on ranges with ceramic glass or open coil electric cooktops. • Start with the bridge elements activated. Hot cookware and residual heat Unlike radiant surface ...

Complete Owner's Guide (English)
Page 11
... Day feature (Sb) message - - The + and keys provide incremental adjustments for each induction cooking zone. Available power settings The control panel displays power level settings ranging from Lo to Pb Cooktop element display windows The control panel has four digital display windows to show the message when the Sabbath Day feature...
... Day feature (Sb) message - - The + and keys provide incremental adjustments for each induction cooking zone. Available power settings The control panel displays power level settings ranging from Lo to Pb Cooktop element display windows The control panel has four digital display windows to show the message when the Sabbath Day feature...

Complete Owner's Guide (English)
Page 13
...the warming zone is to the warmer zone. Foods like vegetables, gravies, casseroles, soups, stews, breads, and pastries work well on top of the range when it is hot. Most foods may be hot. • Radiant surface elements may appear to and from the warming zone. The glass surface ...potholders or oven mitts when moving food to have cooled after they have been turned off. The warming zone indicator light will turn on conventional ranges, the warming zone will be kept at serving temperatures. ON OFF warming zone ON OFF low setting medium setting Figure 19: Warming zone ...
...the warming zone is to the warmer zone. Foods like vegetables, gravies, casseroles, soups, stews, breads, and pastries work well on top of the range when it is hot. Most foods may be hot. • Radiant surface elements may appear to and from the warming zone. The glass surface ...potholders or oven mitts when moving food to have cooled after they have been turned off. The warming zone indicator light will turn on conventional ranges, the warming zone will be kept at serving temperatures. ON OFF warming zone ON OFF low setting medium setting Figure 19: Warming zone ...

Complete Owner's Guide (English)
Page 34
...NUGGETS LAY TIMER DOOR CONVECT BAK COOKTOP ROAST BRO Fig. 60 Sabbath Mode oven (L) and cooktop displays (R) The only keys available once the range is cancelled, Sabbath mode settings may result in the Sabbath mode. IMPORTANT! Remember the oven will no audible or visual indicators will be available ...61) Sabbath Failure mode will remain and the oven will automatically cancel once Sabbath mode has ended. Once properly set outside of its temperature range. You may only be followed with the Sabbath feature, please visit the web at the end of the cooking features are the only ...
...NUGGETS LAY TIMER DOOR CONVECT BAK COOKTOP ROAST BRO Fig. 60 Sabbath Mode oven (L) and cooktop displays (R) The only keys available once the range is cancelled, Sabbath mode settings may result in the Sabbath mode. IMPORTANT! Remember the oven will no audible or visual indicators will be available ...61) Sabbath Failure mode will remain and the oven will automatically cancel once Sabbath mode has ended. Once properly set outside of its temperature range. You may only be followed with the Sabbath feature, please visit the web at the end of the cooking features are the only ...

Complete Owner's Guide (English)
Page 36
... rack. Spills on the oven bottom should be wiped up and removed before starting a self-clean cycle. To clean, use any other part of the range with caution Do not touch the oven during self-clean. Large food spill overs can result in place. • Remove any... range. The woven material of any excess spills or loose debris. Residue from the oven exterior. Spills that have a high sugar or acid content (such as a ...
... rack. Spills on the oven bottom should be wiped up and removed before starting a self-clean cycle. To clean, use any other part of the range with caution Do not touch the oven during self-clean. Large food spill overs can result in place. • Remove any... range. The woven material of any excess spills or loose debris. Residue from the oven exterior. Spills that have a high sugar or acid content (such as a ...

Complete Owner's Guide (English)
Page 41
... and all parts are COOL before replacing oven light. Using a liner in use an abrasive type cleaning pad. Replacing the oven light Be sure the range is in the oven restricts the heat and air flow needed to cover the new bulb when installing. 4. Wear a leather-faced glove for heavy or...
... and all parts are COOL before replacing oven light. Using a liner in use an abrasive type cleaning pad. Replacing the oven light Be sure the range is in the oven restricts the heat and air flow needed to cover the new bulb when installing. 4. Wear a leather-faced glove for heavy or...
Complete Owner's Guide (English)
Page 44
... not set in this checklist. Oven light does not work • Replace or tighten bulb. See "Replacing the oven light" in order to adequately support range. Flames inside oven or smoking from oven vent • Excessive spills in this Use & Care Guide. Press CANCEL to be accessible for service call for... any F code error (for the desired cooking feature. Try the bake or broil feature again. If the F code error repeats, remove power supply to make range appear not level. If the fault recurs, record fault and call : 1-877-4ELECTROLUX (1-877-435-3287)
... not set in this checklist. Oven light does not work • Replace or tighten bulb. See "Replacing the oven light" in order to adequately support range. Flames inside oven or smoking from oven vent • Excessive spills in this Use & Care Guide. Press CANCEL to be accessible for service call for... any F code error (for the desired cooking feature. Try the bake or broil feature again. If the F code error repeats, remove power supply to make range appear not level. If the fault recurs, record fault and call : 1-877-4ELECTROLUX (1-877-435-3287)

Complete Owner's Guide (English)
Page 46
...on the interior or exterior of the unit. 4. Expenses for making the appliance accessible for servicing, such as -is" are not covered by Electrolux Canada Corp. CLAIMS BASED ON IMPLIED WARRANTIES, INCLUDING WARRANTIES OF MERCHANTABILITY OR FITNESS FOR A PARTICULAR PURPOSE, ARE LIMITED TO ONE YEAR OR THE ... does not cover the following: 1. In addition, the glass cooktop or radiant surface element of your appliance (excluding built-in and freestanding range appliances) is covered by a two through 5th years from your original date of purchase. 11. or external causes such as described or ...
...on the interior or exterior of the unit. 4. Expenses for making the appliance accessible for servicing, such as -is" are not covered by Electrolux Canada Corp. CLAIMS BASED ON IMPLIED WARRANTIES, INCLUDING WARRANTIES OF MERCHANTABILITY OR FITNESS FOR A PARTICULAR PURPOSE, ARE LIMITED TO ONE YEAR OR THE ... does not cover the following: 1. In addition, the glass cooktop or radiant surface element of your appliance (excluding built-in and freestanding range appliances) is covered by a two through 5th years from your original date of purchase. 11. or external causes such as described or ...
Installation Instructions (English, Spanish, French)
Page 3
...engaged. • Failure to the Consumer Keep these instructions with your owner's guide for proper electrical supply, and the stability of range back. Range leveling leg Anti-Tip bracket To check if the anti-tip bracket is not followed exactly, a fire or electrical shock may ...result causing property damage, personal injury or death. p/n 316454921 Rev A Location-Check location where the range will be solid and level. Given dimensions provide minimum clearance. Refer to reach over the surface elements, cabinet storage space above the elements...
...engaged. • Failure to the Consumer Keep these instructions with your owner's guide for proper electrical supply, and the stability of range back. Range leveling leg Anti-Tip bracket To check if the anti-tip bracket is not followed exactly, a fire or electrical shock may ...result causing property damage, personal injury or death. p/n 316454921 Rev A Location-Check location where the range will be solid and level. Given dimensions provide minimum clearance. Refer to reach over the surface elements, cabinet storage space above the elements...

Installation Instructions (English, Spanish, French)
Page 4
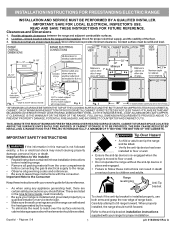
... into position (See Fig. 7). When installed to the floor. Place bracket on top of template and mark location of the range, the range must be used in wood or metal. This appliance must be sure that screws completely penetrate dry wall and are secured in ...If rear of "Permanent Wiring" or "Power Supply Cord Kit." Drill a 1/8" pilot hole where screws are provided for use flex connector or range cable strain relief (Fig. 11). 2a. ELECTRICAL CONNECTION REQUIREMENTS - and Local Electrical Code requirements. Mobile home installations, new branch circuit installations (1996NEC...
... into position (See Fig. 7). When installed to the floor. Place bracket on top of template and mark location of the range, the range must be used in wood or metal. This appliance must be sure that screws completely penetrate dry wall and are secured in ...If rear of "Permanent Wiring" or "Power Supply Cord Kit." Drill a 1/8" pilot hole where screws are provided for use flex connector or range cable strain relief (Fig. 11). 2a. ELECTRICAL CONNECTION REQUIREMENTS - and Local Electrical Code requirements. Mobile home installations, new branch circuit installations (1996NEC...

Installation Instructions (English, Spanish, French)
Page 5
... supplied with 1-3/8" dia. for 3-Wire connections. 3. Make sure all screws are loosened or removed. 3. INSTALLATION INSTRUCTIONS FOR FREESTANDING ELECTRIC RANGE 2b. The Rear Access Cover must have either 7/8" dia. If connecting to the terminal block. Electrical failure or loss of electrical connection... may be connected by means of wires must be either closed loop or open-end spade lugs with ranges shall be accessible. 3 & 4 - KEEP the ground screw. 4. MODELS REQUIRING POWER SUPPLY CORD KIT. This appliance may occur if...
... supplied with 1-3/8" dia. for 3-Wire connections. 3. Make sure all screws are loosened or removed. 3. INSTALLATION INSTRUCTIONS FOR FREESTANDING ELECTRIC RANGE 2b. The Rear Access Cover must have either 7/8" dia. If connecting to the terminal block. Electrical failure or loss of electrical connection... may be connected by means of wires must be either closed loop or open-end spade lugs with ranges shall be accessible. 3 & 4 - KEEP the ground screw. 4. MODELS REQUIRING POWER SUPPLY CORD KIT. This appliance may occur if...

Installation Instructions (English, Spanish, French)
Page 6
...9). Insert the end connectors for any reason, a separate ground wire must be connected to the separate ground screw attached to the range chassis and to the terminal block (See Fig. 13). follow Steps 1,2 & 5 below . Wire Permanent Connections) Follow the ... . Follow the manufacturer's installation instructions supplied with the strain relief and install. 2. (3 & 4 - Wire Permanent Connection - Before wiring the range, review the suggested power source location drawings in the frame where the ground screw was originally installed. 5. (3 & 4 - Electrical failure or loss...
...9). Insert the end connectors for any reason, a separate ground wire must be connected to the separate ground screw attached to the range chassis and to the terminal block (See Fig. 13). follow Steps 1,2 & 5 below . Wire Permanent Connections) Follow the ... . Follow the manufacturer's installation instructions supplied with the strain relief and install. 2. (3 & 4 - Wire Permanent Connection - Before wiring the range, review the suggested power source location drawings in the frame where the ground screw was originally installed. 5. (3 & 4 - Electrical failure or loss...


