
Use and Care Manual
Page 17
... no water if vegetables have just been washed. Remove package from oven and let stand wrapped in a casserole to be added to 10 minutes. 2. Pierce with lid or plastic wrap. water. It will automatically compute the microwave power and cooking time for foods shown in the chart below.... After cooking, let stand, covered, for covering. Ground Meat 0.25 - 2 lb Use this setting to cook ground beef or turkey as patties or in foil for 5 to other ingredients. You don't need to enter the weight...
... no water if vegetables have just been washed. Remove package from oven and let stand wrapped in a casserole to be added to 10 minutes. 2. Pierce with lid or plastic wrap. water. It will automatically compute the microwave power and cooking time for foods shown in the chart below.... After cooking, let stand, covered, for covering. Ground Meat 0.25 - 2 lb Use this setting to cook ground beef or turkey as patties or in foil for 5 to other ingredients. You don't need to enter the weight...

Use and Care Manual
Page 24
Enter weight by touching the number pads 2 and 0. After the 1st stage, open the door. Touch START/add a minute pad. After the 2nd stage, open the door. START/ add a minute After defrost cycle ends, let stand, covered. Check foods when oven signals. Use small smooth strips of aluminum foil to ... less than the amount as 2 or 3 regular size. Use this pad to continue thawing. The oven will appear in the Defrost chart below the weights allowed on the Defrost chart, use time and 30% power. Shield any warm portions. Turn steak over and shield any warm portions. To defrost other ...
Enter weight by touching the number pads 2 and 0. After the 1st stage, open the door. Touch START/add a minute pad. After the 2nd stage, open the door. START/ add a minute After defrost cycle ends, let stand, covered. Check foods when oven signals. Use small smooth strips of aluminum foil to ... less than the amount as 2 or 3 regular size. Use this pad to continue thawing. The oven will appear in the Defrost chart below the weights allowed on the Defrost chart, use time and 30% power. Shield any warm portions. Turn steak over and shield any warm portions. To defrost other ...
Use and Care Manual
Page 32
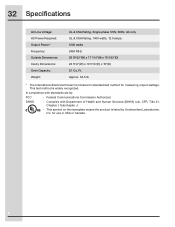
... symbol on the nameplate means the product is widely recognized. 32 Specifications AC Line Voltage: AC Power Required: Output Power:* Frequency: Outside Dimensions: Cavity Dimensions: Oven Capacity: Weight: UL & CSA Rating, Single phase 120V, 60Hz, AC only UL & CSA Rating, 1400 watts, 12.0 amps. 1200 watts 2450 MHz 29 29/32"(W) x 17...
... symbol on the nameplate means the product is widely recognized. 32 Specifications AC Line Voltage: AC Power Required: Output Power:* Frequency: Outside Dimensions: Cavity Dimensions: Oven Capacity: Weight: UL & CSA Rating, Single phase 120V, 60Hz, AC only UL & CSA Rating, 1400 watts, 12.0 amps. 1200 watts 2450 MHz 29 29/32"(W) x 17...

Service Manual
Page 6
... Output 1200 watts (IEC TEST PROCEDURE) Operating frequency of Full Power P-0 No power throughout the cooking time Oven Cavity Light Safety Standard Weight Quick Breakfast, Express Lunch, Dinner Recipes, Popcorn, Reheat, Soften, Melt, Warm, Keep Warm, Cook,...approx. 60% of Full Power P-50 approx. 50% of Full Power P-40 approx. 40% of Full Power P-30 approx. 30% of Full Power P-20 approx. 20% of Full Power P-10 approx. 10% of 2450MHz Case Dimensions Width 29... Control System Clock ( 1:00 - 12:59 ) Timer (0 - 99 min. 99 seconds) Microwave Power for Variable Cooking Repetition Rate;
... Output 1200 watts (IEC TEST PROCEDURE) Operating frequency of Full Power P-0 No power throughout the cooking time Oven Cavity Light Safety Standard Weight Quick Breakfast, Express Lunch, Dinner Recipes, Popcorn, Reheat, Soften, Melt, Warm, Keep Warm, Cook,...approx. 60% of Full Power P-50 approx. 50% of Full Power P-40 approx. 40% of Full Power P-30 approx. 30% of Full Power P-20 approx. 20% of Full Power P-10 approx. 10% of 2450MHz Case Dimensions Width 29... Control System Clock ( 1:00 - 12:59 ) Timer (0 - 99 min. 99 seconds) Microwave Power for Variable Cooking Repetition Rate;

Service Manual
Page 35
...shown UPSIDE in the following figure. 3. Open the base cover. Reinstallation 1. Remove the two (2) screws holding the bottom sash to the oven cavity. the motor mounting angle. STIRRER FAN ASSEMBLY INSTALLATION UPSIDE 1. The upside of the stirrer fan is free. Parts number Stirrer fan Stirrer... with excesive force when installing because the bracket may be larger than normal. CAUTION: * Do not hit the fan blade with a small, light weight, ball peen hammer or rubber mallet. Now, the stirrer motor (left one ) the two (2) screws. 7. Install the stirrer motor (left one...
...shown UPSIDE in the following figure. 3. Open the base cover. Reinstallation 1. Remove the two (2) screws holding the bottom sash to the oven cavity. the motor mounting angle. STIRRER FAN ASSEMBLY INSTALLATION UPSIDE 1. The upside of the stirrer fan is free. Parts number Stirrer fan Stirrer... with excesive force when installing because the bracket may be larger than normal. CAUTION: * Do not hit the fan blade with a small, light weight, ball peen hammer or rubber mallet. Now, the stirrer motor (left one ) the two (2) screws. 7. Install the stirrer motor (left one...