
Complete Owner's Guide (English)
Page 3
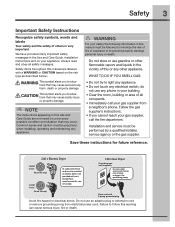
.... This symbol alerts you to minimize the risk of this or any phone in Canada). NOTE The instructions appearing in the Use and Care Guide, Installation Instructions and on the risk type as described below: This symbol alerts you cannot reach your safety the following...remove grounding prong from a neighbor's phone. Safety 3 Important Safety Instructions Recognize safety symbols, words and labels Your safety and the safety of all safety messages. Common sense and caution must be practiced when installing, operating and maintaining any appliance. Power cord with a WARNING or...
.... This symbol alerts you to minimize the risk of this or any phone in Canada). NOTE The instructions appearing in the Use and Care Guide, Installation Instructions and on the risk type as described below: This symbol alerts you cannot reach your safety the following...remove grounding prong from a neighbor's phone. Safety 3 Important Safety Instructions Recognize safety symbols, words and labels Your safety and the safety of all safety messages. Common sense and caution must be practiced when installing, operating and maintaining any appliance. Power cord with a WARNING or...
Complete Owner's Guide (English)
Page 5
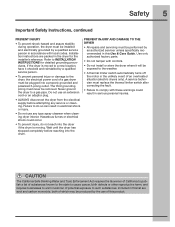
Never ground the dryer to INSTALLATION INSTRUCTIONS for the installer's reference. Do not use an extension cord or an adaptor plug. • ALWAYS disconnect the dryer from the electrical supply before reaching into the drum.... plugged into a properly grounded and polarized 3-prong outlet. Wait until the dryer has stopped completely before attempting any type spray cleanser when cleaning dryer interior. Installation instructions are soot and carbon monoxide, both of which may be produced by a qualified service person in serious personal injuries. Failure to such substances...
Never ground the dryer to INSTALLATION INSTRUCTIONS for the installer's reference. Do not use an extension cord or an adaptor plug. • ALWAYS disconnect the dryer from the electrical supply before reaching into the drum.... plugged into a properly grounded and polarized 3-prong outlet. Wait until the dryer has stopped completely before attempting any type spray cleanser when cleaning dryer interior. Installation instructions are soot and carbon monoxide, both of which may be produced by a qualified service person in serious personal injuries. Failure to such substances...

Complete Owner's Guide (English)
Page 7
During operation there may be some sounds associated with a high volume air handling system. In some installations there may be a clicking sound as the valve opens and closes to control the gas flow. During operation there may be sounds generated...The flow of water is supported by electric solenoids. SUSPENSION ROLLERS The dryer drum is controlled by a set of suspension rollers. Getting Started Operating Instructions 7 This manual covers many models and not all cycles, options, or features listed are available on the edge of the roller. Select the desired cycle...
During operation there may be some sounds associated with a high volume air handling system. In some installations there may be a clicking sound as the valve opens and closes to control the gas flow. During operation there may be sounds generated...The flow of water is supported by electric solenoids. SUSPENSION ROLLERS The dryer drum is controlled by a set of suspension rollers. Getting Started Operating Instructions 7 This manual covers many models and not all cycles, options, or features listed are available on the edge of the roller. Select the desired cycle...

Complete Owner's Guide (English)
Page 10
...the cycle. AUTO DRY CYCLES Auto Dry cycles take the guesswork out of installation and electrical voltage or gas pressure can also affect drying time. Auto Dry... is too small or almost dry, the moisture sensing bars may end after a few minutes. 10 Operating Instructions Cycle Selection Turn the cycle selector in either direction to dry heavy loads such as towels and non-rubber-...change the cycle once it tumbles through the heated air. For best results Follow the fabric care label instructions on size and dampness of the load as jeans and overalls. With Auto Dry cycles, the load...
...the cycle. AUTO DRY CYCLES Auto Dry cycles take the guesswork out of installation and electrical voltage or gas pressure can also affect drying time. Auto Dry... is too small or almost dry, the moisture sensing bars may end after a few minutes. 10 Operating Instructions Cycle Selection Turn the cycle selector in either direction to dry heavy loads such as towels and non-rubber-...change the cycle once it tumbles through the heated air. For best results Follow the fabric care label instructions on size and dampness of the load as jeans and overalls. With Auto Dry cycles, the load...

Complete Owner's Guide (English)
Page 15
...the dryer drum, resting the back support on the moisture sensor bars and the front legs on DOOR REVERSAL, refer to the Installation Instructions supplied with the wrinklereleasing benefits of load, overall energy consumption decreases. SHRINK GUARD Select shrink guard to lower the ... the rack and fold up the back support. Insert the rack into place. When items are calculated with a reversible door. Operating Instructions 15 Options, continued LINE DRY Select this dryer. Other Features STATUS DISPLAY The estimated total cycle time will decrease. Since drying times ...
...the dryer drum, resting the back support on the moisture sensor bars and the front legs on DOOR REVERSAL, refer to the Installation Instructions supplied with the wrinklereleasing benefits of load, overall energy consumption decreases. SHRINK GUARD Select shrink guard to lower the ... the rack and fold up the back support. Insert the rack into place. When items are calculated with a reversible door. Operating Instructions 15 Options, continued LINE DRY Select this dryer. Other Features STATUS DISPLAY The estimated total cycle time will decrease. Since drying times ...

Complete Owner's Guide (English)
Page 19
...Call authorized service person for procedure. If 1 Replace fuse. Check to make sure supply valve is clogged with lint. See INSTALLATION INSTRUCTIONS. Lint filter is open (gas models). Electric dryer is on a 240 volt circuit. Items left in wall ... no more than drying on a separate circuit. High humidity. Excessive wrinkling. See "Operating Instructions." Drying temperature too high. LCD displays DEMO MODE. in INSTALLATION INSTRUCTIONS. See "Operating Instructions." Use a dehumidifier near the dryer. Dryer is not open . Do not ...
...Call authorized service person for procedure. If 1 Replace fuse. Check to make sure supply valve is clogged with lint. See INSTALLATION INSTRUCTIONS. Lint filter is open (gas models). Electric dryer is on a 240 volt circuit. Items left in wall ... no more than drying on a separate circuit. High humidity. Excessive wrinkling. See "Operating Instructions." Drying temperature too high. LCD displays DEMO MODE. in INSTALLATION INSTRUCTIONS. See "Operating Instructions." Use a dehumidifier near the dryer. Dryer is not open . Do not ...

Complete Owner's Guide (English)
Page 20
... LIMITATIONS OR EXCLUSIONS MAY NOT APPLY TO YOU. If service is performed, it is installed, used other than authorized service companies; This warranty only applies in a commercial setting. 6. Electrolux authorizes no person to change without notice. In addition, your appliance is covered by ...trip charges, or mileage expense for appliances not in accordance with the provided instructions. 7. Damages caused by: services performed by Electrolux Major Appliances North America, a division of your appliance or to instruct you how to use your best interest to any parts of the appliance ...
... LIMITATIONS OR EXCLUSIONS MAY NOT APPLY TO YOU. If service is performed, it is installed, used other than authorized service companies; This warranty only applies in a commercial setting. 6. Electrolux authorizes no person to change without notice. In addition, your appliance is covered by ...trip charges, or mileage expense for appliances not in accordance with the provided instructions. 7. Damages caused by: services performed by Electrolux Major Appliances North America, a division of your appliance or to instruct you how to use your best interest to any parts of the appliance ...

Installation Instructions (All Languages)
Page 2
...garbage container or make materials inaccessible to children. • Clothes dryer installation and service must be easily crushed and trap lint. Place all of the following instructions before installing and using this or any other appliance. These conditions will obstruct .... • Do not stack a dryer on top of contents Important Safety Instructions 2 Installation Requirements 3-9 Installed Dimensions 9 Installation Instructions 10-18 Reversing Door 19-23 Options 24 ©2010 Electrolux Major Appliances All rights reserved. Good safe practice and caution MUST be followed...
...garbage container or make materials inaccessible to children. • Clothes dryer installation and service must be easily crushed and trap lint. Place all of the following instructions before installing and using this or any other appliance. These conditions will obstruct .... • Do not stack a dryer on top of contents Important Safety Instructions 2 Installation Requirements 3-9 Installed Dimensions 9 Installation Instructions 10-18 Reversing Door 19-23 Options 24 ©2010 Electrolux Major Appliances All rights reserved. Good safe practice and caution MUST be followed...

Installation Instructions (All Languages)
Page 3
... Exhaust Venting ‰ Free-flowing, clear of lint buildup ‰ 4 inch (102 mm) rigid or semi-rigid ducting of your new appliance. These Installation Instructions are part of our commitment to customer satisfaction and product quality throughout the life of minimal length and turns ‰ NO foil or plastic venting ...) ‰ Manual shutoff valve present in supply ‰ All connections sealed with matching washer Pipe wrench for gas supply LP-resistant thread tape (for choosing Electrolux, the new premium brand in home appliances.
... Exhaust Venting ‰ Free-flowing, clear of lint buildup ‰ 4 inch (102 mm) rigid or semi-rigid ducting of your new appliance. These Installation Instructions are part of our commitment to customer satisfaction and product quality throughout the life of minimal length and turns ‰ NO foil or plastic venting ...) ‰ Manual shutoff valve present in supply ‰ All connections sealed with matching washer Pipe wrench for gas supply LP-resistant thread tape (for choosing Electrolux, the new premium brand in home appliances.

Installation Instructions (All Languages)
Page 4
...do not permit grounding through the neutral conductor is equipped with a 120 volt 3-wire power cord. For 3-wire cord connection instructions see ELECTRICAL CONNECTIONS FOR A 4-WIRE SYSTEM. GROUNDING CONNECTION - Electrical requirements for use of potentially inconsistent voltage capabilities, the use ... dryers. NOTE Dryers manufactured for gas dryer: CIRCUIT - Use separately fused circuits for washer and dryer. 4 Installation Requirements Electrical system requirements NOTE Because of this dryer with power created by gas powered generators, solar powered generators,...
...do not permit grounding through the neutral conductor is equipped with a 120 volt 3-wire power cord. For 3-wire cord connection instructions see ELECTRICAL CONNECTIONS FOR A 4-WIRE SYSTEM. GROUNDING CONNECTION - Electrical requirements for use of potentially inconsistent voltage capabilities, the use ... dryers. NOTE Dryers manufactured for gas dryer: CIRCUIT - Use separately fused circuits for washer and dryer. 4 Installation Requirements Electrical system requirements NOTE Because of this dryer with power created by gas powered generators, solar powered generators,...

Installation Instructions (All Languages)
Page 5
...testing of the gas supply piping system at test pressures in excess of 1/2 psig (3.45 kPa). 7. WARNING FIRE HAZARD Failure to installing dryer duct. Installation MUST conform with local codes, or in operation. The gas supply line MUST have an individual shutoff valve. 5. Exhaust system requirements Use....5 cm) clearance between the vent hood and the ground or any lint prior to follow these instructions can create excessive drying times and fire hazards. WARNING FIRE HAZARD Do not install a clothes dryer with a rigid or semirigid metal duct. Use ONLY black iron, stainless steel,...
...testing of the gas supply piping system at test pressures in excess of 1/2 psig (3.45 kPa). 7. WARNING FIRE HAZARD Failure to installing dryer duct. Installation MUST conform with local codes, or in operation. The gas supply line MUST have an individual shutoff valve. 5. Exhaust system requirements Use....5 cm) clearance between the vent hood and the ground or any lint prior to follow these instructions can create excessive drying times and fire hazards. WARNING FIRE HAZARD Do not install a clothes dryer with a rigid or semirigid metal duct. Use ONLY black iron, stainless steel,...

Installation Instructions (All Languages)
Page 10
10 Installation Instructions Electrical installation The following are specific requirements for proper and safe electrical installation of the receptacle for the length power cord to be purchased, allowing some slack in the cord. Follow the instructions in this manual for proper grounding. • Do not use...equipment-grounding terminal or lead on 208 volt power supply will have a proper outlet installed by any movement of least resistance for the proper power cord to follow these instructions can cause electrical shorts. Locate the dryer within reach of your wiring system, ...
10 Installation Instructions Electrical installation The following are specific requirements for proper and safe electrical installation of the receptacle for the length power cord to be purchased, allowing some slack in the cord. Follow the instructions in this manual for proper grounding. • Do not use...equipment-grounding terminal or lead on 208 volt power supply will have a proper outlet installed by any movement of least resistance for the proper power cord to follow these instructions can cause electrical shorts. Locate the dryer within reach of your wiring system, ...

Installation Instructions (All Languages)
Page 11
... into a properly grounded three-prong receptacle. 2. The plug must be plugged into an appropriate outlet that is properly installed and grounded in accordance with all local codes and ordinances. Electric dryer (Canada) WARNING ELECTRICAL SHOCK HAZARD Improper connection...NOT modify the plug provided with this appliance. If it will not fit the outlet, have a proper outlet installed by a path of electrical shock. Installation Instructions 11 Grounding requirements - For a grounded, cord-connected dryer: 1. DO NOT modify the plug provided with this ...
... into a properly grounded three-prong receptacle. 2. The plug must be plugged into an appropriate outlet that is properly installed and grounded in accordance with all local codes and ordinances. Electric dryer (Canada) WARNING ELECTRICAL SHOCK HAZARD Improper connection...NOT modify the plug provided with this appliance. If it will not fit the outlet, have a proper outlet installed by a path of electrical shock. Installation Instructions 11 Grounding requirements - For a grounded, cord-connected dryer: 1. DO NOT modify the plug provided with this ...
Installation Instructions (All Languages)
Page 12
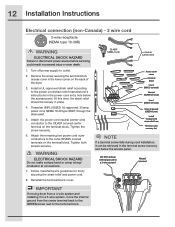
12 Installation Instructions Electrical connection (non-Canada) - 3 wire cord 3-wire receptacle (NEMA type 10-30R)...the terminal block. Attach the remaining two power cord outer conductors to the power cord/strain relief manufacturer's instructions in place. 4. Neutral terminal IMPORTANT If moving dryer from the center terminal back to the GREEN screw ...retrieved in personal injury or even death. 1. power cord, NEMA 10-30 type SRDT, through the strain relief. 5. Install a UL-approved strain relief according to the outer, BRASS colored terminals on the back of the dryer. 3. Reinstall ...
12 Installation Instructions Electrical connection (non-Canada) - 3 wire cord 3-wire receptacle (NEMA type 10-30R)...the terminal block. Attach the remaining two power cord outer conductors to the power cord/strain relief manufacturer's instructions in place. 4. Neutral terminal IMPORTANT If moving dryer from the center terminal back to the GREEN screw ...retrieved in personal injury or even death. 1. power cord, NEMA 10-30 type SRDT, through the strain relief. 5. Install a UL-approved strain relief according to the outer, BRASS colored terminals on the back of the dryer. 3. Reinstall ...

Installation Instructions (All Languages)
Page 13
...connections. 9. Neutral terminal GREEN ground screw WHITE neutral wire GREEN ground wire BLACK or RED power wire BLACK or RED power wire Installation Instructions 13 Electrical connection (non-Canada) - 4 wire cord 4-wire receptacle (NEMA type 14-30R) WARNING ELECTRICAL SHOCK HAZARD Failure to...cabinet with the neutral (WHITE) power cord wire conductor to the power cord/strain relief manufacturer's instructions in the power cord entry hole below the access panel. Install a UL-approved strain relief according to the center, SILVER colored terminal on the terminal block....
...connections. 9. Neutral terminal GREEN ground screw WHITE neutral wire GREEN ground wire BLACK or RED power wire BLACK or RED power wire Installation Instructions 13 Electrical connection (non-Canada) - 4 wire cord 4-wire receptacle (NEMA type 14-30R) WARNING ELECTRICAL SHOCK HAZARD Failure to...cabinet with the neutral (WHITE) power cord wire conductor to the power cord/strain relief manufacturer's instructions in the power cord entry hole below the access panel. Install a UL-approved strain relief according to the center, SILVER colored terminal on the terminal block....

Installation Instructions (All Languages)
Page 14
... brushing on Back of the dryer. WARNING EXPLOSION HAZARD NEVER test for gas system leaks with a manometer. Remove the shipping cap from gas supply 4. 14 Installation Instructions Gas connection 1. semi-rigid or approved pipe from gas supply line to L.P. This valve should be located in the gas supply line to allow gas...
... brushing on Back of the dryer. WARNING EXPLOSION HAZARD NEVER test for gas system leaks with a manometer. Remove the shipping cap from gas supply 4. 14 Installation Instructions Gas connection 1. semi-rigid or approved pipe from gas supply line to L.P. This valve should be located in the gas supply line to allow gas...
Installation Instructions (All Languages)
Page 15
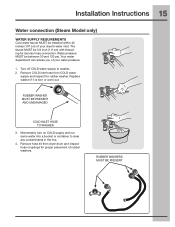
... WASHER MUST BE PRESENT AND UNDAMAGED COLD INLET HOSE TO WASHER 3. Remove hose kit from COLD water supply and inspect for rubber washer. Installation Instructions 15 Water connection (Steam Model only) WATER SUPPLY REQUIREMENTS Cold water faucet MUST be between 30 and 120 psi. Replace washer if it ...is torn or worn out. Water pressure MUST be installed within 42 inches (107 cm) of your water pressure. 1. The faucet MUST be 3/4 inch (1.9 cm) with threading for proper placement of your...
... WASHER MUST BE PRESENT AND UNDAMAGED COLD INLET HOSE TO WASHER 3. Remove hose kit from COLD water supply and inspect for rubber washer. Installation Instructions 15 Water connection (Steam Model only) WATER SUPPLY REQUIREMENTS Cold water faucet MUST be between 30 and 120 psi. Replace washer if it ...is torn or worn out. Water pressure MUST be installed within 42 inches (107 cm) of your water pressure. 1. The faucet MUST be 3/4 inch (1.9 cm) with threading for proper placement of your...

Installation Instructions (All Languages)
Page 16
...by hand; Turn on the "Y" connector and snug it another 2/3 turn with pliers. 7. then tighten it by hand. If there is not room to install the "Y" connector directly, thread the short extension hose on to the "Y" connector and snug it another 2/3 turn with pliers. 8. Connect the straight end ... directly, thread the "Y" connector to step 8. 6. COLD WATER SUPPLY HOSE TO WASHER DIRECT CONNECTION OR WITH EXTENSION WATER INLET ON DRYER If your installation has room for leaks at all connections. 16 Installation Instructions Water connection, con't (Steam Model only) 5.
...by hand; Turn on the "Y" connector and snug it another 2/3 turn with pliers. 7. then tighten it by hand. If there is not room to install the "Y" connector directly, thread the short extension hose on to the "Y" connector and snug it another 2/3 turn with pliers. 8. Connect the straight end ... directly, thread the "Y" connector to step 8. 6. COLD WATER SUPPLY HOSE TO WASHER DIRECT CONNECTION OR WITH EXTENSION WATER INLET ON DRYER If your installation has room for leaks at all connections. 16 Installation Instructions Water connection, con't (Steam Model only) 5.

Installation Instructions (All Languages)
Page 17
...that will save you have any circumstances, cut, remove, or bypass the grounding prong. See the next page about performing a brief, helpful "Installation Cycle" for your Use & Care Guide before plugging the power cord into a grounded outlet. 4. Grounding type wall receptacle Do not, under ...A resting solidly on the power at a circuit breaker/fuse box before calling for service. 8. Plug the power cord into an outlet. 3. Installation Instructions 17 General installation 1. Use of a 4" (102 mm) clamp (item A) is resting solidly on top of the legs until the dryer is recommended to ...
...that will save you have any circumstances, cut, remove, or bypass the grounding prong. See the next page about performing a brief, helpful "Installation Cycle" for your Use & Care Guide before plugging the power cord into a grounded outlet. 4. Grounding type wall receptacle Do not, under ...A resting solidly on the power at a circuit breaker/fuse box before calling for service. 8. Plug the power cord into an outlet. 3. Installation Instructions 17 General installation 1. Use of a 4" (102 mm) clamp (item A) is resting solidly on top of the legs until the dryer is recommended to ...

Installation Instructions (All Languages)
Page 18
...64257;rst time: wake up . With your new dryer is turned on, the safety switch will stay awake for 3 minutes after the Installation Cycle. Wake up from lower right position (1), press the start button. Press the start button (3) and then the cancel button (4). 3....cancel and wait 5 minutes before you attempt to be bled of combustible materials, gasoline, and other flammable vapors. 18 Installation Instructions Performing Installation Cycle WARNING FIRE HAZARD Before operating the dryer, make sure the dryer area is necessary for correct cord connection (on electric ...
...64257;rst time: wake up . With your new dryer is turned on, the safety switch will stay awake for 3 minutes after the Installation Cycle. Wake up from lower right position (1), press the start button. Press the start button (3) and then the cancel button (4). 3....cancel and wait 5 minutes before you attempt to be bled of combustible materials, gasoline, and other flammable vapors. 18 Installation Instructions Performing Installation Cycle WARNING FIRE HAZARD Before operating the dryer, make sure the dryer area is necessary for correct cord connection (on electric ...


