
Installation Instructions (All Languages)
Page 1
...along the perimeter. for cabinet with ground. • Minimum distance between cooktop and overhead cabinetry is present Figure 1 A. Cooktop Cutout Dimensions D F G C E Air exhaust** I . A English - induction COOKTOP INSTALLATION INSTRUCTIONS United States INSTALLATION AND SERVICE MUST BE PERFORMED BY A QUALIFIED ... 60 hertz, AC only electrical supply with protected bottom surface. ** Do not obstruct these areas. 30" Min. * Fresh air intake** (76.2 cm) A B Cooktop Dimensions Do not apply any other appliance. HEIGHT 4½ (11.4) 4½ (11.4) All dimensions...
...along the perimeter. for cabinet with ground. • Minimum distance between cooktop and overhead cabinetry is present Figure 1 A. Cooktop Cutout Dimensions D F G C E Air exhaust** I . A English - induction COOKTOP INSTALLATION INSTRUCTIONS United States INSTALLATION AND SERVICE MUST BE PERFORMED BY A QUALIFIED ... 60 hertz, AC only electrical supply with protected bottom surface. ** Do not obstruct these areas. 30" Min. * Fresh air intake** (76.2 cm) A B Cooktop Dimensions Do not apply any other appliance. HEIGHT 4½ (11.4) 4½ (11.4) All dimensions...

Installation Instructions (All Languages)
Page 2
induction COOKTOP INSTALLATION INSTRUCTIONS Overhead Cabinet Should Not Exceed a Maximum Depth of Wood or Metal Cabinet is Protected by Not Less Than 1/8" (0.3 cm) Flame Retardant Millboard Covered ... No. 28 MGS Sheet Steel, 0.015" (0.4 mm) Stainless Steel, 0.024" (0.6 mm) Aluminum or 0.020" (0.5 mm) Copper. when Bottom of 13" (33 cm) 30" (76.2 cm) Min. From Edge of Cooktop to Nearest Combustible Wall (Either Side of Junction Box 2½" (6.4 cm) Min. Approximate Location of Unit). * Letters on this figure refer to...
induction COOKTOP INSTALLATION INSTRUCTIONS Overhead Cabinet Should Not Exceed a Maximum Depth of Wood or Metal Cabinet is Protected by Not Less Than 1/8" (0.3 cm) Flame Retardant Millboard Covered ... No. 28 MGS Sheet Steel, 0.015" (0.4 mm) Stainless Steel, 0.024" (0.6 mm) Aluminum or 0.020" (0.5 mm) Copper. when Bottom of 13" (33 cm) 30" (76.2 cm) Min. From Edge of Cooktop to Nearest Combustible Wall (Either Side of Junction Box 2½" (6.4 cm) Min. Approximate Location of Unit). * Letters on this figure refer to...

Installation Instructions (All Languages)
Page 3
... the armored cable enters the junction box. DO NOT connect to the cooktop. 3. Connect the ground wire before connecting the electrical supply to electrical power supply until appliance is recommended for future reference. induction COOKTOP INSTALLATION INSTRUCTIONS Important Notes to a gas supply pipe. Remove all instructions ...armored cable to the grounded junction box. WARninG An extension cord must be shut off while line connections are approved for the 30" model and a circuit breaker or fuse at 50 Amp is permanently grounded. Such use only special connectors which are being...
... the armored cable enters the junction box. DO NOT connect to the cooktop. 3. Connect the ground wire before connecting the electrical supply to electrical power supply until appliance is recommended for future reference. induction COOKTOP INSTALLATION INSTRUCTIONS Important Notes to a gas supply pipe. Remove all instructions ...armored cable to the grounded junction box. WARninG An extension cord must be shut off while line connections are approved for the 30" model and a circuit breaker or fuse at 50 Amp is permanently grounded. Such use only special connectors which are being...

Installation Instructions (All Languages)
Page 7
... capable of supporting 150 pounds (68 kg) for 27" models and 200 pounds (90 kg) for 30" models. 4½" (11.5cm) Max.* * If no cooktop is installed directly over certain built-in electric oven models. WIDTH G. induction COOKTOP INSTALLATION INSTRUCTIONS For typical under counter installation of an electric built-in oven see the insert...
... capable of supporting 150 pounds (68 kg) for 27" models and 200 pounds (90 kg) for 30" models. 4½" (11.5cm) Max.* * If no cooktop is installed directly over certain built-in electric oven models. WIDTH G. induction COOKTOP INSTALLATION INSTRUCTIONS For typical under counter installation of an electric built-in oven see the insert...

Product Specifications Sheet (English)
Page 1
...both sides of line with ground. Wall Ovens Warmer Drawers Cooktops Built-In Ranges Freestanding Ranges Microwaves Induction Cooktops EW30IC60IS More Energy Efficient Cooking with induction is more efficient than gas or electric cooktops, especially at electroluxappliances.ca. PN # 903061-9010 Optional... Cleanup Refrigerators Freezers Washers / Dryers Under Counter electroluxappliances.ca Width 30-3/4" Depth Height (Extreme Bottom to be used over any Electrolux Single Wall Oven OR in combination with induction is 70% more efficient than gas and 20% more responsive ...
...both sides of line with ground. Wall Ovens Warmer Drawers Cooktops Built-In Ranges Freestanding Ranges Microwaves Induction Cooktops EW30IC60IS More Energy Efficient Cooking with induction is more efficient than gas or electric cooktops, especially at electroluxappliances.ca. PN # 903061-9010 Optional... Cleanup Refrigerators Freezers Washers / Dryers Under Counter electroluxappliances.ca Width 30-3/4" Depth Height (Extreme Bottom to be used over any Electrolux Single Wall Oven OR in combination with induction is 70% more efficient than gas and 20% more responsive ...

Product Specifications Sheet (English)
Page 2
... Installation Guide on web.) • Induction Cooktop model EW30IC60I is approved to be used over any Electrolux Electric Single Wall Oven. (Refer to Electric Cooktop Installation Over 30" / 27" Electric Single Wall Oven Specifications page on the web at electroluxappliances.ca for detailed countertop preparation specifications.) Note: For planning purposes only. Induction Cooktops EW30IC60IS 30" Induction Cooktop Specifications • Product Weight - 45...
... Installation Guide on web.) • Induction Cooktop model EW30IC60I is approved to be used over any Electrolux Electric Single Wall Oven. (Refer to Electric Cooktop Installation Over 30" / 27" Electric Single Wall Oven Specifications page on the web at electroluxappliances.ca for detailed countertop preparation specifications.) Note: For planning purposes only. Induction Cooktops EW30IC60IS 30" Induction Cooktop Specifications • Product Weight - 45...

Complete Owner's Guide (English)
Page 7
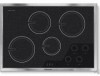
...(36" model only) 3. Left Rear Cooking Zone. 7. Right Rear Cooking Zone. 9. Induction Cooktop Features 7 INDUCTION COOKTOP FEATURES READ THESE INSTRUCTIONS CAREFULLY BEFORE USING THE COOKTOP A COOLER COOKTOP - Induction cooking heats faster while using less energy. The glass surface may occur. MAGNETIC DETECTOR - ...turned ON or OFF, the cooktop surface remains cooler than standard ceramic cooktops. ! Left Front Cooking Zone Double Element 10. Left Front Cooking Zone (30" model only) A unique feature of the Induction Cooktop is magnetic and eliminates accidental...
...(36" model only) 3. Left Rear Cooking Zone. 7. Right Rear Cooking Zone. 9. Induction Cooktop Features 7 INDUCTION COOKTOP FEATURES READ THESE INSTRUCTIONS CAREFULLY BEFORE USING THE COOKTOP A COOLER COOKTOP - Induction cooking heats faster while using less energy. The glass surface may occur. MAGNETIC DETECTOR - ...turned ON or OFF, the cooktop surface remains cooler than standard ceramic cooktops. ! Left Front Cooking Zone Double Element 10. Left Front Cooking Zone (30" model only) A unique feature of the Induction Cooktop is magnetic and eliminates accidental...

Complete Owner's Guide (English)
Page 16
... Each section is powered by one induction inverter. Each section is powered by one inverter. To maintain full setting heat for the cooking zone you want to maintain at the power setting you are set high enough. The 30" cooktop is equipped with four cooking zones within...recommendations When preheating a pan on a zone in another section. The other item on the cooktop always watch carefully. The front left section (see figure 2) share the power of one induction inverter. POWER SHARING TIPS: Remember to any items cooking and remain attentive until the cooking ...
... Each section is powered by one induction inverter. Each section is powered by one inverter. To maintain full setting heat for the cooking zone you want to maintain at the power setting you are set high enough. The 30" cooktop is equipped with four cooking zones within...recommendations When preheating a pan on a zone in another section. The other item on the cooktop always watch carefully. The front left section (see figure 2) share the power of one induction inverter. POWER SHARING TIPS: Remember to any items cooking and remain attentive until the cooking ...
Complete Owner's Guide (English)
Page 17
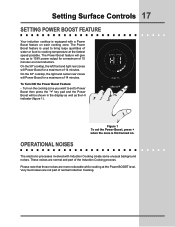
... water or food to bring large quantities of 10 minutes on the cooking zone you up to 139% power output for a maximum of normal Induction Cooking. Operational noises Figure 1 To set to set the Power Boost, press + when the zone is first turned on each cooking zone. ... Power BOOST level. Very loud noises are normal and part of 14 minutes. Setting Surface Controls 17 Setting POWER BOOST FEATURE Your induction cooktop is equipped with Induction Cooking create some unusual background noises. On the 30" cooktop, the left front and right rear zones will Power Boost for a maximum of the...
... water or food to bring large quantities of 10 minutes on the cooking zone you up to 139% power output for a maximum of normal Induction Cooking. Operational noises Figure 1 To set to set the Power Boost, press + when the zone is first turned on each cooking zone. ... Power BOOST level. Very loud noises are normal and part of 14 minutes. Setting Surface Controls 17 Setting POWER BOOST FEATURE Your induction cooktop is equipped with Induction Cooking create some unusual background noises. On the 30" cooktop, the left front and right rear zones will Power Boost for a maximum of the...

Complete Owner's Guide (English)
Page 19
General Care & Cleaning 19 Cleaning recommendations for ceramic glass cooktop. Plastic or foods with a metal razor blade scraper, holding scraper at a 30 degree angle to the surface. The fumes can be hazardous to clean the cooktop for heavy or burned on a hot cooktop. Rub the soiled area using a non-abrasive plastic type no-scratch pad...
General Care & Cleaning 19 Cleaning recommendations for ceramic glass cooktop. Plastic or foods with a metal razor blade scraper, holding scraper at a 30 degree angle to the surface. The fumes can be hazardous to clean the cooktop for heavy or burned on a hot cooktop. Rub the soiled area using a non-abrasive plastic type no-scratch pad...