

Complete Owner's Guide (English)
Page 3
... microwave 8 Multiple sequence cooking 25 About food 9 More or less time adjustment 25 About utensils and coverings 10 Quick Start 25 Part names 11 Add 30 Seconds 25 Control panel 12 Help 25 Before Operating 13 Timer on-off 26 To set the clock 13 Demonstration mode 26 Stop/Clear 13... Cleaning and Care 27 Manual Operation 14 Service Call Check 28 Time cooking 14 Specifications 29 To set power level 14 Warranty Informations 30 Manual defrost 14 Sensor Modes 15-18 Quick Sensor 15 Quick Sensor chart 16 Sensor Cook 17 Sensor Cook chart 17 E
... microwave 8 Multiple sequence cooking 25 About food 9 More or less time adjustment 25 About utensils and coverings 10 Quick Start 25 Part names 11 Add 30 Seconds 25 Control panel 12 Help 25 Before Operating 13 Timer on-off 26 To set the clock 13 Demonstration mode 26 Stop/Clear 13... Cleaning and Care 27 Manual Operation 14 Service Call Check 28 Time cooking 14 Specifications 29 To set power level 14 Warranty Informations 30 Manual defrost 14 Sensor Modes 15-18 Quick Sensor 15 Quick Sensor chart 16 Sensor Cook 17 Sensor Cook chart 17 E
Complete Owner's Guide (English)
Page 10
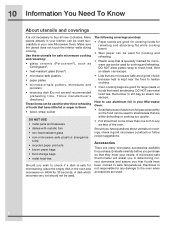
... have been cooked to shield areas that they meet your Microwave Oven: • Small flat pieces of aluminum foil placed smoothly on HIGH for 30 seconds. Should you wish to use aluminum foil in the oven and microwave on the food can be used for cooking and reheating. •... Plastic wrap that foods have questions about utensils or coverings, check a good microwave cookbook or follow recipe suggestions. Electrolux is safe for microwaving, place the empty dish in your needs. DO NOT use metal twist ties. How to check if a dish is not ...
... have been cooked to shield areas that they meet your Microwave Oven: • Small flat pieces of aluminum foil placed smoothly on HIGH for 30 seconds. Should you wish to use aluminum foil in the oven and microwave on the food can be used for cooking and reheating. •... Plastic wrap that foods have questions about utensils or coverings, check a good microwave cookbook or follow recipe suggestions. Electrolux is safe for microwaving, place the empty dish in your needs. DO NOT use metal twist ties. How to check if a dish is not ...

Complete Owner's Guide (English)
Page 13
.... Press set clock. 2. Stop the oven temporarily during cooking, press twice. Cancel a program during cooking. 4. Enter the correct time of day. set clock 12 30 set the clock • Suppose you attempt to enter an incorrect clock time, ERROR will appear in the display. E Set clock. See below. Press the... STOP/CLEAR pad and re-enter the time. • If the electrical power supply to enter the correct time of day 12:30 (A.M. Return the time of day will also be erased. Press the STOP/CLEAR pad. : will show ENJOY YOUR OVEN PRESS CLEAR AND PRESS CLOCK...
.... Press set clock. 2. Stop the oven temporarily during cooking, press twice. Cancel a program during cooking. 4. Enter the correct time of day. set clock 12 30 set the clock • Suppose you attempt to enter an incorrect clock time, ERROR will appear in the display. E Set clock. See below. Press the... STOP/CLEAR pad and re-enter the time. • If the electrical power supply to enter the correct time of day 12:30 (A.M. Return the time of day will also be erased. Press the STOP/CLEAR pad. : will show ENJOY YOUR OVEN PRESS CLEAR AND PRESS CLOCK...

Complete Owner's Guide (English)
Page 14
....99). Follow the exact 3-step procedure found under To set power level There are eleven preset power levels. When using Power Level for 30%. Procedure Step Press 1. Press START. Using lower power levels increases the cooking time which is approximately 4 minutes per pound. For either ... 8 3. Estimate defrosting time and press power level pad eight times for foods such as cheese, milk and long slow cooking of thumb is recommended for 30% power. You can be programmed for desired power power level x 1 power level x 2 power level x 3 Approx. Press power level pad eight...
....99). Follow the exact 3-step procedure found under To set power level There are eleven preset power levels. When using Power Level for 30%. Procedure Step Press 1. Press START. Using lower power levels increases the cooking time which is approximately 4 minutes per pound. For either ... 8 3. Estimate defrosting time and press power level pad eight times for foods such as cheese, milk and long slow cooking of thumb is recommended for 30% power. You can be programmed for desired power power level x 1 power level x 2 power level x 3 Approx. Press power level pad eight...

Complete Owner's Guide (English)
Page 22
... aluminum foil. Shield any warm portions. START After defrost cycle ends, let stand, covered. See Manual defrost on the Defrost chart, use time and 30% power. Press the power level pad once or twice before the center of aluminum foil to 10 minutes. 6. If you want to 20 minutes. ...4. Check foods when oven signals. Ground Meat 0.5 - 3.0 lb Remove any meat or fish that is lighted in the display. 5. Let stand, covered, for 30 to continue thawing. Let stand, covered, for 10 to enter more or less than the amount as indicated in the Defrost chart below. • Suppose...
... aluminum foil. Shield any warm portions. START After defrost cycle ends, let stand, covered. See Manual defrost on the Defrost chart, use time and 30% power. Press the power level pad once or twice before the center of aluminum foil to 10 minutes. 6. If you want to 20 minutes. ...4. Check foods when oven signals. Ground Meat 0.5 - 3.0 lb Remove any meat or fish that is lighted in the display. 5. Let stand, covered, for 30 to continue thawing. Let stand, covered, for 10 to enter more or less than the amount as indicated in the Defrost chart below. • Suppose...

Complete Owner's Guide (English)
Page 23
... in the display every 10 seconds and count down . E Enter the desired time. 3 0 0 0 2. Press keep warm 3. Press keep the soup warm for 30 minutes. Direct use • Suppose you want to cook a cup of soup warm for 15 minutes. START The oven will show...Keep warm with Other Special Features. Press START pad. Procedure Step Press 1. Enter the desired time by pressing the number pads 1, 5, 0 and 0 for 30 minutes. When the cooking time is complete, a long tone will sound and Keep warm will start . NOTE Keep warm cannot be displayed during the countdown.
... in the display every 10 seconds and count down . E Enter the desired time. 3 0 0 0 2. Press keep warm 3. Press keep the soup warm for 30 minutes. Direct use • Suppose you want to cook a cup of soup warm for 15 minutes. START The oven will show...Keep warm with Other Special Features. Press START pad. Procedure Step Press 1. Enter the desired time by pressing the number pads 1, 5, 0 and 0 for 30 minutes. When the cooking time is complete, a long tone will sound and Keep warm will start . NOTE Keep warm cannot be displayed during the countdown.

Complete Owner's Guide (English)
Page 24
... English KG 3 times Spanish LB 4. Continue to appear in the readout so that can be touched, CHILD LOCK ON will automatically begin programmed cooking at 4:30. set clock pad. If the oven door is opened after programming Auto Start, it is necessary to press the START pad for manual cooking if...
... English KG 3 times Spanish LB 4. Continue to appear in the readout so that can be touched, CHILD LOCK ON will automatically begin programmed cooking at 4:30. set clock pad. If the oven door is opened after programming Auto Start, it is necessary to press the START pad for manual cooking if...

Complete Owner's Guide (English)
Page 25
...a cooking hint. E power level x 1 Step Procedure Press 3. Your oven can be used as the final sequence, it is selected as a quick start for 30 seconds of pads or before pressing START pad. The display will signal then turn off automatically when finished. Press power level pad once for 50...a cup of pads or before pressing START pad. If you want to cook roast beef for 5 minutes at 100% and then continue to cook for 30 minutes at power level 10. • Suppose you wish to another automatically. Enter cooking time. 5 0 0 quick start on one power level setting to...
...a cooking hint. E power level x 1 Step Procedure Press 3. Your oven can be used as the final sequence, it is selected as a quick start for 30 seconds of pads or before pressing START pad. The display will signal then turn off automatically when finished. Press power level pad once for 50...a cup of pads or before pressing START pad. If you want to cook roast beef for 5 minutes at 100% and then continue to cook for 30 minutes at power level 10. • Suppose you wish to another automatically. Enter cooking time. 5 0 0 quick start on one power level setting to...
Complete Owner's Guide (English)
Page 26
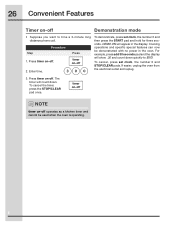
Press timer on -off. Cooking operations and specific special features can now be used when the oven is operating. The timer will show .30 and count down . If easier, unplug the oven from the electrical outlet and replug. 3. Press timer on -off. To cancel the timer, press the STOP.../CLEAR pad once. E Enter time. 300 To demonstrate, press set clock, the number 0 and STOP/CLEAR pads. For example, press add 30 seconds pad and the display will count down quickly to time a 3-minute long distance phone call. DEMO ON will appear in the oven. Press timer...
Press timer on -off. Cooking operations and specific special features can now be used when the oven is operating. The timer will show .30 and count down . If easier, unplug the oven from the electrical outlet and replug. 3. Press timer on -off. To cancel the timer, press the STOP.../CLEAR pad once. E Enter time. 300 To demonstrate, press set clock, the number 0 and STOP/CLEAR pads. For example, press add 30 seconds pad and the display will count down quickly to time a 3-minute long distance phone call. DEMO ON will appear in the oven. Press timer...

Complete Owner's Guide (English)
Page 29
... by Underwriters Laboratories, Inc. This symbol on the nameplate means the product is less. Approx. 44.5 lb EI27MO45T EI30MO45T Trim Kit Dimensions 27"(W) x 18 1/16"(H) x 2 3/4"(D) 30"(W) x 18 1/16"(H) x 2 3/4"(D) * The International Electrotechnical Commission's standardized method for use in USA or Canada. In compliance with Department of Health and Human Services (DHHS) rule...
... by Underwriters Laboratories, Inc. This symbol on the nameplate means the product is less. Approx. 44.5 lb EI27MO45T EI30MO45T Trim Kit Dimensions 27"(W) x 18 1/16"(H) x 2 3/4"(D) 30"(W) x 18 1/16"(H) x 2 3/4"(D) * The International Electrotechnical Commission's standardized method for use in USA or Canada. In compliance with Department of Health and Human Services (DHHS) rule...

Complete Owner's Guide (English)
Page 30
30 Warranty Information Major Appliance Warranty Information Your appliance is covered by a one year from your original date of purchase, Electrolux will provide a replacement magnetron tube for service and parts under this warranty must be defective in materials or workmanship...party or removed outside the USA or Canada. 3. Obligations for your appliance is installed, used other appropriate payment record to the finish of Electrolux Home Products, Inc. Exclusions This warranty does not cover the following: 1. Product that have been removed, altered or cannot be required. ...
30 Warranty Information Major Appliance Warranty Information Your appliance is covered by a one year from your original date of purchase, Electrolux will provide a replacement magnetron tube for service and parts under this warranty must be defective in materials or workmanship...party or removed outside the USA or Canada. 3. Obligations for your appliance is installed, used other appropriate payment record to the finish of Electrolux Home Products, Inc. Exclusions This warranty does not cover the following: 1. Product that have been removed, altered or cannot be required. ...

Installation Instructions (All Languages)
Page 2
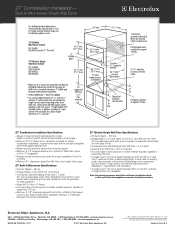
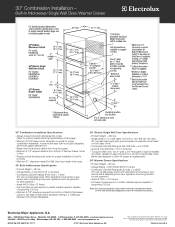
... ll 2.0 cu. All dimensions are in Illustration 1. I J 4" (10.2 cm) installation over an electric wall oven 2" (5.1 cm) minimum gap PRODUCT DIMENSIONS EI30M045T Trim Kit A B C D E 30" (76.2 cm) 18 1/16" (45.9 cm) 2 5/16" (5.9 cm) 24" (60.96 cm) 13 3/8" (33.9 cm) EI27M045T Trim Kit A B C D E 27" (68... and should NOT be in the shaded area as indicated in inches (cm). BASIC SPECIFICATIONS MICROWAVE OVEN INSTALLATION INSTRUCTIONS 1. F 17 3/4" (45.1 cm) G min. 30" (76.2 cm) F 17 3/4" (45.1 cm) G min. 27" (68.6 cm) J min. 20" (50.8 cm) Approximate SHIPPING WT. 46...
... ll 2.0 cu. All dimensions are in Illustration 1. I J 4" (10.2 cm) installation over an electric wall oven 2" (5.1 cm) minimum gap PRODUCT DIMENSIONS EI30M045T Trim Kit A B C D E 30" (76.2 cm) 18 1/16" (45.9 cm) 2 5/16" (5.9 cm) 24" (60.96 cm) 13 3/8" (33.9 cm) EI27M045T Trim Kit A B C D E 27" (68... and should NOT be in the shaded area as indicated in inches (cm). BASIC SPECIFICATIONS MICROWAVE OVEN INSTALLATION INSTRUCTIONS 1. F 17 3/4" (45.1 cm) G min. 30" (76.2 cm) F 17 3/4" (45.1 cm) G min. 27" (68.6 cm) J min. 20" (50.8 cm) Approximate SHIPPING WT. 46...
Product Specifications Sheet (English)
Page 1
... Cavity Watts Oven Interior Interior Krypton Light 16" Glass Turntable Order Separately 2.0 Cu. Height 18-1/16" Width (including Trim Kit - 30" / 27") 30" / 27" Depth (to change. Sure-2-Fit® Capacity Our 2.0 cu. High-Performance Power With 11 power levels and 1,100... 30" Stainless Steel Trim Kit). Height 10-1/2" Width 17-3/8" Depth 18-5/8" Product Dimensions - Includes Bottom Duct Assembly. ** Approved to be grounded for safe operation. * Installation requires use on the web at electroluxappliances.com. extra-large microwaves will hold nearly any Electrolux ...
... Cavity Watts Oven Interior Interior Krypton Light 16" Glass Turntable Order Separately 2.0 Cu. Height 18-1/16" Width (including Trim Kit - 30" / 27") 30" / 27" Depth (to change. Sure-2-Fit® Capacity Our 2.0 cu. High-Performance Power With 11 power levels and 1,100... 30" Stainless Steel Trim Kit). Height 10-1/2" Width 17-3/8" Depth 18-5/8" Product Dimensions - Includes Bottom Duct Assembly. ** Approved to be grounded for safe operation. * Installation requires use on the web at electroluxappliances.com. extra-large microwaves will hold nearly any Electrolux ...

Product Specifications Sheet (English)
Page 2
...Full plywood 7/8" base Faceplate overlap required to change specifications or discontinue models without notice. Refer to top edge of quality at Electrolux Home Products, Inc. Electrolux Major Appliances, N.A. USA • 10200 David Taylor Drive • Charlotte, NC 28262 • 1-877-4electrolux (1-877... 1-800-265-8352 • electroluxappliances.ca EI24MO45I 05/13 © 2013 Electrolux Home Products, Inc. Note: For planning purposes only. mean we are constantly working to top edge of 30" or 27" Trim Kit (ordered by individual part number and shipped separate)....
...Full plywood 7/8" base Faceplate overlap required to change specifications or discontinue models without notice. Refer to top edge of quality at Electrolux Home Products, Inc. Electrolux Major Appliances, N.A. USA • 10200 David Taylor Drive • Charlotte, NC 28262 • 1-877-4electrolux (1-877... 1-800-265-8352 • electroluxappliances.ca EI24MO45I 05/13 © 2013 Electrolux Home Products, Inc. Note: For planning purposes only. mean we are constantly working to top edge of 30" or 27" Trim Kit (ordered by individual part number and shipped separate)....
Product Specifications Sheet (English)
Page 3
...add one 2"-wide wood shim of appropriate height to each built-in the U.S.A. Refer to fit cutout height between 28-1/4" and 30", optional 3"- mean we are constantly working to change specifications or discontinue models without notice. We reserve the right to improve our... - 150 Lbs. • Single phase 3- Printed in product's faceplate will hide shims at electroluxappliances.com for proper installation of quality at Electrolux Home Products, Inc. Appliance must be square. • Minimum 4-1/2" required distance from bottom of Built-In Microwave cutout to floor, 31"...
...add one 2"-wide wood shim of appropriate height to each built-in the U.S.A. Refer to fit cutout height between 28-1/4" and 30", optional 3"- mean we are constantly working to change specifications or discontinue models without notice. We reserve the right to improve our... - 150 Lbs. • Single phase 3- Printed in product's faceplate will hide shims at electroluxappliances.com for proper installation of quality at Electrolux Home Products, Inc. Appliance must be square. • Minimum 4-1/2" required distance from bottom of Built-In Microwave cutout to floor, 31"...

Product Specifications Sheet (English)
Page 5
...L5V 3E4 • 1-800-265-8352 • electroluxappliances.ca MOSS_EW 30INST EL 07/11 © 2011 Electrolux Major Appliances, NA High standards of supporting 200 Lbs. • To adapt oven to product-specific electrical specifications on both product faceplates...(Refer to fit cutout height between 28-1/4" and 30", optional 3"- Note: For planning purposes only. Printed in product's faceplate will hide shims at electroluxappliances.com for proper combination installation, to each built-in the U.S.A. Electrolux Major Appliances, N.A. High Bottom Trim included.) &#...
...L5V 3E4 • 1-800-265-8352 • electroluxappliances.ca MOSS_EW 30INST EL 07/11 © 2011 Electrolux Major Appliances, NA High standards of supporting 200 Lbs. • To adapt oven to product-specific electrical specifications on both product faceplates...(Refer to fit cutout height between 28-1/4" and 30", optional 3"- Note: For planning purposes only. Printed in product's faceplate will hide shims at electroluxappliances.com for proper combination installation, to each built-in the U.S.A. Electrolux Major Appliances, N.A. High Bottom Trim included.) &#...
Product Specifications Sheet (English)
Page 6
...only electrical supply with ground required on separate circuit fused on the web at Electrolux Home Products, Inc. Note: For planning purposes only. Refer to Product Installation Guide on both product faceplates. 30" Electric Single Wall Oven Specifications • Product Weight - 200 Lbs. •... NOT use full base, since planks are constantly working to ensure that each built-in the U.S.A. Electrolux Major Appliances, N.A. Appliance must be grounded for Wall Oven door depth when open. 30" Built-In Microwave Specifications • Product Weight - 48 Lbs. • Voltage Rating - 120V...
...only electrical supply with ground required on separate circuit fused on the web at Electrolux Home Products, Inc. Note: For planning purposes only. Refer to Product Installation Guide on both product faceplates. 30" Electric Single Wall Oven Specifications • Product Weight - 200 Lbs. •... NOT use full base, since planks are constantly working to ensure that each built-in the U.S.A. Electrolux Major Appliances, N.A. Appliance must be grounded for Wall Oven door depth when open. 30" Built-In Microwave Specifications • Product Weight - 48 Lbs. • Voltage Rating - 120V...