

Complete Owner's Guide (English)
Page 3
...-19 to Excessive Microwave Energy 2 Reheat Pasta / Reheat Breads 20 Table of Contents 3 Quick Settings 21 Important Safety Instructions 4 Quick settings chart 21 Unpacking and Installation Instruction.......... 5 Other Special Features 22-23 Grounding Instructions 6 Defrost 22 Information You Need to Know 7-10 Defrost chart 22 About your oven 7 Keep warm 23...
...-19 to Excessive Microwave Energy 2 Reheat Pasta / Reheat Breads 20 Table of Contents 3 Quick Settings 21 Important Safety Instructions 4 Quick settings chart 21 Unpacking and Installation Instruction.......... 5 Other Special Features 22-23 Grounding Instructions 6 Defrost 22 Information You Need to Know 7-10 Defrost chart 22 About your oven 7 Keep warm 23...

Complete Owner's Guide (English)
Page 4
...including the following: To reduce the risk of injury to properly grounded outlet. SAVE THESE INSTRUCTIONS E Connect only to persons: a. Install or locate this appliance only in this appliance. This appliance should be boiling. d. Do not use . 7. See door surface cleaning... cooking. c. Use a wide-mouthed container. Do not operate this appliance outdoors. c. b. If the oven light fails, consult a Electrolux Authorized Servicer. To reduce the risk of table or counter. 15. See "Grounding Instructions" on the appliance. 11. Do not use...
...including the following: To reduce the risk of injury to properly grounded outlet. SAVE THESE INSTRUCTIONS E Connect only to persons: a. Install or locate this appliance only in this appliance. This appliance should be boiling. d. Do not use . 7. See door surface cleaning... cooking. c. Use a wide-mouthed container. Do not operate this appliance outdoors. c. b. If the oven light fails, consult a Electrolux Authorized Servicer. To reduce the risk of table or counter. 15. See "Grounding Instructions" on the appliance. 11. Do not use...

Complete Owner's Guide (English)
Page 5
... kit models EI27MO45T or EI30MO45T for any damage, do not operate the oven and contact your dealer or ELECTROLUX AUTHORIZED SERVICER. Remove all packing materials from the outside of the door. Unpacking and Installation Instruction 5 Unpacking and Examining Your Oven 1. DO NOT REMOVE THE WAVEGUIDE COVER, which is one, from inside the...
... kit models EI27MO45T or EI30MO45T for any damage, do not operate the oven and contact your dealer or ELECTROLUX AUTHORIZED SERVICER. Remove all packing materials from the outside of the door. Unpacking and Installation Instruction 5 Unpacking and Examining Your Oven 1. DO NOT REMOVE THE WAVEGUIDE COVER, which is one, from inside the...
Complete Owner's Guide (English)
Page 6
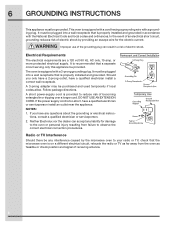
...resulting from the oven as feasible or check position and signal of becoming entangled in or tripping over a longer cord. Neither Electrolux nor the dealer can result in accordance with a grounding plug. E The oven is provided to observe the correct electrical connection... procedures. This oven is too short, have a qualified electrician install a correct wall receptacle. Electrical Requirements The electrical requirements are a 120 volt 60 Hz, AC only, 15 amp. or more protected electrical...
...resulting from the oven as feasible or check position and signal of becoming entangled in or tripping over a longer cord. Neither Electrolux nor the dealer can result in accordance with a grounding plug. E The oven is provided to observe the correct electrical connection... procedures. This oven is too short, have a qualified electrician install a correct wall receptacle. Electrical Requirements The electrical requirements are a 120 volt 60 Hz, AC only, 15 amp. or more protected electrical...

Complete Owner's Guide (English)
Page 30
... or defects in materials or workmanship, or for servicing, such as -is warranted by Electrolux Major Appliances North America, a division of Electrolux Home Products, Inc. your appliance is installed, used other cosmetic parts. 11. DISCLAIMER OF IMPLIED WARRANTIES; LIMITATION OF REMEDIES CUSTOMER'S ...Canada. Rust on the interior or exterior of God. USA 1-877-435-3287 Electrolux Major Appliances North America P.O. use your appliance or to instruct you how to correct the installation of your appliance. 9. Service calls to use of purchase. 12. SOME STATES ...
... or defects in materials or workmanship, or for servicing, such as -is warranted by Electrolux Major Appliances North America, a division of Electrolux Home Products, Inc. your appliance is installed, used other cosmetic parts. 11. DISCLAIMER OF IMPLIED WARRANTIES; LIMITATION OF REMEDIES CUSTOMER'S ...Canada. Rust on the interior or exterior of God. USA 1-877-435-3287 Electrolux Major Appliances North America P.O. use your appliance or to instruct you how to correct the installation of your appliance. 9. Service calls to use of purchase. 12. SOME STATES ...

Installation Instructions (All Languages)
Page 1
...the product. This may void the warranty. • Please observe all local and national codes and ordinances. • The installer should leave these instructions completely and carefully. • Be sure to DISCONNECT THE PLUG of the microwave oven from the electrical outlet before... installing the built-in handling and installation to avoid the possibility of injury. • Do not remove permanently affixed labels, warnings, or plates from the oven ...
...the product. This may void the warranty. • Please observe all local and national codes and ordinances. • The installer should leave these instructions completely and carefully. • Be sure to DISCONNECT THE PLUG of the microwave oven from the electrical outlet before... installing the built-in handling and installation to avoid the possibility of injury. • Do not remove permanently affixed labels, warnings, or plates from the oven ...

Installation Instructions (All Languages)
Page 2
...opening in the wall or cabinet as indicated on Illustration 1. All dimensions are in Illustration 1. BASIC SPECIFICATIONS MICROWAVE OVEN INSTALLATION INSTRUCTIONS 1. NOTE: While the proper functioning of the microwave oven does not require that the local code be a minimum ... REQUIREMENTS Width 17 3/8" (44.1 cm) Height 10 1/2" (26.6 cm) Depth 18 5/8" (47.3 cm) O ver a ll 2.0 cu. H max. I J 4" (10.2 cm) installation over an electric wall oven 2" (5.1 cm) minimum gap PRODUCT DIMENSIONS EI30M045T Trim Kit A B C D E 30" (76.2 cm) 18 1/16" (45.9 cm) 2 5/16" (5.9 cm...
...opening in the wall or cabinet as indicated on Illustration 1. All dimensions are in Illustration 1. BASIC SPECIFICATIONS MICROWAVE OVEN INSTALLATION INSTRUCTIONS 1. NOTE: While the proper functioning of the microwave oven does not require that the local code be a minimum ... REQUIREMENTS Width 17 3/8" (44.1 cm) Height 10 1/2" (26.6 cm) Depth 18 5/8" (47.3 cm) O ver a ll 2.0 cu. H max. I J 4" (10.2 cm) installation over an electric wall oven 2" (5.1 cm) minimum gap PRODUCT DIMENSIONS EI30M045T Trim Kit A B C D E 30" (76.2 cm) 18 1/16" (45.9 cm) 2 5/16" (5.9 cm...
Installation Instructions (All Languages)
Page 3
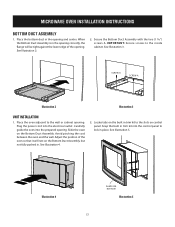
... guide the oven into the electrical outlet. See Illustration 2. 2. Locate tabs on control panel. MICROWAVE OVEN INSTALLAITlluIsOtrNatioInN1STRUCTIONS BOTTOM DUCT ASSEMBLY 1. SCREW A SCREW A Illustration 2 Illustration 3 Unit INSTALLATION 1. Slide the oven on bottom Illustration 5 E3 Secure the Bottom Duct Assembly with the two (1 3/16") screws A.
... guide the oven into the electrical outlet. See Illustration 2. 2. Locate tabs on control panel. MICROWAVE OVEN INSTALLAITlluIsOtrNatioInN1STRUCTIONS BOTTOM DUCT ASSEMBLY 1. SCREW A SCREW A Illustration 2 Illustration 3 Unit INSTALLATION 1. Slide the oven on bottom Illustration 5 E3 Secure the Bottom Duct Assembly with the two (1 3/16") screws A.
Installation Instructions (All Languages)
Page 4
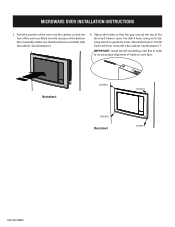
Illustration 6 SCREW B SCREW B Illustration 7 SCREW B SCREW B TINS-B003MRR1 MICROWAVE OVEN INSTALLATION INSTRUCTIONS 3. See Illustration 6. 4. Pre-drill 4 holes using an ¹⁄₈" bit, using the kit to the cabinet. See Illustration 7. Make sure that the feet ... flush with four screws B to guide the holes. Attach the built-in order to secure proper alignment of the door and frame is even. Important: Install top left mounting screw first in trim kit frame with the cabinet. Adjust the frame so that the gap around the top of frame to...
Illustration 6 SCREW B SCREW B Illustration 7 SCREW B SCREW B TINS-B003MRR1 MICROWAVE OVEN INSTALLATION INSTRUCTIONS 3. See Illustration 6. 4. Pre-drill 4 holes using an ¹⁄₈" bit, using the kit to the cabinet. See Illustration 7. Make sure that the feet ... flush with four screws B to guide the holes. Attach the built-in order to secure proper alignment of the door and frame is even. Important: Install top left mounting screw first in trim kit frame with the cabinet. Adjust the frame so that the gap around the top of frame to...
Product Specifications Sheet (English)
Page 1
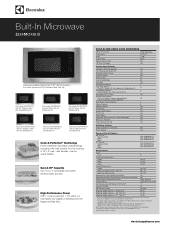
...B Oven Cavity Dimensions - Includes Bottom Duct Assembly. ** Approved to be used above any dish. can be grounded for Electric Single Oven Combination Installation** Yes Power Supply Connection Location Right Top Rear Voltage Rating Connected Load (kW Rating) @ 120 Volts ‡ 120V / 60 Hz / 15... B with 27" Stainless Steel Trim Kit EI27MO45T S Microwave EI24MO45I B with 27" White Trim Kit EI27MO45T W Microwave EI24MO45I B with any Electrolux Electric Single Wall Oven and/or Warmer Drawer. (Not approved to be used in 3 colors (shown with Blue LED Yes Electronic Clock &...
...B Oven Cavity Dimensions - Includes Bottom Duct Assembly. ** Approved to be used above any dish. can be grounded for Electric Single Oven Combination Installation** Yes Power Supply Connection Location Right Top Rear Voltage Rating Connected Load (kW Rating) @ 120 Volts ‡ 120V / 60 Hz / 15... B with 27" Stainless Steel Trim Kit EI27MO45T S Microwave EI24MO45I B with 27" White Trim Kit EI27MO45T W Microwave EI24MO45I B with any Electrolux Electric Single Wall Oven and/or Warmer Drawer. (Not approved to be used in 3 colors (shown with Blue LED Yes Electronic Clock &...

Product Specifications Sheet (English)
Page 2
...and shipped separate). Appliance must be level and front of cabinet square for 90° door swing. • Installation requires use on web.) • When used in combination with another Electrolux built-in product, a minimum clearance of 2 7/8" required from bottom of Built-In Microwave cutout to top ...be built in alone or is greater than 21" 25 1/4" min. 25 3/8" max. 20" min. 30" min. Refer to Product Installation Guide on the web at Electrolux Home Products, Inc. Allow at least 21" clearance for door depth when open 120V / 60Hz grounded outlet Bottom Duct Assembly 16 1/4" ...
...and shipped separate). Appliance must be level and front of cabinet square for 90° door swing. • Installation requires use on web.) • When used in combination with another Electrolux built-in product, a minimum clearance of 2 7/8" required from bottom of Built-In Microwave cutout to top ...be built in alone or is greater than 21" 25 1/4" min. 25 3/8" max. 20" min. 30" min. Refer to Product Installation Guide on the web at Electrolux Home Products, Inc. Allow at least 21" clearance for door depth when open 120V / 60Hz grounded outlet Bottom Duct Assembly 16 1/4" ...
Product Specifications Sheet (English)
Page 3
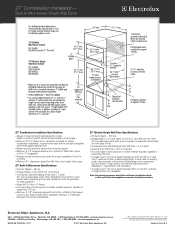
... side of Wall Oven cutout to change specifications or discontinue models without notice. Built-In Microwave/Single Wall Oven 27" Combination Installation Specifications • Always consult local and national electric codes. (Refer to product-specific electrical specifications on this page.) •...2-wire service with ground required on separate circuit fused on the web at Electrolux Home Products, Inc. We reserve the right to floor, 31" suggested. • Respect critical dimensions as noted for proper installation of built-In products. • Minimum 21" clearance needed for safe ...
... side of Wall Oven cutout to change specifications or discontinue models without notice. Built-In Microwave/Single Wall Oven 27" Combination Installation Specifications • Always consult local and national electric codes. (Refer to product-specific electrical specifications on this page.) •...2-wire service with ground required on separate circuit fused on the web at Electrolux Home Products, Inc. We reserve the right to floor, 31" suggested. • Respect critical dimensions as noted for proper installation of built-In products. • Minimum 21" clearance needed for safe ...

Product Specifications Sheet (English)
Page 4
... = 0.45 kW (For use on adequately wired 120V, dedicated circuit having 2-wire service with a separate ground wire. Appliance must be grounded for proper installation of Wall Oven's faceplate, leaving a 2" visible gap between both sides of line. • Connected Load (kW Rating) @ 240 / 208 Volts ...; electroluxappliances.ca MOSS_EW_WD 27INST EL 07/11 © 2011 Electrolux Major Appliances, NA High standards of supporting 150 Lbs. Built-In Microwave/Single Wall Oven/Warmer Drawer 27" Combination Installation Specifications • Always consult local and national electric codes. ...
... = 0.45 kW (For use on adequately wired 120V, dedicated circuit having 2-wire service with a separate ground wire. Appliance must be grounded for proper installation of Wall Oven's faceplate, leaving a 2" visible gap between both sides of line. • Connected Load (kW Rating) @ 240 / 208 Volts ...; electroluxappliances.ca MOSS_EW_WD 27INST EL 07/11 © 2011 Electrolux Major Appliances, NA High standards of supporting 150 Lbs. Built-In Microwave/Single Wall Oven/Warmer Drawer 27" Combination Installation Specifications • Always consult local and national electric codes. ...

Product Specifications Sheet (English)
Page 5
...8352 • electroluxappliances.ca MOSS_EW 30INST EL 07/11 © 2011 Electrolux Major Appliances, NA High standards of built-In products. • Minimum 21" clearance needed for proper combination installation, to each built-in the U.S.A. We reserve the right to improve our...Single phase 3- Lifting oven will hide larger cutout opening under oven side rails. Built-In Microwave/Single Wall Oven 30" Combination Installation Specifications • Always consult local and national electric codes. (Refer to product-specific electrical specifications on this page.) • Minimum...
...8352 • electroluxappliances.ca MOSS_EW 30INST EL 07/11 © 2011 Electrolux Major Appliances, NA High standards of built-In products. • Minimum 21" clearance needed for proper combination installation, to each built-in the U.S.A. We reserve the right to improve our...Single phase 3- Lifting oven will hide larger cutout opening under oven side rails. Built-In Microwave/Single Wall Oven 30" Combination Installation Specifications • Always consult local and national electric codes. (Refer to product-specific electrical specifications on this page.) • Minimum...
Product Specifications Sheet (English)
Page 6
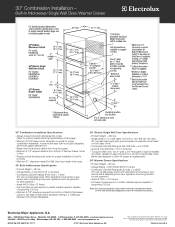
Electrolux Major Appliances, N.A. Note: For planning purposes only. 30" Combination Installation - Built-In Microwave/Single Wall Oven/Warmer Drawer 30" Combination Installation Specifications • Always consult local and national electric codes. (Refer to product-specific electrical ... separate ground wire. Refer to ensure that each built-in the U.S.A. mean we are necessary to allow for proper combination installation, to Product Installation Guide on both product faceplates. 30" Electric Single Wall Oven Specifications • Product Weight - 200 Lbs. •...
Electrolux Major Appliances, N.A. Note: For planning purposes only. 30" Combination Installation - Built-In Microwave/Single Wall Oven/Warmer Drawer 30" Combination Installation Specifications • Always consult local and national electric codes. (Refer to product-specific electrical ... separate ground wire. Refer to ensure that each built-in the U.S.A. mean we are necessary to allow for proper combination installation, to Product Installation Guide on both product faceplates. 30" Electric Single Wall Oven Specifications • Product Weight - 200 Lbs. •...
