

Complete Owner's Guide (English)
Page 1
B (0802) Use & Care Guide Radiant/Induction Electric Cooktop 318 203 603 Rev.
B (0802) Use & Care Guide Radiant/Induction Electric Cooktop 318 203 603 Rev.

Complete Owner's Guide (English)
Page 3
... Touch Control 18 Operating the Single Surface Radiant Element .... 18 Operating the Dual Surface Radiant Element ....... 19 Operating the Induction Cooking Zones .......... 20-21 Induction Cooking Preheat Recommendations ..... 21 Keep Warm Feature 22 Minute Timer 22 Locking the Controls 22 Sabbath Feature Mode 23 Power ...Cooktop Does Not Operate 28 Cooktop Turns Off While Cooking 28 Surface Element Does Not Heat 28 Cooking Zone Does Not Heat Food (Induction Elements 29 Surface Element Too Hot or Not Hot Enough ....... 29 Food Not Heating Evenly 29 Poor Cooking Results 29 Cooktop Zone...
... Touch Control 18 Operating the Single Surface Radiant Element .... 18 Operating the Dual Surface Radiant Element ....... 19 Operating the Induction Cooking Zones .......... 20-21 Induction Cooking Preheat Recommendations ..... 21 Keep Warm Feature 22 Minute Timer 22 Locking the Controls 22 Sabbath Feature Mode 23 Power ...Cooktop Does Not Operate 28 Cooktop Turns Off While Cooking 28 Surface Element Does Not Heat 28 Cooking Zone Does Not Heat Food (Induction Elements 29 Surface Element Too Hot or Not Hot Enough ....... 29 Food Not Heating Evenly 29 Poor Cooking Results 29 Cooktop Zone...
Complete Owner's Guide (English)
Page 4
... to comply with the National Electrical Code No. 70 - CAUTION Persons with a pacemaker or similar medical device should exercise caution using or standing near an induction unit while it is properly installed and grounded by one or more of the FCC rules. Be sure your appliance is in operation, as the...
... to comply with the National Electrical Code No. 70 - CAUTION Persons with a pacemaker or similar medical device should exercise caution using or standing near an induction unit while it is properly installed and grounded by one or more of the FCC rules. Be sure your appliance is in operation, as the...
Complete Owner's Guide (English)
Page 8
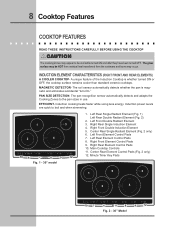
... ON OFF hi + 9 timer 12 PAN SIZE DETECTION- lo hi + 8 - Center Rear Element Control Pads (Fig. 2 only) 12. INDUCTION ELEMENT CHARACTERISTICS (RIGHT FRONT AND REAR ELEMENTS) A COOLER COOKTOP- The pan recognition sensor automatically detects and adapts the Cooking Zones to be HOT from ...OFF hi + 6 - lo hi + 9 Fig. 1 - 30" model timer 12 1. Left Rear Element Control Pads 8. Right Front Element Control Pads 9. Induction power levels are quick to boil and when simmering. 1 2 3 4 POWER lock warm 10 - Left Front Double Radiant Element 3. lo ON OFF hi +...
... ON OFF hi + 9 timer 12 PAN SIZE DETECTION- lo hi + 8 - Center Rear Element Control Pads (Fig. 2 only) 12. INDUCTION ELEMENT CHARACTERISTICS (RIGHT FRONT AND REAR ELEMENTS) A COOLER COOKTOP- The pan recognition sensor automatically detects and adapts the Cooking Zones to be HOT from ...OFF hi + 6 - lo hi + 9 Fig. 1 - 30" model timer 12 1. Left Rear Element Control Pads 8. Right Front Element Control Pads 9. Induction power levels are quick to boil and when simmering. 1 2 3 4 POWER lock warm 10 - Left Front Double Radiant Element 3. lo ON OFF hi +...
Complete Owner's Guide (English)
Page 10
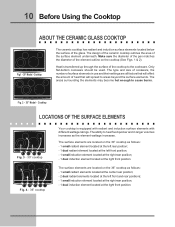
... elements located at the center rear position; - 2 dual radiant elements located at the left front position; - 1 small induction element located at the right rear position; - 1 dual induction element located at the right front position. lo hi + - lo ON OFF hi + - The design of the ceramic... surface of the cooktop to areas beyond the surface elements. lo ON OFF hi + - Cooktop The ceramic cooktop has radiant and induction surface elements located below the surface of the surface element underneath. The surface elements are located on the 30" cooktop as follows:...
... elements located at the center rear position; - 2 dual radiant elements located at the left front position; - 1 small induction element located at the right rear position; - 1 dual induction element located at the right front position. lo hi + - lo ON OFF hi + - The design of the ceramic... surface of the cooktop to areas beyond the surface elements. lo ON OFF hi + - Cooktop The ceramic cooktop has radiant and induction surface elements located below the surface of the surface element underneath. The surface elements are located on the 30" cooktop as follows:...
Complete Owner's Guide (English)
Page 11
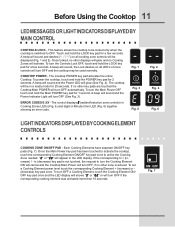
... the Cooktop Main POWER will be used normally. A beep will sound and the Power LED will appear in the LED display. The control displays E (radiant/Induction zone controls) in Cooking Zones LEDs (Fig. 5) and digits in a ready mode for 2 seconds. Once the Main Power key pad has been touched to activate...
... the Cooktop Main POWER will be used normally. A beep will sound and the Power LED will appear in the LED display. The control displays E (radiant/Induction zone controls) in Cooking Zones LEDs (Fig. 5) and digits in a ready mode for 2 seconds. Once the Main Power key pad has been touched to activate...

Complete Owner's Guide (English)
Page 13
... display windows (See Fig. 7). KEEP WARM (L) - PAN DETECTION - Maintain a slow boil; LED MESSAGES DISPLAYED BY INDUCTION COOKING ZONE CONTROLS POWER LEVEL SETTINGS - Once active, the Induction Cooking Zones will appear in the LED display for the affected Cooking Zone. The glass surface may be HOT from residual heat ...is still too HOT, H (See Fig. 4) will provide a Pan Detection message. Use the WARM key pad to a boil and pan broiling. All induction Cooking Zones will appear in the affected Cooking Zone LED display. Fig. 1 Fig. 3 Fig. 5 Fig. 2 Fig. 4 Fig. 6 Fig. 7
... display windows (See Fig. 7). KEEP WARM (L) - PAN DETECTION - Maintain a slow boil; LED MESSAGES DISPLAYED BY INDUCTION COOKING ZONE CONTROLS POWER LEVEL SETTINGS - Once active, the Induction Cooking Zones will appear in the LED display for the affected Cooking Zone. The glass surface may be HOT from residual heat ...is still too HOT, H (See Fig. 4) will provide a Pan Detection message. Use the WARM key pad to a boil and pan broiling. All induction Cooking Zones will appear in the affected Cooking Zone LED display. Fig. 1 Fig. 3 Fig. 5 Fig. 2 Fig. 4 Fig. 6 Fig. 7
Complete Owner's Guide (English)
Page 14
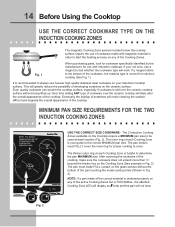
...use a magnet to test whether the cookware type will make cleaning the surface difficult and degrade the overall appearance of the cooktop. The 2 Induction Cooking Zones available on the Cooktop require a MINIMUM pan size to be used at each Cooking Zone is helpful to determine the pan MAXIMUM...hi + - The inner ring of each location (Fig. 2). The thicker outer ring at each Cooking Zone is your Induction Cooktop surface. The pan must FULLY cover the inner ring for Induction cooking (See Fig. 1). This will likely alter the overall appearance of the cooktop. lo hi + timer USE THE...
...use a magnet to test whether the cookware type will make cleaning the surface difficult and degrade the overall appearance of the cooktop. The 2 Induction Cooking Zones available on the Cooktop require a MINIMUM pan size to be used at each Cooking Zone is helpful to determine the pan MAXIMUM...hi + - The inner ring of each location (Fig. 2). The thicker outer ring at each Cooking Zone is your Induction Cooktop surface. The pan must FULLY cover the inner ring for Induction cooking (See Fig. 1). This will likely alter the overall appearance of the cooktop. lo hi + timer USE THE...

Complete Owner's Guide (English)
Page 15
lo hi + - Fig. 1 PLEASE NOTE THAT ON THE INDUCTION COOKING ZONES - ANY one or two of the incorrect conditions listed above in the affected Cooking Zone display. size • Pan does not meet any ...
lo hi + - Fig. 1 PLEASE NOTE THAT ON THE INDUCTION COOKING ZONES - ANY one or two of the incorrect conditions listed above in the affected Cooking Zone display. size • Pan does not meet any ...

Complete Owner's Guide (English)
Page 16
... the ceramic surface. The special cooktop cleaning cream leaves a protective finish on the glass to : • Use cookware made with the correct material type for Induction Cooking (See Fig. 1, page 14). • Use quality cookware with heavier bottoms for better heat distribution allowing for using your warranty). • Do not ...to help prevent scratches and abrasions. Buff with hands. 16 Before Using the Cooktop USE QUALITY COOKWARE IN GOOD CONDITION The cookware used with the Induction Cooktop should match the amount of food being prepared. • Do not let pans boil dry.
... the ceramic surface. The special cooktop cleaning cream leaves a protective finish on the glass to : • Use cookware made with the correct material type for Induction Cooking (See Fig. 1, page 14). • Use quality cookware with heavier bottoms for better heat distribution allowing for using your warranty). • Do not ...to help prevent scratches and abrasions. Buff with hands. 16 Before Using the Cooktop USE QUALITY COOKWARE IN GOOD CONDITION The cookware used with the Induction Cooktop should match the amount of food being prepared. • Do not let pans boil dry.

Complete Owner's Guide (English)
Page 20
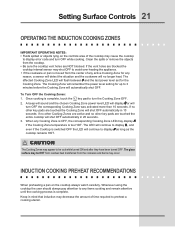
... will clear. 4. Any problems must be corrected before proceeding. 2. Keep warm, melting and simmering. lo hi + Fig. 1 The cooktop has two induction Cooking Zones designed for the Cooking Zone by touching either the or key pad. NOTE: If no power level for the Cooking Zone desired and...sure to center the cookware on Cooking Zone completely covering the minimum ring marked on the Zone surface. 20 Setting Surface Controls OPERATING THE INDUCTION COOKING ZONES - For more Cooking Zones lightly touch the key pad for a few seconds or until the power level is touched within...
... will clear. 4. Any problems must be corrected before proceeding. 2. Keep warm, melting and simmering. lo hi + Fig. 1 The cooktop has two induction Cooking Zones designed for the Cooking Zone by touching either the or key pad. NOTE: If no power level for the Cooking Zone desired and...sure to center the cookware on Cooking Zone completely covering the minimum ring marked on the Zone surface. 20 Setting Surface Controls OPERATING THE INDUCTION COOKING ZONES - For more Cooking Zones lightly touch the key pad for a few seconds or until the power level is touched within...
Complete Owner's Guide (English)
Page 21
...longer heat. ON OFF 2. The glass surface may occur. If the vent holes are NOT blocked. Setting Surface Controls 21 OPERATING THE INDUCTION COOKING ZONES IMPORTANT OPERATING NOTES: • Fluids spilled or objects lying on the cooktop always watch carefully. The Cooking Zone will no other... key pads are touched the entire cooktop will turn OFF while cooking. Keep in 10 seconds. Once cooking is complete. INDUCTION COOKING PREHEAT RECOMMENDATIONS When preheating a pan on the controls area of time required to turn the Cooking Zone OFF. Clean the spills ...
...longer heat. ON OFF 2. The glass surface may occur. If the vent holes are NOT blocked. Setting Surface Controls 21 OPERATING THE INDUCTION COOKING ZONES IMPORTANT OPERATING NOTES: • Fluids spilled or objects lying on the cooktop always watch carefully. The Cooking Zone will no other... key pads are touched the entire cooktop will turn OFF while cooking. Keep in 10 seconds. Once cooking is complete. INDUCTION COOKING PREHEAT RECOMMENDATIONS When preheating a pan on the controls area of time required to turn the Cooking Zone OFF. Clean the spills ...
Complete Owner's Guide (English)
Page 22
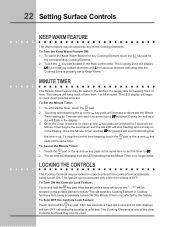
... the same time. timer 2. After few seconds a beep will sound and all LED displays lock will display LH (Low Heat) for radiant elements and L for induction element indicating that the Cooking Zone is no timer and key pads are pressed for any of time from 1 to prevent the cooktop from the...
... the same time. timer 2. After few seconds a beep will sound and all LED displays lock will display LH (Low Heat) for radiant elements and L for induction element indicating that the Cooking Zone is no timer and key pads are pressed for any of time from 1 to prevent the cooktop from the...

Complete Owner's Guide (English)
Page 23
...Note: The WARM feature doesn't work during Sabbath mode. To deactivate the Sabbath Feature Mode: Touch and hold for operating a Radiant Element. On induction element control displays will be showed on the radiant elements control displays and on the Minute Timer Control display (Fig. 1). After few seconds, "...Sb" will be showed on the radiant element control displays and on induction element control displays. When the Sabbath mode is locked during sabbath mode when the power comes up "SF" will showed on the radiant ...
...Note: The WARM feature doesn't work during Sabbath mode. To deactivate the Sabbath Feature Mode: Touch and hold for operating a Radiant Element. On induction element control displays will be showed on the radiant elements control displays and on the Minute Timer Control display (Fig. 1). After few seconds, "...Sb" will be showed on the radiant element control displays and on induction element control displays. When the Sabbath mode is locked during sabbath mode when the power comes up "SF" will showed on the radiant ...

Complete Owner's Guide (English)
Page 24
...level for the food item you wish to maintain last (See Fig. 1). - For example, if pans are powered by an independent induction inverters. These noises are more noticeable while cooking at the Power BOOST level. POWER SHARING TIPS: Remember to set will be maintained,...hi + timer Fig. 1 OPERATIONAL NOISES The electronic processes involved with two induction elements within one inverter. Very loud noises are not part of the Induction Cooking process. 24 Setting Surface Controls POWER SHARING (INDUCTION COOKING ZONES ONLY) Your cooktop is called Power Sharing. Two Cooking Zones ...
...level for the food item you wish to maintain last (See Fig. 1). - For example, if pans are powered by an independent induction inverters. These noises are more noticeable while cooking at the Power BOOST level. POWER SHARING TIPS: Remember to set will be maintained,...hi + timer Fig. 1 OPERATIONAL NOISES The electronic processes involved with two induction elements within one inverter. Very loud noises are not part of the Induction Cooking process. 24 Setting Surface Controls POWER SHARING (INDUCTION COOKING ZONES ONLY) Your cooktop is called Power Sharing. Two Cooking Zones ...

Complete Owner's Guide (English)
Page 29
... Cooking Zone. • Cookware resting on cooktop trim or does not rest completely on the Cooking Zone or cookware material type incorrect for Induction Cooking. • Cookware bottom not large enough for the Cooking Zone being used . Use only flat, evenly balanced, medium or heavyweight cookware... SURFACE ELEMENT TOO HOT OR NOT HOT ENOUGH • Incorrect control setting. Solutions to Common Problems 29 COOKING ZONE DOES NOT HEAT FOOD (INDUCTION ELEMENTS) • No cookware was placed on cooktop surface. • No power to the appliance. POOR COOKING RESULTS • Many factors ...
... Cooking Zone. • Cookware resting on cooktop trim or does not rest completely on the Cooking Zone or cookware material type incorrect for Induction Cooking. • Cookware bottom not large enough for the Cooking Zone being used . Use only flat, evenly balanced, medium or heavyweight cookware... SURFACE ELEMENT TOO HOT OR NOT HOT ENOUGH • Incorrect control setting. Solutions to Common Problems 29 COOKING ZONE DOES NOT HEAT FOOD (INDUCTION ELEMENTS) • No cookware was placed on cooktop surface. • No power to the appliance. POOR COOKING RESULTS • Many factors ...
Complete Owner's Guide (English)
Page 30
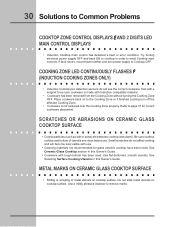
...cookware. Use a mildly abrasive cleanser to Common Problems COOKTOP ZONE CONTROL DISPLAYS E AND 2 DIGITS LED MAIN CONTROL DISPLAYS • Induction Cooktop main control has detected a fault or error condition. SCRATCHES OR ABRASIONS ON CERAMIC GLASS COOKTOP SURFACE • Coarse particles ...clean before use . • Cleaning materials not recommended for correct cookware placement. COOKING ZONE LED CONTINUOUSLY FLASHES F (INDUCTION COOKING ZONES ONLY) • Induction Cooktop pan detection sensors do not affect cooking and will become less visible with rough bottom has been used . ...
...cookware. Use a mildly abrasive cleanser to Common Problems COOKTOP ZONE CONTROL DISPLAYS E AND 2 DIGITS LED MAIN CONTROL DISPLAYS • Induction Cooktop main control has detected a fault or error condition. SCRATCHES OR ABRASIONS ON CERAMIC GLASS COOKTOP SURFACE • Coarse particles ...clean before use . • Cleaning materials not recommended for correct cookware placement. COOKING ZONE LED CONTINUOUSLY FLASHES F (INDUCTION COOKING ZONES ONLY) • Induction Cooktop pan detection sensors do not affect cooking and will become less visible with rough bottom has been used . ...

Product Specifications Sheet (English)
Page 1
...rapid heat for Single Oven Combination Installation* Yes Product Weight 62 Lbs. Shipping Weight 70 Lbs. Cookware Compatibility Electrolux induction hybrid cooktops include a combination of line with ground. electroluxappliances.com Under Counter Single phase 4-wire cable, 120... or national electric codes. Wall Ovens Warmer Drawers Cooktops Built-In Ranges Induction Hybrid Cooktops EW36CC55G S, EW36CC55G W, EW36CC55G B 10" and 6" Induction Elements Boil water in 90 seconds with the 10" induction element, which offers 3,200 watts of Arc) 21-1/2" 21-3/4" Power ...
...rapid heat for Single Oven Combination Installation* Yes Product Weight 62 Lbs. Shipping Weight 70 Lbs. Cookware Compatibility Electrolux induction hybrid cooktops include a combination of line with ground. electroluxappliances.com Under Counter Single phase 4-wire cable, 120... or national electric codes. Wall Ovens Warmer Drawers Cooktops Built-In Ranges Induction Hybrid Cooktops EW36CC55G S, EW36CC55G W, EW36CC55G B 10" and 6" Induction Elements Boil water in 90 seconds with the 10" induction element, which offers 3,200 watts of Arc) 21-1/2" 21-3/4" Power ...

Product Specifications Sheet (English)
Page 2
...electric codes. • Allow 2" space below armoured cable opening to route armoured cable Approximate location of cabinets. • Induction Hybrid Drop-In Cooktop model EW36CC55G is approved to front edge of unit) 20 3/8" min. 25" min. 20 1/2" max. 24" 2 1/2" min....-8352 • electroluxappliances.ca EW36CC55G 01/08 © 2008 Electrolux Major Appliances, NA High standards of arc - 213/4" 6" min. 12" 7 1/2" min. Printed in the U.S.A. to improve our products. Note: For planning purposes only. Induction Hybrid Cooktops EW36CC55G S, EW36CC55G W, EW36CC55G B 13" max. for...
...electric codes. • Allow 2" space below armoured cable opening to route armoured cable Approximate location of cabinets. • Induction Hybrid Drop-In Cooktop model EW36CC55G is approved to front edge of unit) 20 3/8" min. 25" min. 20 1/2" max. 24" 2 1/2" min....-8352 • electroluxappliances.ca EW36CC55G 01/08 © 2008 Electrolux Major Appliances, NA High standards of arc - 213/4" 6" min. 12" 7 1/2" min. Printed in the U.S.A. to improve our products. Note: For planning purposes only. Induction Hybrid Cooktops EW36CC55G S, EW36CC55G W, EW36CC55G B 13" max. for...


