
Complete Owner's Guide (English)
Page 2
... and cleaning 17 Filters 17 Lights 17 Optional Charcoal Filters 18 Hood Surface 18 Warranty Information 19 ©2007 Electrolux Home Products, Inc. Questions? All rights reserved. and Canada: 1-877-4ELECTROLUX (1-877-435-3287) For online...http://www.electroluxusa.com Table of contents Important Safety Instructions 3-4 Electrical & Installation requirements 5 Electrical requirements 5 IMPORTANT 5 Before installing the hood 5 List of Materials 6 Parts Included with Electrolux enhances our ability to serve you for location) NOTE Registering your product ...
... and cleaning 17 Filters 17 Lights 17 Optional Charcoal Filters 18 Hood Surface 18 Warranty Information 19 ©2007 Electrolux Home Products, Inc. Questions? All rights reserved. and Canada: 1-877-4ELECTROLUX (1-877-435-3287) For online...http://www.electroluxusa.com Table of contents Important Safety Instructions 3-4 Electrical & Installation requirements 5 Electrical requirements 5 IMPORTANT 5 Before installing the hood 5 List of Materials 6 Parts Included with Electrolux enhances our ability to serve you for location) NOTE Registering your product ...

Complete Owner's Guide (English)
Page 3
Save these Instructions for the Local Electrical Inspector's use only Do not attempt to install or operate your appliance until you to situations that may cause serious body harm, death or property damage. This symbol alerts you to ... OWNER: Please retain these Instructions with this manual are labeled with a WARNING or CAUTION based on the risk type. INSTALLER: Please leave these instructions for residential appliances For residential use . INSTALLATION MUST COMPLY WITH ALL LOCAL CODES. Safety Warning: Turn off power circuit at service panel and lock out panel, before...
Save these Instructions for the Local Electrical Inspector's use only Do not attempt to install or operate your appliance until you to situations that may cause serious body harm, death or property damage. This symbol alerts you to ... OWNER: Please retain these Instructions with this manual are labeled with a WARNING or CAUTION based on the risk type. INSTALLER: Please leave these instructions for residential appliances For residential use . INSTALLATION MUST COMPLY WITH ALL LOCAL CODES. Safety Warning: Turn off power circuit at service panel and lock out panel, before...

Complete Owner's Guide (English)
Page 4
...EVENT OF A RANGE TOP GREASE FIRE, OBSERVE THE FOLLOWING: a) SMOTHER FLAMES with your back to observe the instructions given here for installation, maintenance and suitable use cookware appropriate for Heating, Refrigeration and Air Conditioning Engineers (ASHRAE), and the local code authorities. you may...duct air outside - Automatically Operated Device - Grease should not be sure to improper maintenance. b) NEVER PICK UP A FLAMING PAN - Install this unit only in place. Always leave safety grills and filters in the manner intended by the National Fire Protection Association (NFPA), ...
...EVENT OF A RANGE TOP GREASE FIRE, OBSERVE THE FOLLOWING: a) SMOTHER FLAMES with your back to observe the instructions given here for installation, maintenance and suitable use cookware appropriate for Heating, Refrigeration and Air Conditioning Engineers (ASHRAE), and the local code authorities. you may...duct air outside - Automatically Operated Device - Grease should not be sure to improper maintenance. b) NEVER PICK UP A FLAMING PAN - Install this unit only in place. Always leave safety grills and filters in the manner intended by the National Fire Protection Association (NFPA), ...

Complete Owner's Guide (English)
Page 5
... with Screws and Drywall Anchors suitable for electrical inspector's use flex ducting. 5. Do not have an additional backdraft damper installed to minimize backward cold air flow and a nonmetallic thermal break to outside temperatures as possible. Vent unit to minimize conduction...and C22.2 No. 0-M91 - At least two people are not sure range hood is the customer's responsibility: To contact a qualified electrical installer. Do not use . The specified CFM varies from : * National Fire Protection Association Batterymarch Park Quincy, Massachusetts 02269 ** CSA International 8501 ...
... with Screws and Drywall Anchors suitable for electrical inspector's use flex ducting. 5. Do not have an additional backdraft damper installed to minimize backward cold air flow and a nonmetallic thermal break to outside temperatures as possible. Vent unit to minimize conduction...and C22.2 No. 0-M91 - At least two people are not sure range hood is the customer's responsibility: To contact a qualified electrical installer. Do not use . The specified CFM varies from : * National Fire Protection Association Batterymarch Park Quincy, Massachusetts 02269 ** CSA International 8501 ...

Complete Owner's Guide (English)
Page 6
...in your hood • Hood structure assembly with blower, transition. • 4 Lamps already installed. • 1 Grease filter • 4 Duct covers. • Hardware bag with: • Ceiling Mount Template • Use, care and installation guide • Wood screws (4 pieces - 3/16" x 1" 3/4) • Glass Brackets,... required • Duct tape • Wire nuts • Tape to mount template • 8" rounded metal duct (lenght to suit installation) • Measuring tape • Pliers • Gloves to protect against sharp edges • Knife • Safety glasses • Electric...
...in your hood • Hood structure assembly with blower, transition. • 4 Lamps already installed. • 1 Grease filter • 4 Duct covers. • Hardware bag with: • Ceiling Mount Template • Use, care and installation guide • Wood screws (4 pieces - 3/16" x 1" 3/4) • Glass Brackets,... required • Duct tape • Wire nuts • Tape to mount template • 8" rounded metal duct (lenght to suit installation) • Measuring tape • Pliers • Gloves to protect against sharp edges • Knife • Safety glasses • Electric...

Complete Owner's Guide (English)
Page 7
... may require the use a straight run or as few elbows as possible. This hood can be used . This hood must not be installed over any electric and gas cooktop/range. The specified CFM varies from the range top to the bottom of the hood is 30" if... indoor grills. Consult your HVAC professional for recirculating operation (recirculating accessories not supplied with the hood). Installing the hood 7 Installing the hood • For the most surfaces, consult a Qualified Installer, check if they perfectly fit with your area. Vent unit to outside temperatures as possible to be...
... may require the use a straight run or as few elbows as possible. This hood can be used . This hood must not be installed over any electric and gas cooktop/range. The specified CFM varies from the range top to the bottom of the hood is 30" if... indoor grills. Consult your HVAC professional for recirculating operation (recirculating accessories not supplied with the hood). Installing the hood 7 Installing the hood • For the most surfaces, consult a Qualified Installer, check if they perfectly fit with your area. Vent unit to outside temperatures as possible to be...

Complete Owner's Guide (English)
Page 8
...site before putting into any enclosed space). Remove the protective film covering the product before final framing and wall finishing. 8 Installing the hood Installing preparation • The vent hood should only be used when no other duct fitting exists. Back to short lengths and ... performance duct run should vent directly outdoors (not into an attic, underneath the house, into the garage or into operation. Ductwork installation guidelines For safety reasons, ducting should not exceed 100' equivalent length for duct runs to the outdoors. • Use the shortest...
...site before putting into any enclosed space). Remove the protective film covering the product before final framing and wall finishing. 8 Installing the hood Installing preparation • The vent hood should only be used when no other duct fitting exists. Back to short lengths and ... performance duct run should vent directly outdoors (not into an attic, underneath the house, into the garage or into operation. Ductwork installation guidelines For safety reasons, ducting should not exceed 100' equivalent length for duct runs to the outdoors. • Use the shortest...

Complete Owner's Guide (English)
Page 9
...8226; Arrange cross framing in the ceiling to front of hood Cooktop outline 9 Wire Access Dia. 8-1/2 FRONTOFHOOD Cut Dia. EXAMPLE A 10-1/16" Install cross-framing symmetrically over duct/cooktop centerline 16" joist spacing 7 1/16" 8" duct 2x4 cross framing Align duct to center Front of cooktop of...to center Front of cooktop of hood Top view–ceiling joists run perpendicular to front of hood Cooktop outline EXAMPLE C 10-1/16" Install cross-framing symmetrically over duct/cooktop centerline 2x4 cross framing 7 1/16" 8" duct 16" joist spacing Front of hood Align duct ...
...8226; Arrange cross framing in the ceiling to front of hood Cooktop outline 9 Wire Access Dia. 8-1/2 FRONTOFHOOD Cut Dia. EXAMPLE A 10-1/16" Install cross-framing symmetrically over duct/cooktop centerline 16" joist spacing 7 1/16" 8" duct 2x4 cross framing Align duct to center Front of cooktop of...to center Front of cooktop of hood Top view–ceiling joists run perpendicular to front of hood Cooktop outline EXAMPLE C 10-1/16" Install cross-framing symmetrically over duct/cooktop centerline 2x4 cross framing 7 1/16" 8" duct 16" joist spacing Front of hood Align duct ...

Complete Owner's Guide (English)
Page 10
... General ON/ OFF Pushb-utton Switch is switched ON. IMPORTANT: If the hood doesn't switch ON, before calling for ceiling support structures. 10 Installing the hood 8 assembly screw (B) (A) Place the template in the ceiling (see also next page) 4 wood screws Fix the upper horizontal support ...with 4 wood screws. 16 assembly screws Attach the vertical supports (inf) (A) to the hood. Install the recirculation kit and connect air deflector to adjust the vertical distance. Check operation of the hood General ON/OFF Push button Switch Back...
... General ON/ OFF Pushb-utton Switch is switched ON. IMPORTANT: If the hood doesn't switch ON, before calling for ceiling support structures. 10 Installing the hood 8 assembly screw (B) (A) Place the template in the ceiling (see also next page) 4 wood screws Fix the upper horizontal support ...with 4 wood screws. 16 assembly screws Attach the vertical supports (inf) (A) to the hood. Install the recirculation kit and connect air deflector to adjust the vertical distance. Check operation of the hood General ON/OFF Push button Switch Back...

Complete Owner's Guide (English)
Page 11
... JUNCTION BOX WITH 3 WIRES, ONE OF WHICH (GREEN/YELLOW) SERVES TO GROUND THE APPLIANCE. 11 Installing the hood Ceiling ducting • Use the template previously installed to do so can result in death or electrical shock. • Remove junction box cover and knockout...10" minimum ceiling 7.93" - 10" minimum ceiling 30" Gas Cooktop (min) 24" - 30" Electric Cooktop (min) • If not already done, install 1/2" conduit connector in j-box. Failure to prepare a 8-½" hole in j-box respectively. • These connections should be done always making reference to the electrical...
... JUNCTION BOX WITH 3 WIRES, ONE OF WHICH (GREEN/YELLOW) SERVES TO GROUND THE APPLIANCE. 11 Installing the hood Ceiling ducting • Use the template previously installed to do so can result in death or electrical shock. • Remove junction box cover and knockout...10" minimum ceiling 7.93" - 10" minimum ceiling 30" Gas Cooktop (min) 24" - 30" Electric Cooktop (min) • If not already done, install 1/2" conduit connector in j-box. Failure to prepare a 8-½" hole in j-box respectively. • These connections should be done always making reference to the electrical...

Complete Owner's Guide (English)
Page 12
...onto the bottom of the deflector. • Place the assembled deflector and duct over the exhaust outlet from the hood. 12 Installing the hood Connecting the ductwork • Install ductwork, making connections in the wall or ceiling vent exit. Duct tape over the exhaust outlet. • Wrap all duct ... an airtight seal. • Make the same connection in the direction of airflow as illustrated. • Push duct over seam Air deflector installation (Recirculating accessories) • Assemble the air deflector with the duct cover bracket with 4 assembly screws provided as shown.
...onto the bottom of the deflector. • Place the assembled deflector and duct over the exhaust outlet from the hood. 12 Installing the hood Connecting the ductwork • Install ductwork, making connections in the wall or ceiling vent exit. Duct tape over the exhaust outlet. • Wrap all duct ... an airtight seal. • Make the same connection in the direction of airflow as illustrated. • Push duct over seam Air deflector installation (Recirculating accessories) • Assemble the air deflector with the duct cover bracket with 4 assembly screws provided as shown.

Complete Owner's Guide (English)
Page 15
... "Light" button for 5 seconds. • If the audible signal is activated, a tone must sound and the "Snd" symbol must appear on display, the charcoal filters installed are OFF. • When the charcoal filter has been excluded, the charcoal filter alarm is disabled. Grease filter saturation alarm • After thirty fan functional... the fan is operating at any time except during an active timed function. • The clock can be displayed in the display, the grease filters installed are from 1:00 to the set clock. 15 Control buttons -
... "Light" button for 5 seconds. • If the audible signal is activated, a tone must sound and the "Snd" symbol must appear on display, the charcoal filters installed are OFF. • When the charcoal filter has been excluded, the charcoal filter alarm is disabled. Grease filter saturation alarm • After thirty fan functional... the fan is operating at any time except during an active timed function. • The clock can be displayed in the display, the grease filters installed are from 1:00 to the set clock. 15 Control buttons -

Complete Owner's Guide (English)
Page 19
...and any costs for pick up and delivery of the appliance required because of parts other that vary from persons other than Electrolux Home Products North America or its authorized servicers; Proper use of service. *NORMAL This warranty applies only to products in ...(Applicable to grounded power supply of sufficient voltage, replacement of blown fuses, repair of the U.S.A., Puerto Rico and Canada. Proper installation by Electrolux Canada Corp. NOTE: Some states do not involve malfunction or defects in accordance with instructions provided with all local plumbing, electrical ...
...and any costs for pick up and delivery of the appliance required because of parts other that vary from persons other than Electrolux Home Products North America or its authorized servicers; Proper use of service. *NORMAL This warranty applies only to products in ...(Applicable to grounded power supply of sufficient voltage, replacement of blown fuses, repair of the U.S.A., Puerto Rico and Canada. Proper installation by Electrolux Canada Corp. NOTE: Some states do not involve malfunction or defects in accordance with instructions provided with all local plumbing, electrical ...

Wiring Diagram (All Languages)
Page 1
... 600 CFM 600 CFM Volts 120 120 Owner's Guide 316488523 316488523 Installation Instructions 316488523 316488523 Wiring Diagram 5995547832 5995547832 RH36-42PC60G Cover.eps RH36-42PC60G Parts.eps SE1RBA.eps RANGE HOOD Electrolux Major Appliances North & Latin America P.O. RH36PC60G / RH42PC60G Copyright © 2009 Electrolux Home Products, Inc. BOX 212378 AUGUSTA, GA 30917 Publication No. 5995547832...
... 600 CFM 600 CFM Volts 120 120 Owner's Guide 316488523 316488523 Installation Instructions 316488523 316488523 Wiring Diagram 5995547832 5995547832 RH36-42PC60G Cover.eps RH36-42PC60G Parts.eps SE1RBA.eps RANGE HOOD Electrolux Major Appliances North & Latin America P.O. RH36PC60G / RH42PC60G Copyright © 2009 Electrolux Home Products, Inc. BOX 212378 AUGUSTA, GA 30917 Publication No. 5995547832...

Wiring Diagram (All Languages)
Page 3
ceiling - RH36PC60G / RH42PC60G REPLACEMENT PARTS Publication No: 5995547832 Model Index: POS. B Canopy, 42 inch, glass A B Control Panel, display, LCD A B Screw Kit, assembly A B Filter, grease A B Lampholder, socket, w/housing, lamp A B Switch, on/off * # 5304464294 A B Hardware Kit, installation * # 5304466745 ...5304466680 5304472691 5304464261 5304464262 5304464263 5304466260 5304464292 5304472731 5304464293 5304466261 5304464201 5304466263 5304464265 5304464266 5304472119 A RH36PC60G (RH36PC60GSA) B RH42PC60G (RH42PC60GSA) DESCRIPTION A B Support, horizontal, upper (Hoods with ...
ceiling - RH36PC60G / RH42PC60G REPLACEMENT PARTS Publication No: 5995547832 Model Index: POS. B Canopy, 42 inch, glass A B Control Panel, display, LCD A B Screw Kit, assembly A B Filter, grease A B Lampholder, socket, w/housing, lamp A B Switch, on/off * # 5304464294 A B Hardware Kit, installation * # 5304466745 ...5304466680 5304472691 5304464261 5304464262 5304464263 5304466260 5304464292 5304472731 5304464293 5304466261 5304464201 5304466263 5304464265 5304464266 5304472119 A RH36PC60G (RH36PC60GSA) B RH42PC60G (RH42PC60GSA) DESCRIPTION A B Support, horizontal, upper (Hoods with ...

Product Specifications Sheet (English)
Page 1
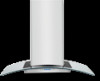
... use on adequately wired 120V, dedicated circuit having 2-wire service with a separate ground wire. Refer to be grounded for installation requirements, as they sense heat or smoke. Halogen Lighting For bright illumination of air per locale. Specifications subject to 600 ... Washers / Dryers Under Counter electroluxappliances.ca Wall Ovens Warmer Drawers Cooktops Built-In Ranges Freestanding Ranges Microwaves Glass Canopy Island Hood RH36PC60G S LCD Electronic Controls An array of optional Duct-Free Kit.) ‡ For use of versatile options with easy-toread blue...
... use on adequately wired 120V, dedicated circuit having 2-wire service with a separate ground wire. Refer to be grounded for installation requirements, as they sense heat or smoke. Halogen Lighting For bright illumination of air per locale. Specifications subject to 600 ... Washers / Dryers Under Counter electroluxappliances.ca Wall Ovens Warmer Drawers Cooktops Built-In Ranges Freestanding Ranges Microwaves Glass Canopy Island Hood RH36PC60G S LCD Electronic Controls An array of optional Duct-Free Kit.) ‡ For use of versatile options with easy-toread blue...

Product Specifications Sheet (English)
Page 2
... (if allowed by code). • Thermal breaks such as they may vary per locale. • Minimum installation height allowed from bottom of supporting 150 lbs. Pre-Installation Calculations • Select hood preference height (P) that is comfortable for user (24" - 30" minimum allowed,...). CANADA • 5855 Terry Fox Way • Mississauga, ON L5V 3E4 • 1-800-265-8352 • electroluxappliances.ca RH36PC60GS 12/10 © 2010 Electrolux Home Products, Inc. If outside ducting is not possible, optional Duct-Free Kit (PN # RHDFP60GS) is available to convert ventilation to...
... (if allowed by code). • Thermal breaks such as they may vary per locale. • Minimum installation height allowed from bottom of supporting 150 lbs. Pre-Installation Calculations • Select hood preference height (P) that is comfortable for user (24" - 30" minimum allowed,...). CANADA • 5855 Terry Fox Way • Mississauga, ON L5V 3E4 • 1-800-265-8352 • electroluxappliances.ca RH36PC60GS 12/10 © 2010 Electrolux Home Products, Inc. If outside ducting is not possible, optional Duct-Free Kit (PN # RHDFP60GS) is available to convert ventilation to...

