
Complete Owner's Guide (English)
Page 6
...your hood • Hood structure assembly with blower, transition. • 4 Lamps already installed. • 1 Grease filter • 4 Duct covers. • Hardware bag with: • Ceiling Mount Template • Use, care and installation guide • Wood screws (4 pieces - 3/16"... x 1" 3/4) • Glass Brackets, Springs, Gaskets ( 2 each ) • Assembly screws (70 pieces) • 4 Plastic Springs • Duct cover brackets (4 each) • 8 Vertical supports. • 2 Upper Ductcover supports. • 2 Horizontal supports. • Glass canopy Optional accessories • ...
...your hood • Hood structure assembly with blower, transition. • 4 Lamps already installed. • 1 Grease filter • 4 Duct covers. • Hardware bag with: • Ceiling Mount Template • Use, care and installation guide • Wood screws (4 pieces - 3/16"... x 1" 3/4) • Glass Brackets, Springs, Gaskets ( 2 each ) • Assembly screws (70 pieces) • 4 Plastic Springs • Duct cover brackets (4 each) • 8 Vertical supports. • 2 Upper Ductcover supports. • 2 Horizontal supports. • Glass canopy Optional accessories • ...

Complete Owner's Guide (English)
Page 8
... attic, underneath the house, into the garage or into operation. Keep duct runs as short and straight as is installed before the cook-top and countertop are not recommended. Remove the protective film covering the product before final framing and wall finishing. In order of the ...remote blower gives the best delivery. Order the wall or roof cap and any duct configurations. • Refer to "Ductwork installation guidelines" chart...
... attic, underneath the house, into the garage or into operation. Keep duct runs as short and straight as is installed before the cook-top and countertop are not recommended. Remove the protective film covering the product before final framing and wall finishing. In order of the ...remote blower gives the best delivery. Order the wall or roof cap and any duct configurations. • Refer to "Ductwork installation guidelines" chart...

Complete Owner's Guide (English)
Page 10
...Pushb-utton Switch is switched ON. Installation with screws (16) Insert the plastic gaskets on each side of the hood Place lower duct covers using 2 screws by side. Then verify Instal the grease filter and turn power on the ceiling Assure with optional recirculation kit. ...Perform the electrical connection. Install the recirculation kit and connect air deflector to transition SEE NEXT PAGES FOR FURTHER DETAIL Attach the vertical duct cover supports using a screw by 4 screws. Attach the assembly to the support fixed on at each spring using 4 screws. Place each vertex...
...Pushb-utton Switch is switched ON. Installation with screws (16) Insert the plastic gaskets on each side of the hood Place lower duct covers using 2 screws by side. Then verify Instal the grease filter and turn power on the ceiling Assure with optional recirculation kit. ...Perform the electrical connection. Install the recirculation kit and connect air deflector to transition SEE NEXT PAGES FOR FURTHER DETAIL Attach the vertical duct cover supports using a screw by 4 screws. Attach the assembly to the support fixed on at each spring using 4 screws. Place each vertex...

Complete Owner's Guide (English)
Page 11
...should be done always making reference to do so can result in death or electrical shock. • Remove junction box cover and knockout on the top left side. 8 1/2" Knockout Junction box cover 4 12/16" (At least) 23 12/16" 8.43" - 10" minimum ceiling 7.93" - 10" ... connector in the ceiling for ductwork. Failure to the electrical diagram found inside the hood. • Close j-box cover and reapply screws. 11 Installing the hood Ceiling ducting • Use the template previously installed to prepare a 8-½" hole in j-box. ELECTRICAL GROUNDING INSTRUCTIONS THIS APPLIANCE...
...should be done always making reference to do so can result in death or electrical shock. • Remove junction box cover and knockout on the top left side. 8 1/2" Knockout Junction box cover 4 12/16" (At least) 23 12/16" 8.43" - 10" minimum ceiling 7.93" - 10" ... connector in the ceiling for ductwork. Failure to the electrical diagram found inside the hood. • Close j-box cover and reapply screws. 11 Installing the hood Ceiling ducting • Use the template previously installed to prepare a 8-½" hole in j-box. ELECTRICAL GROUNDING INSTRUCTIONS THIS APPLIANCE...

Complete Owner's Guide (English)
Page 12
Assemble the air deflector with the duct cover bracket with 4 assembly screws provided as shown. • Use duct tape to the bottom of the hood outlet, as shown. 12 Installing the hood Connecting the ductwork • Install ductwork, making ...flange connections with 4 assembly screws provided as shown. • Cut the duct at the exhaust outlet from the hood. Duct tape over seam Air deflector installation (Recirculating accessories) • Assemble the air deflector with the duct cover bracket with duct tape for an airtight seal. • Make the same connection in the...
Assemble the air deflector with the duct cover bracket with 4 assembly screws provided as shown. • Use duct tape to the bottom of the hood outlet, as shown. 12 Installing the hood Connecting the ductwork • Install ductwork, making ...flange connections with 4 assembly screws provided as shown. • Cut the duct at the exhaust outlet from the hood. Duct tape over seam Air deflector installation (Recirculating accessories) • Assemble the air deflector with the duct cover bracket with duct tape for an airtight seal. • Make the same connection in the...
Complete Owner's Guide (English)
Page 13
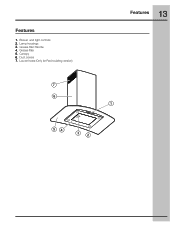
Features 1. Grease filter 5. Louver holes (Only for Recirculating version) 7 6 13 Features 1 54 32 Lamp housings 3. Canopy 6. Duct covers 7. Grease filter Handle 4. Blower and light controls 2.
Features 1. Grease filter 5. Louver holes (Only for Recirculating version) 7 6 13 Features 1 54 32 Lamp housings 3. Canopy 6. Duct covers 7. Grease filter Handle 4. Blower and light controls 2.

Wiring Diagram (All Languages)
Page 3
...5304464292 5304472731 5304464293 5304466261 5304464201 5304466263 5304464265 5304464266 5304472119 A RH36PC60G (RH36PC60GSA) B RH42PC60G (RH42PC60GSA) DESCRIPTION A B ...duct cover, vertical (Hoods with Serial Numbers 2F82700001through 2F84299999) A B Support, duct cover, vertical (Hoods with Serial Numbers starting at2F843300703) A B Cover, duct, upper flue (Hoods with Serial Numbers 2F82700001through 2F84299999) A B Cover, duct, upper flue (Hoods with Serial Numbers starting at2F843300703) A B Cover, duct, lower flue (Hoods with Serial Numbers 2F82700001through 2F84299999) A B Cover, duct...
...5304464292 5304472731 5304464293 5304466261 5304464201 5304466263 5304464265 5304464266 5304472119 A RH36PC60G (RH36PC60GSA) B RH42PC60G (RH42PC60GSA) DESCRIPTION A B ...duct cover, vertical (Hoods with Serial Numbers 2F82700001through 2F84299999) A B Support, duct cover, vertical (Hoods with Serial Numbers starting at2F843300703) A B Cover, duct, upper flue (Hoods with Serial Numbers 2F82700001through 2F84299999) A B Cover, duct, upper flue (Hoods with Serial Numbers starting at2F843300703) A B Cover, duct, lower flue (Hoods with Serial Numbers 2F82700001through 2F84299999) A B Cover, duct...

Product Specifications Sheet (English)
Page 1
...ca. Wall Ovens Warmer Drawers Cooktops Built-In Ranges Freestanding Ranges Microwaves Glass Canopy Island Hood RH36PC60G S LCD Electronic Controls An array of the cooktop surface. of optional Duct-Free Kit.) ‡ For use of air per locale. PN # RHDFP60GS Optional Specifications... Product Dimensions - NOTE: Always consult local and national electric codes. Check local building codes for safe operation. Height (With One Cover) (With Flue ...
...ca. Wall Ovens Warmer Drawers Cooktops Built-In Ranges Freestanding Ranges Microwaves Glass Canopy Island Hood RH36PC60G S LCD Electronic Controls An array of the cooktop surface. of optional Duct-Free Kit.) ‡ For use of air per locale. PN # RHDFP60GS Optional Specifications... Product Dimensions - NOTE: Always consult local and national electric codes. Check local building codes for safe operation. Height (With One Cover) (With Flue ...
