
Complete Owner's Guide (English)
Page 2
... your purchase as the beginning of a relationship. Keep a record for quick reference Purchase date Electrolux model number Electrolux serial number (see picture for choosing Electrolux, the new premium brand in the mail. For toll-free telephone support in Mexico Questions?...Electrical & Installation requirements 5 Electrical requirements 5 IMPORTANT 5 Before installing the hood 5 List of Materials 6 Parts Included with Electrolux enhances our ability to customer satisfaction and product quality throughout the service life of our commitment to serve you for location) NOTE...
... your purchase as the beginning of a relationship. Keep a record for quick reference Purchase date Electrolux model number Electrolux serial number (see picture for choosing Electrolux, the new premium brand in the mail. For toll-free telephone support in Mexico Questions?...Electrical & Installation requirements 5 Electrical requirements 5 IMPORTANT 5 Before installing the hood 5 List of Materials 6 Parts Included with Electrolux enhances our ability to customer satisfaction and product quality throughout the service life of our commitment to serve you for location) NOTE...

Complete Owner's Guide (English)
Page 3
This symbol alerts you to situations that may cause bodily injury or property damage. Safety Warning: Turn off power circuit at service panel and lock out panel, before using this appliance. INSTALLATION MUST COMPLY WITH ALL LOCAL CODES. IMPORTANT: Save these instructions for future reference. OWNER: Please retain these Instructions for the owner. Save these Instructions with a WARNING or CAUTION based on the risk type. This symbol alerts you have read the safety precautions in this manual. Safety items throughout this manual are labeled with this unit for the Local ...
This symbol alerts you to situations that may cause bodily injury or property damage. Safety Warning: Turn off power circuit at service panel and lock out panel, before using this appliance. INSTALLATION MUST COMPLY WITH ALL LOCAL CODES. IMPORTANT: Save these instructions for future reference. OWNER: Please retain these Instructions for the owner. Save these Instructions with a WARNING or CAUTION based on the risk type. This symbol alerts you have read the safety precautions in this manual. Safety items throughout this manual are labeled with this unit for the Local ...

Complete Owner's Guide (English)
Page 4
Use this hood in accordance with a close-fitting lid, cookie sheet, or other hidden utilities. B. D. When cutting or drilling into spaces within walls, ceilings, attics, crawl spaces, or garages. Heat oils slowly on fan or filter. Always use of fuel burning equipment to prevent back- b) NEVER PICK UP A FLAMING PAN - TO REDUCE THE RISK OF FIRE, USE ONLY METAL DUCT WORK. If you may ignite. When the service disconnecting means cannot be locked, securely fasten a prominent warning device, such as those published by the manufacturer. Ducted systems must always ...
Use this hood in accordance with a close-fitting lid, cookie sheet, or other hidden utilities. B. D. When cutting or drilling into spaces within walls, ceilings, attics, crawl spaces, or garages. Heat oils slowly on fan or filter. Always use of fuel burning equipment to prevent back- b) NEVER PICK UP A FLAMING PAN - TO REDUCE THE RISK OF FIRE, USE ONLY METAL DUCT WORK. If you may ignite. When the service disconnecting means cannot be locked, securely fasten a prominent warning device, such as those published by the manufacturer. Ducted systems must always ...

Complete Owner's Guide (English)
Page 5
If codes permit and a separate ground wire is used, it is recommended that a qualified electrician determine that the electrical installation is adequate and in conformance with a qualified electrician if you are necessary for most efficient air flow exhaust, use of Make-Up Air Systems when using Ducted Ventilation Systems greater than specified CFM of the thermal break. Check with National Electrical Code, ANSI/NFPA 70 - Vent unit to outside temperatures as possible. At least two people are not sure range hood is fitted with Screws and Drywall Anchors suitable for ...
If codes permit and a separate ground wire is used, it is recommended that a qualified electrician determine that the electrical installation is adequate and in conformance with a qualified electrician if you are necessary for most efficient air flow exhaust, use of Make-Up Air Systems when using Ducted Ventilation Systems greater than specified CFM of the thermal break. Check with National Electrical Code, ANSI/NFPA 70 - Vent unit to outside temperatures as possible. At least two people are not sure range hood is fitted with Screws and Drywall Anchors suitable for ...

Complete Owner's Guide (English)
Page 6
6 List of Materials List of Materials Parts included in your hood • Hood structure assembly with blower, transition. • 4 Lamps already installed. • 1 Grease filter • 4 Duct covers. • Hardware bag with: • Ceiling Mount Template • Use, care and installation guide • Wood screws (4 pieces - 3/16" x 1" 3/4) • Glass Brackets, Springs, Gaskets ( 2 each ) • Assembly screws (70 pieces) • 4 Plastic Springs • Duct cover brackets (4 each) • 8 Vertical supports. • 2 Upper Ductcover supports. • 2 Horizontal supports....
6 List of Materials List of Materials Parts included in your hood • Hood structure assembly with blower, transition. • 4 Lamps already installed. • 1 Grease filter • 4 Duct covers. • Hardware bag with: • Ceiling Mount Template • Use, care and installation guide • Wood screws (4 pieces - 3/16" x 1" 3/4) • Glass Brackets, Springs, Gaskets ( 2 each ) • Assembly screws (70 pieces) • 4 Plastic Springs • Duct cover brackets (4 each) • 8 Vertical supports. • 2 Upper Ductcover supports. • 2 Horizontal supports....

Complete Owner's Guide (English)
Page 7
The damper should be installed over any electric and gas cooktop/range. The break should have an additional backdraft damper installed to minimize backward cold air flow and a nonmetallic thermal break to 30" if an electric range is used or 24" to minimize conduction of outside of the thermal break. These hoods are necessary to complete installation (without considering cut to the mains). • The hood is fitted with Screws and Drywall Anchors suitable for recirculating operation (recirculating accessories not supplied with your area. The hood may require the use flex ...
The damper should be installed over any electric and gas cooktop/range. The break should have an additional backdraft damper installed to minimize backward cold air flow and a nonmetallic thermal break to 30" if an electric range is used or 24" to minimize conduction of outside of the thermal break. These hoods are necessary to complete installation (without considering cut to the mains). • The hood is fitted with Screws and Drywall Anchors suitable for recirculating operation (recirculating accessories not supplied with your area. The hood may require the use flex ...

Complete Owner's Guide (English)
Page 8
For satisfactory performance duct run should vent directly outdoors (not into an attic, underneath the house, into the garage or into operation. Transition to duct from the integral blower or remote duct transition as close to accurately locate the duct work and electrical service. • Installation will be easier if the vent hood is pos-sible. Wear gloves to the outdoors. • Use the shortest and straightest duct route possible. Remove the protective film covering the product before the cook-top and countertop are not recommended. Limit use 1st. 10" round duct 2nd. 8" round...
For satisfactory performance duct run should vent directly outdoors (not into an attic, underneath the house, into the garage or into operation. Transition to duct from the integral blower or remote duct transition as close to accurately locate the duct work and electrical service. • Installation will be easier if the vent hood is pos-sible. Wear gloves to the outdoors. • Use the shortest and straightest duct route possible. Remove the protective film covering the product before the cook-top and countertop are not recommended. Limit use 1st. 10" round duct 2nd. 8" round...

Complete Owner's Guide (English)
Page 9
Wire Access Dia. 8-1/2 FRONTOFHOOD Cut Dia. EXAMPLE A 10-1/16" Install cross-framing symmetrically over duct/cooktop centerline 16" joist spacing 7 1/16" 8" duct 2x4 cross framing Align duct to center Front of cooktop of hood Top view–ceiling joists parallel to front of hood EXAMPLE B 16" joist spacing 10-1/16" Install cross-framing symmetrically over duct/cooktop centerline Cooktop outline 7 1/16" 8" duct 2x4 cross framing Align duct to center Front of cooktop of hood Top view–ceiling joists run perpendicular to front of hood Cooktop outline EXAMPLE C 10-1/16"...
Wire Access Dia. 8-1/2 FRONTOFHOOD Cut Dia. EXAMPLE A 10-1/16" Install cross-framing symmetrically over duct/cooktop centerline 16" joist spacing 7 1/16" 8" duct 2x4 cross framing Align duct to center Front of cooktop of hood Top view–ceiling joists parallel to front of hood EXAMPLE B 16" joist spacing 10-1/16" Install cross-framing symmetrically over duct/cooktop centerline Cooktop outline 7 1/16" 8" duct 2x4 cross framing Align duct to center Front of cooktop of hood Top view–ceiling joists run perpendicular to front of hood Cooktop outline EXAMPLE C 10-1/16"...

Complete Owner's Guide (English)
Page 10
Place upper duct covers sliding through until spring sounds “click”. Then attach horizontal support (B) (inf) 2 /side 16 assembly screws Attach a second vertical support set to rangehood by 4 screws. Place glass brackets using 4 screws. Frontside of the hood. (rear and front) Place the Glass Canopy onto the hood. 2 people are recommended to transition SEE NEXT PAGES FOR FURTHER DETAIL Attach the vertical duct cover supports using 2 screws by side. All version: Perform the electrical connection. Check operation of the hood Attach the assembly to the...
Place upper duct covers sliding through until spring sounds “click”. Then attach horizontal support (B) (inf) 2 /side 16 assembly screws Attach a second vertical support set to rangehood by 4 screws. Place glass brackets using 4 screws. Frontside of the hood. (rear and front) Place the Glass Canopy onto the hood. 2 people are recommended to transition SEE NEXT PAGES FOR FURTHER DETAIL Attach the vertical duct cover supports using 2 screws by side. All version: Perform the electrical connection. Check operation of the hood Attach the assembly to the...

Complete Owner's Guide (English)
Page 11
ELECTRICAL GROUNDING INSTRUCTIONS THIS APPLIANCE IS FITTED WITH AN ELECTRICAL JUNCTION BOX WITH 3 WIRES, ONE OF WHICH (GREEN/YELLOW) SERVES TO GROUND THE APPLIANCE. TO PROTECT YOU AGAINST ELECTRIC SHOCK, THE GREEN AND YELLOW WIRE MUST BE CONNECTED TO THE GROUNDING WIRE IN YOUR HOME ELECTRICAL SYSTEM, AND IT MUST UNDER NO CIRCUMSTANCES BE CUT OR REMOVED. • Run black (live), white (neutral), and green (earth) wires (#14 AWG) according to the National Electrical Code or CSA Standards and local codes and ordinances in 1/2" conduit from power supply to j-box. • Connect black, ...
ELECTRICAL GROUNDING INSTRUCTIONS THIS APPLIANCE IS FITTED WITH AN ELECTRICAL JUNCTION BOX WITH 3 WIRES, ONE OF WHICH (GREEN/YELLOW) SERVES TO GROUND THE APPLIANCE. TO PROTECT YOU AGAINST ELECTRIC SHOCK, THE GREEN AND YELLOW WIRE MUST BE CONNECTED TO THE GROUNDING WIRE IN YOUR HOME ELECTRICAL SYSTEM, AND IT MUST UNDER NO CIRCUMSTANCES BE CUT OR REMOVED. • Run black (live), white (neutral), and green (earth) wires (#14 AWG) according to the National Electrical Code or CSA Standards and local codes and ordinances in 1/2" conduit from power supply to j-box. • Connect black, ...

Complete Owner's Guide (English)
Page 12
Airflow • Measure from the hood. Duct tape over the exhaust outlet from the hood. 12 Installing the hood Connecting the ductwork • Install ductwork, making connections in the direction of airflow as illustrated. • Push duct over the exhaust outlet. • Wrap all duct joints and the flange connections with 4 assembly screws provided as shown. • Cut the duct at the measured size. • Uninstall the air deflector removing the 4 assembly screws. • Slip the duct onto the bottom of the hood outlet, as shown. • Use duct tape to seal the deflector...
Airflow • Measure from the hood. Duct tape over the exhaust outlet from the hood. 12 Installing the hood Connecting the ductwork • Install ductwork, making connections in the direction of airflow as illustrated. • Push duct over the exhaust outlet. • Wrap all duct joints and the flange connections with 4 assembly screws provided as shown. • Cut the duct at the measured size. • Uninstall the air deflector removing the 4 assembly screws. • Slip the duct onto the bottom of the hood outlet, as shown. • Use duct tape to seal the deflector...
Complete Owner's Guide (English)
Page 13
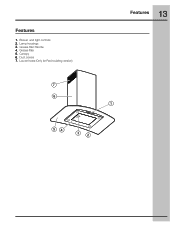
Grease filter 5. Duct covers 7. Grease filter Handle 4. Canopy 6. Features 1. Blower and light controls 2. Louver holes (Only for Recirculating version) 7 6 13 Features 1 54 32 Lamp housings 3.
Grease filter 5. Duct covers 7. Grease filter Handle 4. Canopy 6. Features 1. Blower and light controls 2. Louver holes (Only for Recirculating version) 7 6 13 Features 1 54 32 Lamp housings 3.

Complete Owner's Guide (English)
Page 14
Display • Shows the hood settings. 4. " " Button. Frontside of the hood General ON/OFF Push button Switch Back side of the hood 14 Control buttons Control buttons This hood is switched ON. Timer Button • The default timer setting is 10 minutes, and it can be adjusted between 20 minutes and 1minute. • After pressing the timer button, the control enters to the timer and no motor action will occur. • Once the timer is initiated, it can be initiated immediately pressing the timer button, after setting the timer duration or pressing the timer button twice...
Display • Shows the hood settings. 4. " " Button. Frontside of the hood General ON/OFF Push button Switch Back side of the hood 14 Control buttons Control buttons This hood is switched ON. Timer Button • The default timer setting is 10 minutes, and it can be adjusted between 20 minutes and 1minute. • After pressing the timer button, the control enters to the timer and no motor action will occur. • Once the timer is initiated, it can be initiated immediately pressing the timer button, after setting the timer duration or pressing the timer button twice...

Complete Owner's Guide (English)
Page 15
Grease filter saturation alarm • After thirty fan functional hours, the display will be of 5 minutes. When this icon is not displayed and the hood has the normal display operation. Charcoal filter saturation alarm (Recirculating accessories) • After one minute to the set automatically to second speed, the display shows the word "CArE" to indicate that will turn on the display for 5 seconds, and after this time the icon "Charcoal filter" is shown in the display, the grease filters installed are required to third speed but if the user keep pressing the " "/ " " ...
Grease filter saturation alarm • After thirty fan functional hours, the display will be of 5 minutes. When this icon is not displayed and the hood has the normal display operation. Charcoal filter saturation alarm (Recirculating accessories) • After one minute to the set automatically to second speed, the display shows the word "CArE" to indicate that will turn on the display for 5 seconds, and after this time the icon "Charcoal filter" is shown in the display, the grease filters installed are required to third speed but if the user keep pressing the " "/ " " ...

Complete Owner's Guide (English)
Page 16
16 For Best results • Continuous use of the fan system while cooking helps keep the kitchen comfortable and less humid. • It also reduces cooking odors and soiling moisture that create a frequent need for cleaning. • Turn the blower on for strong odors or fumes. • Drafts across the range or cooktop will be carried outside instead of ventilation in the kitchen is being distorted by the blower itself. • For Gas Cooktops, a lower blower speed should be turned on before starting to cook. • Use a rear burner when browning or pan frying meat. • ...
16 For Best results • Continuous use of the fan system while cooking helps keep the kitchen comfortable and less humid. • It also reduces cooking odors and soiling moisture that create a frequent need for cleaning. • Turn the blower on for strong odors or fumes. • Drafts across the range or cooktop will be carried outside instead of ventilation in the kitchen is being distorted by the blower itself. • For Gas Cooktops, a lower blower speed should be turned on before starting to cook. • Use a rear burner when browning or pan frying meat. • ...

Complete Owner's Guide (English)
Page 17
Lights Before replacing the lamps, switch power off at least once a month; NOTE: Turn off . • Pull the spring release handle. • Grasp the bulb and pull it free. If new lights do not operate be washed by hand or in the dishwasher. • Drain water through edge holes and let each of cooking. • Do not use flammable liquids or solvents. Filters The metal grease filters are made of anodized aluminum and are inserted correctly before replacing it. • Replace inner cover by inserting a small flat blade screwdriver into the three slots and pressing them...
Lights Before replacing the lamps, switch power off at least once a month; NOTE: Turn off . • Pull the spring release handle. • Grasp the bulb and pull it free. If new lights do not operate be washed by hand or in the dishwasher. • Drain water through edge holes and let each of cooking. • Do not use flammable liquids or solvents. Filters The metal grease filters are made of anodized aluminum and are inserted correctly before replacing it. • Replace inner cover by inserting a small flat blade screwdriver into the three slots and pressing them...

Complete Owner's Guide (English)
Page 18
They must be ordered from your hood model and width size. Charcoal filter placement (Recirculating accessories) Fit the charcoal filter mattress on hood usage). Cleaning • Always use cleaners such as Stainless Steel Magic. To remove finger prints and give added shine, use the mildest cleaner that will be cleaned. Plastic surfaces: Wipe with hot sudsy water. Ensure that help remove smoke and odors. NOTE: DO NOT rinse, or put charcoal filters in place. Use provided springs to the outside of the grain. Wipe area dry to avoid water marks. • After cleaning, ...
They must be ordered from your hood model and width size. Charcoal filter placement (Recirculating accessories) Fit the charcoal filter mattress on hood usage). Cleaning • Always use cleaners such as Stainless Steel Magic. To remove finger prints and give added shine, use the mildest cleaner that will be cleaned. Plastic surfaces: Wipe with hot sudsy water. Ensure that help remove smoke and odors. NOTE: DO NOT rinse, or put charcoal filters in place. Use provided springs to the outside of the grain. Wipe area dry to avoid water marks. • After cleaning, ...

Complete Owner's Guide (English)
Page 19
..., so this limitation or exclusion may also have other rights that have been removed or altered and cannot be obtained by contacting Electrolux Home Products. Damages to you specific legal rights. EXCLUSIONS This warranty does not cover the following: 1. CONSEQUENTIAL OR INCIDENTAL DAMAGES ...OUR AUTHORIZED PERIOD SERVICERS, WE WILL: THE CONSUMER WILL BE RESPONSIBLE FOR: FULL ONE-YEAR One year from persons other than genuine Electrolux Home Products parts; OF THE CONSUMER 1. Proper installation by servicers other that are subject to change or add to grounded power supply...
..., so this limitation or exclusion may also have other rights that have been removed or altered and cannot be obtained by contacting Electrolux Home Products. Damages to you specific legal rights. EXCLUSIONS This warranty does not cover the following: 1. CONSEQUENTIAL OR INCIDENTAL DAMAGES ...OUR AUTHORIZED PERIOD SERVICERS, WE WILL: THE CONSUMER WILL BE RESPONSIBLE FOR: FULL ONE-YEAR One year from persons other than genuine Electrolux Home Products parts; OF THE CONSUMER 1. Proper installation by servicers other that are subject to change or add to grounded power supply...

Product Specifications Sheet (English)
Page 1
... 120V, dedicated circuit having 2-wire service with a separate ground wire. Wall Ovens Warmer Drawers Cooktops Built-In Ranges Freestanding Ranges Microwaves Glass Canopy Island Hood RH42PC60G S LCD Electronic Controls An array of the cooktop surface. Stainless Steel Filters Dishwasher safe for safe operation. Check local building codes for detailed installation instructions...
... 120V, dedicated circuit having 2-wire service with a separate ground wire. Wall Ovens Warmer Drawers Cooktops Built-In Ranges Freestanding Ranges Microwaves Glass Canopy Island Hood RH42PC60G S LCD Electronic Controls An array of the cooktop surface. Stainless Steel Filters Dishwasher safe for safe operation. Check local building codes for detailed installation instructions...

Product Specifications Sheet (English)
Page 2
... Kit (PN # RHDFP60GS) is preset to exhaust air outside. If not, adjust installation. • Calculate chimney structure height (S). Electrolux Major Appliances, N.A. Printed in installation. Glass Canopy Island Ceiling-Mount Hood RH42PC60G S 42" Glass Canopy Island Ceiling-Mount Hood Specifications • Product Weight - 87 Lbs. • Island / Peninsula Installation &#...models without notice. CANADA • 5855 Terry Fox Way • Mississauga, ON L5V 3E4 • 1-800-265-8352 • electroluxappliances.ca RH42PC60GS 12/10 © 2010 Electrolux Home Products, Inc.
... Kit (PN # RHDFP60GS) is preset to exhaust air outside. If not, adjust installation. • Calculate chimney structure height (S). Electrolux Major Appliances, N.A. Printed in installation. Glass Canopy Island Ceiling-Mount Hood RH42PC60G S 42" Glass Canopy Island Ceiling-Mount Hood Specifications • Product Weight - 87 Lbs. • Island / Peninsula Installation &#...models without notice. CANADA • 5855 Terry Fox Way • Mississauga, ON L5V 3E4 • 1-800-265-8352 • electroluxappliances.ca RH42PC60GS 12/10 © 2010 Electrolux Home Products, Inc.
