

Installation Guide
Page 3
... reinforce the wall before installation, and maintain the strength of the projector attached to ensure there are any broken parts, stop using the included Epson wall mount. 3 Never modify the wall mount. If the projector or wall mount falls, it could interfere with any loose screws... lights or air conditioners. About This Installation Guide This guide describes how to mount the ultra-short-throw projectors BrightLink 575Wi/585Wi/575Wi+/585Wi+ and PowerLite 570/575W/580/585W to reduce external noise. Tighten all screws firmly after installation. If the wall is recommended to...
... reinforce the wall before installation, and maintain the strength of the projector attached to ensure there are any broken parts, stop using the included Epson wall mount. 3 Never modify the wall mount. If the projector or wall mount falls, it could interfere with any loose screws... lights or air conditioners. About This Installation Guide This guide describes how to mount the ultra-short-throw projectors BrightLink 575Wi/585Wi/575Wi+/585Wi+ and PowerLite 570/575W/580/585W to reduce external noise. Tighten all screws firmly after installation. If the wall is recommended to...

Installation Guide
Page 8
... LAN device Computer cable (for computer video output) Microphone Document camera (Epson DC-06) Computer USB cable (for devices, such as a document camera or microphone, that you will connect to the projector. For details, refer to be installed. 3 Connecting Devices Make sure you... have all necessary cables for Easy Interactive Function on BrightLink models only) Dedicated USB cable (supplied with document camera) For Interactive Use (BrightLink 575Wi/585Wi/575Wi+/585Wi+ only) ...
... LAN device Computer cable (for computer video output) Microphone Document camera (Epson DC-06) Computer USB cable (for devices, such as a document camera or microphone, that you will connect to the projector. For details, refer to be installed. 3 Connecting Devices Make sure you... have all necessary cables for Easy Interactive Function on BrightLink models only) Dedicated USB cable (supplied with document camera) For Interactive Use (BrightLink 575Wi/585Wi/575Wi+/585Wi+ only) ...

Installation Guide
Page 9
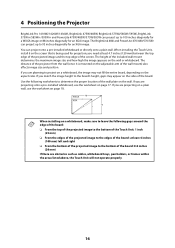
... the ceiling to the top of the wall mount) also affects image size and position. Measure the distance from floor to bottom of the projector from the wall (once it is mounted on page 10. The distance of image area (f) 9 If you are planning to project on ...a whiteboard, the image may appear on a pre-installed wall-mounted board 1. English 4 Positioning the Projector BrightLink 575Wi/585Wi/575Wi+/585Wi+ and PowerLite 575W/585W can project up to 100 inches diagonally for a WXGA image or 88 inches diagonally for an XGA image. You can project onto...
... the ceiling to the top of the wall mount) also affects image size and position. Measure the distance from floor to bottom of the projector from the wall (once it is mounted on page 10. The distance of image area (f) 9 If you are planning to project on ...a whiteboard, the image may appear on a pre-installed wall-mounted board 1. English 4 Positioning the Projector BrightLink 575Wi/585Wi/575Wi+/585Wi+ and PowerLite 575W/585W can project up to 100 inches diagonally for a WXGA image or 88 inches diagonally for an XGA image. You can project onto...

Installation Guide
Page 13
... is the number given when the vertical slide is set to the position of the stamp on the wall plate. When using BrightLink 575Wi/585Wi/575Wi+/585Wi+ or PowerLite 575W/585W to project images at a 4:3 aspect ratio, the images are resized automatically and the quality of the projected images may decrease. When projecting... images may differ depending on the wall mount to the base position, as shown below. Match the notch on the location where you place the projector. Base position Stamp on plate Notch on mount arm The measurements may decrease. 13
... is the number given when the vertical slide is set to the position of the stamp on the wall plate. When using BrightLink 575Wi/585Wi/575Wi+/585Wi+ or PowerLite 575W/585W to project images at a 4:3 aspect ratio, the images are resized automatically and the quality of the projected images may decrease. When projecting... images may differ depending on the wall mount to the base position, as shown below. Match the notch on the location where you place the projector. Base position Stamp on plate Notch on mount arm The measurements may decrease. 13

Installation Guide
Page 34
... on the remote control, or the [Wide] button on the projector Using the Remote Control Using the Control Panel B Display the test pattern 1. Using the Remote Control Using the Control Panel 34 When using the BrightLink 575Wi/585Wi/575Wi+/585Wi+ and PowerLite 570/575W/580/585W, follow the steps below to the projected image...
... on the remote control, or the [Wide] button on the projector Using the Remote Control Using the Control Panel B Display the test pattern 1. Using the Remote Control Using the Control Panel 34 When using the BrightLink 575Wi/585Wi/575Wi+/585Wi+ and PowerLite 570/575W/580/585W, follow the steps below to the projected image...

Installation Guide
Page 35
... , depending on the resolution. Remote Control Aspect Ratio Normal Alternatively, set the aspect ratio from the Signal menu - BrightLink 575Wi/585Wi/575Wi+/585Wi+ and PowerLite 575W/585W • Auto: Automatically sets the aspect ratio according to the input signal and the Resolution setting (available only for... display area. • 16:9: Converts the aspect ratio of the image to 16:9. 4:3 ratio images are elongated horizontally to fit. s Projector User's Guide: Signal Menu 35 Choose this setting or Auto to automatically resize the image and make the best use of the display area...
... , depending on the resolution. Remote Control Aspect Ratio Normal Alternatively, set the aspect ratio from the Signal menu - BrightLink 575Wi/585Wi/575Wi+/585Wi+ and PowerLite 575W/585W • Auto: Automatically sets the aspect ratio according to the input signal and the Resolution setting (available only for... display area. • 16:9: Converts the aspect ratio of the image to 16:9. 4:3 ratio images are elongated horizontally to fit. s Projector User's Guide: Signal Menu 35 Choose this setting or Auto to automatically resize the image and make the best use of the display area...

Installation Guide - Ultra-Short Throw Wall Mount (ELPMB43)
Page 2
...damage due to eyesight. 2 If the instructions are not followed, the wall mount may result in this guide before using the included Epson® wall mount. If the Touch Unit is designed specifically for your safety, read all the instructions in damage. Incomplete or ...performed by this guide: • BrightLink® 475Wi/480i/485Wi/575Wi/585Wi/595Wi and 575Wi+/585Wi+/595Wi+ • BrightLink Pro 1410Wi/1420Wi/1430Wi • PowerLite® 470/475W/480/485W/570/575W/580/585W Safety Instructions For your projector and follow the instructions in the User's Guide for mounting...
...damage due to eyesight. 2 If the instructions are not followed, the wall mount may result in this guide before using the included Epson® wall mount. If the Touch Unit is designed specifically for your safety, read all the instructions in damage. Incomplete or ...performed by this guide: • BrightLink® 475Wi/480i/485Wi/575Wi/585Wi/595Wi and 575Wi+/585Wi+/595Wi+ • BrightLink Pro 1410Wi/1420Wi/1430Wi • PowerLite® 470/475W/480/485W/570/575W/580/585W Safety Instructions For your projector and follow the instructions in the User's Guide for mounting...
Installation Guide - Ultra-Short Throw Wall Mount (ELPMB43)
Page 16
... appears on the adjustable arm of the projector from the wall (once it on the screen that is mounted on the wall or whiteboard. 4 Positioning the Projector BrightLink Pro 1410Wi/1420Wi/1430Wi, BrightLink 475W/485W, BrightLink 575Wi/585Wi/595Wi, BrightLink 575Wi+/585Wi+/595Wi+ and PowerLite 475W/485W/575W/585W can project up to 93 inches...
... appears on the adjustable arm of the projector from the wall (once it on the screen that is mounted on the wall or whiteboard. 4 Positioning the Projector BrightLink Pro 1410Wi/1420Wi/1430Wi, BrightLink 475W/485W, BrightLink 575Wi/585Wi/595Wi, BrightLink 575Wi+/585Wi+/595Wi+ and PowerLite 475W/485W/575W/585W can project up to 93 inches...
Installation Guide - Ultra-Short Throw Wall Mount (ELPMB43)
Page 20
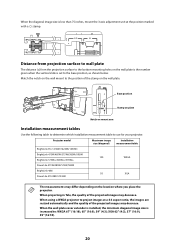
... project images at the position marked with a stamp. Projector model Maximum image size (diagonal) Installation measurement table BrightLink Pro 1410Wi/1420Wi/1430Wi BrightLink 475W/485W/575Wi/585Wi/595Wi 100 BrightLink 575Wi+/585Wi+/595Wi+ WXGA PowerLite 475W/485W/575W/585W BrightLink 480i PowerLite 470/480/570/580 93 XGA The measurements may differ depending on...
... project images at the position marked with a stamp. Projector model Maximum image size (diagonal) Installation measurement table BrightLink Pro 1410Wi/1420Wi/1430Wi BrightLink 475W/485W/575Wi/585Wi/595Wi 100 BrightLink 575Wi+/585Wi+/595Wi+ WXGA PowerLite 475W/485W/575W/585W BrightLink 480i PowerLite 470/480/570/580 93 XGA The measurements may differ depending on...

Installation Guide - Ultra-Short Throw Wall Mount (ELPMB43)
Page 41
... control column PowerLite 470/480/570/580 BrightLink 475W/480i/485W/575Wi/585Wi/595Wi A BrightLink 575Wi+/585Wi+/595Wi+ PowerLite 475W/485W/575W/585W BrightLink Pro 1410Wi/1420Wi/1430Wi B A Turn on the projector Using the Remote Control A Using the Remote Control B Using the Control Panel B Display ...adjustments with the Quick Corner or Keystone functions of the projector. Follow these guidelines for setting up the projector: • Make sure the image is evenly rectangular, without distortion. • Make sure the projector is tilted no more than ±3° vertically and...
... control column PowerLite 470/480/570/580 BrightLink 475W/480i/485W/575Wi/585Wi/595Wi A BrightLink 575Wi+/585Wi+/595Wi+ PowerLite 475W/485W/575W/585W BrightLink Pro 1410Wi/1420Wi/1430Wi B A Turn on the projector Using the Remote Control A Using the Remote Control B Using the Control Panel B Display ...adjustments with the Quick Corner or Keystone functions of the projector. Follow these guidelines for setting up the projector: • Make sure the image is evenly rectangular, without distortion. • Make sure the projector is tilted no more than ±3° vertically and...

Installation Guide - Ultra-Short Throw Wall Mount (ELPMB43)
Page 43
English BrightLink Pro 1410Wi/1420Wi/1430Wi, BrightLink 575Wi/575Wi+/585Wi/585Wi+/595Wi/ 595Wi+, and PowerLite 575W/585W • Auto: Automatically sets the aspect ratio according to the input signal and the Resolution setting (available only for HDMI image sources). • Normal: ... is (aspect ratio and resolution are elongated horizontally. • Zoom: Displays images using the full projection area and maintains the aspect ratio of the image. s Projector User's Guide: Signal Menu D Adjust the focus 1.
English BrightLink Pro 1410Wi/1420Wi/1430Wi, BrightLink 575Wi/575Wi+/585Wi/585Wi+/595Wi/ 595Wi+, and PowerLite 575W/585W • Auto: Automatically sets the aspect ratio according to the input signal and the Resolution setting (available only for HDMI image sources). • Normal: ... is (aspect ratio and resolution are elongated horizontally. • Zoom: Displays images using the full projection area and maintains the aspect ratio of the image. s Projector User's Guide: Signal Menu D Adjust the focus 1.


