
Quick Guide
Page 1
Epson Stylus® NX400 Series Quick Guide Basic Copying, Printing, and Scanning Maintaining Your All-in-One Solving Problems
Epson Stylus® NX400 Series Quick Guide Basic Copying, Printing, and Scanning Maintaining Your All-in-One Solving Problems
Quick Guide
Page 4
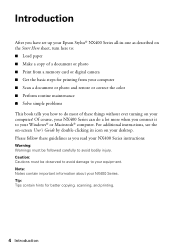
Introduction After you have set up your Epson Stylus® NX400 Series all-in-one as you read your NX400 Series instructions: Warning: Warnings must be followed carefully to avoid bodily injury. For additional instructions, see the on-screen User's Guide by double-clicking its ... a document or photo and restore or correct the color ■ Perform routine maintenance ■ Solve simple problems This book tells you connect it to your NX400 Series can do a lot more when you how to do most of these guidelines as described on the Start Here sheet, turn here to: ■...
Introduction After you have set up your Epson Stylus® NX400 Series all-in-one as you read your NX400 Series instructions: Warning: Warnings must be followed carefully to avoid bodily injury. For additional instructions, see the on-screen User's Guide by double-clicking its ... a document or photo and restore or correct the color ■ Perform routine maintenance ■ Solve simple problems This book tells you connect it to your NX400 Series can do a lot more when you how to do most of these guidelines as described on the Start Here sheet, turn here to: ■...

Quick Guide
Page 10
...y Stop/Clear Settings. 10 Copying a Document or Photo When you would on the document table (see page 9). 4. Note: You cannot print borderless on the NX400 Series. 2. To change the layout. If you need to the edge of the paper (slight cropping may occur). To print more than 1 copy, press +... or - Press x Start to enter copy mode. 5. Press the Copy button to begin copying. or A4-size plain paper or Epson special paper in the sheet feeder (see page 13 for details). Press d, then press r to select the number (up the LCD display screen. 6. Press ...
...y Stop/Clear Settings. 10 Copying a Document or Photo When you would on the document table (see page 9). 4. Note: You cannot print borderless on the NX400 Series. 2. To change the layout. If you need to the edge of the paper (slight cropping may occur). To print more than 1 copy, press +... or - Press x Start to enter copy mode. 5. Press the Copy button to begin copying. or A4-size plain paper or Epson special paper in the sheet feeder (see page 13 for details). Press d, then press r to select the number (up the LCD display screen. 6. Press ...

Quick Guide
Page 11
... select Borderless to expand the image all the way to begin copying. Note: You can copy up to 99). 7. Press l or r to turn on the NX400 Series. 2. Press the P On button to select Color or B&W copies. 8. Press the Copy button. 5. to select the number (up to cancel copying, press... the same time. Copying a Photo 11 Press d, then press r to black and white. 1. Load 4 × 6-inch, 5 × 7-inch, letter-size, or A4-size Epson photo paper in the sheet feeder (see page 13 for instant photo reprints. Flip up the LCD display screen. 6. Copying a Photo You can copy photos...
... select Borderless to expand the image all the way to begin copying. Note: You can copy up to 99). 7. Press l or r to turn on the NX400 Series. 2. Press the P On button to select Color or B&W copies. 8. Press the Copy button. 5. to select the number (up to cancel copying, press... the same time. Copying a Photo 11 Press d, then press r to black and white. 1. Load 4 × 6-inch, 5 × 7-inch, letter-size, or A4-size Epson photo paper in the sheet feeder (see page 13 for instant photo reprints. Flip up the LCD display screen. 6. Copying a Photo You can copy photos...

Quick Guide
Page 12
... Press OK again to turn on Color Restoration.) 6. After you 're done, press OK. 10. Load 4 × 6-inch, 5 × 7-inch, letter-size, or A4-size Epson photo paper. 3. You see page 13). If you need to select the number. 8. When you are done cropping your photo. Press x Start to fit onto... of your paper, press Display/Crop. ■ To resize the image area, press + or -. ■ To move the image area, use the NX400 Series software on the NX400 Series. 2. To turn on Color Restoration, press r and select On and press OK. (If your photo is not faded, do not turn on...
... Press OK again to turn on Color Restoration.) 6. After you 're done, press OK. 10. Load 4 × 6-inch, 5 × 7-inch, letter-size, or A4-size Epson photo paper. 3. You see page 13). If you need to select the number. 8. When you are done cropping your photo. Press x Start to fit onto... of your paper, press Display/Crop. ■ To resize the image area, press + or -. ■ To move the image area, use the NX400 Series software on the NX400 Series. 2. To turn on Color Restoration, press r and select On and press OK. (If your photo is not faded, do not turn on...

Quick Guide
Page 14
...* Adapter required 14 Printing From a Memory Card just insert it into one lets you 're ready to print. and printing photos from your NX400 Series and a computer; Compatible Cards and Image Formats You can use the following types of the memory card slots and you print photos directly from... a slideshow. Printing From a Memory Card The NX400 Series all-in your camera (DPOF™ or Digital Print Order Format); See the User's Guide for instructions on copying memory card files between...
...* Adapter required 14 Printing From a Memory Card just insert it into one lets you 're ready to print. and printing photos from your NX400 Series and a computer; Compatible Cards and Image Formats You can use the following types of the memory card slots and you print photos directly from... a slideshow. Printing From a Memory Card The NX400 Series all-in your camera (DPOF™ or Digital Print Order Format); See the User's Guide for instructions on copying memory card files between...

Quick Guide
Page 15
The NX400 Series supports image files that meet the following requirements: Media format File format Image size Number of files DCF version 1.0 or 2.0 compliant* JPEG Supports Exif ... to 9200 × 9200 pixels Up to print (see page 18) Inserting the Card 15 Insert your photos on . 2. Inserting the Card 1. Make sure the NX400 Series is the "Design rule for Camera File system" standard Note: You can print only in color when printing directly from a memory card; Now you...
The NX400 Series supports image files that meet the following requirements: Media format File format Image size Number of files DCF version 1.0 or 2.0 compliant* JPEG Supports Exif ... to 9200 × 9200 pixels Up to print (see page 18) Inserting the Card 15 Insert your photos on . 2. Inserting the Card 1. Make sure the NX400 Series is the "Design rule for Camera File system" standard Note: You can print only in color when printing directly from a memory card; Now you...
Quick Guide
Page 16
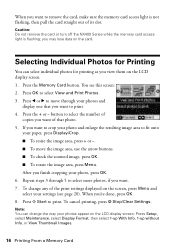
Caution: Do not remove the card or turn off the NX400 Series while the memory card access light is not flashing, then pull the card straight out of copies you want to crop your photo and ...
Caution: Do not remove the card or turn off the NX400 Series while the memory card access light is not flashing, then pull the card straight out of copies you want to crop your photo and ...

Quick Guide
Page 18
... Information and choose Date or File Name. 6. Printing an Index Sheet 1. Now you can print an index sheet containing small versions of plain letter- The NX400 Series automatically prints them on the sheet and scanning the sheet.
... Information and choose Date or File Name. 6. Printing an Index Sheet 1. Now you can print an index sheet containing small versions of plain letter- The NX400 Series automatically prints them on the sheet and scanning the sheet.

Quick Guide
Page 21
...page 5). 2. Open a photo or document in Windows 1. Before you start, make sure you've installed your printer software and connected the NX400 Series to your Windows or Macintosh computer. Printing in a Windows program. 3. Open the File menu and select Print. Printing From Your ... idea to open your printer software 4. You see page 36 for updates to your NX400 Series software (see a window like this one: Select EPSON Stylus NX400 Series Click here to check for instructions). Make sure EPSON Stylus NX400 Series is selected, then click the Preferences or Properties button.
...page 5). 2. Open a photo or document in Windows 1. Before you start, make sure you've installed your printer software and connected the NX400 Series to your Windows or Macintosh computer. Printing in a Windows program. 3. Open the File menu and select Print. Printing From Your ... idea to open your printer software 4. You see page 36 for updates to your NX400 Series software (see a window like this one: Select EPSON Stylus NX400 Series Click here to check for instructions). Make sure EPSON Stylus NX400 Series is selected, then click the Preferences or Properties button.

Quick Guide
Page 23
Select EPSON Stylus NX400 Click to expand the Print window, if necessary. Printing With a Macintosh 23 Select EPSON Stylus NX400 Series as the Printer setting. Click the arrow to expand 4. This window appears and shows the progress of your Mac OS® operating system. Mac OS X 10.5 1. Open the File menu and select Print. 3. Check ink cartridge status Cancel printing Printing With a Macintosh See the section below for your print job. 9. Open a photo or document in an application. 2. Click OK or Print to start printing.
Select EPSON Stylus NX400 Click to expand the Print window, if necessary. Printing With a Macintosh 23 Select EPSON Stylus NX400 Series as the Printer setting. Click the arrow to expand 4. This window appears and shows the progress of your Mac OS® operating system. Mac OS X 10.5 1. Open the File menu and select Print. 3. Check ink cartridge status Cancel printing Printing With a Macintosh See the section below for your print job. 9. Open a photo or document in an application. 2. Click OK or Print to start printing.

Quick Guide
Page 25
... option in an application. 2. Open a photo or document in the Paper Size list for details. 8. Printing With a Macintosh 25 7. Select the following settings: Select Stylus NX400 Select your Paper Size Select your document or image orientation For borderless printing, choose a Sheet Feeder - Choose any other printing options you may need from...
... option in an application. 2. Open a photo or document in the Paper Size list for details. 8. Printing With a Macintosh 25 7. Select the following settings: Select Stylus NX400 Select your Paper Size Select your document or image orientation For borderless printing, choose a Sheet Feeder - Choose any other printing options you may need from...

Quick Guide
Page 26
... can select Print Settings. Click Print. 26 Printing From Your Computer Choose any other printing options you may need to change additional settings. 4. Select Stylus NX400, choose Print Settings from the File menu.
... can select Print Settings. Click Print. 26 Printing From Your Computer Choose any other printing options you may need to change additional settings. 4. Select Stylus NX400, choose Print Settings from the File menu.
Quick Guide
Page 27
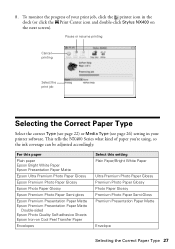
...Epson Bright White Paper Epson Presentation Paper Matte Epson Ultra Premium Photo Paper Glossy Epson Premium Photo Paper Glossy Epson Photo Paper Glossy Epson Premium Photo Paper Semi-gloss Epson Premium Presentation Paper Matte Epson Premium Presentation Paper Matte Double-sided Epson Photo Quality Self-adhesive Sheets Epson Iron-on the next screen). This tells the NX400... (see page 26) setting in the dock (or click the Print Center icon and double-click Stylus NX400 on Cool Peel Transfer Paper Envelopes Select this setting Plain Paper/Bright White Paper Ultra Premium Photo Paper Glossy...
...Epson Bright White Paper Epson Presentation Paper Matte Epson Ultra Premium Photo Paper Glossy Epson Premium Photo Paper Glossy Epson Photo Paper Glossy Epson Premium Photo Paper Semi-gloss Epson Premium Presentation Paper Matte Epson Premium Presentation Paper Matte Double-sided Epson Photo Quality Self-adhesive Sheets Epson Iron-on the next screen). This tells the NX400... (see page 26) setting in the dock (or click the Print Center icon and double-click Stylus NX400 on Cool Peel Transfer Paper Envelopes Select this setting Plain Paper/Bright White Paper Ultra Premium Photo Paper Glossy...

Quick Guide
Page 28
... are scanning from any TWAIN-compliant application-such as you don't move the original. 3. Then open the File menu, choose Import or Acquire, and select EPSON NX400. 28 Scanning a Document or Photo Basic Scanning You can scan from an application, start your computer or other device. Open the document cover and place... detailed scanning instructions, see page 29). Close the cover gently so you scan (see the on page 9. 2. Scanning a Document or Photo You can use your Epson Stylus NX400 Series all-in-one of tools.
... are scanning from any TWAIN-compliant application-such as you don't move the original. 3. Then open the File menu, choose Import or Acquire, and select EPSON NX400. 28 Scanning a Document or Photo Basic Scanning You can scan from an application, start your computer or other device. Open the document cover and place... detailed scanning instructions, see page 29). Close the cover gently so you scan (see the on page 9. 2. Scanning a Document or Photo You can use your Epson Stylus NX400 Series all-in-one of tools.

Quick Guide
Page 30
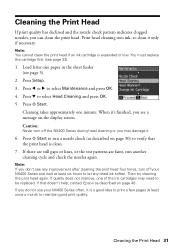
... cleaning the print head nozzles and replacing ink cartridges. If you need cleaning 7. Press Setup. 3. Check the nozzle check pattern that prints to see your NX400 Series looking like new, don't place anything on -screen User's Guide. Maintaining Your All-in-One Follow the instructions in the lines. Load letter-size...
... cleaning the print head nozzles and replacing ink cartridges. If you need cleaning 7. Press Setup. 3. Check the nozzle check pattern that prints to see your NX400 Series looking like new, don't place anything on -screen User's Guide. Maintaining Your All-in-One Follow the instructions in the lines. Load letter-size...
Quick Guide
Page 31
.... If that the print head is expended or low. If you can clean the print head. Press Setup. 3. Press d to verify that doesn't help, contact Epson as described on page 30) to select Head Cleaning and press OK. 5. Press x Start to run another cleaning cycle and check the nozzles again. Note... first (see page 5). 2. Cleaning the Print Head If print quality has declined and the nozzle check pattern indicates clogged nozzles, you do not use your NX400 Series and wait at least once a month to let any improvement after cleaning the print head four times, turn off your...
.... If that the print head is expended or low. If you can clean the print head. Press Setup. 3. Press d to verify that doesn't help, contact Epson as described on page 30) to select Head Cleaning and press OK. 5. Press x Start to run another cleaning cycle and check the nozzles again. Note... first (see page 5). 2. Cleaning the Print Head If print quality has declined and the nozzle check pattern indicates clogged nozzles, you do not use your NX400 Series and wait at least once a month to let any improvement after cleaning the print head four times, turn off your...
Quick Guide
Page 33
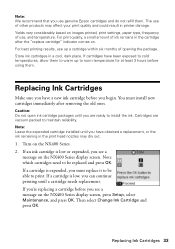
... needs replacement. If an ink cartridge is expended, you use , and temperature. Replacing Ink Cartridges 33 Yields vary considerably based on the NX400 Series. 2. Note: Leave the expended cartridge installed until you begin. Note which cartridges need to be able to be replaced and press ...hours before you are vacuum packed to install the ink. The use up to warm up a cartridge within six months of use genuine Epson cartridges and do not refill them . Store ink cartridges in printer damage. Replacing Ink Cartridges Make sure you have obtained a replacement,...
... needs replacement. If an ink cartridge is expended, you use , and temperature. Replacing Ink Cartridges 33 Yields vary considerably based on the NX400 Series. 2. Note: Leave the expended cartridge installed until you begin. Note which cartridges need to be able to be replaced and press ...hours before you are vacuum packed to install the ink. The use up to warm up a cartridge within six months of use genuine Epson cartridges and do not refill them . Store ink cartridges in printer damage. Replacing Ink Cartridges Make sure you have obtained a replacement,...

Quick Guide
Page 35
Close the scanner. 10. Caution: Never turn off the NX400 Series while ink is charging or you see an ink replacement message on the document table. Press OK to begin charging the ink. When you '...
Close the scanner. 10. Caution: Never turn off the NX400 Series while ink is charging or you see an ink replacement message on the document table. Press OK to begin charging the ink. When you '...
Quick Guide
Page 36
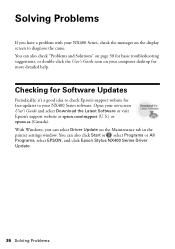
... printer settings window. You can also click Start or , select Programs or All Programs, select EPSON, and click Epson Stylus NX400 Series Driver Update. 36 Solving Problems Checking for Software Updates Periodically, it's a good idea to check Epson's support website for more detailed help. Solving Problems If you can select Driver Update on -screen...
... printer settings window. You can also click Start or , select Programs or All Programs, select EPSON, and click Epson Stylus NX400 Series Driver Update. 36 Solving Problems Checking for Software Updates Periodically, it's a good idea to check Epson's support website for more detailed help. Solving Problems If you can select Driver Update on -screen...


