User Manual
Page 6
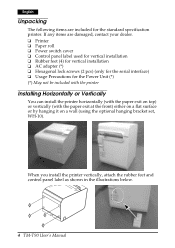
...on a wall (using the optional hanging bracket set, WH-10). English Unpacking The following items are damaged, contact your dealer. ❏ Printer ❏ Paper roll ❏ Power switch cover ❏ Control panel label used for vertical installation ❏ Rubber feet (4) for vertical ... adapter (*) ❏ Hexagonal lock screws (2 pcs) (only for the serial interface) ❏ Usage Precautions for the standard specification printer. When you install the printer vertically, attach the rubber feet and control panel label as shown in the illustrations below. 4 TM-T90 User's Manual
...on a wall (using the optional hanging bracket set, WH-10). English Unpacking The following items are damaged, contact your dealer. ❏ Printer ❏ Paper roll ❏ Power switch cover ❏ Control panel label used for vertical installation ❏ Rubber feet (4) for vertical ... adapter (*) ❏ Hexagonal lock screws (2 pcs) (only for the serial interface) ❏ Usage Precautions for the standard specification printer. When you install the printer vertically, attach the rubber feet and control panel label as shown in the illustrations below. 4 TM-T90 User's Manual
User Manual
Page 7
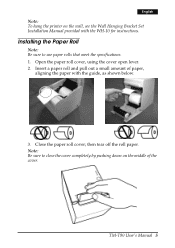
English Note: To hang the printer on the middle of paper, aligning the paper with the WH-10 for instructions. Note: Be sure to use paper rolls that meet the specifications. 1. Insert a paper roll and pull out a small amount of the cover. Close the paper roll cover; then tear off the roll paper. TM-T90 User's Manual 5 Open the paper roll cover, using the cover open lever. 2. Installing the Paper Roll Note: Be sure to close the cover completely by pushing down on the wall, see the Wall Hanging Bracket Set Installation Manual provided with the guide, as shown below. 3.
English Note: To hang the printer on the middle of paper, aligning the paper with the WH-10 for instructions. Note: Be sure to use paper rolls that meet the specifications. 1. Insert a paper roll and pull out a small amount of the cover. Close the paper roll cover; then tear off the roll paper. TM-T90 User's Manual 5 Open the paper roll cover, using the cover open lever. 2. Installing the Paper Roll Note: Be sure to close the cover completely by pushing down on the wall, see the Wall Hanging Bracket Set Installation Manual provided with the guide, as shown below. 3.
User Manual
Page 10
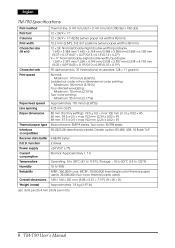
English . TM-T90 Specifications Print method Thermal line, 0.141 mm/dot × 0.141 mm/dot (180 dpi × 180 dpi) Print font 12 × 24/9 × 17 Columns 12 × 24/9 × 17: ...;F}, Storage: -10 to 50°C {14 to 122°F} Humidity 10 to 90% Reliability MTBF: 360,000 hours, MCBF: 70,000,000 lines (single-color thermal paper used), 35,000,000 (two-color thermal paper used) Overall dimensions 148 × 140 × 201 mm {5.83 × 5.51 × 7.91"} (H × W × D) Weight (mass) Approximately 1.8 kg {3.97...
English . TM-T90 Specifications Print method Thermal line, 0.141 mm/dot × 0.141 mm/dot (180 dpi × 180 dpi) Print font 12 × 24/9 × 17 Columns 12 × 24/9 × 17: ...;F}, Storage: -10 to 50°C {14 to 122°F} Humidity 10 to 90% Reliability MTBF: 360,000 hours, MCBF: 70,000,000 lines (single-color thermal paper used), 35,000,000 (two-color thermal paper used) Overall dimensions 148 × 140 × 201 mm {5.83 × 5.51 × 7.91"} (H × W × D) Weight (mass) Approximately 1.8 kg {3.97...