
Installation Guide
Page 1
North Ave. • Melrose Park, IL 60160 • (800) 865-2112 or (708) 865-8870 • Fax: (708) 865-2941 • www.peerlessmounts.com Maximum UL Load Capacity: 50 lb (22.7 kg) Manufactured by a qualified professional R installer. Installation and Assembly: Universal Projector Ceiling Mount Model: ELPMBPJF This product is UL Listed. It must be installed by Peerless Industries, Inc. 3215 W.
North Ave. • Melrose Park, IL 60160 • (800) 865-2112 or (708) 865-8870 • Fax: (708) 865-2941 • www.peerlessmounts.com Maximum UL Load Capacity: 50 lb (22.7 kg) Manufactured by a qualified professional R installer. Installation and Assembly: Universal Projector Ceiling Mount Model: ELPMBPJF This product is UL Listed. It must be installed by Peerless Industries, Inc. 3215 W.

Installation Guide
Page 2
...Parts List ...3 Installation to Extension Column ...4 Installation to Wood Joist Ceilings ...5 Installation to Concrete Ceilings ...6 Flush Mount Application ...7 Attaching Adapter Plate to Projector ...7-8 Attaching Adapter Plate to Projector Mount ...8 Projector Alignment and Accessories ...9 Warranty Information ...10 Visit the Peerless Web... with basic building construction, and fully understands these instructions. • When installing or adjusting the ceiling mount, do not overtighten. If you have read and understood the instructions and warnings contained in this product...
...Parts List ...3 Installation to Extension Column ...4 Installation to Wood Joist Ceilings ...5 Installation to Concrete Ceilings ...6 Flush Mount Application ...7 Attaching Adapter Plate to Projector ...7-8 Attaching Adapter Plate to Projector Mount ...8 Projector Alignment and Accessories ...9 Warranty Information ...10 Visit the Peerless Web... with basic building construction, and fully understands these instructions. • When installing or adjusting the ceiling mount, do not overtighten. If you have read and understood the instructions and warnings contained in this product...

Installation Guide
Page 3
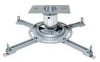
... screw Q 2 mm security allen wrench R washer Qty. Parts List Description A projector mount B 4 mm security allen wrench C M5 x .8 x 10 mm socket pin type F screw D #10-32 x 3/8" spade thumb screw E #10-32 x 3/8" serrated washer head socket pin screw F #14 x 2.5" phillips hex head wood screw G ceiling plate H .25" ID x .56" OD x .26 spacer I G C E J MN O P KD F H R B Q Visit... start check the parts list to ensure all of 10 ISSUED: 01-23-07 SHEET #:055-9498-2 05-29-08 For Technical Support Contact Peerless Mounts at 1-800-729-0307 or 708-865-8870.
... screw Q 2 mm security allen wrench R washer Qty. Parts List Description A projector mount B 4 mm security allen wrench C M5 x .8 x 10 mm socket pin type F screw D #10-32 x 3/8" spade thumb screw E #10-32 x 3/8" serrated washer head socket pin screw F #14 x 2.5" phillips hex head wood screw G ceiling plate H .25" ID x .56" OD x .26 spacer I G C E J MN O P KD F H R B Q Visit... start check the parts list to ensure all of 10 ISSUED: 01-23-07 SHEET #:055-9498-2 05-29-08 For Technical Support Contact Peerless Mounts at 1-800-729-0307 or 708-865-8870.

Installation Guide
Page 4
...Align slot in projector mount (A) to one #10-32 x 3/8" socket pin screw (J) through extension column connector (I ) to extension column. See detail 2. See detail 3. *NOTE: Slotted set screws (K) are used to jam against the threads of the bottom holes in the ceiling plate (G) and...connector (I COLUMN SLOT A Visit the Peerless Web Site at www.peerlessmounts.com K J A DETAIL 3 4 of the top holes in projector mount (A) using security allen wrench (B). Screw extension column connector (I ) into slot on extension column using security allen wrench (B). Insert and tighten ...
...Align slot in projector mount (A) to one #10-32 x 3/8" socket pin screw (J) through extension column connector (I ) to extension column. See detail 2. See detail 3. *NOTE: Slotted set screws (K) are used to jam against the threads of the bottom holes in the ceiling plate (G) and...connector (I COLUMN SLOT A Visit the Peerless Web Site at www.peerlessmounts.com K J A DETAIL 3 4 of the top holes in projector mount (A) using security allen wrench (B). Screw extension column connector (I ) into slot on extension column using security allen wrench (B). Insert and tighten ...

Installation Guide
Page 7
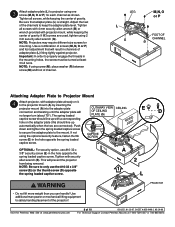
... difficult to ensure that the projector is the responsibility of the projector mount (A). DETAIL 1 CAUTION • It is properly ventilated. Using one of the four holes of the ceiling plate (G) and secure projector mount (A) with notch* facing forward as close to projector center of gravity as shown. Flush Mount Application 1 Screw projector mount (A) into ceiling plate (G). Place projector upside down. Loosen channels...
... difficult to ensure that the projector is the responsibility of the projector mount (A). DETAIL 1 CAUTION • It is properly ventilated. Using one of the four holes of the ceiling plate (G) and secure projector mount (A) with notch* facing forward as close to projector center of gravity as shown. Flush Mount Application 1 Screw projector mount (A) into ceiling plate (G). Place projector upside down. Loosen channels...
Installation Guide
Page 8
... (M, N, O or P) and foot adjustment that adapter plate (L) is straight. The spring loaded PLATE (G) captive screw should line up with projector mount, while keeping the center of gravity. OPTIONAL: For security option, use the #10-32 x 3/8" screw (E) (or the thumb screw (D)... or P FOOT OF CHANNEL Attaching Adapter Plate to the projector mount (A) by inserting the projector mount (A) into the adapter plate connection and twisting until the adapter plate will prevent the projector from being removed. This will CUTAWAY VIEW CEILING OF CEILING E D no longer turn (about 75°). If ...
... (M, N, O or P) and foot adjustment that adapter plate (L) is straight. The spring loaded PLATE (G) captive screw should line up with projector mount, while keeping the center of gravity. OPTIONAL: For security option, use the #10-32 x 3/8" screw (E) (or the thumb screw (D)... or P FOOT OF CHANNEL Attaching Adapter Plate to the projector mount (A) by inserting the projector mount (A) into the adapter plate connection and twisting until the adapter plate will prevent the projector from being removed. This will CUTAWAY VIEW CEILING OF CEILING E D no longer turn (about 75°). If ...

Installation Guide
Page 9
... cable management • 1 ½" - 11.5" NPT pipe threaded on both ends • Notched ends for projector removal. SET SCREW PROJECTOR Accessories NOTE: All accessories are available for purchase through Epson (www.epson.com) ELPMBP01 Adjustable Suspended Ceiling Channel Kit • Mounts above 2' x 2' or 2' x 4' ceiling tile to structural ceiling with tie wires • Includes tie wire supports and flush...
... cable management • 1 ½" - 11.5" NPT pipe threaded on both ends • Notched ends for projector removal. SET SCREW PROJECTOR Accessories NOTE: All accessories are available for purchase through Epson (www.epson.com) ELPMBP01 Adjustable Suspended Ceiling Channel Kit • Mounts above 2' x 2' or 2' x 4' ceiling tile to structural ceiling with tie wires • Includes tie wire supports and flush...
