
Users Guide
Page 7
... Product Control Panel 153 Checking the Nozzles Using a Computer Utility 155 Print Head Cleaning ...156 Cleaning the Print Head Using the Product Control Panel 157 Cleaning the Print Head Using a Computer Utility 158 Power Cleaning ...161 Power Cleaning Using the Product Control Panel 161 Power Cleaning Using a Computer Utility 162 Print Head Alignment ...164 Aligning the Print Head Using...
... Product Control Panel 153 Checking the Nozzles Using a Computer Utility 155 Print Head Cleaning ...156 Cleaning the Print Head Using the Product Control Panel 157 Cleaning the Print Head Using a Computer Utility 158 Power Cleaning ...161 Power Cleaning Using the Product Control Panel 161 Power Cleaning Using a Computer Utility 162 Print Head Alignment ...164 Aligning the Print Head Using...
Users Guide
Page 152
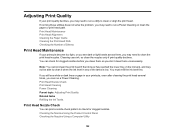
... may need to run a utility to clean the print head nozzles. Print Head Nozzle Check Print Head Cleaning Power Cleaning Parent topic: Adjusting Print Quality Related tasks Refilling the Ink Tanks Print Head Nozzle Check You can run a Power Cleaning or clean the paper or print head path. Print... Head Maintenance Print Head Alignment Cleaning the Paper Guide Cleaning the Print Head Path Checking the Number of the tanks is low. You ...
... may need to run a utility to clean the print head nozzles. Print Head Nozzle Check Print Head Cleaning Power Cleaning Parent topic: Adjusting Print Quality Related tasks Refilling the Ink Tanks Print Head Nozzle Check You can run a Power Cleaning or clean the paper or print head path. Print... Head Maintenance Print Head Alignment Cleaning the Paper Guide Cleaning the Print Head Path Checking the Number of the tanks is low. You ...
Users Guide
Page 154
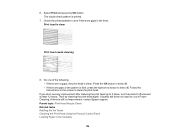
... the Product Control Panel Loading Paper in the lines. 6. The nozzle check pattern is clean Print head needs cleaning 8. Do one of the following: • If there are no improvement, contact Epson support. If quality still does not improve, run a Power Cleaning. Press the OK button to select X. If there is still no gaps, the...
... the Product Control Panel Loading Paper in the lines. 6. The nozzle check pattern is clean Print head needs cleaning 8. Do one of the following: • If there are no improvement, contact Epson support. If quality still does not improve, run a Power Cleaning. Press the OK button to select X. If there is still no gaps, the...

Users Guide
Page 158
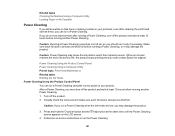
...nozzle check and confirm that the print head is still no improvement, contact Epson support. Press the OK button to 3 times, turn off the product and wait at least 12 hours. Then try cleaning the print head again. Press the OK button to Get Help Related tasks ... in the Cassette Cleaning the Print Head Using a Computer Utility You can clean the print head using a utility on the LCD screen during a cleaning cycle or you see any improvement after cleaning the print head up to run a Power Cleaning. Parent topic: Print Head Cleaning Related references Where to clean the print head....
...nozzle check and confirm that the print head is still no improvement, contact Epson support. Press the OK button to 3 times, turn off the product and wait at least 12 hours. Then try cleaning the print head again. Press the OK button to Get Help Related tasks ... in the Cassette Cleaning the Print Head Using a Computer Utility You can clean the print head using a utility on the LCD screen during a cleaning cycle or you see any improvement after cleaning the print head up to run a Power Cleaning. Parent topic: Print Head Cleaning Related references Where to clean the print head....

Users Guide
Page 159
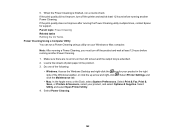
...right-click . • Mac: In the Apple menu or the Dock, select System Preferences. You see a window like this: 5. The power light flashes throughout the cleaning cycle and stays on the LCD screen and the output tray is finished. 159 Select Print & Fax, Print & Scan, or Printers & ...Scanners, select your product in the product. 3. Select Head Cleaning. Click Start to begin the cleaning cycle. Load a few sheets of plain paper in the right side of the following: • Windows: Access the Windows Desktop and ...
...right-click . • Mac: In the Apple menu or the Dock, select System Preferences. You see a window like this: 5. The power light flashes throughout the cleaning cycle and stays on the LCD screen and the output tray is finished. 159 Select Print & Fax, Print & Scan, or Printers & ...Scanners, select your product in the product. 3. Select Head Cleaning. Click Start to begin the cleaning cycle. Load a few sheets of plain paper in the right side of the following: • Windows: Access the Windows Desktop and ...

Users Guide
Page 160
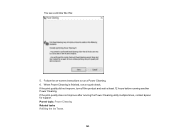
If quality still does not improve, run a Power Cleaning. click Print Nozzle Check Pattern and click Print. 7. If there is faint, click Clean to clean the print head again. Check the printed pattern to see if there are gaps or the pattern is still no gaps, click Finish. ... product or open the printer cover during a cleaning cycle or you can check to see if the nozzles are clean; When the cleaning cycle is clean Print head needs cleaning • If there are no improvement, contact Epson support. If you don't see any improvement after cleaning the print head up to 3 times, turn...
If quality still does not improve, run a Power Cleaning. click Print Nozzle Check Pattern and click Print. 7. If there is faint, click Clean to clean the print head again. Check the printed pattern to see if there are gaps or the pattern is still no gaps, click Finish. ... product or open the printer cover during a cleaning cycle or you can check to see if the nozzles are clean; When the cleaning cycle is clean Print head needs cleaning • If there are no improvement, contact Epson support. If you don't see any improvement after cleaning the print head up to 3 times, turn...
Users Guide
Page 161
... ink levels and make sure each ink tank is at least one -third full. After a Power Cleaning, you must contact Epson for support. Caution: If you run a Power Cleaning when the ink levels are low, you should run the Power Cleaning. 161 Caution: Power Cleaning may damage the product. 3. When an ink pad reaches the end of ink, so...
... ink levels and make sure each ink tank is at least one -third full. After a Power Cleaning, you must contact Epson for support. Caution: If you run a Power Cleaning when the ink levels are low, you should run the Power Cleaning. 161 Caution: Power Cleaning may damage the product. 3. When an ink pad reaches the end of ink, so...
Users Guide
Page 162
...the right side of plain paper in the product. 3. Note: After running a Power Cleaning, you must turn off the product and wait at least 12 hours before running the Power Cleaning utility multiple times, contact Epson for your product, and select Options & Supplies. Load a few sheets of ...the Windows taskbar, or click the up arrow and right-click . When the Power Cleaning is extended. 2. Select Printer Settings and ...
...the right side of plain paper in the product. 3. Note: After running a Power Cleaning, you must turn off the product and wait at least 12 hours before running the Power Cleaning utility multiple times, contact Epson for your product, and select Options & Supplies. Load a few sheets of ...the Windows taskbar, or click the up arrow and right-click . When the Power Cleaning is extended. 2. Select Printer Settings and ...
Users Guide
Page 163
If the print quality does not improve after running another Power Cleaning. When Power Cleaning is finished, run a Power Cleaning. 6. You see a window like this: 5. If the print quality did not improve, turn off the product and wait at least 12 hours before running the Power Cleaning utility multiple times, contact Epson for support. Follow the on-screen instructions to run a nozzle check. Parent topic: Power Cleaning Related tasks Refilling the Ink Tanks 163
If the print quality does not improve after running another Power Cleaning. When Power Cleaning is finished, run a Power Cleaning. 6. You see a window like this: 5. If the print quality did not improve, turn off the product and wait at least 12 hours before running the Power Cleaning utility multiple times, contact Epson for support. Follow the on-screen instructions to run a nozzle check. Parent topic: Power Cleaning Related tasks Refilling the Ink Tanks 163

Users Guide
Page 167
... paper path, the print head path inside the printer may damage your product. 1. To clean the print head path, use the following: • Several cotton swabs • ¼ cup (59 ml) water containing 2 to 3 drops of mild dish detergent • A ...small flashlight Caution: Do not use any connected cables. 4. Unplug the power cable. 3. Disconnect any other liquid to clean the print head path or you may be smeared with ink. Lift up the scanner unit. 167 Turn off the product. 2.
... paper path, the print head path inside the printer may damage your product. 1. To clean the print head path, use the following: • Several cotton swabs • ¼ cup (59 ml) water containing 2 to 3 drops of mild dish detergent • A ...small flashlight Caution: Do not use any connected cables. 4. Unplug the power cable. 3. Disconnect any other liquid to clean the print head path or you may be smeared with ink. Lift up the scanner unit. 167 Turn off the product. 2.

Users Guide
Page 169
Use a new, dry cotton swab to clean all ink smears. 9. Windows Checking the Sheet Counter - When the translucent film is dry, close the scanner unit. 10. Reconnect any disconnected cables, plug in ... Settings. 3. Access the Windows Desktop and right-click the icon for your product in the power cord, and turn on the product. Parent topic: Adjusting Print Quality Related concepts Print Head Cleaning Print Head Alignment Related tasks Cleaning the Print Head Using a Computer Utility Checking the Number of Sheets You can also view...
Use a new, dry cotton swab to clean all ink smears. 9. Windows Checking the Sheet Counter - When the translucent film is dry, close the scanner unit. 10. Reconnect any disconnected cables, plug in ... Settings. 3. Access the Windows Desktop and right-click the icon for your product in the power cord, and turn on the product. Parent topic: Adjusting Print Quality Related concepts Print Head Cleaning Print Head Alignment Related tasks Cleaning the Print Head Using a Computer Utility Checking the Number of Sheets You can also view...

Users Guide
Page 172
... other lubricants inside the product or let water get inside it several times a year. Unplug the power cord. 3. Do not use a hard brush, alcohol, or paint thinner to clean or transport your product working at its best, you may damage it. Cleaning and Transporting Your Product See these sections if you need to...
... other lubricants inside the product or let water get inside it several times a year. Unplug the power cord. 3. Do not use a hard brush, alcohol, or paint thinner to clean or transport your product working at its best, you may damage it. Cleaning and Transporting Your Product See these sections if you need to...

Users Guide
Page 174
Open the ADF cover. 9. Clean the outer case and control panel with a soft, dry cloth. Turn off the product. 2. Use a soft, dry, lint-free cloth (microfiber is recommended) to clean the rollers and the interior of the ADF. 10. Do not use liquid or chemical cleansers. Parent topic: Cleaning and Transporting Your Product Cleaning the Paper Rollers If you encounter repeated paper feed issues from the cassette, clean the paper rollers inside the product. 1. 8. Disconnect any connected cables. 174 Unplug the power cable. 3.
Open the ADF cover. 9. Clean the outer case and control panel with a soft, dry cloth. Turn off the product. 2. Use a soft, dry, lint-free cloth (microfiber is recommended) to clean the rollers and the interior of the ADF. 10. Do not use liquid or chemical cleansers. Parent topic: Cleaning and Transporting Your Product Cleaning the Paper Rollers If you encounter repeated paper feed issues from the cassette, clean the paper rollers inside the product. 1. 8. Disconnect any connected cables. 174 Unplug the power cable. 3.

Users Guide
Page 177
..., follow these guidelines: • Avoid tilting the product, placing it vertically, or turning it for transportation as described here. Parent topic: Cleaning and Transporting Your Product Transporting Your Product If you need to impacts or temperature changes. Keep the ink bottle upright when tightening the cap and... not tilt the bottle and do not subject it to store your product or transport it some distance, prepare it upside down; 9. Unplug the power cable. 4. Remove all the paper from the product. 3. Replace the paper, slide in the box with the product. • Do not ...
..., follow these guidelines: • Avoid tilting the product, placing it vertically, or turning it for transportation as described here. Parent topic: Cleaning and Transporting Your Product Transporting Your Product If you need to impacts or temperature changes. Keep the ink bottle upright when tightening the cap and... not tilt the bottle and do not subject it to store your product or transport it some distance, prepare it upside down; 9. Unplug the power cable. 4. Remove all the paper from the product. 3. Replace the paper, slide in the box with the product. • Do not ...

Users Guide
Page 205
... Turn off any of the print head nozzles are clogged. Mac Refilling the Ink Tanks 205 Note: Power Cleaning consumes a lot of ink, so run the Power Cleaning utility. Printing Software Related tasks Selecting Printing Preferences - Parent topic: Solving Print Quality Problems Related concepts ...Print Head Nozzle Check Print Head Cleaning Power Cleaning Print Head Alignment Related references Paper or Media Type Settings - Faint Printout or Printout Has Gaps Grainy Printout ...
... Turn off any of the print head nozzles are clogged. Mac Refilling the Ink Tanks 205 Note: Power Cleaning consumes a lot of ink, so run the Power Cleaning utility. Printing Software Related tasks Selecting Printing Preferences - Parent topic: Solving Print Quality Problems Related concepts ...Print Head Nozzle Check Print Head Cleaning Power Cleaning Print Head Alignment Related references Paper or Media Type Settings - Faint Printout or Printout Has Gaps Grainy Printout ...

Users Guide
Page 206
...or loaded incorrectly in your product. • Use a support sheet with special paper, or load special paper one side of ink, so run the Power Cleaning utility. Visually check the ink levels. • Run a nozzle check to see if print quality has improved. • If you have not ...to ensure proper saturation and absorption of genuine Epson inks. • Make sure the paper type setting in your product software matches the type of paper you loaded. • Make sure you cannot improve print quality by cleaning the print head. 206 Note: Power Cleaning consumes a lot of a sheet will contain...
...or loaded incorrectly in your product. • Use a support sheet with special paper, or load special paper one side of ink, so run the Power Cleaning utility. Visually check the ink levels. • Run a nozzle check to see if print quality has improved. • If you have not ...to ensure proper saturation and absorption of genuine Epson inks. • Make sure the paper type setting in your product software matches the type of paper you loaded. • Make sure you cannot improve print quality by cleaning the print head. 206 Note: Power Cleaning consumes a lot of a sheet will contain...

Users Guide
Page 207
...Parent topic: Solving Print Quality Problems Related concepts Print Head Nozzle Check Print Head Cleaning Print Head Alignment Related references Paper Specifications Compatible Epson Papers Related tasks Selecting Additional Layout and Print Options - Then clean the print head, if necessary. • The ink levels may be low. ...Place it on a flat, stable surface that extends beyond the base of the product in the product software. • Clean the paper path. • If you have not used the product for a long time, run the Power Cleaning utility. 207 Mac Selecting Extended Settings -
...Parent topic: Solving Print Quality Problems Related concepts Print Head Nozzle Check Print Head Cleaning Print Head Alignment Related references Paper Specifications Compatible Epson Papers Related tasks Selecting Additional Layout and Print Options - Then clean the print head, if necessary. • The ink levels may be low. ...Place it on a flat, stable surface that extends beyond the base of the product in the product software. • Clean the paper path. • If you have not used the product for a long time, run the Power Cleaning utility. 207 Mac Selecting Extended Settings -

Users Guide
Page 208
...if you cannot improve print quality by the same amount you increase 208 Parent topic: Solving Print Quality Problems Related concepts Print Head Cleaning Print Head Alignment Print Head Nozzle Check Related references Paper or Media Type Settings - Note: Images from the Internet may need ... Settings - Then clean the print head, if necessary. • Align the print head. • Adjust the print quality. • You may be low resolution and not result in a high quality printout. • If you enlarged the image size in your software documentation. Note: Power Cleaning consumes a lot ...
...if you cannot improve print quality by the same amount you increase 208 Parent topic: Solving Print Quality Problems Related concepts Print Head Cleaning Print Head Alignment Print Head Nozzle Check Related references Paper or Media Type Settings - Note: Images from the Internet may need ... Settings - Then clean the print head, if necessary. • Align the print head. • Adjust the print quality. • You may be low resolution and not result in a high quality printout. • If you enlarged the image size in your software documentation. Note: Power Cleaning consumes a lot ...

Users Guide
Page 209
...Basic Print Settings - Windows Selecting Printing Preferences - Mac Selecting Additional Layout and Print Options - Then run the Power Cleaning utility. Note: Higher resolution settings result in your printout need to process and print. Then clean the print head, if necessary. • The ink levels may be seen in the printer software, try these...-Vivid (Windows) or Normal-Vivid (Mac) as the ink dries. Parent topic: Solving Print Quality Problems Related concepts Print Head Nozzle Check Print Head Cleaning Print Head Alignment Related tasks Selecting Basic Print Settings -
...Basic Print Settings - Windows Selecting Printing Preferences - Mac Selecting Additional Layout and Print Options - Then run the Power Cleaning utility. Note: Higher resolution settings result in your printout need to process and print. Then clean the print head, if necessary. • The ink levels may be seen in the printer software, try these...-Vivid (Windows) or Normal-Vivid (Mac) as the ink dries. Parent topic: Solving Print Quality Problems Related concepts Print Head Nozzle Check Print Head Cleaning Print Head Alignment Related tasks Selecting Basic Print Settings -

Users Guide
Page 210
Parent topic: Solving Print Quality Problems Related concepts Print Head Nozzle Check Print Head Cleaning Power Cleaning Related references Compatible Epson Papers Related tasks Selecting Basic Print Settings - Mac Solving Scanning Problems Check these solutions: • Make sure your computer has adequate memory and meets the ...
Parent topic: Solving Print Quality Problems Related concepts Print Head Nozzle Check Print Head Cleaning Power Cleaning Related references Compatible Epson Papers Related tasks Selecting Basic Print Settings - Mac Solving Scanning Problems Check these solutions: • Make sure your computer has adequate memory and meets the ...


