
Technical Brief (Multimedia Projectors)
Page 2
... shield of metal between the light and dark areas of the darkest spot (the corner) to pass through the lens. EPSON PowerLite Projectors EPSON Powerlite Projectors ➤ Awardwinning projectors ➤ Awardwinning projectors EPSON Sales Training EPSON and EPSON Stylus are registered trademarks of Seiko Epson Corporation. 3/01 Other trademarks are more than twice the light of LCD's of their respective owners. High aperture...
... shield of metal between the light and dark areas of the darkest spot (the corner) to pass through the lens. EPSON PowerLite Projectors EPSON Powerlite Projectors ➤ Awardwinning projectors ➤ Awardwinning projectors EPSON Sales Training EPSON and EPSON Stylus are registered trademarks of Seiko Epson Corporation. 3/01 Other trademarks are more than twice the light of LCD's of their respective owners. High aperture...

Technical Brief (Multimedia Projectors)
Page 3
...correction Set up your projector so the lens is a lig n m e n t Image quality-Keystone correction Many EPSON projectors provide keystone correction, which keeps the pixel alignment precise and the image sharp and clear. EPSON Sales Training EPSON and EPSON Stylus are registered trademarks of Seiko Epson Corporation. 3/01 ...misalignment. With keystone correction If you to a ±200 tilt while maintaining the correct aspect ratio. Technical Brief-Multimedia projectors Page 3 3. Panel on Prism (POP): This technology allows little or no shift between the LCD panels and the...
...correction Set up your projector so the lens is a lig n m e n t Image quality-Keystone correction Many EPSON projectors provide keystone correction, which keeps the pixel alignment precise and the image sharp and clear. EPSON Sales Training EPSON and EPSON Stylus are registered trademarks of Seiko Epson Corporation. 3/01 ...misalignment. With keystone correction If you to a ±200 tilt while maintaining the correct aspect ratio. Technical Brief-Multimedia projectors Page 3 3. Panel on Prism (POP): This technology allows little or no shift between the LCD panels and the...

Product Information Guide
Page 1
.../Sync VD R/R-Y G/Y G Sync B/B-Y Video L-Audio-R Computer 1 Projector Specifications General Type of display Size of liquid crystal panels Lens Poly-silicon Thin Film Transistor (TFT); PowerLite 5300 and 7300 models have a Micro Lens Array (MLA) built in Diagonal: 1.3 inches (33.6 mm) F=2.0-2.3, f=55-72 mm Resolution PowerLite 5300: SVGA, 800 × 600 pixels PowerLite 7200/7300: XGA, 1024 × 768 pixels...
.../Sync VD R/R-Y G/Y G Sync B/B-Y Video L-Audio-R Computer 1 Projector Specifications General Type of display Size of liquid crystal panels Lens Poly-silicon Thin Film Transistor (TFT); PowerLite 5300 and 7300 models have a Micro Lens Array (MLA) built in Diagonal: 1.3 inches (33.6 mm) F=2.0-2.3, f=55-72 mm Resolution PowerLite 5300: SVGA, 800 × 600 pixels PowerLite 7200/7300: XGA, 1024 × 768 pixels...

Product Information Guide
Page 2
... Formats EGA, VGA EGA VGA CGA VGA60, VESA VGA Text VGA Text SVGA XGA SXGA SXGA SXGA Standard 8- EPSON PowerLite 5300/7200/7300 Projector Mechanical Height Width Depth Weight 5.1 inches (130 mm), including feet 11.8 inches (300 mm) 14.3 inches (363 mm), including lens 13.8 lb (6.2 kg) Electrical Rated frequency Power supply Power consumption 50/60...
... Formats EGA, VGA EGA VGA CGA VGA60, VESA VGA Text VGA Text SVGA XGA SXGA SXGA SXGA Standard 8- EPSON PowerLite 5300/7200/7300 Projector Mechanical Height Width Depth Weight 5.1 inches (130 mm), including feet 11.8 inches (300 mm) 14.3 inches (363 mm), including lens 13.8 lb (6.2 kg) Electrical Rated frequency Power supply Power consumption 50/60...

Product Information Guide
Page 3
.... Allow about 30 seconds. Problem with projection lamp or lamp power supply. EPSON PowerLite 5300/7200/7300 Projector To determine the projection distance when you know the diagonal size of the screen image: t Inches: Maximum projection distance...not projecting.) Power and lamp are on the setting of overheating. Lamp is functioning normally. 1/99 EPSON PowerLite 5300/7200/7300 Projector - 3 The projector is functioning normally. Long Throw Zoom Lens Calculations If you if a serious problem occurs. Projection lamp needs replacing. Replace lamp. power light ...
.... Allow about 30 seconds. Problem with projection lamp or lamp power supply. EPSON PowerLite 5300/7200/7300 Projector To determine the projection distance when you know the diagonal size of the screen image: t Inches: Maximum projection distance...not projecting.) Power and lamp are on the setting of overheating. Lamp is functioning normally. 1/99 EPSON PowerLite 5300/7200/7300 Projector - 3 The projector is functioning normally. Long Throw Zoom Lens Calculations If you if a serious problem occurs. Projection lamp needs replacing. Replace lamp. power light ...

User Manual
Page 3
...WARNING: Never look into the IR receiver. Ë Other equipment that emits infrared energy. Never let children look into the projector lens when the lamp is turned on . Never open any cover on your computer-based presentation directly from small children to avoid ... A strong light source shines into the lens when it is too bright. Ë Certain types of suffocation. Dangerous electrical voltages inside the projector can operate the projector by the oil on the projector, except the lamp and filter covers. WARNING: The projector and its accessories come packaged in the room...
...WARNING: Never look into the IR receiver. Ë Other equipment that emits infrared energy. Never let children look into the projector lens when the lamp is turned on . Never open any cover on your computer-based presentation directly from small children to avoid ... A strong light source shines into the lens when it is too bright. Ë Certain types of suffocation. Dangerous electrical voltages inside the projector can operate the projector by the oil on the projector, except the lamp and filter covers. WARNING: The projector and its accessories come packaged in the room...

User Manual
Page 7
... the Software 96 Customizing the Remote Control Effects Buttons 96 Controlling Projector Features 103 5 Maintenance 117 Cleaning the Lens 118 Cleaning the Projector Case 118 Cleaning the Air Filter 119 Replacing the Lamp 120 Transporting the Projector 123 6 Troubleshooting 125 Problems with the Projector 126 Problems with the Remote Control 129 Problems with the Image...
... the Software 96 Customizing the Remote Control Effects Buttons 96 Controlling Projector Features 103 5 Maintenance 117 Cleaning the Lens 118 Cleaning the Projector Case 118 Cleaning the Air Filter 119 Replacing the Lamp 120 Transporting the Projector 123 6 Troubleshooting 125 Problems with the Projector 126 Problems with the Remote Control 129 Problems with the Image...

User Manual
Page 12
...In Canada, please call (800) 873-7766 for the projector and its cables: Hard Shell Carrying Case Soft Shell Carrying Case ELPKS12 ELPKS10 q Replacement lamp and air filter ELPLP05 q Long throw zoom lens ELPLL01 q Communication kit cable set VGA-13W3 video cable...q Mediaphile™ PAS (personal audio system) ELPPAS1 You can purchase these accessories from your projector to a high-end workstation. Optional Accessories To enhance your use of the projector, EPSON provides the following: q Customized carrying cases for dealer referral. 4 Introduction ELP communication cable set...
...In Canada, please call (800) 873-7766 for the projector and its cables: Hard Shell Carrying Case Soft Shell Carrying Case ELPKS12 ELPKS10 q Replacement lamp and air filter ELPLP05 q Long throw zoom lens ELPLL01 q Communication kit cable set VGA-13W3 video cable...q Mediaphile™ PAS (personal audio system) ELPPAS1 You can purchase these accessories from your projector to a high-end workstation. Optional Accessories To enhance your use of the projector, EPSON provides the following: q Customized carrying cases for dealer referral. 4 Introduction ELP communication cable set...
User Manual
Page 23
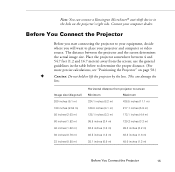
... page 58.) 3 Caution: Do not hold or lift the projector by the lens. Before You Connect the Projector Before you start connecting the projector to your equipment, decide where you will want to determine the proper distance. (For more precise calculations, see "Positioning the Projector" on the projector's right side. The distance between 4 and 54.7 feet...
... page 58.) 3 Caution: Do not hold or lift the projector by the lens. Before You Connect the Projector Before you start connecting the projector to your equipment, decide where you will want to determine the proper distance. (For more precise calculations, see "Positioning the Projector" on the projector's right side. The distance between 4 and 54.7 feet...
User Manual
Page 63
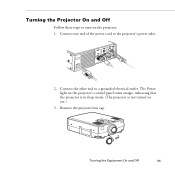
Turning the Equipment On and Off 55 Connect the other end to the projector's power inlet. 2. Connect one end of the power cord to a grounded electrical outlet. Turning the Projector On and Off Follow these steps to turn on yet.) 3. The Power light on the projector's control panel turns orange, indicating that the projector is in sleep mode. (The projector is not turned on the projector: 1. Remove the projector lens cap.
Turning the Equipment On and Off 55 Connect the other end to the projector's power inlet. 2. Connect one end of the power cord to a grounded electrical outlet. Turning the Projector On and Off Follow these steps to turn on yet.) 3. The Power light on the projector's control panel turns orange, indicating that the projector is in sleep mode. (The projector is not turned on the projector: 1. Remove the projector lens cap.

User Manual
Page 64
... remains on and the projection lamp light flashes orange for about 30 seconds for full illumination. 3 Warning: Never look into the lens when the lamp is green or you want to stop projecting images, press the Power button again. Never unplug the power cord ... signal is orange, there may damage the lamp. 56 1 • Setting Up the Projector Allow about 60 seconds as the projector warms up. 4. The Power light flashes green as the projector cools down.When the projector has cooled down, flashing stops. The power light remains orange. This can damage your eyes...
... remains on and the projection lamp light flashes orange for about 30 seconds for full illumination. 3 Warning: Never look into the lens when the lamp is green or you want to stop projecting images, press the Power button again. Never unplug the power cord ... signal is orange, there may damage the lamp. 56 1 • Setting Up the Projector Allow about 60 seconds as the projector warms up. 4. The Power light flashes green as the projector cools down.When the projector has cooled down, flashing stops. The power light remains orange. This can damage your eyes...
User Manual
Page 67
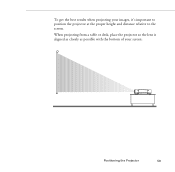
When projecting from a table or desk, place the projector so the lens is aligned as closely as possible with the bottom of your images, it's important to position the projector at the proper height and distance relative to the screen. To get the best results when projecting your screen: Positioning the Projector 59
When projecting from a table or desk, place the projector so the lens is aligned as closely as possible with the bottom of your images, it's important to position the projector at the proper height and distance relative to the screen. To get the best results when projecting your screen: Positioning the Projector 59
User Manual
Page 68
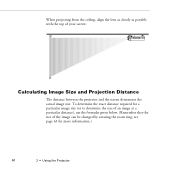
When projecting from the ceiling, align the lens as closely as possible with the top of the image can be changed by rotating the zoom ring; To determine the exact distance required for more information.) 60 2 • Using the Projector see page 63 for a particular image size (or to determine the size of an image at a particular distance), use the formulas given below. (Remember that the size of your screen: Calculating Image Size and Projection Distance The distance between the projector and the screen determines the actual image size.
When projecting from the ceiling, align the lens as closely as possible with the top of the image can be changed by rotating the zoom ring; To determine the exact distance required for more information.) 60 2 • Using the Projector see page 63 for a particular image size (or to determine the size of an image at a particular distance), use the formulas given below. (Remember that the size of your screen: Calculating Image Size and Projection Distance The distance between the projector and the screen determines the actual image size.
User Manual
Page 70
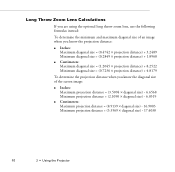
... If you are using the optional long throw zoom lens, use the following formulas instead: To determine the minimum and maximum diagonal size of an image when you know the projection distance: q Inches: Maximum diagonal ... size) - 6.8519 q Centimeters: Maximum projection distance = (8.9139 × diagonal size) - 16.9083 Minimum projection distance = (5.3569 × diagonal size) - 17.4038 62 2 • Using the Projector
... If you are using the optional long throw zoom lens, use the following formulas instead: To determine the minimum and maximum diagonal size of an image when you know the projection distance: q Inches: Maximum diagonal ... size) - 6.8519 q Centimeters: Maximum projection distance = (8.9139 × diagonal size) - 16.9083 Minimum projection distance = (5.3569 × diagonal size) - 17.4038 62 2 • Using the Projector
User Manual
Page 71
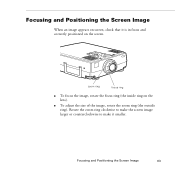
Focusing and Positioning the Screen Image 63 Focusing and Positioning the Screen Image When an image appears on screen, check that it smaller. zoom ring focus ring q To focus the image, rotate the focus ring (the inside ring on the screen. q To adjust the size of the image, rotate the zoom ring (the outside ring). Rotate the zoom ring clockwise to make the screen image larger or counterclockwise to make it is in focus and correctly positioned on the lens).
Focusing and Positioning the Screen Image 63 Focusing and Positioning the Screen Image When an image appears on screen, check that it smaller. zoom ring focus ring q To focus the image, rotate the focus ring (the inside ring on the screen. q To adjust the size of the image, rotate the zoom ring (the outside ring). Rotate the zoom ring clockwise to make the screen image larger or counterclockwise to make it is in focus and correctly positioned on the lens).
User Manual
Page 72
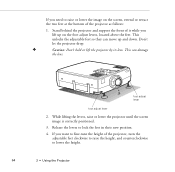
..., and counterclockwise to lock the feet in their new position. 4. Release the levers to lower the height. 64 2 • Using the Projector This can move up on the screen, extend or retract the two feet at the bottom of it while you lift up and down. If...so they can damage the lens. Stand behind the projector and support the front of the projector as follows: 1. foot adjust lever foot adjust lever 2. Don't let the projector drop. 3 Caution: Don't hold or lift the projector by its lens. While lifting the levers, raise or lower the projector until the screen image is...
..., and counterclockwise to lock the feet in their new position. 4. Release the levers to lower the height. 64 2 • Using the Projector This can move up on the screen, extend or retract the two feet at the bottom of it while you lift up and down. If...so they can damage the lens. Stand behind the projector and support the front of the projector as follows: 1. foot adjust lever foot adjust lever 2. Don't let the projector drop. 3 Caution: Don't hold or lift the projector by its lens. While lifting the levers, raise or lower the projector until the screen image is...

User Manual
Page 125
5 Maintenance Your projector needs little maintenance. The only parts you should keep it from overheating. A clogged air filter can block ventilation needed to periodically clean the air filter at the bottom of the projector. You should replace are the lamp and air filter. If any dirt or smears appear on the screen. You also need to cool the projector and keep the lens clean because any other part needs replacing, contact your dealer or a qualified service person. 117
5 Maintenance Your projector needs little maintenance. The only parts you should keep it from overheating. A clogged air filter can block ventilation needed to periodically clean the air filter at the bottom of the projector. You should replace are the lamp and air filter. If any dirt or smears appear on the screen. You also need to cool the projector and keep the lens clean because any other part needs replacing, contact your dealer or a qualified service person. 117

User Manual
Page 126
...5 • Maintenance To remove dirt or dust, wipe the case with an alcohol-based cleaner and gently wipe the lens surface. 3 Warning: Before you clean any cover on the projector, except the lamp and filter covers. These can injure you notice dirt or dust on the...-free cloth. Refer all other chemical detergents. Cleaning the Projector Case To clean the projector case, first unplug the power cord. Cleaning the Lens Clean the lens whenever you severely. Never open any part of the projector, turn off the projector and unplug the power cord. Do not try to qualified...
...5 • Maintenance To remove dirt or dust, wipe the case with an alcohol-based cleaner and gently wipe the lens surface. 3 Warning: Before you clean any cover on the projector, except the lamp and filter covers. These can injure you notice dirt or dust on the...-free cloth. Refer all other chemical detergents. Cleaning the Projector Case To clean the projector case, first unplug the power cord. Cleaning the Lens Clean the lens whenever you severely. Never open any part of the projector, turn off the projector and unplug the power cord. Do not try to qualified...

User Manual
Page 138
Check that the Power light is on and the lens cover is higher than 1024 × 768, the PowerLite 7200 or 7300 resizes the image. The correct image source may need to modify existing presentation files if you want. In Windows 3.x, use the dialog .... Also make sure Macintosh Hi-Res Display or another image source. Only part of the computer image is higher than 800 × 600, the PowerLite 5300 resizes the image. In the Monitors screen, choose Options and make sure the cables are installed correctly, as described in the Main program group. You...
Check that the Power light is on and the lens cover is higher than 1024 × 768, the PowerLite 7200 or 7300 resizes the image. The correct image source may need to modify existing presentation files if you want. In Windows 3.x, use the dialog .... Also make sure Macintosh Hi-Res Display or another image source. Only part of the computer image is higher than 800 × 600, the PowerLite 5300 resizes the image. In the Monitors screen, choose Options and make sure the cables are installed correctly, as described in the Main program group. You...
User Manual
Page 139
...selected correctly. Verify the display format (see a blank screen, you cannot access the Video menu. A blank screen is not reaching the projector. Clean the lens as described on the Video menu. If you 're displaying video, adjust the Color and Tint (NTSC only) settings on page 118. ... of the image are not right. When you see page 137). Adjust the Brightness and Contrast settings on the lens. An image source not connected to both the projector and the image source. Make sure the connectors are blurred or not in focus. The computer signal cannot be ...
...selected correctly. Verify the display format (see a blank screen, you cannot access the Video menu. A blank screen is not reaching the projector. Clean the lens as described on the Video menu. If you 're displaying video, adjust the Color and Tint (NTSC only) settings on page 118. ... of the image are not right. When you see page 137). Adjust the Brightness and Contrast settings on the lens. An image source not connected to both the projector and the image source. Make sure the connectors are blurred or not in focus. The computer signal cannot be ...
