
Technical Brief (Multimedia Projectors)
Page 4
...able to be controlled by the included infrared remote control and control panel. You use the remote control from virtually any video standard. It allows the projector to maintain their respective owners. EPSON Sales Training EPSON and EPSON Stylus are registered trademarks of SizeWise technology, ...SX G A SXGA XGA VGA 7 6 8 P ix e ls 600 Pixels 8 0 0 P ix e ls XGA 6 4 0 P ix e ls 800 Pixels 4 8 0 P ix e ls 6 0 0 P ix e ls SV G A VG A SVGA Versatility-Flexible controls Each EPSON projector can be remotely controlled either from a dedicated remote control or a computer.
...able to be controlled by the included infrared remote control and control panel. You use the remote control from virtually any video standard. It allows the projector to maintain their respective owners. EPSON Sales Training EPSON and EPSON Stylus are registered trademarks of SizeWise technology, ...SX G A SXGA XGA VGA 7 6 8 P ix e ls 600 Pixels 8 0 0 P ix e ls XGA 6 4 0 P ix e ls 800 Pixels 4 8 0 P ix e ls 6 0 0 P ix e ls SV G A VG A SVGA Versatility-Flexible controls Each EPSON projector can be remotely controlled either from a dedicated remote control or a computer.

Technical Brief (Multimedia Projectors)
Page 5
... Versatility-Flexible installation EPSON PowerLite projectors can be installed in a variety of ways: Front projection Rear projection Ceiling mount Ceiling mount LL L L LLL Many EPSON projectors can be installed outside of the presentation room or in a position inaccessible to : Draw lines, ellipses, squares, and bars in P Preset - Volume + Remote Control Infrared Receiver Connecting Block EPSON Projector Typical installation...
... Versatility-Flexible installation EPSON PowerLite projectors can be installed in a variety of ways: Front projection Rear projection Ceiling mount Ceiling mount LL L L LLL Many EPSON projectors can be installed outside of the presentation room or in a position inaccessible to : Draw lines, ellipses, squares, and bars in P Preset - Volume + Remote Control Infrared Receiver Connecting Block EPSON Projector Typical installation...

Product Information Guide
Page 1
...) Internal speaker system 3 × 3 W stereo output 2 × 3 W 8 (ohm) speakers Optical aspect ratio PowerLite 5300/7300: 4:3 (horiz.:vertical) PowerLite 7200: 5:4 (SVGA); 4:3 (VGA, SVGA, XGA); 16:9 (wide screen video) Zoom ratio 1:1.3 Tilt angle 0° to 12° Supported video interface standards NTSC... at 50% brightness ELPLP05 Remote Control Range Batteries 32.8 feet (10 meters) Alkaline AA (2) Mouse Compatibility Supports PS/2, serial, ADB Repeater Interface Supports Xantech® IR repeaters, 3.5 mm stereo mini-jack 1/99 EPSON PowerLite 5300/7200/7300 Projector - 1
...) Internal speaker system 3 × 3 W stereo output 2 × 3 W 8 (ohm) speakers Optical aspect ratio PowerLite 5300/7300: 4:3 (horiz.:vertical) PowerLite 7200: 5:4 (SVGA); 4:3 (VGA, SVGA, XGA); 16:9 (wide screen video) Zoom ratio 1:1.3 Tilt angle 0° to 12° Supported video interface standards NTSC... at 50% brightness ELPLP05 Remote Control Range Batteries 32.8 feet (10 meters) Alkaline AA (2) Mouse Compatibility Supports PS/2, serial, ADB Repeater Interface Supports Xantech® IR repeaters, 3.5 mm stereo mini-jack 1/99 EPSON PowerLite 5300/7200/7300 Projector - 1
Product Information Guide
Page 4
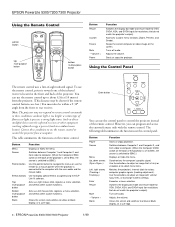
...or to a blue or black display, or a user logo. 4 - Switches the display dot mode and resize mode for VGA, SVGA, XGA, and SXGA input (for resolutions that is too bright; Accesses Custom menu functions (Zoom, Preview, and Strobe). Button Function.... Using the Control Panel The remote control uses a line-of the remote control. Acts as a radiant room heater). Use these buttons to adjust an image with the remote control. EPSON PowerLite 5300/7200/7300 Projector 1/99 EPSON PowerLite 5300/7200/7300 Projector Using the Remote Control pointer button top multi-purpose...
...or to a blue or black display, or a user logo. 4 - Switches the display dot mode and resize mode for VGA, SVGA, XGA, and SXGA input (for resolutions that is too bright; Accesses Custom menu functions (Zoom, Preview, and Strobe). Button Function.... Using the Control Panel The remote control uses a line-of the remote control. Acts as a radiant room heater). Use these buttons to adjust an image with the remote control. EPSON PowerLite 5300/7200/7300 Projector 1/99 EPSON PowerLite 5300/7200/7300 Projector Using the Remote Control pointer button top multi-purpose...

User Manual
Page 3
... Information You can always control your bare hands; Try the following conditions: Ë There is an object between the remote control IR emitter and the IR receiver on the projector. Ë Ambient light is too bright. Ë Certain types of direct sunlight. Ë Turn off any fluorescent lights. ... WARNING: Never look into the lens when it is on. The projector may be low on the projector, except the lamp and filter covers. Use a cloth or glove to remote control commands under the following : Ë The remote control unit's batteries may not respond to handle the new lamp. ...
... Information You can always control your bare hands; Try the following conditions: Ë There is an object between the remote control IR emitter and the IR receiver on the projector. Ë Ambient light is too bright. Ë Certain types of direct sunlight. Ë Turn off any fluorescent lights. ... WARNING: Never look into the lens when it is on. The projector may be low on the projector, except the lamp and filter covers. Use a cloth or glove to remote control commands under the following : Ë The remote control unit's batteries may not respond to handle the new lamp. ...
User Manual
Page 5
Contents Introduction 1 Getting the Most Out of Your Projector 3 Optional Accessories 4 About This Guide 5 Where to Get Help 6 Electronic Support Services 6 Automated Telephone Services 7 Safety Instructions 8 1 Setting Up the Projector 11 Unpacking the Projector 12 Additional Components 14 Before You Connect the Projector 15 Installing the Remote Control Batteries 16 i
Contents Introduction 1 Getting the Most Out of Your Projector 3 Optional Accessories 4 About This Guide 5 Where to Get Help 6 Electronic Support Services 6 Automated Telephone Services 7 Safety Instructions 8 1 Setting Up the Projector 11 Unpacking the Projector 12 Additional Components 14 Before You Connect the Projector 15 Installing the Remote Control Batteries 16 i

User Manual
Page 6
... to an External Speaker or PA System 53 Turning the Equipment On and Off 54 Turning the Projector On and Off 55 2 Using the Projector 57 Positioning the Projector 58 Calculating Image Size and Projection Distance 60 Focusing and Positioning the Screen Image 63 Resize Button... 65 Sleep Mode 65 Controlling the Projector 66 Using the Remote Control 67 Using the Control Panel 70 Projector Status Lights 72 3 Using the Projector Menus 75 Accessing the Main Menu 76 Changing a Menu Setting 78 Video Menu (Image...
... to an External Speaker or PA System 53 Turning the Equipment On and Off 54 Turning the Projector On and Off 55 2 Using the Projector 57 Positioning the Projector 58 Calculating Image Size and Projection Distance 60 Focusing and Positioning the Screen Image 63 Resize Button... 65 Sleep Mode 65 Controlling the Projector 66 Using the Remote Control 67 Using the Control Panel 70 Projector Status Lights 72 3 Using the Projector Menus 75 Accessing the Main Menu 76 Changing a Menu Setting 78 Video Menu (Image...

User Manual
Page 7
... Launching the Software 94 Launching the Software from Windows 95 Launching the Software on a Macintosh 96 Using the Software 96 Customizing the Remote Control Effects Buttons 96 Controlling Projector Features 103 5 Maintenance 117 Cleaning the Lens 118 Cleaning the Projector Case 118 Cleaning the Air Filter 119 Replacing the Lamp 120 Transporting the...
... Launching the Software 94 Launching the Software from Windows 95 Launching the Software on a Macintosh 96 Using the Software 96 Customizing the Remote Control Effects Buttons 96 Controlling Projector Features 103 5 Maintenance 117 Cleaning the Lens 118 Cleaning the Projector Case 118 Cleaning the Air Filter 119 Replacing the Lamp 120 Transporting the...
User Manual
Page 10
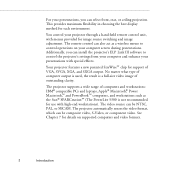
...to control the projector's settings from your computer and enhance your computer screen during presentations. The remote control can be composite video, S-Video, or component video. The video source can also act as the Sun® SPARCstation™ (The PowerLite 5300 is not recommended... for details on your presentations with special effects. This provides maximum flexibility in choosing the best display method for support of VGA, SVGA, XGA, and SXGA output. Your projector features a new patented SizeWise™...
...to control the projector's settings from your computer and enhance your computer screen during presentations. The remote control can be composite video, S-Video, or component video. The video source can also act as the Sun® SPARCstation™ (The PowerLite 5300 is not recommended... for details on your presentations with special effects. This provides maximum flexibility in choosing the best display method for support of VGA, SVGA, XGA, and SXGA output. Your projector features a new patented SizeWise™...
User Manual
Page 11
... freeze, volume, mute, and image source switching. In sleep mode, the projector remains on and off the lamp after the projector has not been used for a quick summary of the important features. Use the remote control buttons to access custom functions (with a full set of features that ...the settings for the image display, video, and audio. Control Panel The control panel buttons on the projector duplicate the remote control buttons. To get the most out of the projector, read this section for 30 minutes. Sleep Mode Sleep mode conserves electricity by automatically turning off , and...
... freeze, volume, mute, and image source switching. In sleep mode, the projector remains on and off the lamp after the projector has not been used for a quick summary of the important features. Use the remote control buttons to access custom functions (with a full set of features that ...the settings for the image display, video, and audio. Control Panel The control panel buttons on the projector duplicate the remote control buttons. To get the most out of the projector, read this section for 30 minutes. Sleep Mode Sleep mode conserves electricity by automatically turning off , and...

User Manual
Page 12
...cable ELPKC04 ELPKC02 ELPAP01 ELPKC06 ELPKC07 q Portable projection screen ELPSC06 q Remote control receiver module ELPST02 q Mediaphile™ PAS (personal audio system) ELPPAS1 You can purchase these accessories from your projector to a second computer. sales only). or visit our web site ... cable set and computer cable so you can connect your dealer or by calling EPSON Accessories at www.epsonsupplies.com (U.S. Optional Accessories To enhance your use of the projector, EPSON provides the following: q Customized carrying cases for dealer referral. 4 Introduction There is...
...cable ELPKC04 ELPKC02 ELPAP01 ELPKC06 ELPKC07 q Portable projection screen ELPSC06 q Remote control receiver module ELPST02 q Mediaphile™ PAS (personal audio system) ELPPAS1 You can purchase these accessories from your projector to a second computer. sales only). or visit our web site ... cable set and computer cable so you can connect your dealer or by calling EPSON Accessories at www.epsonsupplies.com (U.S. Optional Accessories To enhance your use of the projector, EPSON provides the following: q Customized carrying cases for dealer referral. 4 Introduction There is...

User Manual
Page 13
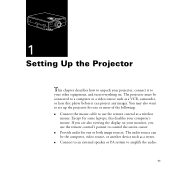
... to set up and use the EPSON PowerLite 5300, PowerLite 7200, and PowerLite 7300 projectors. The instructions pertain to the screen, focus and position the screen image, control the projector using the remote control and the control panel, and monitor the projector's operating status. connect it . Chapter 2, "Using the Projector," explains how to position the projector relative to all these models...
... to set up and use the EPSON PowerLite 5300, PowerLite 7200, and PowerLite 7300 projectors. The instructions pertain to the screen, focus and position the screen image, control the projector using the remote control and the control panel, and monitor the projector's operating status. connect it . Chapter 2, "Using the Projector," explains how to position the projector relative to all these models...
User Manual
Page 17
... surface, or in a closed-in this User's Guide, do not attempt to qualified service personnel. Never push objects of any kind into the projector. 13. Unplug the projector during lightning storms or when it will not be walked on a sofa, rug, or other hazards. 14. Safety Instructions 9 Do not operate...proper ventilation is provided. 12. Use a damp cloth for extended periods. 15. Refer all servicing to service this product yourself. 8. Do not place the projector and remote control on top of any kind through cabinet slots. Opening or removing covers may result in the...
... surface, or in a closed-in this User's Guide, do not attempt to qualified service personnel. Never push objects of any kind into the projector. 13. Unplug the projector during lightning storms or when it will not be walked on a sofa, rug, or other hazards. 14. Safety Instructions 9 Do not operate...proper ventilation is provided. 12. Use a damp cloth for extended periods. 15. Refer all servicing to service this product yourself. 8. Do not place the projector and remote control on top of any kind through cabinet slots. Opening or removing covers may result in the...
User Manual
Page 19
...to amplify the audio. 11 You may also want to set up the projector for one or both image sources. q Provide audio for some laptops, this disables your computer's mouse. If you use the remote control as a stereo. The audio source can project any images. 1 ...Setting Up the Projector This chapter describes how to unpack your projector, connect it can be the computer, video source, or another device such as ...
...to amplify the audio. 11 You may also want to set up the projector for one or both image sources. q Provide audio for some laptops, this disables your computer's mouse. If you use the remote control as a stereo. The audio source can project any images. 1 ...Setting Up the Projector This chapter describes how to unpack your projector, connect it can be the computer, video source, or another device such as ...
User Manual
Page 20
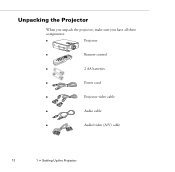
Unpacking the Projector When you unpack the projector, make sure you have all these components: q Projector q Remote control q 2 AA batteries q Power cord q Projector video cable q Audio cable q Audio/video (A/V) cable 12 1 • Setting Up the Projector
Unpacking the Projector When you unpack the projector, make sure you have all these components: q Projector q Remote control q 2 AA batteries q Power cord q Projector video cable q Audio cable q Audio/video (A/V) cable 12 1 • Setting Up the Projector
User Manual
Page 21
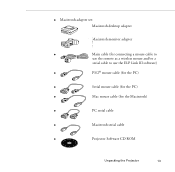
q Macintosh adapter set: Macintosh desktop adapter Macintosh monitor adapter q Main cable (for connecting a mouse cable to use the remote as a wireless mouse and/or a serial cable to use the ELP Link III software) q PS/2® mouse cable (for the PC) q Serial mouse cable (for the PC) q Mac mouse cable (for the Macintosh) q PC serial cable q Macintosh serial cable q Projector Software CD ROM Unpacking the Projector 13
q Macintosh adapter set: Macintosh desktop adapter Macintosh monitor adapter q Main cable (for connecting a mouse cable to use the remote as a wireless mouse and/or a serial cable to use the ELP Link III software) q PS/2® mouse cable (for the PC) q Serial mouse cable (for the PC) q Mac mouse cable (for the Macintosh) q PC serial cable q Macintosh serial cable q Projector Software CD ROM Unpacking the Projector 13
User Manual
Page 24
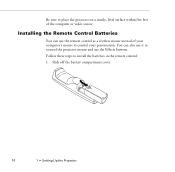
Slide off the battery compartment cover. 16 1 • Setting Up the Projector Installing the Remote Control Batteries You can also use it to install the batteries in the remote control: 1. Follow these steps to control the projector menus and use the remote control as a wireless mouse instead of the computer or video source. You can use the Effects buttons. Be sure to place the projector on a sturdy, level surface within five feet of your computer's mouse to control your presentation.
Slide off the battery compartment cover. 16 1 • Setting Up the Projector Installing the Remote Control Batteries You can also use it to install the batteries in the remote control: 1. Follow these steps to control the projector menus and use the remote control as a wireless mouse instead of the computer or video source. You can use the Effects buttons. Be sure to place the projector on a sturdy, level surface within five feet of your computer's mouse to control your presentation.
User Manual
Page 27
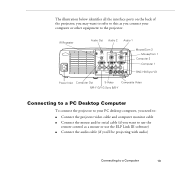
...may want to use the ELP Link III software) q Connect the audio cable (if you connect your PC desktop computer, you need to: q Connect the projector video cable and computer monitor cable q Connect the mouse and/or serial cable (if you want to refer to this as a mouse or use the... remote control as you 'll be projecting with audio) Connecting to the projector. IR Repeater Audio Out Audio 2 Audio 1 Mouse/Com 2 1 Mouse/Com 1 Computer 2 Computer 1 BNC HD/Sync VD Power Inlet ...
...may want to use the ELP Link III software) q Connect the audio cable (if you connect your PC desktop computer, you need to: q Connect the projector video cable and computer monitor cable q Connect the mouse and/or serial cable (if you want to refer to this as a mouse or use the... remote control as you 'll be projecting with audio) Connecting to the projector. IR Repeater Audio Out Audio 2 Audio 1 Mouse/Com 2 1 Mouse/Com 1 Computer 2 Computer 1 BNC HD/Sync VD Power Inlet ...
User Manual
Page 30
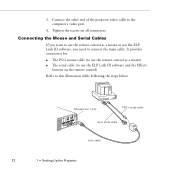
.../2 mouse cable 9-pin serial cable main cable 22 1 • Setting Up the Projector 3. It provides connectors for: q The PS/2 mouse cable (to this illustration while following the steps below. Tighten the screws on the remote control) Refer to use the remote control as a mouse or use the ELP Link III software and the...
.../2 mouse cable 9-pin serial cable main cable 22 1 • Setting Up the Projector 3. It provides connectors for: q The PS/2 mouse cable (to this illustration while following the steps below. Tighten the screws on the remote control) Refer to use the remote control as a mouse or use the ELP Link III software and the...
User Manual
Page 31
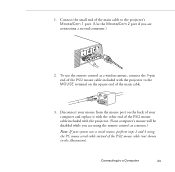
... your mouse from the mouse port on the square end of the main cable to the projector's Mouse/Com 1 port. (Use the Mouse/Com 2 port if you are connecting a second computer.) 2. 1. To use the remote control as a mouse.) Note: If your computer and replace it with the other end of... terminal on the back of your system uses a serial mouse, perform steps 2 and 3 using the remote control as a wireless mouse, connect the 9-pin end of the PS/2 mouse cable included with the projector. (Your computer's mouse will be disabled while you are using the PC mouse serial cable instead of...
... your mouse from the mouse port on the square end of the main cable to the projector's Mouse/Com 1 port. (Use the Mouse/Com 2 port if you are connecting a second computer.) 2. 1. To use the remote control as a mouse.) Note: If your computer and replace it with the other end of... terminal on the back of your system uses a serial mouse, perform steps 2 and 3 using the remote control as a wireless mouse, connect the 9-pin end of the PS/2 mouse cable included with the projector. (Your computer's mouse will be disabled while you are using the PC mouse serial cable instead of...


