Users Guide
Page 19
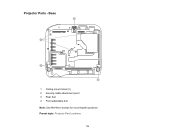
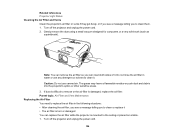
Parent topic: Projector Part Locations 19 Base 1 Ceiling mount holes (3) 2 Security cable attachment point 3 Rear feet 4 Front adjustable foot Note: Use M4×9mm screws for mounting the projector. Projector Parts -
Parent topic: Projector Part Locations 19 Base 1 Ceiling mount holes (3) 2 Security cable attachment point 3 Rear feet 4 Front adjustable foot Note: Use M4×9mm screws for mounting the projector. Projector Parts -

Users Guide
Page 24
...: Setting Up the Projector Projector Setup and Installation Options You can also install the projector in a ceiling mount if you select a projector location: • Place the projector on a sturdy, level surface or install it using a compatible mount. • Place the projector parallel to the screen. • Leave plenty of space around and under...
...: Setting Up the Projector Projector Setup and Installation Options You can also install the projector in a ceiling mount if you select a projector location: • Place the projector on a sturdy, level surface or install it using a compatible mount. • Place the projector parallel to the screen. • Leave plenty of space around and under...
Users Guide
Page 89
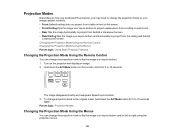
... so your images project correctly. • Front (default setting) lets you project from a table in front of the screen. • Front/Ceiling flips the image over top-to-bottom to project upside-down the A/V Mute button for 5 to 10 seconds. To change projection back to the... original mode, hold down from a ceiling or wall mount. • Rear flips the image horizontally to project from the ceiling and behind a translucent screen. Changing the Projection Mode Using the Remote Control Changing the Projection Mode Using the...
... so your images project correctly. • Front (default setting) lets you project from a table in front of the screen. • Front/Ceiling flips the image over top-to-bottom to project upside-down the A/V Mute button for 5 to 10 seconds. To change projection back to the... original mode, hold down from a ceiling or wall mount. • Rear flips the image horizontally to project from the ceiling and behind a translucent screen. Changing the Projection Mode Using the Remote Control Changing the Projection Mode Using the...
Users Guide
Page 112
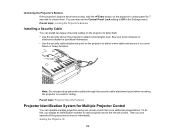
... or electronics dealer for 7 seconds to unlock them. Note: Do not pass drop-prevention cables through the security cable attachment point when mounting the projector on a wall or ceiling. Then you assign an identification number to each projector and to the remote control. Parent topic: Projector Security Features Projector Identification System for...
... or electronics dealer for 7 seconds to unlock them. Note: Do not pass drop-prevention cables through the security cable attachment point when mounting the projector on a wall or ceiling. Then you assign an identification number to each projector and to the remote control. Parent topic: Projector Security Features Projector Identification System for...
Users Guide
Page 154
... dust using a small vacuum designed for computers or a very soft brush (such as a paintbrush). If dust is difficult to remove or the air filter is mounted to the ceiling or placed on a table. 1.
... dust using a small vacuum designed for computers or a very soft brush (such as a paintbrush). If dust is difficult to remove or the air filter is mounted to the ceiling or placed on a table. 1.
Users Guide
Page 158
...Display - Note: We recommend the use of non-genuine lamps may not be hot. Any damage or malfunction caused by Epson's warranty. This may explode increases. Info Menu Replacing the Lamp Before you continue to cool down for at least one...the lamp may shorten the lamp's operating life. You should always have a spare lamp unit ready in case it to the ceiling, if necessary. 1. Caution: Do not repeatedly turn the projector power on and off the projector and unplug the power cord...., replace the lamp with a new one as soon as possible, even if it is mounted to avoid injury.
...Display - Note: We recommend the use of non-genuine lamps may not be hot. Any damage or malfunction caused by Epson's warranty. This may explode increases. Info Menu Replacing the Lamp Before you continue to cool down for at least one...the lamp may shorten the lamp's operating life. You should always have a spare lamp unit ready in case it to the ceiling, if necessary. 1. Caution: Do not repeatedly turn the projector power on and off the projector and unplug the power cord...., replace the lamp with a new one as soon as possible, even if it is mounted to avoid injury.

Users Guide
Page 192
...EX3280/VS260: 15000:1 with Dynamic Color Mode, Zoom Wide, and Normal Power Consumption mode EX5280/EX9230/EX7280/EX9240: 16000:1 with IDMS 15.4; Color light output measured in accordance with Dynamic Color Mode, Zoom Wide,... and Normal Power Consumption mode EX3280/VS260: 30 inches (0.76 m) to 350 inches (8.89 m) EX5280/EX9240: 30 inches (0.76 m) to 300 inches (7.62 m) EX9230: 34 inches (0.36 m) to 332 inches (8.43 m) EX7280... (10.95 m) EX7280: 36 inches (0.91 m) to 429 inches (10.89 m) EX9240: 34 inches (0.87 m) to 567 inches (14.41 m) Front, rear, ceiling-mounted 192
...EX3280/VS260: 15000:1 with Dynamic Color Mode, Zoom Wide, and Normal Power Consumption mode EX5280/EX9230/EX7280/EX9240: 16000:1 with IDMS 15.4; Color light output measured in accordance with Dynamic Color Mode, Zoom Wide,... and Normal Power Consumption mode EX3280/VS260: 30 inches (0.76 m) to 350 inches (8.89 m) EX5280/EX9240: 30 inches (0.76 m) to 300 inches (7.62 m) EX9230: 34 inches (0.36 m) to 332 inches (8.43 m) EX7280... (10.95 m) EX7280: 36 inches (0.91 m) to 429 inches (10.89 m) EX9240: 34 inches (0.87 m) to 567 inches (14.41 m) Front, rear, ceiling-mounted 192
Users Guide
Page 202
... the projector on a sofa, rug, or other soft surface, or set it on its ceiling mount. Do not insert the plug into the outlet. If you are setting up and using mounting hardware designed for cleaning. This may cause the projector case to crack and the projector to hold...disconnecting the plug; Insert the plug firmly into a dusty outlet. Failure to comply with this projector. • When installing or adjusting a ceiling or wall mount, do not use oils or lubricants. The bright light can be installed by qualified technicians using the projector: • Do not look into...
... the projector on a sofa, rug, or other soft surface, or set it on its ceiling mount. Do not insert the plug into the outlet. If you are setting up and using mounting hardware designed for cleaning. This may cause the projector case to crack and the projector to hold...disconnecting the plug; Insert the plug firmly into a dusty outlet. Failure to comply with this projector. • When installing or adjusting a ceiling or wall mount, do not use oils or lubricants. The bright light can be installed by qualified technicians using the projector: • Do not look into...


