

Product Information Guide
Page 4
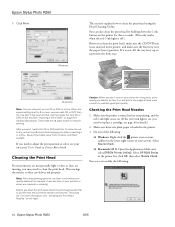
... ink light and green P power light are still flashing, contact your dealer or Epson as described in your on-screen User's Guide or Printer Basics book. Green P power light is off ; Before you print on a CD or DVD, pull the tray lever down to set the front tray to the ...the red H ink light is not in the correct position. Then, load more than six months old, you 're printing on paper, it may need to replace it . Epson Stylus Photo R260 Control Panel To diagnose problems, check the printer's control panel, as described in "Replacing an Ink Cartridge" on the right.
... ink light and green P power light are still flashing, contact your dealer or Epson as described in your on-screen User's Guide or Printer Basics book. Green P power light is off ; Before you print on a CD or DVD, pull the tray lever down to set the front tray to the ...the red H ink light is not in the correct position. Then, load more than six months old, you 're printing on paper, it may need to replace it . Epson Stylus Photo R260 Control Panel To diagnose problems, check the printer's control panel, as described in "Replacing an Ink Cartridge" on the right.
Product Information Guide
Page 5
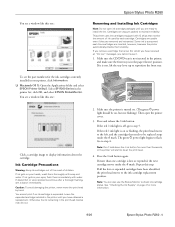
...have been identified, the print head moves to the ink cartridge replacement position. Make sure the CD/DVD tray is not inserted in the printer, and make sure the front tray is consumed each cartridge. You see a window like this one: Epson Stylus Photo R260 Removing and Installing Ink ... is turned on or flashing, the print head moves to the left, and the cartridge that is low (for more information. 9/06 Epson Stylus Photo R260 - 5 Note: Don't hold down the H ink button for the ink cartridges currently installed in the printer until you are removed and reinserted. Repeat...
...have been identified, the print head moves to the ink cartridge replacement position. Make sure the CD/DVD tray is not inserted in the printer, and make sure the front tray is consumed each cartridge. You see a window like this one: Epson Stylus Photo R260 Removing and Installing Ink ... is turned on or flashing, the print head moves to the left, and the cartridge that is low (for more information. 9/06 Epson Stylus Photo R260 - 5 Note: Don't hold down the H ink button for the ink cartridges currently installed in the printer until you are removed and reinserted. Repeat...
Product Information Guide
Page 7
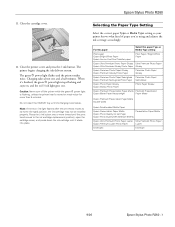
... Photo Paper Epson Premium Luster Photo Paper Luster Envelopes Envelope 9/06 Epson Stylus Photo R260 - 7 Press the H ink button two or more times (until the print head moves to its home (far right) position, the ink cartridge may not be installed properly. Selecting the Paper Type Setting Select the correct paper Type or Media Type setting so your printer...
... Photo Paper Epson Premium Luster Photo Paper Luster Envelopes Envelope 9/06 Epson Stylus Photo R260 - 7 Press the H ink button two or more times (until the print head moves to its home (far right) position, the ink cartridge may not be installed properly. Selecting the Paper Type Setting Select the correct paper Type or Media Type setting so your printer...
Product Information Guide
Page 8
...side face-up. Then follow the instructions that lets you want to check the print position or color, see your on CDs or DVDs, it's a good idea to import your own photos, add text, and modify your printer. Do not move the tray lever. Make sure the disc lies flat in ...lever while the printer is not extended. Otherwise, the disc may smear. otherwise the ink may not be used with the paper. Press the ) paper button to be fully ejected. ❏ Don't load paper above the arrow mark on any ink jetprintable CD or DVD. If you print. Epson Stylus Photo R260 9/06 Repeat step...
...side face-up. Then follow the instructions that lets you want to check the print position or color, see your on CDs or DVDs, it's a good idea to import your own photos, add text, and modify your printer. Do not move the tray lever. Make sure the disc lies flat in ...lever while the printer is not extended. Otherwise, the disc may smear. otherwise the ink may not be used with the paper. Press the ) paper button to be fully ejected. ❏ Don't load paper above the arrow mark on any ink jetprintable CD or DVD. If you print. Epson Stylus Photo R260 9/06 Repeat step...
Product Information Guide
Page 9
... select Print. 2. Make sure EPSON Stylus Photo R260 Series (Windows) or Stylus Photo R260 (Macintosh) is on the tray; Select CD/DVD or CD/DVD Premium Surface as the Print Confirmation Pattern setting (Windows) or Test Print Pattern setting (Macintosh). 9/06 Epson Stylus Photo R260 - 9 Be sure to create and print a design with 8-cm CDs or DVDs 8-cm CD/DVD Epson Stylus Photo R260 Do not insert the CD/DVD tray while the printer is printing...
... select Print. 2. Make sure EPSON Stylus Photo R260 Series (Windows) or Stylus Photo R260 (Macintosh) is on the tray; Select CD/DVD or CD/DVD Premium Surface as the Print Confirmation Pattern setting (Windows) or Test Print Pattern setting (Macintosh). 9/06 Epson Stylus Photo R260 - 9 Be sure to create and print a design with 8-cm CDs or DVDs 8-cm CD/DVD Epson Stylus Photo R260 Do not insert the CD/DVD tray while the printer is printing...
Product Information Guide
Page 10
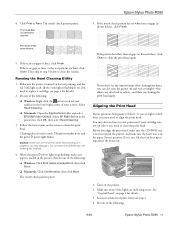
...adjust the print position or color, see lines in the lower right corner of your printer for loading instructions). If it on , you may need to replace a cartridge; To allow the ink to dry, wait at least once a month to clean the print head. This saves ink. Epson Stylus Photo R260 9/06...cleaned. You see "Inserting a CD or DVD" on the right. Before you print, handle the CD or DVD carefully. After you clean the print head, check the print head nozzles first to confirm that the print head needs to reposition the front tray. Keep printed discs away from the tray ...
...adjust the print position or color, see lines in the lower right corner of your printer for loading instructions). If it on , you may need to replace a cartridge; To allow the ink to dry, wait at least once a month to clean the print head. This saves ink. Epson Stylus Photo R260 9/06...cleaned. You see "Inserting a CD or DVD" on the right. Before you print, handle the CD or DVD carefully. After you clean the print head, check the print head nozzles first to confirm that the print head needs to reposition the front tray. Keep printed discs away from the tray ...
Product Information Guide
Page 11
...tray. 1. Click Print or Next. Caution: Never turn the printer off . (If the H ink light is in the lower right corner of the following : ❏ Windows: Right-click the printer icon on page 4 for details.) 2. Make sure none of the following: 9/06 Epson Stylus Photo R260 - 11 If there...light stops flashing, make sure paper is loaded in the printer, and make sure the CD/DVD tray is not inserted in the printer, then do one of the following : ❏ Windows: Click Print nozzle check pattern, then click Print. ❏ Macintosh: Click Confirmation, then click Next. ...
...tray. 1. Click Print or Next. Caution: Never turn the printer off . (If the H ink light is in the lower right corner of the following : ❏ Windows: Right-click the printer icon on page 4 for details.) 2. Make sure none of the following: 9/06 Epson Stylus Photo R260 - 11 If there...light stops flashing, make sure paper is loaded in the printer, and make sure the CD/DVD tray is not inserted in the printer, then do one of the following : ❏ Windows: Click Print nozzle check pattern, then click Print. ❏ Macintosh: Click Confirmation, then click Next. ...
Product Information Guide
Page 13
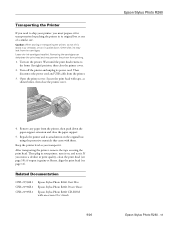
Removing the cartridges can dehydrate the print head and may leak from printing. 1. Repack the printer and its attachments in print quality, clean the print head (see page 11). After transporting the printer, remove the tape securing the print head. Related Documentation CPD-21934R1 CPD-21936R1 CPD-21935R1 Epson Stylus Photo R260 Start Here Epson Stylus Photo R260 Printer Basics Epson Stylus Photo R260 CD-ROM with tape, as you transport it...
Removing the cartridges can dehydrate the print head and may leak from printing. 1. Repack the printer and its attachments in print quality, clean the print head (see page 11). After transporting the printer, remove the tape securing the print head. Related Documentation CPD-21934R1 CPD-21936R1 CPD-21935R1 Epson Stylus Photo R260 Start Here Epson Stylus Photo R260 Printer Basics Epson Stylus Photo R260 CD-ROM with tape, as you transport it...
Printer Basics
Page 3
... Printing Borderless Photos 20 Storing and Displaying Your Prints 21 Windows Vista 21 Windows XP 23 Macintosh 26 Printing on CDs and DVDs 28 Cleaning the Rollers 28 Inserting a CD or DVD 28 Designing and Printing in Windows 31 Designing and Printing on a Macintosh 36 Direct Printing from a Digital Camera or Mobile Phone 41 Connecting and Printing 41 Maintaining Your Printer...
... Printing Borderless Photos 20 Storing and Displaying Your Prints 21 Windows Vista 21 Windows XP 23 Macintosh 26 Printing on CDs and DVDs 28 Cleaning the Rollers 28 Inserting a CD or DVD 28 Designing and Printing in Windows 31 Designing and Printing on a Macintosh 36 Direct Printing from a Digital Camera or Mobile Phone 41 Connecting and Printing 41 Maintaining Your Printer...
Printer Basics
Page 4
... and Solutions 60 Setup and Software Installation Problems 60 Printer Problems 61 Print Quality Problems 62 Problems With Paper or CD/DVD Tray Feeding 64 CD/DVD Printing Problems 65 Miscellaneous Printout Problems 66 Uninstalling Printer Software 67 Windows 67 Macintosh 68 Where To Get Help 69 Epson Technical Support 69 Purchase Supplies and Accessories 69 Requirements...
... and Solutions 60 Setup and Software Installation Problems 60 Printer Problems 61 Print Quality Problems 62 Problems With Paper or CD/DVD Tray Feeding 64 CD/DVD Printing Problems 65 Miscellaneous Printout Problems 66 Uninstalling Printer Software 67 Windows 67 Macintosh 68 Where To Get Help 69 Epson Technical Support 69 Purchase Supplies and Accessories 69 Requirements...
Printer Basics
Page 5
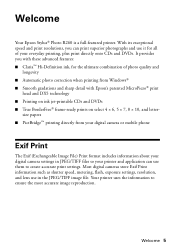
... print resolutions, you with Epson's patented MicroPiezo® print head and DX5 technology ■ Printing on ink jet-printable CDs and DVDs ■ True BorderFree® frame-ready prints on select 4 × 6, 5 × 7, 8 × 10, and letter- Your printer uses the information to create accurate print settings. Welcome Your Epson Stylus® Photo R260 is a full-featured printer. Most digital cameras store Exif Print...
... print resolutions, you with Epson's patented MicroPiezo® print head and DX5 technology ■ Printing on ink jet-printable CDs and DVDs ■ True BorderFree® frame-ready prints on select 4 × 6, 5 × 7, 8 × 10, and letter- Your printer uses the information to create accurate print settings. Welcome Your Epson Stylus® Photo R260 is a full-featured printer. Most digital cameras store Exif Print...

Printer Basics
Page 6
... About Your Documentation To set up your equipment. Note: Notes contain important information about your printer, double-click the Stylus Photo R260 User's Guide icon on CDs and DVDs, direct printing from a digital camera or mobile phone, maintaining your printer, and solving basic problems. For more information about your desktop. Please follow these guidelines throughout: Warning: Warnings...
... About Your Documentation To set up your equipment. Note: Notes contain important information about your printer, double-click the Stylus Photo R260 User's Guide icon on CDs and DVDs, direct printing from a digital camera or mobile phone, maintaining your printer, and solving basic problems. For more information about your desktop. Please follow these guidelines throughout: Warning: Warnings...

Printer Basics
Page 28
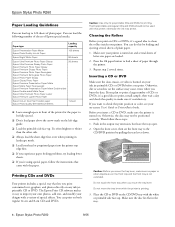
...Epson Print CD software makes it 's a good idea to clean the rollers inside your printer. You can print on the surface may smear. Make sure your printer is burned on and several sheets of special effects. Otherwise, dirt or scratches on both regular 12-cm and 8-cm mini CDs and DVDs. Inserting a CD...Finish Caution: Use only ink jet-printable CDs and DVDs for printing. Printing on CDs and DVDs Your printer includes a special tray that lets you print customized text, graphics, and photos directly on CDs or DVDs, it easy to import your own photos, add text, and modify your designs ...
...Epson Print CD software makes it 's a good idea to clean the rollers inside your printer. You can print on the surface may smear. Make sure your printer is burned on and several sheets of special effects. Otherwise, dirt or scratches on both regular 12-cm and 8-cm mini CDs and DVDs. Inserting a CD...Finish Caution: Use only ink jet-printable CDs and DVDs for printing. Printing on CDs and DVDs Your printer includes a special tray that lets you print customized text, graphics, and photos directly on CDs or DVDs, it easy to import your own photos, add text, and modify your designs ...

Printer Basics
Page 29
...the front tray and the front tray is on the CD/DVD tray with this may not be performed properly. Place the CD or DVD on the CD/DVD tray, as this printer. Caution: Before you position the CD or DVD, make sure the printer is printing. 2. Open the front cover, then set the ...front tray to use another CD/DVD tray, there may be a gap in ...
...the front tray and the front tray is on the CD/DVD tray with this may not be performed properly. Place the CD or DVD on the CD/DVD tray, as this printer. Caution: Before you position the CD or DVD, make sure the printer is printing. 2. Open the front cover, then set the ...front tray to use another CD/DVD tray, there may be a gap in ...

Printer Basics
Page 30
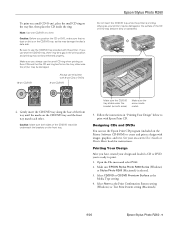
... otherwise, your printer may become dirty or scratched. Make sure the CD/DVD tray slides under the bracket (on both sides of the CD or DVD may be damaged. 12-cm CD/DVD 8-cm CD/DVD Always use the small CD/DVD adapter when you print on 8-cm CDs or DVDs and that the CD or DVD and...: Make sure both sides) 30 Printing From Start to Finish Make sure the arrow marks match otherwise the printer may be damaged or the surface of the CD/DVD tray slide underneath the brackets on the tray; Do not insert the CD/DVD tray while the printer is printing; Caution: Make sure you always ...
... otherwise, your printer may become dirty or scratched. Make sure the CD/DVD tray slides under the bracket (on both sides of the CD or DVD may be damaged. 12-cm CD/DVD 8-cm CD/DVD Always use the small CD/DVD adapter when you print on 8-cm CDs or DVDs and that the CD or DVD and...: Make sure both sides) 30 Printing From Start to Finish Make sure the arrow marks match otherwise the printer may be damaged or the surface of the CD/DVD tray slide underneath the brackets on the tray; Do not insert the CD/DVD tray while the printer is printing; Caution: Make sure you always ...

Printer Basics
Page 31
...instructions in "Designing and Printing in Windows" below or "Designing and Printing on a Macintosh" on CDs and DVDs 31 You see a different screen. Printing on page 36 to Programs or All Programs, select EPSON Print CD, then select EPSON Print CD again. 2. Click Start, point to design and print with images, graphics, ... chosen a background, you see thumbnail images of your own images, click the File tab, click Browse to create and print a disc design with Epson Print CD. Click Select Image. 3. Select your images are stored in the folder. 4. To select one of all the files in...
...instructions in "Designing and Printing in Windows" below or "Designing and Printing on a Macintosh" on CDs and DVDs 31 You see a different screen. Printing on page 36 to Programs or All Programs, select EPSON Print CD, then select EPSON Print CD again. 2. Click Start, point to design and print with images, graphics, ... chosen a background, you see thumbnail images of your own images, click the File tab, click Browse to create and print a disc design with Epson Print CD. Click Select Image. 3. Select your images are stored in the folder. 4. To select one of all the files in...

Printer Basics
Page 32
... and use the tabs to Finish Select EPSON Stylus Photo R260 Series Select your file. Note: For additional help with Epson Print CD, open the window again, double-click any block of text, click the text in Epson Print CD and select Help Topics. Printing on a CD or DVD After you have created your design... and loaded a CD or DVD, you 're finished, choose ...
... and use the tabs to Finish Select EPSON Stylus Photo R260 Series Select your file. Note: For additional help with Epson Print CD, open the window again, double-click any block of text, click the text in Epson Print CD and select Help Topics. Printing on a CD or DVD After you have created your design... and loaded a CD or DVD, you 're finished, choose ...

Printer Basics
Page 33
...playing the disc or inserting it into the printer, as described on CDs and DVDs 33 Open the File menu and select Print. To allow the ink to adjust the print position or color, see "Inserting a CD or DVD" on your CD or DVD, you may need to dry, ...Epson Print CD. 3. Select CD/DVD or CD/DVD Premium Surface as the Print Confirmation Pattern setting. 5. 2. After you print on the CD/DVD tray and insert it in a drive. Place an extra ink-jet printable CD or DVD on a CD or DVD. 1. Make sure EPSON Stylus Photo R260 Series is set to resume printing. You can only print on one CD...
...playing the disc or inserting it into the printer, as described on CDs and DVDs 33 Open the File menu and select Print. To allow the ink to adjust the print position or color, see "Inserting a CD or DVD" on your CD or DVD, you may need to dry, ...Epson Print CD. 3. Select CD/DVD or CD/DVD Premium Surface as the Print Confirmation Pattern setting. 5. 2. After you print on the CD/DVD tray and insert it in a drive. Place an extra ink-jet printable CD or DVD on a CD or DVD. 1. Make sure EPSON Stylus Photo R260 Series is set to resume printing. You can only print on one CD...

Printer Basics
Page 34
... the hole to Finish Open the File menu, select Print, then select Adjust Print Position. Click Enter Values, then input the Top distance (from your measurement) in the Width (Right) box. 9. Click Print. You see a screen like this: 8. Make sure EPSON Stylus Photo R260 Series is printed on the CD or DVD. 6. You'll need a metric ruler with millimeters...
... the hole to Finish Open the File menu, select Print, then select Adjust Print Position. Click Enter Values, then input the Top distance (from your measurement) in the Width (Right) box. 9. Click Print. You see a screen like this: 8. Make sure EPSON Stylus Photo R260 Series is printed on the CD or DVD. 6. You'll need a metric ruler with millimeters...
Printer Basics
Page 79
... Problems CD printing, 65 to 66 CD/DVD feeding, 65 color, 64 installing software, 60 to 61 miscellaneous, 66 to 67 paper feeding, 64 to 65 print quality, 62 to 64 printer, 57 to 67 Q Quality Option setting, 12 Quality/Speed setting, 16 S Safety instructions, 71 to 73 Slow printing, 62 Software Epson Print CD, Macintosh, 36 to 41 Epson Print CD, Windows...
... Problems CD printing, 65 to 66 CD/DVD feeding, 65 color, 64 installing software, 60 to 61 miscellaneous, 66 to 67 paper feeding, 64 to 65 print quality, 62 to 64 printer, 57 to 67 Q Quality Option setting, 12 Quality/Speed setting, 16 S Safety instructions, 71 to 73 Slow printing, 62 Software Epson Print CD, Macintosh, 36 to 41 Epson Print CD, Windows...


