

Product Information Guide
Page 1
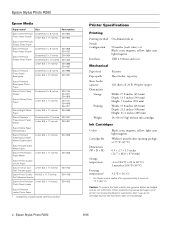
... support Sheet feeder Right edge guide Printer cover Left edge guide EXT. I/F USB port Front tray Front cover Front tray extensions Tray lever USB port Epson Stylus Photo R260 Accessories Ink Cartridges Cartridge Black Cyan Magenta Yellow Light Cyan Light Magenta High-Capacity Black High... button Ink button Paper button CD/DVD tray 9/06 Epson Stylus Photo R260 - 1 Note: Try the High Capacity 77 cartridges available at http://www.epson.com/highcapacity (U.S. Don't use genuine Epson cartridges and do not refill them. Other products may cause damage to your printer not covered by...
... support Sheet feeder Right edge guide Printer cover Left edge guide EXT. I/F USB port Front tray Front cover Front tray extensions Tray lever USB port Epson Stylus Photo R260 Accessories Ink Cartridges Cartridge Black Cyan Magenta Yellow Light Cyan Light Magenta High-Capacity Black High... button Ink button Paper button CD/DVD tray 9/06 Epson Stylus Photo R260 - 1 Note: Try the High Capacity 77 cartridges available at http://www.epson.com/highcapacity (U.S. Don't use genuine Epson cartridges and do not refill them. Other products may cause damage to your printer not covered by...
Product Information Guide
Page 2
Epson Stylus Photo R260 9/06 Epson Stylus Photo R260 Epson Media Paper name* Size Part number Epson Ultra Premium Borderless 4 × 6 inches Photo Paper Glossy Letter (8.5 × 11 inches) S041934 S041935 Epson Ultra Premium Glossy Photo Paper Epson Premium Borderless 4 × 6 inches S041808 Photo Paper Glossy S041727 Epson Premium Glossy Photo Paper Borderless 5 × 7 inches S041464 Borderless 8 × 10 inches S041465 Letter (8.5 × 11 inches) S041286 S041667 Epson Premium...
Epson Stylus Photo R260 9/06 Epson Stylus Photo R260 Epson Media Paper name* Size Part number Epson Ultra Premium Borderless 4 × 6 inches Photo Paper Glossy Letter (8.5 × 11 inches) S041934 S041935 Epson Ultra Premium Glossy Photo Paper Epson Premium Borderless 4 × 6 inches S041808 Photo Paper Glossy S041727 Epson Premium Glossy Photo Paper Borderless 5 × 7 inches S041464 Borderless 8 × 10 inches S041465 Letter (8.5 × 11 inches) S041286 S041667 Epson Premium...
Product Information Guide
Page 3
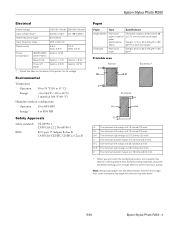
...12 W Letter Pattern Sleep mode Approx. 1.1 W Approx. 1.2 W Power off mode Approx. 0.2 W Approx. 0.4 W * Check the label on the back of the printer for plain bond paper Envelopes Plain bond paper Weight: 20 lb to 24 lb (75 g/m² to 90 g/m²) Printable area Normal Borderless* Envelopes A The...decline in the expanded area. E The minimum bottom margin is 0.20 inches (5.0 mm). B-L The minimum left with the short edge first. Epson Stylus Photo R260 Electrical Rated Voltage 100-120 V Model 220-240 V Model Input voltage range* AC 90 to 132 V AC 198 to 264 V Rated ...
...12 W Letter Pattern Sleep mode Approx. 1.1 W Approx. 1.2 W Power off mode Approx. 0.2 W Approx. 0.4 W * Check the label on the back of the printer for plain bond paper Envelopes Plain bond paper Weight: 20 lb to 24 lb (75 g/m² to 90 g/m²) Printable area Normal Borderless* Envelopes A The...decline in the expanded area. E The minimum bottom margin is 0.20 inches (5.0 mm). B-L The minimum left with the short edge first. Epson Stylus Photo R260 Electrical Rated Voltage 100-120 V Model 220-240 V Model Input voltage range* AC 90 to 132 V AC 198 to 264 V Rated ...

Product Information Guide
Page 4
... Camera or Mobile Phone" in your taskbar (in the lower right corner of the print head. Epson Stylus Photo R260 9/06 Epson Stylus Photo R260 Control Panel To diagnose problems, check the printer's control panel, as described in your on-screen User's Guide or Printer Basics book. If you have fed at once. Make sure you 're printing on paper...
... Camera or Mobile Phone" in your taskbar (in the lower right corner of the print head. Epson Stylus Photo R260 9/06 Epson Stylus Photo R260 Control Panel To diagnose problems, check the printer's control panel, as described in your on-screen User's Guide or Printer Basics book. If you have fed at once. Make sure you 're printing on paper...
Product Information Guide
Page 5
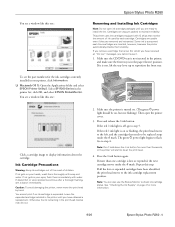
... numbers for which you have obtained a replacement. If more information. 9/06 Epson Stylus Photo R260 - 5 Otherwise the ink remaining in your hands, wash them immediately with water. You see a window like this one: Epson Stylus Photo R260 Removing and Installing Ink Cartridges Note: Do not open the printer cover. 3. If all the low or expended cartridges have been identified...
... numbers for which you have obtained a replacement. If more information. 9/06 Epson Stylus Photo R260 - 5 Otherwise the ink remaining in your hands, wash them immediately with water. You see a window like this one: Epson Stylus Photo R260 Removing and Installing Ink Cartridges Note: Do not open the printer cover. 3. If all the low or expended cartridges have been identified...
Product Information Guide
Page 6
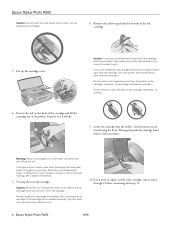
...cartridge and lift the cartridge out of the printer. Press in your hands, wash them immediately with water. If ink gets on the side of the ink cartridge when you install it carefully. 9. Unwrap the new ink cartridge. Epson Stylus Photo R260 9/06 Do not remove the transparent seal ... Keep ink cartridges out of the reach of the cartridge; Epson Stylus Photo R260 Caution: Do not touch the area shown below when you have installed an ink cartridge without removing the yellow tape, take the cartridge out of the printer, remove the yellow tape, and then reinstall it clicks into ...
...cartridge and lift the cartridge out of the printer. Press in your hands, wash them immediately with water. If ink gets on the side of the ink cartridge when you install it carefully. 9. Unwrap the new ink cartridge. Epson Stylus Photo R260 9/06 Do not remove the transparent seal ... Keep ink cartridges out of the reach of the cartridge; Epson Stylus Photo R260 Caution: Do not touch the area shown below when you have installed an ink cartridge without removing the yellow tape, take the cartridge out of the printer, remove the yellow tape, and then reinstall it clicks into ...
Product Information Guide
Page 7
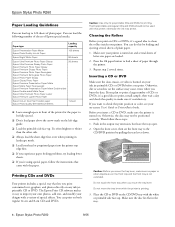
... Double-sided Epson Double-sided Matte Paper Epson Presentation Paper Matte Presentation Paper Matte Epson Photo Quality Ink Jet Paper Epson Photo Quality Self Adhesive Sheets Epson Ultra Premium Photo Paper Luster Ultra Premium Photo Paper Epson Premium Luster Photo Paper Luster Envelopes Envelope 9/06 Epson Stylus Photo R260 - 7 Do not insert the CD/DVD tray until ink charging is flashing, unless the printer hasn't moved...
... Double-sided Epson Double-sided Matte Paper Epson Presentation Paper Matte Presentation Paper Matte Epson Photo Quality Ink Jet Paper Epson Photo Quality Self Adhesive Sheets Epson Ultra Premium Photo Paper Luster Ultra Premium Photo Paper Epson Premium Luster Photo Paper Luster Envelopes Envelope 9/06 Epson Stylus Photo R260 - 7 Do not insert the CD/DVD tray until ink charging is flashing, unless the printer hasn't moved...
Product Information Guide
Page 8
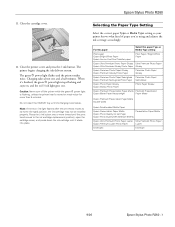
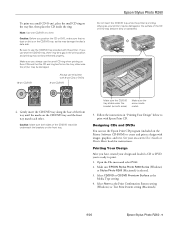
... side face-up. Press the ) paper button to import your own photos, add text, and modify your printer is printing. 3. Inserting a CD or DVD Make sure the data, music, or video is turned on. Epson Stylus Photo R260 9/06 The Epson Print CD software makes it 's a good idea to print a small.... Epson Stylus Photo R260 Paper Loading Guidelines You can print on both regular 12-cm and 8-cm CDs and DVDs. You can do this printer; Printing CDs and DVDs Your printer includes a special tray that came with the white or printable side face-up to check the print position or color, see...
... side face-up. Press the ) paper button to import your own photos, add text, and modify your printer is printing. 3. Inserting a CD or DVD Make sure the data, music, or video is turned on. Epson Stylus Photo R260 9/06 The Epson Print CD software makes it 's a good idea to print a small.... Epson Stylus Photo R260 Paper Loading Guidelines You can print on both regular 12-cm and 8-cm CDs and DVDs. You can do this printer; Printing CDs and DVDs Your printer includes a special tray that came with the white or printable side face-up to check the print position or color, see...
Product Information Guide
Page 9
... base of the front tray until the marks on both sides of the CD or DVD may be performed properly. Make sure EPSON Stylus Photo R260 Series (Windows) or Stylus Photo R260 (Macintosh) is on the Printer Software CD-ROM) to use another CD/DVD tray, there may be a gap in "Printing Your Design" below to print....dirt is selected. 3. Make sure you 're ready to print with 8-cm CDs or DVDs 8-cm CD/DVD Epson Stylus Photo R260 Do not insert the CD/DVD tray while the printer is printing; Follow the instructions in the print position and printing may not be damaged or the surface of the CD...
... base of the front tray until the marks on both sides of the CD or DVD may be performed properly. Make sure EPSON Stylus Photo R260 Series (Windows) or Stylus Photo R260 (Macintosh) is on the Printer Software CD-ROM) to use another CD/DVD tray, there may be a gap in "Printing Your Design" below to print....dirt is selected. 3. Make sure you 're ready to print with 8-cm CDs or DVDs 8-cm CD/DVD Epson Stylus Photo R260 Do not insert the CD/DVD tray while the printer is printing; Follow the instructions in the print position and printing may not be damaged or the surface of the CD...
Product Information Guide
Page 10
... OS X: Open the Applications folder and select EPSON Printer Utility2. Epson Stylus Photo R260 9/06 If it only when print quality declines (for loading instructions). After you clean the print head, check the print head nozzles first to confirm that the print head needs to adjust the print position or color, see a screen like the following : ❏...
... OS X: Open the Applications folder and select EPSON Printer Utility2. Epson Stylus Photo R260 9/06 If it only when print quality declines (for loading instructions). After you clean the print head, check the print head nozzles first to confirm that the print head needs to adjust the print position or color, see a screen like the following : ❏...
Product Information Guide
Page 11
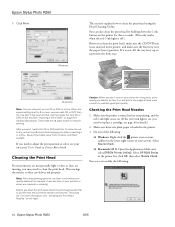
...your screen). Click Print or Next. Make sure the printer is turned on page 4 for details.) 2. The nozzle check pattern prints. Do one of the following : 9/06 Epson Stylus Photo R260 - 11 The printer makes noise and the green P power light flashes. ...cartridges are faint, click Clean. Caution: Never turn the printer off the printer while head cleaning is flashing or on the printer. 2. Epson Stylus Photo R260 4. Select Head Cleaning. ❏ Macintosh: Open the Applications folder and select EPSON Printer Utility2. Then skip to step 3 below ), click Clean ...
...your screen). Click Print or Next. Make sure the printer is turned on page 4 for details.) 2. The nozzle check pattern prints. Do one of the following : 9/06 Epson Stylus Photo R260 - 11 The printer makes noise and the green P power light flashes. ...cartridges are faint, click Clean. Caution: Never turn the printer off the printer while head cleaning is flashing or on the printer. 2. Epson Stylus Photo R260 4. Select Head Cleaning. ❏ Macintosh: Open the Applications folder and select EPSON Printer Utility2. Then skip to step 3 below ), click Clean ...
Product Information Guide
Page 12
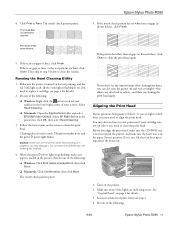
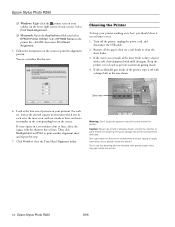
... from getting inside the printer. Epson Stylus Photo R260 ❏ Windows: Right-click the printer icon on your taskbar (in your printout. Turn off with special paper; Keep the printer cover closed to determine which one : Cleaning the Printer To keep your printer working at the four ... or apply lubricants, oils or grease inside . 4. If ink accidentally gets inside the printer. For each set contains a line or lines, select the square with mild detergent. Epson Stylus Photo R260 9/06 Caution: Never use a soft brush to close the Print Head Alignment utility. Warning...
... from getting inside the printer. Epson Stylus Photo R260 ❏ Windows: Right-click the printer icon on your taskbar (in your printout. Turn off with special paper; Keep the printer cover closed to determine which one : Cleaning the Printer To keep your printer working at the four ... or apply lubricants, oils or grease inside . 4. If ink accidentally gets inside the printer. For each set contains a line or lines, select the square with mild detergent. Epson Stylus Photo R260 9/06 Caution: Never use a soft brush to close the Print Head Alignment utility. Warning...
Product Information Guide
Page 13
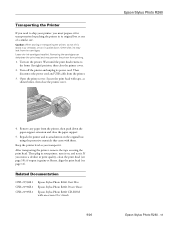
... and USB cable from printing. 1. Remove any paper from the cartridges. Related Documentation CPD-21934R1 CPD-21936R1 CPD-21935R1 Epson Stylus Photo R260 Start Here Epson Stylus Photo R260 Printer Basics Epson Stylus Photo R260 CD-ROM with tape, as you must prepare it . Open the printer cover. Epson Stylus Photo R260 4. if output is grainy or blurry, align the print head (see page 10); After transporting the...
... and USB cable from printing. 1. Remove any paper from the cartridges. Related Documentation CPD-21934R1 CPD-21936R1 CPD-21935R1 Epson Stylus Photo R260 Start Here Epson Stylus Photo R260 Printer Basics Epson Stylus Photo R260 CD-ROM with tape, as you must prepare it . Open the printer cover. Epson Stylus Photo R260 4. if output is grainy or blurry, align the print head (see page 10); After transporting the...
Printer Basics
Page 5
... such as shutter speed, metering, flash, exposure settings, resolution, and lens use them to ensure the most accurate image reproduction. Welcome Your Epson Stylus® Photo R260 is a full-featured printer. Welcome 5 Your printer uses the information to create accurate print settings. It provides you can print superior photographs and use it for the ultimate combination...
... such as shutter speed, metering, flash, exposure settings, resolution, and lens use them to ensure the most accurate image reproduction. Welcome Your Epson Stylus® Photo R260 is a full-featured printer. Welcome 5 Your printer uses the information to create accurate print settings. It provides you can print superior photographs and use it for the ultimate combination...

Printer Basics
Page 6
... better printing. 6 Welcome Note: Notes contain important information about your printer, double-click the Stylus Photo R260 User's Guide icon on CDs and DVDs, direct printing from a digital camera or mobile phone, maintaining your printer, and solving basic problems. For more information about your printer and install its software, see the Start Here sheet. About Your...
... better printing. 6 Welcome Note: Notes contain important information about your printer, double-click the Stylus Photo R260 User's Guide icon on CDs and DVDs, direct printing from a digital camera or mobile phone, maintaining your printer, and solving basic problems. For more information about your printer and install its software, see the Start Here sheet. About Your...
Printer Basics
Page 11
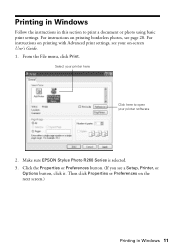
...photos, see a Setup, Printer, or Options button, click it. Select your printer here Click here to print a document or photo using basic print settings. From the File menu, click Print. Printing in Windows Follow the instructions in Windows 11 Click the Properties or Preferences button. (If you see page 20. Make sure EPSON Stylus Photo R260... Series is selected. 3. Then click Properties or Preferences on the next screen.) Printing in this section to open your on printing with Advanced print settings, see your printer software 2. For ...
...photos, see a Setup, Printer, or Options button, click it. Select your printer here Click here to print a document or photo using basic print settings. From the File menu, click Print. Printing in Windows Follow the instructions in Windows 11 Click the Properties or Preferences button. (If you see page 20. Make sure EPSON Stylus Photo R260... Series is selected. 3. Then click Properties or Preferences on the next screen.) Printing in this section to open your on printing with Advanced print settings, see your printer software 2. For ...
Printer Basics
Page 15
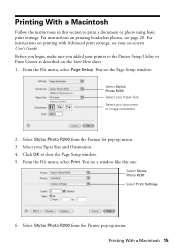
... Page Setup. Select your document or image orientation 2. Click OK to the Printer Setup Utility or Print Center as described on printing borderless photos, see the Page Setup window: Select Stylus Photo R260 Select your Paper Size Select your Paper Size and Orientation. 4. For instructions on...section to print a document or photo using basic print settings. Select Stylus Photo R260 from the Format for pop-up menu. You see page 20. Before you begin, make sure you added your on-screen User's Guide. Select Stylus Photo R260 from the Printer pop-up menu. 3. For instructions...
... Page Setup. Select your document or image orientation 2. Click OK to the Printer Setup Utility or Print Center as described on printing borderless photos, see the Page Setup window: Select Stylus Photo R260 Select your Paper Size Select your Paper Size and Orientation. 4. For instructions on...section to print a document or photo using basic print settings. Select Stylus Photo R260 from the Format for pop-up menu. You see page 20. Before you begin, make sure you added your on-screen User's Guide. Select Stylus Photo R260 from the Printer pop-up menu. 3. For instructions...
Printer Basics
Page 17
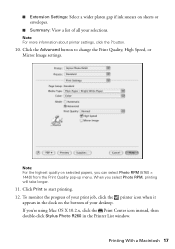
...-click Stylus Photo R260 in the dock on the bottom of your desktop. Note: For the highest quality on selected papers, you select Photo RPM, printing will take longer. 11. Click Print to change the Print Quality, High Speed, or Mirror Image settings. Note: For more information about printer settings,... click the ? When you can select Photo RPM (5760 × 1440) from the Print Quality pop-up menu. Click the Advanced button to start printing. 12....
...-click Stylus Photo R260 in the dock on the bottom of your desktop. Note: For the highest quality on selected papers, you select Photo RPM, printing will take longer. 11. Click Print to change the Print Quality, High Speed, or Mirror Image settings. Note: For more information about printer settings,... click the ? When you can select Photo RPM (5760 × 1440) from the Print Quality pop-up menu. Click the Advanced button to start printing. 12....
Printer Basics
Page 24
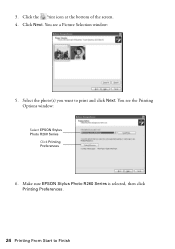
You see the Printing Options window: Select EPSON Stylus Photo R260 Series Click Printing Preferences 6. Make sure EPSON Stylus Photo R260 Series is selected, then click Printing Preferences. 24 Printing From Start to print and click Next. 3. Select the photo(s) you want to Finish Click the Print icon at the bottom of the screen. 4. You see a Picture Selection window: 5. Click Next.
You see the Printing Options window: Select EPSON Stylus Photo R260 Series Click Printing Preferences 6. Make sure EPSON Stylus Photo R260 Series is selected, then click Printing Preferences. 24 Printing From Start to print and click Next. 3. Select the photo(s) you want to Finish Click the Print icon at the bottom of the screen. 4. You see a Picture Selection window: 5. Click Next.
Printer Basics
Page 26
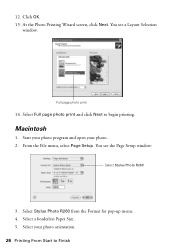
You see the Page Setup window: Select Stylus Photo R260 3. Click OK. 13. Select Full page photo print and click Next to Finish You see a Layout Selection window: Full page photo print 14. Macintosh 1. Start your photo program and open your photo orientation. 26 Printing From Start to begin printing. From the File menu, select Page Setup. Select Stylus Photo R260 from the Format for pop-up menu. 4. At the Photo Printing Wizard screen, click Next. Select your photo. 2. 12. Select a borderless Paper Size. 5.
You see the Page Setup window: Select Stylus Photo R260 3. Click OK. 13. Select Full page photo print and click Next to Finish You see a Layout Selection window: Full page photo print 14. Macintosh 1. Start your photo program and open your photo orientation. 26 Printing From Start to begin printing. From the File menu, select Page Setup. Select Stylus Photo R260 from the Format for pop-up menu. 4. At the Photo Printing Wizard screen, click Next. Select your photo. 2. 12. Select a borderless Paper Size. 5.


