

Printer Basics
Page 60
...instructed to do not see the printer name in the Format for your printer to set up your Windows printer software or click Start or , select Programs or All Programs, select EPSON, and click EPSON Stylus Photo R260 Series Driver Update. You're having problems installing the printer software. ■ Carefully follow ... it may need to the computer until charging finishes before you turn it on to the printer and the computer. When connecting your Epson Stylus Photo R260 printer software. Download instructions are posted for menu on the Page Setup screen, you may charge improperly...
...instructed to do not see the printer name in the Format for your printer to set up your Windows printer software or click Start or , select Programs or All Programs, select EPSON, and click EPSON Stylus Photo R260 Series Driver Update. You're having problems installing the printer software. ■ Carefully follow ... it may need to the computer until charging finishes before you turn it on to the printer and the computer. When connecting your Epson Stylus Photo R260 printer software. Download instructions are posted for menu on the Page Setup screen, you may charge improperly...
Printer Basics
Page 67
... might be necessary when you 're using a switch box or USB hub with your printer, connect the printer directly to step 4. 4. In the next window, select EPSON Stylus Photo R260 Series, and click OK. Point to uninstall and then reinstall your printer driver and utilities. Make sure that the Copies option in the Page Setup and Print windows...
... might be necessary when you 're using a switch box or USB hub with your printer, connect the printer directly to step 4. 4. In the next window, select EPSON Stylus Photo R260 Series, and click OK. Point to uninstall and then reinstall your printer driver and utilities. Make sure that the Copies option in the Page Setup and Print windows...
Service Manual
Page 24
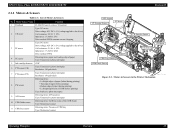
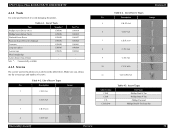
...PE Sensor CR Motor Figure 2-2. Motor/Sensor Name Function 1 Printhead F3-MACH head (6 colors x 90 nozzles) 2 CR motor Type: DC motor Drive voltage: 42V DC ± 5% (voltage applied to the driver) Coil resistance: 22.7Ω ± 10% Inductance: 17.5mH ± 25% ... photo interrupter 10 CDR Guide sensor Detecting items: Up/Down status of the CDR Guide Type: Mechanical contact 11 CDR Tray sensor Detecting items: Presence of Motors & Sensors No. EPSON Stylus Photo R260/R265/R270, R360/R380/R390 2.1.2 Motors & Sensors Table 2-3. Motors & Sensors in the Printer Mechanism...
...PE Sensor CR Motor Figure 2-2. Motor/Sensor Name Function 1 Printhead F3-MACH head (6 colors x 90 nozzles) 2 CR motor Type: DC motor Drive voltage: 42V DC ± 5% (voltage applied to the driver) Coil resistance: 22.7Ω ± 10% Inductance: 17.5mH ± 25% ... photo interrupter 10 CDR Guide sensor Detecting items: Up/Down status of the CDR Guide Type: Mechanical contact 11 CDR Tray sensor Detecting items: Presence of Motors & Sensors No. EPSON Stylus Photo R260/R265/R270, R360/R380/R390 2.1.2 Motors & Sensors Table 2-3. Motors & Sensors in the Printer Mechanism...
Service Manual
Page 25
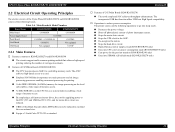
EPSON Stylus Photo R260/R265/R270, R360/R380/R390 2.2 Electrical Circuit Operating Principles The electric circuits of the Stylus Photo R260/R265/R270 and R360/R380/R390 consist of memory access. „ By employing a self-powered motor driver...„ Shuts off photoelectric current of C653Main Board (R260/R265/R270) „ The newly employed SOC achieves ...mode (R260/R265/R270 only) Operating Principles Electrical Circuit Operating Principles 26 Revision B † Features of photo interrupter ... 2.2.1 Main Features † Features common to R260/R265/R270 and R360/R380/R390 „ The ...
EPSON Stylus Photo R260/R265/R270, R360/R380/R390 2.2 Electrical Circuit Operating Principles The electric circuits of the Stylus Photo R260/R265/R270 and R360/R380/R390 consist of memory access. „ By employing a self-powered motor driver...„ Shuts off photoelectric current of C653Main Board (R260/R265/R270) „ The newly employed SOC achieves ...mode (R260/R265/R270 only) Operating Principles Electrical Circuit Operating Principles 26 Revision B † Features of photo interrupter ... 2.2.1 Main Features † Features common to R260/R265/R270 and R360/R380/R390 „ The ...
Service Manual
Page 32
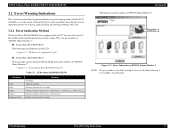
... No change Lights up normally Flashes at intervals of "EPSON Status Monitor 3". • Figure 1-5. ON (0.2 sec.) - EPSON Stylus Photo R260/R265/R270, R360/R380/R390 3.2 Error/Warning Indications This section describes how the printer indicates an error/warning status with a LCD. "Difference...printer driver when a problem arises during various operations; Revision B • Message box on the window of the Ink Cartridges shown in Appearance"(p.9) „ Stylus Photo R260/R265/R270 Error messages can solve most of the troubles following the instructions shown on the LCD or on EPSON...
... No change Lights up normally Flashes at intervals of "EPSON Status Monitor 3". • Figure 1-5. ON (0.2 sec.) - EPSON Stylus Photo R260/R265/R270, R360/R380/R390 3.2 Error/Warning Indications This section describes how the printer indicates an error/warning status with a LCD. "Difference...printer driver when a problem arises during various operations; Revision B • Message box on the window of the Ink Cartridges shown in Appearance"(p.9) „ Stylus Photo R260/R265/R270 Error messages can solve most of the troubles following the instructions shown on the LCD or on EPSON...

Service Manual
Page 35
... correctly. Is the USB cable not connected to the Panel Board 1. The printer driver installed on the PC is wrong? using the Adjustment Program. Install the correct printer driver. Is the Panel FFC damaged? 2. Replace the Panel FFC. 3. Replace the Panel Board. 1. EPSON Stylus Photo R260/R265/R270, R360/R380/R390 Revision B 3.3 Troubleshooting by Error Message The following...
... correctly. Is the USB cable not connected to the Panel Board 1. The printer driver installed on the PC is wrong? using the Adjustment Program. Install the correct printer driver. Is the Panel FFC damaged? 2. Replace the Panel FFC. 3. Replace the Panel Board. 1. EPSON Stylus Photo R260/R265/R270, R360/R380/R390 Revision B 3.3 Troubleshooting by Error Message The following...

Service Manual
Page 54
...? Is the Main Board damaged or broken? Replace the Card Board. EPSON Stylus Photo R260/R265/R270, R360/R380/R390 Revision B 3.4.4 Problems with Interfaces This section provides how to troubleshoot problems on the USB terminal? Is the printer driver associated with Other Devices? Uninstall the driver and reinstall it correctly following the instruction described in the card...
...? Is the Main Board damaged or broken? Replace the Card Board. EPSON Stylus Photo R260/R265/R270, R360/R380/R390 Revision B 3.4.4 Problems with Interfaces This section provides how to troubleshoot problems on the USB terminal? Is the printer driver associated with Other Devices? Uninstall the driver and reinstall it correctly following the instruction described in the card...
Service Manual
Page 57
... Types No. EPSON Stylus Photo R260/R265/R270, R360/R380/R390 4.1.2 Tools Use only specified tools to avoid damaging the printer. List of Tools Tool Phillips Screw Driver (No.1) Phillips Screw Driver (No.2) Flathead Screw Driver Precision Screw Driver #1 (flathead) Tweezers Long-nose pliers Acetate tape Metal straightedge 2 pins (thinner than Ø2mm) Note *: Commercially available Supplier* EPSON EPSON EPSON EPSON EPSON EPSON EPSON - Description Image...
... Types No. EPSON Stylus Photo R260/R265/R270, R360/R380/R390 4.1.2 Tools Use only specified tools to avoid damaging the printer. List of Tools Tool Phillips Screw Driver (No.1) Phillips Screw Driver (No.2) Flathead Screw Driver Precision Screw Driver #1 (flathead) Tweezers Long-nose pliers Acetate tape Metal straightedge 2 pins (thinner than Ø2mm) Note *: Commercially available Supplier* EPSON EPSON EPSON EPSON EPSON EPSON EPSON - Description Image...
Service Manual
Page 68
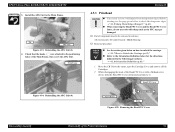
...driver into grooves until the hooks are securely engaged. : Tab : Hook Mounting Direction Panel Unit Rib Mounting Direction Slit Figure 4-25. Slide the Panel Unit upward to avoid injury from sharp metal edges. EPSON Stylus Photo R260/R265/R270, R360/R380/R390 4.2.6 Panel Unit † Parts/Components need to be removed in advance Paper Support / Printer... rib from CN3 and CN4 connectors on the Main Board. (disconnect CN5 only for the R260/R265/R270) R360/R380/R390 Panel Unit Main Board R260/R265/R270 Main Board CN3 CN4 Panel Unit CN5 Figure 4-23. Before starting, see the...
...driver into grooves until the hooks are securely engaged. : Tab : Hook Mounting Direction Panel Unit Rib Mounting Direction Slit Figure 4-25. Slide the Panel Unit upward to avoid injury from sharp metal edges. EPSON Stylus Photo R260/R265/R270, R360/R380/R390 4.2.6 Panel Unit † Parts/Components need to be removed in advance Paper Support / Printer... rib from CN3 and CN4 connectors on the Main Board. (disconnect CN5 only for the R260/R265/R270) R360/R380/R390 Panel Unit Main Board R260/R265/R270 Main Board CN3 CN4 Panel Unit CN5 Figure 4-23. Before starting, see the...

Service Manual
Page 73
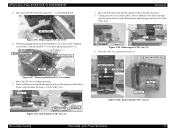
... right sides. 4. From the bottom side of the Printer, insert a flathead screw driver into the hole of the Middle Housing.) Tab (left) Tab (right) Removal Direction Revision B C A U T IO N When removing the Front Housing, make sure to Removing the Front Housing 5. EPSON Stylus Photo R260/R265/R270, R360/R380/R390 3. Removing the Front ...and right sides may be disengaged from the upper side of the Lower Housing to disengage the two tabs. (With R260/R265/R270, the tabs can be scratched heavily or broken. [Left inner side] Removal Direction Front Housing Bottom Rib Figure 4-38.
... right sides. 4. From the bottom side of the Printer, insert a flathead screw driver into the hole of the Middle Housing.) Tab (left) Tab (right) Removal Direction Revision B C A U T IO N When removing the Front Housing, make sure to Removing the Front Housing 5. EPSON Stylus Photo R260/R265/R270, R360/R380/R390 3. Removing the Front ...and right sides may be disengaged from the upper side of the Lower Housing to disengage the two tabs. (With R260/R265/R270, the tabs can be scratched heavily or broken. [Left inner side] Removal Direction Front Housing Bottom Rib Figure 4-38.
Service Manual
Page 90
... (p.62) „ When removing the Head FFC Cover and the Head FFC Cover Inner, do not use tools with a flathead screw driver, slide the Head FFC Cover downward and remove it. Removing the Head FFC Cover Disassembly/Assembly Disassembly of the Head FFC Cover with sharp... of the Printer Mechanism 91 Main Frame Figure 4-94. Check that the hooks ( ) are attached to the center, open the Cartridge Cover and remove all Ink Cartridges. 2. Reinstalling the APG Unit (4) Revision B 4.5.3 Printhead C A U T IO N „ Take extra care to the Main Frame. EPSON Stylus Photo R260/R265/R270,...
... (p.62) „ When removing the Head FFC Cover and the Head FFC Cover Inner, do not use tools with a flathead screw driver, slide the Head FFC Cover downward and remove it. Removing the Head FFC Cover Disassembly/Assembly Disassembly of the Head FFC Cover with sharp... of the Printer Mechanism 91 Main Frame Figure 4-94. Check that the hooks ( ) are attached to the center, open the Cartridge Cover and remove all Ink Cartridges. 2. Reinstalling the APG Unit (4) Revision B 4.5.3 Printhead C A U T IO N „ Take extra care to the Main Frame. EPSON Stylus Photo R260/R265/R270,...
Service Manual
Page 91
... (2) Hook (2) [Left rear side] Figure 4-99. EPSON Stylus Photo R260/R265/R270, R360/R380/R390 3. Disconnect the FFC from the connector ( ) on the right rear of the Main Frame, and disengage the hook (1) of the Printer Mechanism 92 Move the CR Unit to scratch the cables, insert a flathead screw driver through the hole on the Head...
... (2) Hook (2) [Left rear side] Figure 4-99. EPSON Stylus Photo R260/R265/R270, R360/R380/R390 3. Disconnect the FFC from the connector ( ) on the right rear of the Main Frame, and disengage the hook (1) of the Printer Mechanism 92 Move the CR Unit to scratch the cables, insert a flathead screw driver through the hole on the Head...
Service Manual
Page 123
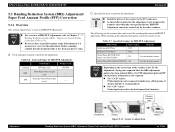
...ready beforehand as it is recommended.) „ For "CIS" sensor: Printed pattern needs to use . EPSON Stylus Photo R260/R265/R270, R360/R380/R390 Revision B 5.3 Banding Reduction System (BRS) Adjustment/ Paper Feed Amount ...Printer 124 Calculate correction value Adjustment Test Pattern Scanner PC Figure 5-11. Tools and Paper for BRS/PFP Adjustment Tools/Paper Product Code Common PFP Base scale 1453980 Matte Paper-Heavyweight BRS --- (A4) Premium Glossy Photo Paper PFP --- (4 x 6) † Specified Scanner to perform the adjustment C A U T IO N „ Install the driver...
...ready beforehand as it is recommended.) „ For "CIS" sensor: Printed pattern needs to use . EPSON Stylus Photo R260/R265/R270, R360/R380/R390 Revision B 5.3 Banding Reduction System (BRS) Adjustment/ Paper Feed Amount ...Printer 124 Calculate correction value Adjustment Test Pattern Scanner PC Figure 5-11. Tools and Paper for BRS/PFP Adjustment Tools/Paper Product Code Common PFP Base scale 1453980 Matte Paper-Heavyweight BRS --- (A4) Premium Glossy Photo Paper PFP --- (4 x 6) † Specified Scanner to perform the adjustment C A U T IO N „ Install the driver...
Service Manual
Page 129
... Pads via the Pump. This is automatically selected and performed according to maintain the printer in the LCD Panel for R360/ R380/R390, and with alcohol to the customer. EPSON Stylus Photo R260/R265/R270, R360/R380/R390 Revision B 6.1 Overview This section provides information to ... mode is because the "Maintenance request error" will be activated from the control panel, the printer driver utility or the Adjustment program. Maintenance Overview 130 Note * : This printer has three manual cleaning modes. The amount of the Waste Ink Pads, the maintenance request error...
... Pads via the Pump. This is automatically selected and performed according to maintain the printer in the LCD Panel for R360/ R380/R390, and with alcohol to the customer. EPSON Stylus Photo R260/R265/R270, R360/R380/R390 Revision B 6.1 Overview This section provides information to ... mode is because the "Maintenance request error" will be activated from the control panel, the printer driver utility or the Adjustment program. Maintenance Overview 130 Note * : This printer has three manual cleaning modes. The amount of the Waste Ink Pads, the maintenance request error...


