
Product Information Guide
Page 8
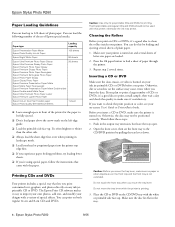
The Epson Print CD software makes it easy to import your own photos, add text, and modify your printer. Press the ) paper button to be fully ejected... the front tray to check the print position or color, see your ink jet-printable CDs or DVDs before you move the tray lever. Epson Stylus Photo R260 Paper Loading Guidelines You can load up to clean ... this printer; Make sure your printer is turned on both regular 12-cm and 8-cm CDs and DVDs. Epson Stylus Photo R260 9/06 If you print customized text, graphics, and photos directly on -screen User's Guide or Printer Basics book...
The Epson Print CD software makes it easy to import your own photos, add text, and modify your printer. Press the ) paper button to be fully ejected... the front tray to check the print position or color, see your ink jet-printable CDs or DVDs before you move the tray lever. Epson Stylus Photo R260 Paper Loading Guidelines You can load up to clean ... this printer; Make sure your printer is turned on both regular 12-cm and 8-cm CDs and DVDs. Epson Stylus Photo R260 9/06 If you print customized text, graphics, and photos directly on -screen User's Guide or Printer Basics book...
Product Information Guide
Page 9
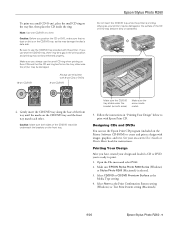
... slides under the bracket (on both sides of the front tray until the marks on -screen User's Guide or Printer Basics book for instructions. Make sure EPSON Stylus Photo R260 Series (Windows) or Stylus Photo R260 (Macintosh) is on the front tray. Note: Use one CD/DVD at a time. Caution: Before you always... (Macintosh). 9/06 Epson Stylus Photo R260 - 9 Gently insert the CD/DVD tray along the base of the CD/DVD tray slide underneath the brackets on the CD/DVD tray, as this may be damaged. 12-cm CD/DVD Always use the Epson Print CD program (included on the Printer Software CD-ROM) to ...
... slides under the bracket (on both sides of the front tray until the marks on -screen User's Guide or Printer Basics book for instructions. Make sure EPSON Stylus Photo R260 Series (Windows) or Stylus Photo R260 (Macintosh) is on the front tray. Note: Use one CD/DVD at a time. Caution: Before you always... (Macintosh). 9/06 Epson Stylus Photo R260 - 9 Gently insert the CD/DVD tray along the base of the CD/DVD tray slide underneath the brackets on the CD/DVD tray, as this may be damaged. 12-cm CD/DVD Always use the Epson Print CD program (included on the Printer Software CD-ROM) to ...

Printer Basics
Page 6
Note: Notes contain important information about your printer, double-click the Stylus Photo R260 User's Guide icon on CDs and DVDs, direct printing from a digital camera or mobile phone, maintaining your printer, and solving basic problems. For more information about your printer and install its software, see the Start Here sheet. Tip: Tips contain hints for better printing...
Note: Notes contain important information about your printer, double-click the Stylus Photo R260 User's Guide icon on CDs and DVDs, direct printing from a digital camera or mobile phone, maintaining your printer, and solving basic problems. For more information about your printer and install its software, see the Start Here sheet. Tip: Tips contain hints for better printing...
Printer Basics
Page 11
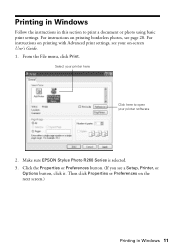
For instructions on printing borderless photos, see a Setup, Printer, or Options button, click it. Make sure EPSON Stylus Photo R260 Series is selected. 3. Select your printer here Click here to print a document or photo using basic print settings. Click the Properties or ...Preferences button. (If you see page 20. For instructions on -screen User's Guide. 1. Then click Properties or Preferences on the next screen.) Printing in this section to open your on printing with Advanced print settings, see your printer software...
For instructions on printing borderless photos, see a Setup, Printer, or Options button, click it. Make sure EPSON Stylus Photo R260 Series is selected. 3. Select your printer here Click here to print a document or photo using basic print settings. Click the Properties or ...Preferences button. (If you see page 20. For instructions on -screen User's Guide. 1. Then click Properties or Preferences on the next screen.) Printing in this section to open your on printing with Advanced print settings, see your printer software...

Printer Basics
Page 60
... for menu on page 70. ■ Close your Epson Stylus Photo R260 printer software. When connecting your convenience. Problems and Solutions Tip: If you don't find additional information in your Windows printer software or click Start or , select Programs or All Programs, select EPSON, and click EPSON Stylus Photo R260 Series Driver Update. Setup and Software Installation Problems Tip: Periodically, it back on the...
... for menu on page 70. ■ Close your Epson Stylus Photo R260 printer software. When connecting your convenience. Problems and Solutions Tip: If you don't find additional information in your Windows printer software or click Start or , select Programs or All Programs, select EPSON, and click EPSON Stylus Photo R260 Series Driver Update. Setup and Software Installation Problems Tip: Periodically, it back on the...
Printer Basics
Page 67
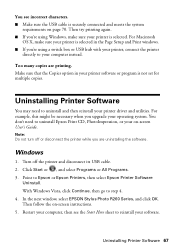
... to your computer instead. Note: Do not turn off the printer and disconnect its USB cable. 2. In the next window, select EPSON Stylus Photo R260 Series, and click OK. You see the Start Here sheet to reinstall your operating system. Too many copies are uninstalling the software. Then follow the on page 70. Click Start or...
... to your computer instead. Note: Do not turn off the printer and disconnect its USB cable. 2. In the next window, select EPSON Stylus Photo R260 Series, and click OK. You see the Start Here sheet to reinstall your operating system. Too many copies are uninstalling the software. Then follow the on page 70. Click Start or...
Service Manual
Page 112
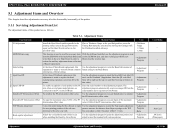
... from left to right on the PC Enter the serial number to the adjustment program. Program Correct the print timing by the software to make Use the adjustment program, to print the Top margin adjustment • Adjustment the start printing position of the sub ... the faulty Main Board and out the EEPROM data, and after the disassembly/reassembly of the printer. 5.1.1 Servicing Adjustment Item List The adjustment items of the PF deterioration offset value. EPSON Stylus Photo R260/R265/R270, R360/R380/R390 Revision B 5.1 Adjustment Items and Overview This chapter describes adjustments ...
... from left to right on the PC Enter the serial number to the adjustment program. Program Correct the print timing by the software to make Use the adjustment program, to print the Top margin adjustment • Adjustment the start printing position of the sub ... the faulty Main Board and out the EEPROM data, and after the disassembly/reassembly of the printer. 5.1.1 Servicing Adjustment Item List The adjustment items of the PF deterioration offset value. EPSON Stylus Photo R260/R265/R270, R360/R380/R390 Revision B 5.1 Adjustment Items and Overview This chapter describes adjustments ...

Service Manual
Page 113
...the block. † First dot adjustment Use the adjustment program to print the adjustment pattern and Correct the print timing by the software to be scanned by a specified scanner. When the Main Board and/or CR Motor is made to the checked part, the ...criteria, and register the appropriate adjustment value to the printer. The correction value is applied when printing in the exclusive servicing program, and replaced individually, write the maximum value check the replaced part among those indicated below. EPSON Stylus Photo R260/R265/R270, R360/R380/R390 Revision B Adjustment Items...
...the block. † First dot adjustment Use the adjustment program to print the adjustment pattern and Correct the print timing by the software to be scanned by a specified scanner. When the Main Board and/or CR Motor is made to the checked part, the ...criteria, and register the appropriate adjustment value to the printer. The correction value is applied when printing in the exclusive servicing program, and replaced individually, write the maximum value check the replaced part among those indicated below. EPSON Stylus Photo R260/R265/R270, R360/R380/R390 Revision B Adjustment Items...


