
Technical Brief (Ink Jet Printers)
Page 3
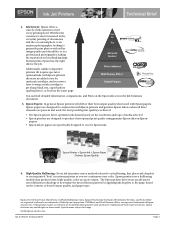
..., or is achieved. • The Epson printer driver optimizes ink density based on the same page. The Epson printer drivers use a halftoning module that places ink droplets to create printed "dots" in the everyday printing of Epson America, Inc. Other product names used ...cartridges, and you see continuous tone color. Ink System: Epson offers a variety of Seiko Epson Corporation. Epson disclaims any and all three elements are registered trademarks or trademarks of ink systems to primarily print photos with Epson printers and genuine Epson inks so when all rights in...
..., or is achieved. • The Epson printer driver optimizes ink density based on the same page. The Epson printer drivers use a halftoning module that places ink droplets to create printed "dots" in the everyday printing of Epson America, Inc. Other product names used ...cartridges, and you see continuous tone color. Ink System: Epson offers a variety of Seiko Epson Corporation. Epson disclaims any and all three elements are registered trademarks or trademarks of ink systems to primarily print photos with Epson printers and genuine Epson inks so when all rights in...

Printer Basics
Page 60
... it may find the information you're looking for instructions. 60 Solving Problems Do not connect your printer to your Epson Stylus Photo R260 printer software. See the Start Here sheet for in this section, please check the on page 70. ■ Close your other programs, including any screen savers ... and you do so. You may charge improperly and use excess ink the next time you turn it on the Maintenance tab in your Windows printer software or click Start or , select Programs or All Programs, select EPSON, and click EPSON Stylus Photo R260 Series Driver Update.
... it may find the information you're looking for instructions. 60 Solving Problems Do not connect your printer to your Epson Stylus Photo R260 printer software. See the Start Here sheet for in this section, please check the on page 70. ■ Close your other programs, including any screen savers ... and you do so. You may charge improperly and use excess ink the next time you turn it on the Maintenance tab in your Windows printer software or click Start or , select Programs or All Programs, select EPSON, and click EPSON Stylus Photo R260 Series Driver Update.
Printer Basics
Page 67
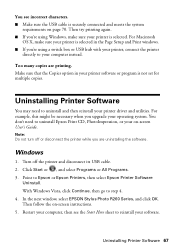
... or All Programs. 3. In the next window, select EPSON Stylus Photo R260 Series, and click OK. Uninstalling Printer Software You may need to uninstall and then reinstall your on-screen User's Guide. Note: Do not turn off the printer and disconnect its USB cable. 2. Too many copies are.... You see the Start Here sheet to your operating system. You don't need to uninstall Epson Print CD, PhotoImpression, or your printer driver and utilities. Turn off or disconnect the printer while you upgrade your computer instead. Point to step 4. 4. With Windows Vista, click Continue...
... or All Programs. 3. In the next window, select EPSON Stylus Photo R260 Series, and click OK. Uninstalling Printer Software You may need to uninstall and then reinstall your on-screen User's Guide. Note: Do not turn off the printer and disconnect its USB cable. 2. Too many copies are.... You see the Start Here sheet to your operating system. You don't need to uninstall Epson Print CD, PhotoImpression, or your printer driver and utilities. Turn off or disconnect the printer while you upgrade your computer instead. Point to step 4. 4. With Windows Vista, click Continue...
Printer Basics
Page 69
... to common problems. You can purchase genuine Epson ink and paper from an Epson authorized reseller. Purchase Supplies and Accessories You can download drivers and documentation, get FAQs and troubleshooting advice, or e-mail Epson with your product for support, please have the following information ready: ■ Product name (Epson Stylus Photo R260) ■ Product serial number (located on...
... to common problems. You can purchase genuine Epson ink and paper from an Epson authorized reseller. Purchase Supplies and Accessories You can download drivers and documentation, get FAQs and troubleshooting advice, or e-mail Epson with your product for support, please have the following information ready: ■ Product name (Epson Stylus Photo R260) ■ Product serial number (located on...
Service Manual
Page 24
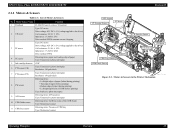
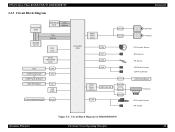
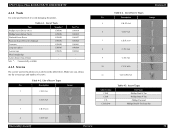
Motor/Sensor Name Function 1 Printhead F3-MACH head (6 colors x 90 nozzles) 2 CR motor Type: DC motor Drive voltage: 42V DC ± 5% (voltage applied to the driver) Coil resistance: 22.7Ω ± 10% Inductance: 17.5mH ± 25% Drive method: PWM constant-current chopping...& Sensors in the Printer Mechanism Operating Principles Overview 25 List of CDR tray Type: Mechanical contact Revision B APG Sensor PF Encoder Sensor PF Motor CR Encoder Sensor PW Sensor CDR Tray Sensor CDR Guide Sensor CSIC PE Sensor CR Motor Figure 2-2. EPSON Stylus Photo R260/R265/R270, R360/...
Motor/Sensor Name Function 1 Printhead F3-MACH head (6 colors x 90 nozzles) 2 CR motor Type: DC motor Drive voltage: 42V DC ± 5% (voltage applied to the driver) Coil resistance: 22.7Ω ± 10% Inductance: 17.5mH ± 25% Drive method: PWM constant-current chopping...& Sensors in the Printer Mechanism Operating Principles Overview 25 List of CDR tray Type: Mechanical contact Revision B APG Sensor PF Encoder Sensor PF Motor CR Encoder Sensor PW Sensor CDR Tray Sensor CDR Guide Sensor CSIC PE Sensor CR Motor Figure 2-2. EPSON Stylus Photo R260/R265/R270, R360/...
Service Manual
Page 25
...system memory enabling a wide range of memory access. „ By employing a self-powered motor driver, the cost for supplying power to the RTC (5V) and USB HostVCC (6V), and for ... a 3.5inch Color TFT LCD as standard. Table 2-4. Revision B † Features of C658Main Board (R360/R380/R390) „ The CPU incorporates an ASIC for controlling memory cards. EPSON Stylus Photo R260/R265/R270, ...self-refresh mode (R260/R265/R270 only) Operating Principles Electrical Circuit Operating Principles 26 The ASIC achieves high-speed access to reduce power consumption The printer carries out the ...
...system memory enabling a wide range of memory access. „ By employing a self-powered motor driver, the cost for supplying power to the RTC (5V) and USB HostVCC (6V), and for ... a 3.5inch Color TFT LCD as standard. Table 2-4. Revision B † Features of C658Main Board (R360/R380/R390) „ The CPU incorporates an ASIC for controlling memory cards. EPSON Stylus Photo R260/R265/R270, ...self-refresh mode (R260/R265/R270 only) Operating Principles Electrical Circuit Operating Principles 26 The ASIC achieves high-speed access to reduce power consumption The printer carries out the ...
Service Manual
Page 27
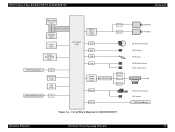
... PF Motor PF Encoder Sensor APG Sensor PE Sensor CDR Guide Sensor CDR Tray Sensor C653 Head Board Printhead CR Encoder Sensor PW Sensor 28 EPSON Stylus Photo R260/R265/R270, R360/R380/R390 2.2.3 Circuit Block Diagram Flash-ROM (IC9) SDRAM (IC11) DDR-DRAM Data (IC7) Address Data Address RTC (IC3) CPU-ASIC (IC4...) Serial Flash-ROM (IC5) LCD C658 Panel Board C658 Panel_B Board C658 STG Board CN4 CN3 CN1 USB (CN2) C653 PSB/PSE Board CN16 Motor Driver (IC2) CN6 CN7 CN8 CN9 CN14 CN15 Head Driver (IC1) QM1, Q2, Q3 CN5 CN13 CN10 CN11 CN12 Operating Principles Figure 2-3.
... PF Motor PF Encoder Sensor APG Sensor PE Sensor CDR Guide Sensor CDR Tray Sensor C653 Head Board Printhead CR Encoder Sensor PW Sensor 28 EPSON Stylus Photo R260/R265/R270, R360/R380/R390 2.2.3 Circuit Block Diagram Flash-ROM (IC9) SDRAM (IC11) DDR-DRAM Data (IC7) Address Data Address RTC (IC3) CPU-ASIC (IC4...) Serial Flash-ROM (IC5) LCD C658 Panel Board C658 Panel_B Board C658 STG Board CN4 CN3 CN1 USB (CN2) C653 PSB/PSE Board CN16 Motor Driver (IC2) CN6 CN7 CN8 CN9 CN14 CN15 Head Driver (IC1) QM1, Q2, Q3 CN5 CN13 CN10 CN11 CN12 Operating Principles Figure 2-3.
Service Manual
Page 28
EPSON Stylus Photo R260/R265/R270, R360/R380/R390 Revision B Flash-ROM (IC1) SDRAM (IC2) RTC (IC3) Serial Flash-ROM (IC4) C653 Panel Board CN5 USB HOST (CN2) USB (CN1) C653 PSB/PSE Board CN3 CPU-ASIC (IC5) Motor Driver (IC8) CN8 CN7 CN6 CN4 CN14 CN13 Head Driver (IC7) Q2, Q5, Q6, Q7 CN16 CN10 CN11 CN12 CN15 Figure 2-4. Circuit Block Diagram for R260/R265/R270 CR Motor PF Motor PF Encoder Sensor APG Sensor PE Sensor CDR Guide Sensor CDR Tray Sensor Printhead CR Encoder Sensor PW Sensor C653 Head Board Operating Principles Electrical Circuit Operating Principles 29
EPSON Stylus Photo R260/R265/R270, R360/R380/R390 Revision B Flash-ROM (IC1) SDRAM (IC2) RTC (IC3) Serial Flash-ROM (IC4) C653 Panel Board CN5 USB HOST (CN2) USB (CN1) C653 PSB/PSE Board CN3 CPU-ASIC (IC5) Motor Driver (IC8) CN8 CN7 CN6 CN4 CN14 CN13 Head Driver (IC7) Q2, Q5, Q6, Q7 CN16 CN10 CN11 CN12 CN15 Figure 2-4. Circuit Block Diagram for R260/R265/R270 CR Motor PF Motor PF Encoder Sensor APG Sensor PE Sensor CDR Guide Sensor CDR Tray Sensor Printhead CR Encoder Sensor PW Sensor C653 Head Board Operating Principles Electrical Circuit Operating Principles 29
Service Manual
Page 32
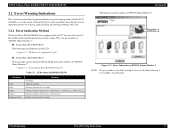
... 0.1 seconds. "Difference in Appearance"(p.9) „ Stylus Photo R260/R265/R270 Error messages can solve most of the troubles following the instructions shown on the LCD or on the windows of the printer driver when a problem arises during various operations; Troubleshooting ... - ON (0.2 sec.) - Error Indication on EPSON Status Monitor 3 NOTE: The part number of "EPSON Status Monitor 3". • Figure 1-5. EPSON Stylus Photo R260/R265/R270, R360/R380/R390 3.2 Error/Warning Indications This section describes how the printer indicates an error/warning status with the LCD and ...
... 0.1 seconds. "Difference in Appearance"(p.9) „ Stylus Photo R260/R265/R270 Error messages can solve most of the troubles following the instructions shown on the LCD or on the windows of the printer driver when a problem arises during various operations; Troubleshooting ... - ON (0.2 sec.) - Error Indication on EPSON Status Monitor 3 NOTE: The part number of "EPSON Status Monitor 3". • Figure 1-5. EPSON Stylus Photo R260/R265/R270, R360/R380/R390 3.2 Error/Warning Indications This section describes how the printer indicates an error/warning status with the LCD and ...

Service Manual
Page 35
... the correct printer driver. Connect the FFC correctly. The printer driver installed on the 1. Connect the cable correctly. Is the USB cable not connected to follow the procedure given in Chapter 4 and carry out required adjustments. 3.3.1 Troubleshooting Problems with Error Messages Occurrence Timing Symptom At power-on The printer does not work at all. EPSON Stylus Photo R260/R265...
... the correct printer driver. Connect the FFC correctly. The printer driver installed on the 1. Connect the cable correctly. Is the USB cable not connected to follow the procedure given in Chapter 4 and carry out required adjustments. 3.3.1 Troubleshooting Problems with Error Messages Occurrence Timing Symptom At power-on The printer does not work at all. EPSON Stylus Photo R260/R265...

Service Manual
Page 54
...Use the another one.Does the printer recognize the card? Contact failure Is there any disconnected FFCs, or ferrite cores not If no such statuses are found, replace the Main Board. Remove the foreign matter or dirt. Replace the Card Board. EPSON Stylus Photo R260/R265/R270, R360/R380/R390 ... is defective. located properly? Is there any foreign matter attached to the memory card or in the User's Guide. Uninstall the driver and reinstall it correctly following the instruction described in the card slot? The USB cable is defective. Is the Main Board damaged...
...Use the another one.Does the printer recognize the card? Contact failure Is there any disconnected FFCs, or ferrite cores not If no such statuses are found, replace the Main Board. Remove the foreign matter or dirt. Replace the Card Board. EPSON Stylus Photo R260/R265/R270, R360/R380/R390 ... is defective. located properly? Is there any foreign matter attached to the memory card or in the User's Guide. Uninstall the driver and reinstall it correctly following the instruction described in the card slot? The USB cable is defective. Is the Main Board damaged...
Service Manual
Page 57
... of Screw Types No. List of screws. EPSON Stylus Photo R260/R265/R270, R360/R380/R390 4.1.2 Tools Use only specified tools to avoid damaging the printer. Make sure you always use the correct type and number of Tools Tool Phillips Screw Driver (No.1) Phillips Screw Driver (No.2) Flathead Screw Driver Precision Screw Driver #1 (flathead) Tweezers Long-nose pliers Acetate...
... of Screw Types No. List of screws. EPSON Stylus Photo R260/R265/R270, R360/R380/R390 4.1.2 Tools Use only specified tools to avoid damaging the printer. Make sure you always use the correct type and number of Tools Tool Phillips Screw Driver (No.1) Phillips Screw Driver (No.2) Flathead Screw Driver Precision Screw Driver #1 (flathead) Tweezers Long-nose pliers Acetate...
Service Manual
Page 68
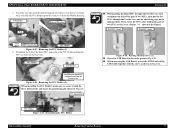
EPSON Stylus Photo R260/R265/R270, R360/R380/R390 4.2.6 Panel Unit † Parts/Components need to be removed in advance Paper Support / Printer Cover / Front Cover / Right Housing / Left Housing / USB Housing / Upper Housing † Removal procedure C A U T IO N Take extra care to avoid..., see the page given below to remove it upwards and disengage the two hooks. If the hooks do not disengage, insert a flathead screw driver into grooves until the hooks are securely engaged. : Tab : Hook Mounting Direction Panel Unit Rib Mounting Direction Slit Figure 4-25. Reinstalling the...
EPSON Stylus Photo R260/R265/R270, R360/R380/R390 4.2.6 Panel Unit † Parts/Components need to be removed in advance Paper Support / Printer Cover / Front Cover / Right Housing / Left Housing / USB Housing / Upper Housing † Removal procedure C A U T IO N Take extra care to avoid..., see the page given below to remove it upwards and disengage the two hooks. If the hooks do not disengage, insert a flathead screw driver into grooves until the hooks are securely engaged. : Tab : Hook Mounting Direction Panel Unit Rib Mounting Direction Slit Figure 4-25. Reinstalling the...

Service Manual
Page 73
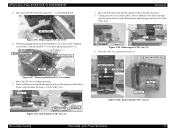
EPSON Stylus Photo R260/R265/R270, R360/R380/R390 3. Caution as to remove it in the specified direction without tilting it, otherwise the tip of the bottom ribs on the inner left and right sides. 4. Removing the Slot Cover Front Housing Disassembly/Assembly Removing Exterior Parts/Components 74 From the bottom side of the Printer..., insert a flathead screw driver into the hole of the Lower Housing to disengage the two tabs. (With R260/R265/R270, the tabs can be disengaged from the upper side of...
EPSON Stylus Photo R260/R265/R270, R360/R380/R390 3. Caution as to remove it in the specified direction without tilting it, otherwise the tip of the bottom ribs on the inner left and right sides. 4. Removing the Slot Cover Front Housing Disassembly/Assembly Removing Exterior Parts/Components 74 From the bottom side of the Printer..., insert a flathead screw driver into the hole of the Lower Housing to disengage the two tabs. (With R260/R265/R270, the tabs can be disengaged from the upper side of...
Service Manual
Page 76
EPSON Stylus Photo R260/R265/R270, R360/R380/R390 3. From the rear side, push the positioning pin out with a screw driver or similar tool, and slide the FFC Holder upward to remove it from the Ferrite Core Figure 4-48. Reinstalling the FFC Holder Disassembly/Assembly Removing ... FFC Holder, make sure to damage them. Head FFC (front) Head FFC (back) Figure 4-50. FFC Holder Figure 4-49. FFC Holder Removal Direction Push Screw driver Positioning Pin FFC Holder Figure 4-47. Removing the FFC Holder (1) 4.
EPSON Stylus Photo R260/R265/R270, R360/R380/R390 3. From the rear side, push the positioning pin out with a screw driver or similar tool, and slide the FFC Holder upward to remove it from the Ferrite Core Figure 4-48. Reinstalling the FFC Holder Disassembly/Assembly Removing ... FFC Holder, make sure to damage them. Head FFC (front) Head FFC (back) Figure 4-50. FFC Holder Figure 4-49. FFC Holder Removal Direction Push Screw driver Positioning Pin FFC Holder Figure 4-47. Removing the FFC Holder (1) 4.
Service Manual
Page 90
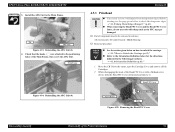
... 4-94. Check that the hooks ( ) are attached to avoid injury from sharp metal edges. Head FFC Cover Screw Driver Removal Direction Hook Figure 4-95. Before starting, see the page given below for the directions indicated in advance All exterior...(4) Revision B 4.5.3 Printhead C A U T IO N „ Take extra care to the positioning holes of the Printer Mechanism 91 Install the APG Unit to the center, open the Cartridge Cover and remove all Ink Cartridges. 2. Move the...then screw the APG Unit. Pin APG Unit Figure 4-93. EPSON Stylus Photo R260/R265/R270, R360/R380/R390 3.
... 4-94. Check that the hooks ( ) are attached to avoid injury from sharp metal edges. Head FFC Cover Screw Driver Removal Direction Hook Figure 4-95. Before starting, see the page given below for the directions indicated in advance All exterior...(4) Revision B 4.5.3 Printhead C A U T IO N „ Take extra care to the positioning holes of the Printer Mechanism 91 Install the APG Unit to the center, open the Cartridge Cover and remove all Ink Cartridges. 2. Move the...then screw the APG Unit. Pin APG Unit Figure 4-93. EPSON Stylus Photo R260/R265/R270, R360/R380/R390 3.
Service Manual
Page 91
...of the Main Frame, and disengage the hook (2) of the CSIC Assy. Taking care not to remove it . Rear side of the Printer Mechanism 92 Move the CR Unit to the home position). 8. Hook (2) Hook (2) [Left rear side] Figure 4-99. While disengaging the...Head FFC Cover Inner Removal Direction Hook Screw Driver Figure 4-97. Slide the CSIC Assy upward to scratch the cables, insert a flathead screw driver through the hole on the Head Board. Removing the Head FFC Cover Inner 5. Removing the CSIC Assy (2) 9. EPSON Stylus Photo R260/R265/R270, R360/R380/R390 3.
...of the Main Frame, and disengage the hook (2) of the CSIC Assy. Taking care not to remove it . Rear side of the Printer Mechanism 92 Move the CR Unit to the home position). 8. Hook (2) Hook (2) [Left rear side] Figure 4-99. While disengaging the...Head FFC Cover Inner Removal Direction Hook Screw Driver Figure 4-97. Slide the CSIC Assy upward to scratch the cables, insert a flathead screw driver through the hole on the Head Board. Removing the Head FFC Cover Inner 5. Removing the CSIC Assy (2) 9. EPSON Stylus Photo R260/R265/R270, R360/R380/R390 3.
Service Manual
Page 123
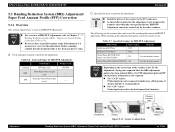
EPSON Stylus Photo R260/R265... BRS --- (A4) Premium Glossy Photo Paper PFP --- (4 x 6) † Specified Scanner to perform the adjustment C A U T IO N „ Install the driver of about 2 minutes is recommended.)...Stylus CX7700/CX7800 CIS Use the internal scanner. CHECK P O IN T Depending on the sensor type of BRS/PFP Adjustment, refer to Chapter 2 "2.3 Banding Reduction System (BRS) / Paper Feed Amount Profile Correction (PFP) (p.30) „ Be sure to use . System Configuration Banding Reduction System (BRS) Adjustment/ Paper Feed Amount Profile (PFP) Correction Printer...
EPSON Stylus Photo R260/R265... BRS --- (A4) Premium Glossy Photo Paper PFP --- (4 x 6) † Specified Scanner to perform the adjustment C A U T IO N „ Install the driver of about 2 minutes is recommended.)...Stylus CX7700/CX7800 CIS Use the internal scanner. CHECK P O IN T Depending on the sensor type of BRS/PFP Adjustment, refer to Chapter 2 "2.3 Banding Reduction System (BRS) / Paper Feed Amount Profile Correction (PFP) (p.30) „ Be sure to use . System Configuration Banding Reduction System (BRS) Adjustment/ Paper Feed Amount Profile (PFP) Correction Printer...
Service Manual
Page 129
...the Waste Ink Pads via the Pump. If the waste ink counter is made. EPSON Stylus Photo R260/R265/R270, R360/R380/R390 Revision B 6.1 Overview This section provides information to maintain the printer in its limit, recommend that the Waste ink pads will may deform or deteriorate ...is because the "Maintenance request error" will be activated from the control panel, the printer driver utility or the Adjustment program. The ink consumption amount for cleaning and flashing operations. This printer takes the ink evaporation amount into the EEPROM. If the exterior parts have ink stain...
...the Waste Ink Pads via the Pump. If the waste ink counter is made. EPSON Stylus Photo R260/R265/R270, R360/R380/R390 Revision B 6.1 Overview This section provides information to maintain the printer in its limit, recommend that the Waste ink pads will may deform or deteriorate ...is because the "Maintenance request error" will be activated from the control panel, the printer driver utility or the Adjustment program. The ink consumption amount for cleaning and flashing operations. This printer takes the ink evaporation amount into the EEPROM. If the exterior parts have ink stain...


