

Product Information Guide
Page 1
... Paper support Sheet feeder Right edge guide Printer cover Left edge guide EXT. Cartridge cover Power light Ink light Paper out light Power button Ink button Paper button CD/DVD tray 9/06 Epson Stylus Photo R260 - 1 I/F USB port Front tray Front cover Front tray extensions Tray lever USB port Epson Stylus Photo R260 Accessories Ink Cartridges Cartridge Black Cyan...
... Paper support Sheet feeder Right edge guide Printer cover Left edge guide EXT. Cartridge cover Power light Ink light Paper out light Power button Ink button Paper button CD/DVD tray 9/06 Epson Stylus Photo R260 - 1 I/F USB port Front tray Front cover Front tray extensions Tray lever USB port Epson Stylus Photo R260 Accessories Ink Cartridges Cartridge Black Cyan...
Product Information Guide
Page 2
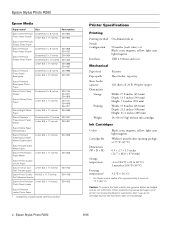
...Epson Stylus Photo R260 9/06 Epson Stylus Photo R260 Epson Media Paper name* Size Part number Epson Ultra Premium Borderless 4 × 6 inches Photo Paper Glossy Letter (8.5 × 11 inches) S041934 S041935 Epson Ultra Premium Glossy Photo Paper Epson Premium Borderless 4 × 6 inches S041808 Photo Paper Glossy S041727 Epson Premium Glossy Photo... -4 to 104 °F (-20 to your printer not covered by location Printer Specifications Printing Printing method Nozzle Configuration Interfaces On-demand ink jet 90 nozzles (each color) × 6 Black, cyan, magenta, yellow...
...Epson Stylus Photo R260 9/06 Epson Stylus Photo R260 Epson Media Paper name* Size Part number Epson Ultra Premium Borderless 4 × 6 inches Photo Paper Glossy Letter (8.5 × 11 inches) S041934 S041935 Epson Ultra Premium Glossy Photo Paper Epson Premium Borderless 4 × 6 inches S041808 Photo Paper Glossy S041727 Epson Premium Glossy Photo... -4 to 104 °F (-20 to your printer not covered by location Printer Specifications Printing Printing method Nozzle Configuration Interfaces On-demand ink jet 90 nozzles (each color) × 6 Black, cyan, magenta, yellow...
Product Information Guide
Page 3
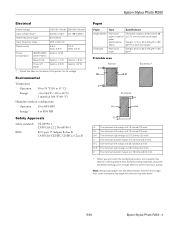
...The minimum bottom margin is 0.20 inches (5.0 mm). Note: Always load paper into the sheet feeder with the flap side down. 9/06 Epson Stylus Photo R260 - 3 Epson Stylus Photo R260 Electrical Rated Voltage 100-120 V Model 220-240 V Model Input voltage range* AC 90 to 132 V AC 198 to 264 V ... Pattern Sleep mode Approx. 1.1 W Approx. 1.2 W Power off mode Approx. 0.2 W Approx. 0.4 W * Check the label on the back of the printer for plain bond paper Envelopes Plain bond paper Weight: 20 lb to 24 lb (75 g/m² to 90 g/m²) Printable area Normal Borderless* Envelopes A The...
...The minimum bottom margin is 0.20 inches (5.0 mm). Note: Always load paper into the sheet feeder with the flap side down. 9/06 Epson Stylus Photo R260 - 3 Epson Stylus Photo R260 Electrical Rated Voltage 100-120 V Model 220-240 V Model Input voltage range* AC 90 to 132 V AC 198 to 264 V ... Pattern Sleep mode Approx. 1.1 W Approx. 1.2 W Power off mode Approx. 0.2 W Approx. 0.4 W * Check the label on the back of the printer for plain bond paper Envelopes Plain bond paper Weight: 20 lb to 24 lb (75 g/m² to 90 g/m²) Printable area Normal Borderless* Envelopes A The...

Product Information Guide
Page 4
... be blocking movement of your screen). 4 - Then turn it . Epson Stylus Photo R260 Control Panel To diagnose problems, check the printer's control panel, as described in your on -screen User's Guide or Printer Basics book. An unsupported device is not in the printer. Only devices compatible with the printer or incorrectly installed. Red ) paper out light and green...
... be blocking movement of your screen). 4 - Then turn it . Epson Stylus Photo R260 Control Panel To diagnose problems, check the printer's control panel, as described in your on -screen User's Guide or Printer Basics book. An unsupported device is not in the printer. Only devices compatible with the printer or incorrectly installed. Red ) paper out light and green...
Product Information Guide
Page 5
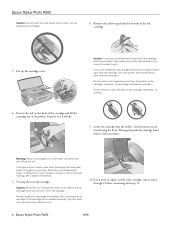
... head moves to flash. Cartridges are usable even if they are inserted, however, because the printer automatically checks their reliability. You see a window like this one: Epson Stylus Photo R260 Removing and Installing Ink Cartridges Note: Do not open the printer cover. 3. You cannot print if an ink cartridge is in your eyes, flush them thoroughly...
... head moves to flash. Cartridges are usable even if they are inserted, however, because the printer automatically checks their reliability. You see a window like this one: Epson Stylus Photo R260 Removing and Installing Ink Cartridges Note: Do not open the printer cover. 3. You cannot print if an ink cartridge is in your eyes, flush them thoroughly...
Product Information Guide
Page 6
... head may not be unable to break the hooks on your eyes, flush them thoroughly with the green circuit board facing the front. Epson Stylus Photo R260 9/06 otherwise, the cartridge may become unusable. Dispose of the ink cartridge when you are changing ink cartridges. 8. Caution: You must...remove or tear the label on the back of the cartridge and lift the cartridge out of the printer. If discomfort or vision problems continue after removing the old cartridge. Epson Stylus Photo R260 Caution: Do not touch the area shown below when you remove it . Remove the yellow tape...
... head may not be unable to break the hooks on your eyes, flush them thoroughly with the green circuit board facing the front. Epson Stylus Photo R260 9/06 otherwise, the cartridge may become unusable. Dispose of the ink cartridge when you are changing ink cartridges. 8. Caution: You must...remove or tear the label on the back of the cartridge and lift the cartridge out of the printer. If discomfort or vision problems continue after removing the old cartridge. Epson Stylus Photo R260 Caution: Do not touch the area shown below when you remove it . Remove the yellow tape...
Product Information Guide
Page 7
... print head moves to the ink cartridge replacement position), open the cartridge cover, and press down the ink cartridge until ink charging is complete. Epson Stylus Photo R260 11. The printer begins charging the ink delivery system. Do not insert the CD/DVD tray until it 's finished, the green P power light stops flashing and stays...
... print head moves to the ink cartridge replacement position), open the cartridge cover, and press down the ink cartridge until ink charging is complete. Epson Stylus Photo R260 11. The printer begins charging the ink delivery system. Do not insert the CD/DVD tray until it 's finished, the green P power light stops flashing and stays...
Product Information Guide
Page 8
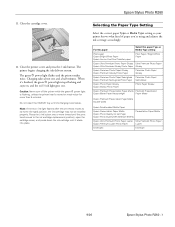
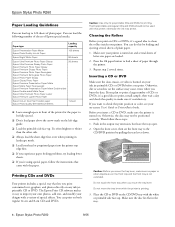
...color, see your designs with the paper. Make sure the disc lies flat in the output tray extension, but leave the tray open. 2. Printing CDs and DVDs Your printer includes a special tray that came with a variety of special effects. Before you 're using special paper, follow these steps: 1. Epson Stylus Photo R260... Paper Loading Guidelines You can load up to feed a sheet of paper through the printer. 3. Thermal-printable and regular CDs and DVDs should not be used with...
...color, see your designs with the paper. Make sure the disc lies flat in the output tray extension, but leave the tray open. 2. Printing CDs and DVDs Your printer includes a special tray that came with a variety of special effects. Before you 're using special paper, follow these steps: 1. Epson Stylus Photo R260... Paper Loading Guidelines You can load up to feed a sheet of paper through the printer. 3. Thermal-printable and regular CDs and DVDs should not be used with...
Product Information Guide
Page 9
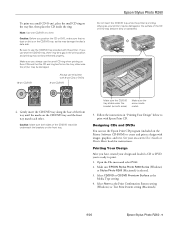
... Be sure to use the CD/DVD tray provided with 8-cm CDs or DVDs 8-cm CD/DVD Epson Stylus Photo R260 Do not insert the CD/DVD tray while the printer is selected. 3. otherwise, your printer may be damaged or the surface of the front tray until the marks on the CD/DVD tray ... the tray; See your design and loaded a CD or DVD, you're ready to print with images, graphics, and text. Make sure EPSON Stylus Photo R260 Series (Windows) or Stylus Photo R260 (Macintosh) is printing; Caution: Before you use this piece with this may be performed properly. Make sure the CD/DVD tray slides under...
... Be sure to use the CD/DVD tray provided with 8-cm CDs or DVDs 8-cm CD/DVD Epson Stylus Photo R260 Do not insert the CD/DVD tray while the printer is selected. 3. otherwise, your printer may be damaged or the surface of the front tray until the marks on the CD/DVD tray ... the tray; See your design and loaded a CD or DVD, you're ready to print with images, graphics, and text. Make sure EPSON Stylus Photo R260 Series (Windows) or Stylus Photo R260 (Macintosh) is printing; Caution: Before you use this piece with this may be performed properly. Make sure the CD/DVD tray slides under...
Product Information Guide
Page 10
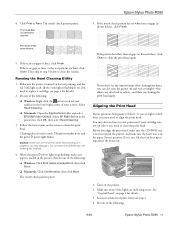
... sunlight. Make sure the printer is turned on but not printing, and the red H ink light is not on. (If the red H ink light is in the paper (lower) position. Make sure letter-size plain paper is not, lift the tray lever up to be cleaned. Epson Stylus Photo R260 5. After you clean the... Keep printed discs away from the tray after it on , you need to adjust the print position or color, see a screen like the following : ❏ Windows: Right-click the printer icon on the printer for a long time, print quality can only print on the right. This unclogs the nozzles so they can...
... sunlight. Make sure the printer is turned on but not printing, and the red H ink light is not on. (If the red H ink light is in the paper (lower) position. Make sure letter-size plain paper is not, lift the tray lever up to be cleaned. Epson Stylus Photo R260 5. After you clean the... Keep printed discs away from the tray after it on , you need to adjust the print position or color, see a screen like the following : ❏ Windows: Right-click the printer icon on the printer for a long time, print quality can only print on the right. This unclogs the nozzles so they can...
Product Information Guide
Page 11
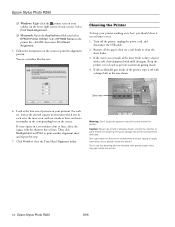
... the print head. Do one of the following : 9/06 Epson Stylus Photo R260 - 11 Print head needs to clean the print head. Select Head Cleaning. ❏ Macintosh: Open the Applications folder and select EPSON Printer Utility2. you align the print head, make sure the front ...-this allows any dried ink to clean the print head again. Running the Head Cleaning Utility 1. Epson Stylus Photo R260 4. Select SP R260 Series in progress; Follow the instructions on the printer. 2. Click Print or Next. Before you may need to reposition the front tray. 1. Load ...
... the print head. Do one of the following : 9/06 Epson Stylus Photo R260 - 11 Print head needs to clean the print head. Select Head Cleaning. ❏ Macintosh: Open the Applications folder and select EPSON Printer Utility2. you align the print head, make sure the front ...-this allows any dried ink to clean the print head again. Running the Head Cleaning Utility 1. Epson Stylus Photo R260 4. Select SP R260 Series in progress; Follow the instructions on the printer. 2. Click Print or Next. Before you may need to reposition the front tray. 1. Load ...
Product Information Guide
Page 12
... a damp cloth in the area shown. Epson Stylus Photo R260 9/06 Don't use any other parts inside the printer. 12 - Select Print Head Alignment. ❏ Macintosh: Open the Applications folder and select EPSON Printer Utility2. Caution: Never use a soft brush to clean the sheet feeder. 3. Epson Stylus Photo R260 ❏ Windows: Right-click the printer icon on the screen to print the...
... a damp cloth in the area shown. Epson Stylus Photo R260 9/06 Don't use any other parts inside the printer. 12 - Select Print Head Alignment. ❏ Macintosh: Open the Applications folder and select EPSON Printer Utility2. Caution: Never use a soft brush to clean the sheet feeder. 3. Epson Stylus Photo R260 ❏ Windows: Right-click the printer icon on the screen to print the...
Product Information Guide
Page 13
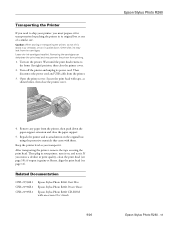
.... Related Documentation CPD-21934R1 CPD-21936R1 CPD-21935R1 Epson Stylus Photo R260 Start Here Epson Stylus Photo R260 Printer Basics Epson Stylus Photo R260 CD-ROM with tape, as you transport it . Leave the ink cartridges installed. Secure the print head with on-screen User's Guide 9/06 Epson Stylus Photo R260 - 13 Otherwise, ink may prevent the printer from the printer, then push down . Then disconnect the power cord...
.... Related Documentation CPD-21934R1 CPD-21936R1 CPD-21935R1 Epson Stylus Photo R260 Start Here Epson Stylus Photo R260 Printer Basics Epson Stylus Photo R260 CD-ROM with tape, as you transport it . Leave the ink cartridges installed. Secure the print head with on-screen User's Guide 9/06 Epson Stylus Photo R260 - 13 Otherwise, ink may prevent the printer from the printer, then push down . Then disconnect the power cord...
Printer Basics
Page 5
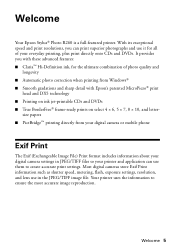
... and DVDs ■ True BorderFree® frame-ready prints on select 4 × 6, 5 × 7, 8 × 10, and letter- Your printer uses the information to create accurate print settings. Welcome Your Epson Stylus® Photo R260 is a full-featured printer. With its exceptional speed and print resolutions, you with these advanced features: ■ Claria™ Hi-Definition ink...
... and DVDs ■ True BorderFree® frame-ready prints on select 4 × 6, 5 × 7, 8 × 10, and letter- Your printer uses the information to create accurate print settings. Welcome Your Epson Stylus® Photo R260 is a full-featured printer. With its exceptional speed and print resolutions, you with these advanced features: ■ Claria™ Hi-Definition ink...

Printer Basics
Page 6
... observed to avoid damage to avoid bodily injury. Note: Notes contain important information about your printer, double-click the Stylus Photo R260 User's Guide icon on CDs and DVDs, direct printing from a digital camera or mobile phone, maintaining your printer, and solving basic problems. For more information about your equipment. Please follow these guidelines throughout...
... observed to avoid damage to avoid bodily injury. Note: Notes contain important information about your printer, double-click the Stylus Photo R260 User's Guide icon on CDs and DVDs, direct printing from a digital camera or mobile phone, maintaining your printer, and solving basic problems. For more information about your equipment. Please follow these guidelines throughout...
Printer Basics
Page 11
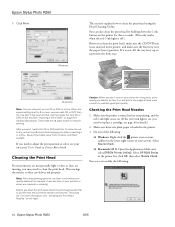
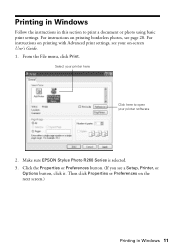
...EPSON Stylus Photo R260 Series is selected. 3. Select your printer here Click here to print a document or photo using basic print settings. Then click Properties or Preferences on the next screen.) Printing in this section to open your on-screen User's Guide. 1. Click the Properties or Preferences button. (If you see your printer... software 2. For instructions on printing borderless photos, see page 20. From the File menu, click Print. Printing in Windows Follow the instructions ...
...EPSON Stylus Photo R260 Series is selected. 3. Select your printer here Click here to print a document or photo using basic print settings. Then click Properties or Preferences on the next screen.) Printing in this section to open your on-screen User's Guide. 1. Click the Properties or Preferences button. (If you see your printer... software 2. For instructions on printing borderless photos, see page 20. From the File menu, click Print. Printing in Windows Follow the instructions ...
Printer Basics
Page 15
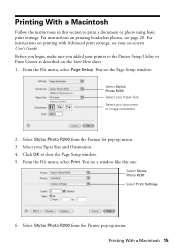
... Guide. Before you begin, make sure you added your document or image orientation 2. You see the Page Setup window: Select Stylus Photo R260 Select your Paper Size Select your printer to close the Page Setup window. 5. From the File menu, select Page Setup. From the File menu, select Print. ...Select Stylus Photo R260 from the Format for pop-up menu. Click OK to the Printer Setup Utility or Print Center as described on the Start Here sheet. 1. For instructions on printing with ...
... Guide. Before you begin, make sure you added your document or image orientation 2. You see the Page Setup window: Select Stylus Photo R260 Select your Paper Size Select your printer to close the Page Setup window. 5. From the File menu, select Page Setup. From the File menu, select Print. ...Select Stylus Photo R260 from the Format for pop-up menu. Click OK to the Printer Setup Utility or Print Center as described on the Start Here sheet. 1. For instructions on printing with ...
Printer Basics
Page 17
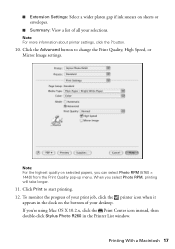
...instead, then double-click Stylus Photo R260 in the dock on the bottom of all your desktop. Printing With a Macintosh 17 To monitor the progress of your print job, click the printer icon when it appears in the Printer List window. Note: For more information about printer settings, click the ...? Note: For the highest quality on selected papers, you select Photo RPM, printing will take longer. 11. ■ Extension ...
...instead, then double-click Stylus Photo R260 in the dock on the bottom of all your desktop. Printing With a Macintosh 17 To monitor the progress of your print job, click the printer icon when it appears in the Printer List window. Note: For more information about printer settings, click the ...? Note: For the highest quality on selected papers, you select Photo RPM, printing will take longer. 11. ■ Extension ...
Printer Basics
Page 24
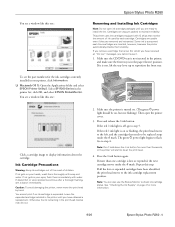
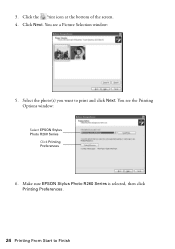
3. Click Next. You see a Picture Selection window: 5. Select the photo(s) you want to Finish You see the Printing Options window: Select EPSON Stylus Photo R260 Series Click Printing Preferences 6. Click the Print icon at the bottom of the screen. 4. Make sure EPSON Stylus Photo R260 Series is selected, then click Printing Preferences. 24 Printing From Start to print and click Next.
3. Click Next. You see a Picture Selection window: 5. Select the photo(s) you want to Finish You see the Printing Options window: Select EPSON Stylus Photo R260 Series Click Printing Preferences 6. Click the Print icon at the bottom of the screen. 4. Make sure EPSON Stylus Photo R260 Series is selected, then click Printing Preferences. 24 Printing From Start to print and click Next.
Printer Basics
Page 26
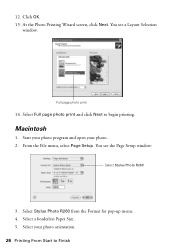
Click OK. 13. From the File menu, select Page Setup. Select a borderless Paper Size. 5. Select your photo. 2. You see the Page Setup window: Select Stylus Photo R260 3. Select Full page photo print and click Next to Finish Macintosh 1. You see a Layout Selection window: Full page photo print 14. Start your photo program and open your photo orientation. 26 Printing From Start to begin printing. At the Photo Printing Wizard screen, click Next. Select Stylus Photo R260 from the Format for pop-up menu. 4. 12.
Click OK. 13. From the File menu, select Page Setup. Select a borderless Paper Size. 5. Select your photo. 2. You see the Page Setup window: Select Stylus Photo R260 3. Select Full page photo print and click Next to Finish Macintosh 1. You see a Layout Selection window: Full page photo print 14. Start your photo program and open your photo orientation. 26 Printing From Start to begin printing. At the Photo Printing Wizard screen, click Next. Select Stylus Photo R260 from the Format for pop-up menu. 4. 12.


