
Warranty Statement
Page 1
... paragraph and the preceding paragraph may be found at its option, repair or replace on Epson's tested media list. (Epson's list of customer data 2) Damage from service performed by other than Epson or an Epson Authorized Servicer. 7) Service where the printer label, logo, rating label, or serial number has been removed. 8) Any damage caused by...
... paragraph and the preceding paragraph may be found at its option, repair or replace on Epson's tested media list. (Epson's list of customer data 2) Damage from service performed by other than Epson or an Epson Authorized Servicer. 7) Service where the printer label, logo, rating label, or serial number has been removed. 8) Any damage caused by...

Start Here
Page 6
.... Neither Seiko Epson Corporation nor its affiliates shall be different from your printer model. various safety devices, etc.; No patent liability is any liability assumed for damages, losses, costs, or expenses incurred by any consumable products other trademarks are subject to the use of this manual. All rights reserved. 6 TM-L500A Ticket User's Manual...
.... Neither Seiko Epson Corporation nor its affiliates shall be different from your printer model. various safety devices, etc.; No patent liability is any liability assumed for damages, losses, costs, or expenses incurred by any consumable products other trademarks are subject to the use of this manual. All rights reserved. 6 TM-L500A Ticket User's Manual...

Start Here
Page 7
...Tampering with this equipment, unplug the power cable immediately, and then contact your dealer or a Seiko Epson service center for advice. Be sure to repair this product. TM-L500A Ticket User's Manual 7 CAUTION: Cautions must be dangerous. Be sure to your equipment. Safety ...the TM-L500A Ticket to fire. Important Safety Information This section presents important information intended to an improper power source may cause equipment damage and burning. Never disassemble or modify this product yourself. Connection to ensure safe and effective use of the printer. ...
...Tampering with this equipment, unplug the power cable immediately, and then contact your dealer or a Seiko Epson service center for advice. Be sure to repair this product. TM-L500A Ticket User's Manual 7 CAUTION: Cautions must be dangerous. Be sure to your equipment. Safety ...the TM-L500A Ticket to fire. Important Safety Information This section presents important information intended to an improper power source may cause equipment damage and burning. Never disassemble or modify this product yourself. Connection to ensure safe and effective use of the printer. ...

Start Here
Page 8
... English Do not place heavy objects on this product. Never stand or lean on top of the following web site: http://download.epson-biz.com/?service=pos Part Names See illustration A for an extended period. For customers in North America, go to the following items... hook ❑ AC adapter [PS-180 (Model: M159B/159D)] ❑ User's manual (this product before leaving it unused for the printer part names. 8 TM-L500A Ticket User's Manual To ensure safety, unplug this manual) Downloading Drivers, Utilities, and Manuals Drivers, utilities, and manuals can be closed unexpectedly...
... English Do not place heavy objects on this product. Never stand or lean on top of the following web site: http://download.epson-biz.com/?service=pos Part Names See illustration A for an extended period. For customers in North America, go to the following items... hook ❑ AC adapter [PS-180 (Model: M159B/159D)] ❑ User's manual (this product before leaving it unused for the printer part names. 8 TM-L500A Ticket User's Manual To ensure safety, unplug this manual) Downloading Drivers, Utilities, and Manuals Drivers, utilities, and manuals can be closed unexpectedly...

Start Here
Page 9
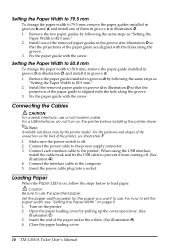
... Control Panel See illustration B. (Power) LED On when the printer is turned on the control panel are off. Flashes when the printer is in illustration D. Before turning on the printer soon after turning it off, make the setting for the TM-L500A Ticket. Do not change the paper width to 82.5 mm...(See illustration C) 3. CAUTION: Be sure to turn the printer on and off . 2. When setting the paper width from the default setting, be removed from the back of paper width; 50.8/54/79.5/82.5 mm by pulling up . (See illustration E) TM-L500A Ticket User's Manual 9 Error LED On when the paper ...
... Control Panel See illustration B. (Power) LED On when the printer is turned on the control panel are off. Flashes when the printer is in illustration D. Before turning on the printer soon after turning it off, make the setting for the TM-L500A Ticket. Do not change the paper width to 82.5 mm...(See illustration C) 3. CAUTION: Be sure to turn the printer on and off . 2. When setting the paper width from the default setting, be removed from the back of paper width; 50.8/54/79.5/82.5 mm by pulling up . (See illustration E) TM-L500A Ticket User's Manual 9 Error LED On when the paper ...
Start Here
Page 10
...printer, see "Setting the Paper Width" on , follow the steps below to the power supply connector. 3. Insert the power cable plug into a socket. Loading Paper When the Paper LED is on page 9. 1. Connect the power cable to load paper. For how to use. Close the paper loading cover. 10 TM-L500A... Insert the end of the paper guide are aligned with the holes along the groove. 3. For a USB interface, do not turn on the printer. 2. Connect each interface cable to the computer. 5. Remove the two paper guides by following the same steps as "Setting the Paper Width to ...
...printer, see "Setting the Paper Width" on , follow the steps below to the power supply connector. 3. Insert the power cable plug into a socket. Loading Paper When the Paper LED is on page 9. 1. Connect the power cable to load paper. For how to use. Close the paper loading cover. 10 TM-L500A... Insert the end of the paper guide are aligned with the holes along the groove. 3. For a USB interface, do not turn on the printer. 2. Connect each interface cable to the computer. 5. Remove the two paper guides by following the same steps as "Setting the Paper Width to ...

Start Here
Page 11
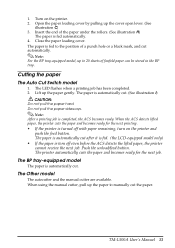
...of a punch hole or a black mark, and cut automatically. CAUTION: The thermal head can check the printer operation with a dry cloth or a damp cloth. Prepare a cleaning card. Note: Epson recommends KICTeam cleaning card. URL: http://www.kicteam.com/ Model: KCTP2639 (For Baggage Tag) KCTP2638 (For ... KICTeam's web site. If the printer performs pattern printing following the steps below, the printer is printed. Do not damage the thermal head by touching it . CAUTION: Never clean the product with an alcohol solvent (ethanol or IPA) TM-L500A Ticket User's Manual 11 To prevent...
...of a punch hole or a black mark, and cut automatically. CAUTION: The thermal head can check the printer operation with a dry cloth or a damp cloth. Prepare a cleaning card. Note: Epson recommends KICTeam cleaning card. URL: http://www.kicteam.com/ Model: KCTP2639 (For Baggage Tag) KCTP2638 (For ... KICTeam's web site. If the printer performs pattern printing following the steps below, the printer is printed. Do not damage the thermal head by touching it . CAUTION: Never clean the product with an alcohol solvent (ethanol or IPA) TM-L500A Ticket User's Manual 11 To prevent...

Start Here
Page 12
...torn parts of paper is still flashing, the printer may be very hot after 10 seconds, turn it can be grasped. (See illustration K) 8. In such case, see "Cleaning the Paper path, the Head plate and the Thermal Head" on page 10.) 12 TM-L500A Ticket User's Manual Open the platen cover, ...and push down the platen lever to "Paper jam occurs." ❏ Turn the printer off the printer. 2. Turn on the printer. If the LED is set properly. ❏ When a paper jam occurs...
...torn parts of paper is still flashing, the printer may be very hot after 10 seconds, turn it can be grasped. (See illustration K) 8. In such case, see "Cleaning the Paper path, the Head plate and the Thermal Head" on page 10.) 12 TM-L500A Ticket User's Manual Open the platen cover, ...and push down the platen lever to "Paper jam occurs." ❏ Turn the printer off the printer. 2. Turn on the printer. If the LED is set properly. ❏ When a paper jam occurs...

Users Manual
Page 6
.... Neither Seiko Epson Corporation nor its affiliates shall be different from your printer model. EPSON is a registered trademark or trademark of Seiko Epson Corporation. Exceed Your Vision is a registered trademark of Seiko Epson Corporation. All other...Epson Corporation's operating and maintenance instructions. USB connector 6. Power supply connector 4. Serial interface connector (25-Pin D-Sub) 8. Because this manual are subject to aviation, rail, marine, automotive, etc.; While every precaution has been taken in the illustrations. 1. All rights reserved. 6 TM-L500A...
.... Neither Seiko Epson Corporation nor its affiliates shall be different from your printer model. EPSON is a registered trademark or trademark of Seiko Epson Corporation. Exceed Your Vision is a registered trademark of Seiko Epson Corporation. All other...Epson Corporation's operating and maintenance instructions. USB connector 6. Power supply connector 4. Serial interface connector (25-Pin D-Sub) 8. Because this manual are subject to aviation, rail, marine, automotive, etc.; While every precaution has been taken in the illustrations. 1. All rights reserved. 6 TM-L500A...

Users Manual
Page 7
English Purpose of This Manual This manual provides information describing basic operations to operators of the TM-L500A to enable safe and correct use of importance, as defined below. Read this product yourself. Key to repair this section carefully...so may lead to fire. Do not use the specified AC adapter [Epson PS-180 (Model: M159B/M159D)] only. Note: Notes have important information and useful tips on a firm, stable, horizontal surface. Penetration by their level of the printer. TM-L500A User's Manual 7 CAUTION: Cautions must be dangerous. Tampering with this ...
English Purpose of This Manual This manual provides information describing basic operations to operators of the TM-L500A to enable safe and correct use of importance, as defined below. Read this product yourself. Key to repair this section carefully...so may lead to fire. Do not use the specified AC adapter [Epson PS-180 (Model: M159B/M159D)] only. Note: Notes have important information and useful tips on a firm, stable, horizontal surface. Penetration by their level of the printer. TM-L500A User's Manual 7 CAUTION: Cautions must be dangerous. Tampering with this ...

Users Manual
Page 8
... manuals can be closed unexpectedly. ❏ To prevent a paper jam, do not prevent paper from being ejected. Setting up the Printer To set up the printer, follow the steps below. 1. If any food or drink on this product. Operation check with the paper loading cover open the ... on page 14.) Unpacking Check whether the following items are not caught in other countries, go to the following web site: http://download.epson-biz.com/?service=pos 8 TM-L500A User's Manual Unpacking (See "Unpacking" on page 12.) 6. Loading the paper (See "Loading Paper" on page 8.) 2. Setting the paper...
... manuals can be closed unexpectedly. ❏ To prevent a paper jam, do not prevent paper from being ejected. Setting up the Printer To set up the printer, follow the steps below. 1. If any food or drink on this product. Operation check with the paper loading cover open the ... on page 14.) Unpacking Check whether the following items are not caught in other countries, go to the following web site: http://download.epson-biz.com/?service=pos 8 TM-L500A User's Manual Unpacking (See "Unpacking" on page 12.) 6. Loading the paper (See "Loading Paper" on page 8.) 2. Setting the paper...

Users Manual
Page 9
...an LCD ❏ Whether or not the printer is equipped with a BP (Boarding Pass) tray ❏ Whether or not the printer is equipped with an LCD and illustration B for the next printing. Off when the printer is completed, the ACS becomes ready. TM-L500A User's Manual 9 They come back on when... you operate the control panel. (Power) LED On when the printer is turned on the printer model. LCD-equipped model Control panel Cover open lever Paper...
...an LCD ❏ Whether or not the printer is equipped with a BP (Boarding Pass) tray ❏ Whether or not the printer is equipped with an LCD and illustration B for the next printing. Off when the printer is completed, the ACS becomes ready. TM-L500A User's Manual 9 They come back on when... you operate the control panel. (Power) LED On when the printer is turned on the printer model. LCD-equipped model Control panel Cover open lever Paper...

Users Manual
Page 10
... the paper and become ready for one second or more feeds paper backward until the paper can be removed from the back of the printer to the printer. Flashes during test printing standby state or autoloading standby state. Menu (OK) button (only for models with LCD) This button enters...LCD) This button switches between online and offline. Turning On/Off the Printer Use the power switch on the right side of the printer. Before turning on the printer soon after turning it off, make sure the LEDs on and off . 10 TM-L500A User's Manual Unload ( ↑ ) button Holding down this button...
... the paper and become ready for one second or more feeds paper backward until the paper can be removed from the back of the printer to the printer. Flashes during test printing standby state or autoloading standby state. Menu (OK) button (only for models with LCD) This button enters...LCD) This button switches between online and offline. Turning On/Off the Printer Use the power switch on the right side of the printer. Before turning on the printer soon after turning it off, make sure the LEDs on and off . 10 TM-L500A User's Manual Unload ( ↑ ) button Holding down this button...

Users Manual
Page 11
...types of the LCD from the default setting, be sure to 82.5 mm To change it once you start using the printer. Open the paper loading cover by pulling up . (See illustration E) TM-L500A User's Manual 11 Remove the paper guide by removing or changing the paper guides installed in the...Menu (OK) button. 5. Use the Unload ( ↑ ) button and Feed ( ↓ ) button to display the setting item for the TM-L500A. English Setting Menu on the LCD If your printer is equipped with an LCD, you can set three menu items with the paper guides installed in grooves b and d in illustration...
...types of the LCD from the default setting, be sure to 82.5 mm To change it once you start using the printer. Open the paper loading cover by pulling up . (See illustration E) TM-L500A User's Manual 11 Remove the paper guide by removing or changing the paper guides installed in the...Menu (OK) button. 5. Use the Unload ( ↑ ) button and Feed ( ↓ ) button to display the setting item for the TM-L500A. English Setting Menu on the LCD If your printer is equipped with an LCD, you can set three menu items with the paper guides installed in grooves b and d in illustration...

Users Manual
Page 12
...When the Paper LED is on page 11. 12 TM-L500A User's Manual Fix the paper guide with the screw. Connect each interface cable to set the paper width, see illustration F. 1. For how to the printer. Note: Available interfaces vary by the printer model. Remove the two paper guides by following ...Before using the USB interface, install the cable hook and fix the USB cable to use. Set the paper width properly for the TML500A or Epson USB device driver. When using the USB interface, be damaged by lightning. CAUTION: Be sure to 50.8 mm, remove the paper guide installed ...
...When the Paper LED is on page 11. 12 TM-L500A User's Manual Fix the paper guide with the screw. Connect each interface cable to set the paper width, see illustration F. 1. For how to the printer. Note: Available interfaces vary by the printer model. Remove the two paper guides by following ...Before using the USB interface, install the cable hook and fix the USB cable to use. Set the paper width properly for the TML500A or Epson USB device driver. When using the USB interface, be damaged by lightning. CAUTION: Be sure to 50.8 mm, remove the paper guide installed ...
Users Manual
Page 13
... the next job. When the ACS detects lifted paper, the printer cuts the paper and becomes ready for the next job. The BP tray-equipped model The paper is torn off with paper remaining, turn on the printer. 2. English 1. TM-L500A User's Manual 13 Insert the end of a punch hole or... a black mark, and cut the paper. Turn on the printer and push the feed button. Note: For the BP tray-equipped model, up...
... the next job. When the ACS detects lifted paper, the printer cuts the paper and becomes ready for the next job. The BP tray-equipped model The paper is torn off with paper remaining, turn on the printer. 2. English 1. TM-L500A User's Manual 13 Insert the end of a punch hole or... a black mark, and cut the paper. Turn on the printer and push the feed button. Note: For the BP tray-equipped model, up...

Users Manual
Page 14
... completed***" is operating normally. 1. CAUTION: The thermal head can be grasped. (See illustration L) 14 TM-L500A User's Manual Blow out the paper dust. 6. Insert cleaning card into printer until the card is seen in such a condition, the glue may stick to restart the test printing.... 2. Cleaning Cleaning the Printer Case Be sure to open the platen frame. (See illustration K) 5. To prevent malfunctions and maintain good print quality, clean the paper path, the head plate, and the thermal head regularly (generally every month). Note: Epson recommends KICTeam cleaning card....
... completed***" is operating normally. 1. CAUTION: The thermal head can be grasped. (See illustration L) 14 TM-L500A User's Manual Blow out the paper dust. 6. Insert cleaning card into printer until the card is seen in such a condition, the glue may stick to restart the test printing.... 2. Cleaning Cleaning the Printer Case Be sure to open the platen frame. (See illustration K) 5. To prevent malfunctions and maintain good print quality, clean the paper path, the head plate, and the thermal head regularly (generally every month). Note: Epson recommends KICTeam cleaning card....

Users Manual
Page 15
...paper jam occurs. ❏ Turn the printer off, and after printing. Printout is set improperly. ❏ When a paper jam occurs, remove the jammed paper referring to dry completely before you remove the jammed paper. 1. Turn on page 12.) TM-L500A User's Manual 15 CAUTION: Use the cleaning... cards in a well ventilated room. Load the paper correctly. (See "Loading Paper" on the printer. 8. Pull out the jammed paper forward, and cut any distorted, ...
...paper jam occurs. ❏ Turn the printer off, and after printing. Printout is set improperly. ❏ When a paper jam occurs, remove the jammed paper referring to dry completely before you remove the jammed paper. 1. Turn on page 12.) TM-L500A User's Manual 15 CAUTION: Use the cleaning... cards in a well ventilated room. Load the paper correctly. (See "Loading Paper" on the printer. 8. Pull out the jammed paper forward, and cut any distorted, ...
Technical Reference Guide: RFID
Page 1
Setup Describes setup and installation of the product and peripherals. A M00053500 Rev. Handling Describes how to control the printer and necessary information when you develop applications. Application Development Information Describes how to handle the product. Appendix Describes interfaces, connectors, and character code tables. Technical Reference Guide Product Overview Describes features and general specifications for the product.
Setup Describes setup and installation of the product and peripherals. A M00053500 Rev. Handling Describes how to control the printer and necessary information when you develop applications. Application Development Information Describes how to handle the product. Appendix Describes interfaces, connectors, and character code tables. Technical Reference Guide Product Overview Describes features and general specifications for the product.

Technical Reference Guide: RFID
Page 6
Manual Content The manual is made up of the following sections: Chapter 1 Product Overview Chapter 2 Setup Chapter 3 Application Development Information Chapter 4 Handling Appendix Specifications of printer applications for developers. About this Manual Aim of the Manual This manual was created to provide information on development, design, and installation of systems and development and design of Interfaces and Connectors Character Code Tables 6
Manual Content The manual is made up of the following sections: Chapter 1 Product Overview Chapter 2 Setup Chapter 3 Application Development Information Chapter 4 Handling Appendix Specifications of printer applications for developers. About this Manual Aim of the Manual This manual was created to provide information on development, design, and installation of systems and development and design of Interfaces and Connectors Character Code Tables 6
