
UB-E03 Users Manual
Page 2
... interface connector LED (green) LED (yellow) Push button Switches When using a TM printer that has this interface board, the DIP switches of the memory switches to "enabled" if you are turned off. 2. Set the reset signal for pin 25 of the TM printer must be used when the UB-E03 is installed.... 3. Note: This display module connector on the TM printer cannot be set the reset signal...
... interface connector LED (green) LED (yellow) Push button Switches When using a TM printer that has this interface board, the DIP switches of the memory switches to "enabled" if you are turned off. 2. Set the reset signal for pin 25 of the TM printer must be used when the UB-E03 is installed.... 3. Note: This display module connector on the TM printer cannot be set the reset signal...
UB-E04 Users Manual
Page 6
...When the UB-E04 is installed, a customer display connector on the printer. Switch and function names may result in the printer to the printer. 2 Connecting the Cables 1. Changing the setting may vary depending on the TM printer cannot be used. 3. Part Names LED (green) Ethernet LED (yellow...Plug the Ethernet cable securely into TM printer. Connect the power supply cable to stop operating. Printer settings If the TM printer has a memory switch or a dip switch for "#25 pin reset signal" or "#31 pin reset signal" setting, do not change the setting from or install the interface board...
...When the UB-E04 is installed, a customer display connector on the printer. Switch and function names may result in the printer to the printer. 2 Connecting the Cables 1. Changing the setting may vary depending on the TM printer cannot be used. 3. Part Names LED (green) Ethernet LED (yellow...Plug the Ethernet cable securely into TM printer. Connect the power supply cable to stop operating. Printer settings If the TM printer has a memory switch or a dip switch for "#25 pin reset signal" or "#31 pin reset signal" setting, do not change the setting from or install the interface board...
UB-R04 Technical Reference Guide
Page 24
... hold down the push button on while pressing the Feed button. The interface of the TM printer must be selected as "parallel" with two screws. 3 Set the DIP switch of the TM Printer. If a TM printer that can check all setting values necessary for more than 3 seconds. Connect the UB-R04 to the... TM Printer 1 Confirm items in the pack. ("Unpacking" on page 19) 2 Remove the two...
... hold down the push button on while pressing the Feed button. The interface of the TM printer must be selected as "parallel" with two screws. 3 Set the DIP switch of the TM Printer. If a TM printer that can check all setting values necessary for more than 3 seconds. Connect the UB-R04 to the... TM Printer 1 Confirm items in the pack. ("Unpacking" on page 19) 2 Remove the two...

UB-R04 Users Manual
Page 2
...EPSON_Printer WPA2-Personal AES 12345678 *) SimpleAP is supported if Soft Version is 1.10 or later. • Connection Set the setting of the host PC and AP to match the network setting that DIP switch 1-8 is set the UB-R04 with the status sheet. Example: Ping 192.168.192.168 Note: Although the example shows...You can check whether the connection to "enable," if you are the same, you should power on and configure only one of the TM printer must be sure that you have confirmed with the wireless LAN connection or USB connection by inputting the ping command through the command ...
...EPSON_Printer WPA2-Personal AES 12345678 *) SimpleAP is supported if Soft Version is 1.10 or later. • Connection Set the setting of the host PC and AP to match the network setting that DIP switch 1-8 is set the UB-R04 with the status sheet. Example: Ping 192.168.192.168 Note: Although the example shows...You can check whether the connection to "enable," if you are the same, you should power on and configure only one of the TM printer must be sure that you have confirmed with the wireless LAN connection or USB connection by inputting the ping command through the command ...
UB-S01 Users Manual
Page 1
... when the equipment is tested using the EPSON power supplies and TM series printers.) FCC Compliance Statement For American Users Europe: CE marking This equipment has been tested and found to North America: FCC/ICES-003 Class A comply with the limits for information about setting the DIP switches. Operation of this equipment in a residential area...
... when the equipment is tested using the EPSON power supplies and TM series printers.) FCC Compliance Statement For American Users Europe: CE marking This equipment has been tested and found to North America: FCC/ICES-003 Class A comply with the limits for information about setting the DIP switches. Operation of this equipment in a residential area...

UB-S01 Users Manual
Page 2
...strap when handling the UB-S01 to remove it. Push the UB-S01 in gently until you set the printer DIP switches. Connector of the UB-S01 Connector of the printer circuit even when the power switch is flowing in the illustration below. See the printer documentation for storage to the new interface. ... printer before you may not work correctly. 2 otherwise you remove the UB-S01; Hold the UB-S01 as shown in some parts of the TM printer 3. Unpacking Make sure you have these settings. You must disconnect the power supply because the electrical current is turned off.
...strap when handling the UB-S01 to remove it. Push the UB-S01 in gently until you set the printer DIP switches. Connector of the UB-S01 Connector of the printer circuit even when the power switch is flowing in the illustration below. See the printer documentation for storage to the new interface. ... printer before you may not work correctly. 2 otherwise you remove the UB-S01; Hold the UB-S01 as shown in some parts of the TM printer 3. Unpacking Make sure you have these settings. You must disconnect the power supply because the electrical current is turned off.
TM-T88IV Technical Reference Guide
Page 5
... on top of electric shock, do not set up this equipment, do not continue to close the cover and tighten the screw after adjusting the DIP switch. Improper repair work can be sure to use it. Unplug the power cord immediately and contact your dealer or a Seiko Epson service center for advice. • If...
... on top of electric shock, do not set up this equipment, do not continue to close the cover and tighten the screw after adjusting the DIP switch. Improper repair work can be sure to use it. Unplug the power cord immediately and contact your dealer or a Seiko Epson service center for advice. • If...

TM-T88IV Technical Reference Guide
Page 9
...■ Installing the Printer ...34 Important Notes on Horizontal Installation 34 Important Notes on Wall Hanging ...34 ■ Setting the DIP Switches ...35 Setting Procedure ...35 For Serial Interface ...36 For Parallel/LAN/Wireless LAN Interface 38 For USB Interface ...40 Selecting the Print Density... (DIP Switch 2-3/2-4 41 Selecting the BUSY Status...42 ■ Setting the Memory Switches 43 ■ Adjusting the Paper Roll Near-End Sensor 45 ■ Connecting the Printer to the...
...■ Installing the Printer ...34 Important Notes on Horizontal Installation 34 Important Notes on Wall Hanging ...34 ■ Setting the DIP Switches ...35 Setting Procedure ...35 For Serial Interface ...36 For Parallel/LAN/Wireless LAN Interface 38 For USB Interface ...40 Selecting the Print Density... (DIP Switch 2-3/2-4 41 Selecting the BUSY Status...42 ■ Setting the Memory Switches 43 ■ Adjusting the Paper Roll Near-End Sensor 45 ■ Connecting the Printer to the...
TM-T88IV Technical Reference Guide
Page 24
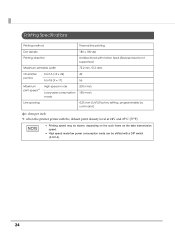
... per line Font B (9 × 17) 56 Maximum print speed*1 High speed mode Low power consumption mode 200 mm/s 150 mm/s Line spacing 4.23 mm {1/6"} (Factory setting, programmable by command) dpi: dots per inch *1: when the printer prints with the default print density level at 24V and 25°C {77°F}. •... may be slower, depending on the such items as the data transmission speed. • High speed mode/low power consumption mode can be shifted with a DIP switch (2-3/2-4). 24
... per line Font B (9 × 17) 56 Maximum print speed*1 High speed mode Low power consumption mode 200 mm/s 150 mm/s Line spacing 4.23 mm {1/6"} (Factory setting, programmable by command) dpi: dots per inch *1: when the printer prints with the default print density level at 24V and 25°C {77°F}. •... may be slower, depending on the such items as the data transmission speed. • High speed mode/low power consumption mode can be shifted with a DIP switch (2-3/2-4). 24
TM-T88IV Technical Reference Guide
Page 33
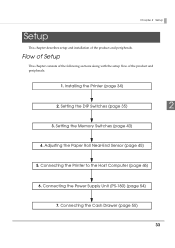
Setting the Memory Switches (page 43) 4. Installing the Printer (page 34) 2. Connecting the Power Supply Unit (PS-180) (page 54) 7. Flow of Setup This chapter consists of the following sections along with the setup flow of the product and peripherals. Chapter 2 Setup Setup This chapter describes setup and installation of the product and peripherals. 1. Connecting the Printer to the Host Computer (page 46) 6. Setting the DIP Switches (page 35) 2 3. Adjusting the Paper Roll Near-End Sensor (page 45) 5. Connecting the Cash Drawer (page 55) 33
Setting the Memory Switches (page 43) 4. Installing the Printer (page 34) 2. Connecting the Power Supply Unit (PS-180) (page 54) 7. Flow of Setup This chapter consists of the following sections along with the setup flow of the product and peripherals. Chapter 2 Setup Setup This chapter describes setup and installation of the product and peripherals. 1. Connecting the Printer to the Host Computer (page 46) 6. Setting the DIP Switches (page 35) 2 3. Adjusting the Paper Roll Near-End Sensor (page 45) 5. Connecting the Cash Drawer (page 55) 33

TM-T88IV Technical Reference Guide
Page 35
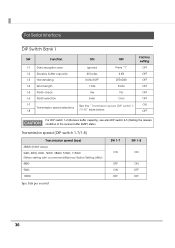
... with DIP switches. DIP switch bank 1 DIP switch bank 2 3 Set the DIP switches, using the tip of the DIP switches differ depending on page 56. CAUTION Before you can make various settings with the buzzer function, see also "Setting the Buzzer" on the interface. DIP switch settings are changed after that, the functions will not change the DIP switch settings. Chapter 2 Setup Setting the DIP Switches On this printer, you remove the DIP switch...
... with DIP switches. DIP switch bank 1 DIP switch bank 2 3 Set the DIP switches, using the tip of the DIP switches differ depending on page 56. CAUTION Before you can make various settings with the buzzer function, see also "Setting the Buzzer" on the interface. DIP switch settings are changed after that, the functions will not change the DIP switch settings. Chapter 2 Setup Setting the DIP Switches On this printer, you remove the DIP switch...
TM-T88IV Technical Reference Guide
Page 36
OFF For DIP switch 1-2 (Receive buffer capacity), see also DIP switch 2-5 (Setting the release condition of the receive buffer BUSY state). Transmission speed (DIP switch 1-7/1-8) Transmission speed (bps) 38400 (Initial value) 2400, 4800, 9600, 19200, 38400, 57600, 115200 (When setting with a command/Memory Switch Setting Utility) 4800 9600... Parity check Yes No OFF 1-6 Parity selection Even Odd OFF 1-7 See the " Transmission speed (DIP switch 1- For Serial Interface DIP Switch Bank 1 SW Function ON OFF Factory setting 1-1 Data reception error Ignored Prints "?"
OFF For DIP switch 1-2 (Receive buffer capacity), see also DIP switch 2-5 (Setting the release condition of the receive buffer BUSY state). Transmission speed (DIP switch 1-7/1-8) Transmission speed (bps) 38400 (Initial value) 2400, 4800, 9600, 19200, 38400, 57600, 115200 (When setting with a command/Memory Switch Setting Utility) 4800 9600... Parity check Yes No OFF 1-6 Parity selection Even Odd OFF 1-7 See the " Transmission speed (DIP switch 1- For Serial Interface DIP Switch Bank 1 SW Function ON OFF Factory setting 1-1 Data reception error Ignored Prints "?"
TM-T88IV Technical Reference Guide
Page 37
... (This function is effective OFF of the receive of DIP switches 2-2 and 2-6. For other settings, the value set with a command or the memory switch utility is enabled only when DIP switches 1-7 and 1-8 are on page 42. • Do not change the setting of the receive when DIP switch 1-2 is set to OFF OFF settings) 2-7 I/F pin 6 reset signal Enabled Disabled OFF 2-8 IF pin...
... (This function is effective OFF of the receive of DIP switches 2-2 and 2-6. For other settings, the value set with a command or the memory switch utility is enabled only when DIP switches 1-7 and 1-8 are on page 42. • Do not change the setting of the receive when DIP switch 1-2 is set to OFF OFF settings) 2-7 I/F pin 6 reset signal Enabled Disabled OFF 2-8 IF pin...
TM-T88IV Technical Reference Guide
Page 38
...the BUSY state when the remaining capacity of the receive buffer reaches 256 bytes. Setting the release condition of the receive buffer BUSY state (This function is effective when DIP switch 1-2 is set to ON Factory setting OFF OFF OFF OFF OFF ON 38 Releases the BUSY state when the remaining ...capacity of the receive buffer reaches 138 bytes. Reserved (Do not change settings) Fixed to OFF IF pin 31 reset signal ...
...the BUSY state when the remaining capacity of the receive buffer reaches 256 bytes. Setting the release condition of the receive buffer BUSY state (This function is effective when DIP switch 1-2 is set to ON Factory setting OFF OFF OFF OFF OFF ON 38 Releases the BUSY state when the remaining ...capacity of the receive buffer reaches 138 bytes. Reserved (Do not change settings) Fixed to OFF IF pin 31 reset signal ...

TM-T88IV Technical Reference Guide
Page 39
Chapter 2 Setup • For DIP switch 2-1 (BUSY condition), see also "Selecting the BUSY Status" on page 42. • Do not change the setting of DIP switches 2-2, 2-6, and 2-7. Otherwise, the printer may not operate normally. 2 39
Chapter 2 Setup • For DIP switch 2-1 (BUSY condition), see also "Selecting the BUSY Status" on page 42. • Do not change the setting of DIP switches 2-2, 2-6, and 2-7. Otherwise, the printer may not operate normally. 2 39

TM-T88IV Technical Reference Guide
Page 41
... "Dark" level, printing speed may be reduced. • The print density can be set with DIP switches (2-3/2-4) or to the customized value. (See "Setting the Memory Switches" on the DIP switch settings." If the customized value is changed, the value set with the customized value is "Depends on page 43.) The initial setting of the customized value is enabled. 2 41
... "Dark" level, printing speed may be reduced. • The print density can be set with DIP switches (2-3/2-4) or to the customized value. (See "Setting the Memory Switches" on the DIP switch settings." If the customized value is changed, the value set with the customized value is "Depends on page 43.) The initial setting of the customized value is enabled. 2 41
TM-T88IV Technical Reference Guide
Page 43
... (the motor sometimes stops). Selecting the print speed Selectable from levels 1 to set with DIP switches (2-3/2-4) or the customized value. (See "Setting the Memory Switches" on page 43.) The initial setting of the serial interface. (See "Transmission speed (DIP switch 1-7/1-8)" on the DIP switch settings." In power saving mode, all customized value settings are ignored. • For detailed information about the memory...
... (the motor sometimes stops). Selecting the print speed Selectable from levels 1 to set with DIP switches (2-3/2-4) or the customized value. (See "Setting the Memory Switches" on page 43.) The initial setting of the serial interface. (See "Transmission speed (DIP switch 1-7/1-8)" on the DIP switch settings." In power saving mode, all customized value settings are ignored. • For detailed information about the memory...

TM-T88IV Technical Reference Guide
Page 64
... printer functions by running the self-test. • Control circuit functions • Printer mechanism • Print quality • ROM version • DIP switch settings Starting Self-test Follow the steps below to run the self-test. 1 Close the roll paper cover. 2 While pressing the FEED button, turn ... mode. 4 After printing the following message is printed and the PAPER OUT LED flashes. (The printer is initialized and returned to check settings of the printer on the response time from a host.) When the printer finishes printing the printer status, the following message, the printer...
... printer functions by running the self-test. • Control circuit functions • Printer mechanism • Print quality • ROM version • DIP switch settings Starting Self-test Follow the steps below to run the self-test. 1 Close the roll paper cover. 2 While pressing the FEED button, turn ... mode. 4 After printing the following message is printed and the PAPER OUT LED flashes. (The printer is initialized and returned to check settings of the printer on the response time from a host.) When the printer finishes printing the printer status, the following message, the printer...

TM-T88IV Technical Reference Guide
Page 73
... of the customized value is designed so that it lower (See "Setting the Memory Switches" on the DIP switch settings." The print density can smoothly replace the TM-T88III. Without special configurations, the TM-T88IV prints the same results as can the TM-T88III. The initial setting of the TM-T88III except some character font designs. Compatibility Printing The printing and...
... of the customized value is designed so that it lower (See "Setting the Memory Switches" on the DIP switch settings." The print density can smoothly replace the TM-T88III. Without special configurations, the TM-T88IV prints the same results as can the TM-T88III. The initial setting of the TM-T88III except some character font designs. Compatibility Printing The printing and...

TM-T88IV Technical Reference Guide
Page 81
What is in the printer memory. Chapter 5 Replacement of Customized Value For the TM-T88IV, the customized value function is added. (See "Setting the Memory Switches" on page 43.) With the customized value, you can enable the USB low power consumption mode with the Status API of ...to use it for transmission. You can read the information with a DIP switch setting. (See "For USB Interface" on the main circuit board operates for periodical checks or part replacement. 81 You can perform the following ones are available for the TM-T88IV. • UB-U05 • UB-U06 • UB-...
What is in the printer memory. Chapter 5 Replacement of Customized Value For the TM-T88IV, the customized value function is added. (See "Setting the Memory Switches" on page 43.) With the customized value, you can enable the USB low power consumption mode with the Status API of ...to use it for transmission. You can read the information with a DIP switch setting. (See "For USB Interface" on the main circuit board operates for periodical checks or part replacement. 81 You can perform the following ones are available for the TM-T88IV. • UB-U05 • UB-U06 • UB-...


