
Operation Manual
Page 1
... to the bookmarks to magnify or reduce the page display. Return to the right.) Use the scroll bar on the left side of this guide. TM-U300C/U300D/U300PC/U300PD Operator's Manual Using this online operator's guide The words on the right side of this screen to move through the text. Click...
... to the bookmarks to magnify or reduce the page display. Return to the right.) Use the scroll bar on the left side of this guide. TM-U300C/U300D/U300PC/U300PD Operator's Manual Using this online operator's guide The words on the right side of this screen to move through the text. Click...
Operation Manual
Page 2
1 station printer TM-U300C/U300D TM-U300PC/U300PD Operator's Manual 400204504
1 station printer TM-U300C/U300D TM-U300PC/U300PD Operator's Manual 400204504

Operation Manual
Page 4
... à la norme NMB-003 du Canada. Operation of this device. EMC and Safety Standards Applied Printer Product Name: TM-U300C/D, TM-U300PC/PD Model Name: M51JC/D, M51PC/PD The following standards are applied only to the printers that are so labeled. (EMC is tested using the packaged AC adapter.) Europe: CE marking North... cause harmful interference, in a commercial environment. These limits are applied only to the AC adapters that changes or modifications not expressly approved by SEIKO EPSON could void your authority to correct the interference at his own expense. i
... à la norme NMB-003 du Canada. Operation of this device. EMC and Safety Standards Applied Printer Product Name: TM-U300C/D, TM-U300PC/PD Model Name: M51JC/D, M51PC/PD The following standards are applied only to the printers that are so labeled. (EMC is tested using the packaged AC adapter.) Europe: CE marking North... cause harmful interference, in a commercial environment. These limits are applied only to the AC adapters that changes or modifications not expressly approved by SEIKO EPSON could void your authority to correct the interference at his own expense. i
Operation Manual
Page 5
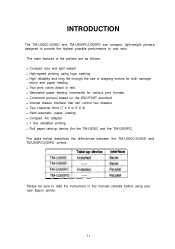
Please be sure to cost ratio. INTRODUCTION The TM-U300C-U300D and TM-U300PC/U300PD are as follows: l Compact size and light weight l High-speed printing using your new Epson printer. The main features of the printers are compact, light-weight printers, designed to provide the highest possible performance to read ... fonts (7 X 9 or 9 X 9) l Semi-automatic paper loading l Compact AC adapter l 1 line validation printing l Roll paper take-up device (for the TM-U300C and the TM-U300PC) The table below describes the differences between the TM-U300C/U300D and TM-U300PC/U300PD printers. ii
Please be sure to cost ratio. INTRODUCTION The TM-U300C-U300D and TM-U300PC/U300PD are as follows: l Compact size and light weight l High-speed printing using your new Epson printer. The main features of the printers are compact, light-weight printers, designed to provide the highest possible performance to read ... fonts (7 X 9 or 9 X 9) l Semi-automatic paper loading l Compact AC adapter l 1 line validation printing l Roll paper take-up device (for the TM-U300C and the TM-U300PC) The table below describes the differences between the TM-U300C/U300D and TM-U300PC/U300PD printers. ii
Operation Manual
Page 7
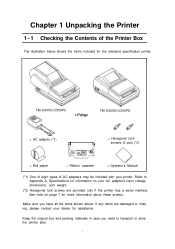
TM-U300C/U300PC TM-U300D/U300PD l AC adapter (*1) n l Hexagonal lock 7 screws (2 pcs) (*2) l Roll paper l Ribbon cassette l Operator's Manual (*1) One of eight types of the Printer Box The illustration below shows the items included for the standard specification printer. If any items are provided only if the printer has a ...AC adapter's input voltage, dimensions, and weight. (*2) Hexagonal lock screws are damaged or missing, please contact your printer. Keep the original box and packing materials in case you have all the items shown above. Refer to transport or store the...
TM-U300C/U300PC TM-U300D/U300PD l AC adapter (*1) n l Hexagonal lock 7 screws (2 pcs) (*2) l Roll paper l Ribbon cassette l Operator's Manual (*1) One of eight types of the Printer Box The illustration below shows the items included for the standard specification printer. If any items are provided only if the printer has a ...AC adapter's input voltage, dimensions, and weight. (*2) Hexagonal lock screws are damaged or missing, please contact your printer. Keep the original box and packing materials in case you have all the items shown above. Refer to transport or store the...
Operation Manual
Page 9
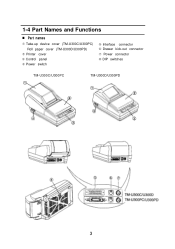
1-4 Part Names and Functions n Part names Œ Take-up device cover (TM-U300C/U300PC) Roll paper cover (TM-U300D/U300PD) Printer cover Ž Control panel Power switch Interface connector ‘ Drawer kick-out connector ’ Power connector “ DIP switches TM-U300C/U300PC TM-U300D/U300PD 3
1-4 Part Names and Functions n Part names Œ Take-up device cover (TM-U300C/U300PC) Roll paper cover (TM-U300D/U300PD) Printer cover Ž Control panel Power switch Interface connector ‘ Drawer kick-out connector ’ Power connector “ DIP switches TM-U300C/U300PC TM-U300D/U300PD 3
Operation Manual
Page 12
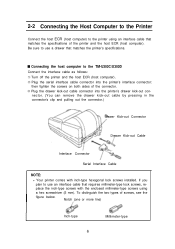
...types of the connector. Ž Plug the drawer kick-out cable connector into the printer's drawer kick-out con- If you plan to the TM-U300C/U300D Connect the interface cable as follows: Œ Turn off the printer and the host ECR (host computer). Plug the serial interface cable connector... into the printer's interface connector: then tighten the screws on both sides of screws, see the ...
...types of the connector. Ž Plug the drawer kick-out cable connector into the printer's drawer kick-out con- If you plan to the TM-U300C/U300D Connect the interface cable as follows: Œ Turn off the printer and the host ECR (host computer). Plug the serial interface cable connector... into the printer's interface connector: then tighten the screws on both sides of screws, see the ...

Operation Manual
Page 13
...the parallel interface cable with the frame ground screw on the bottom of the printer. Plug the drawer kick-out cable connector into the printer's drawer kick-out con- n Connecting the host computer to the TM-U300PC/U300PD Connect the interface cable as follows: Œ Turn off the... printer and the host ECR (host computer). Plug the parallel interface cable connector into the printer's interface connector. Ž Squeeze the wire clips together until...
...the parallel interface cable with the frame ground screw on the bottom of the printer. Plug the drawer kick-out cable connector into the printer's drawer kick-out con- n Connecting the host computer to the TM-U300PC/U300PD Connect the interface cable as follows: Œ Turn off the... printer and the host ECR (host computer). Plug the parallel interface cable connector into the printer's interface connector. Ž Squeeze the wire clips together until...
Operation Manual
Page 17
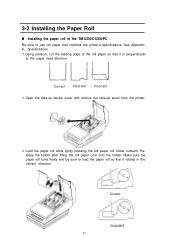
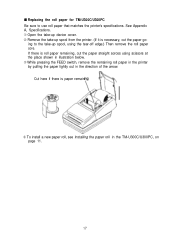
... cut the leading edge of the roll paper so that it rotates in the TM-U300C/U300PC Be sure to use roll paper that it is perpendicular to load the paper roll so that matches the printer's specifications. Correct Incorrect Incorrect Open the take-up device cover and remove... the take-up spool from the printer. Ž Load the paper roll while lightly pressing the left paper roll holder outward...
... cut the leading edge of the roll paper so that it rotates in the TM-U300C/U300PC Be sure to use roll paper that it is perpendicular to load the paper roll so that matches the printer's specifications. Correct Incorrect Incorrect Open the take-up device cover and remove... the take-up spool from the printer. Ž Load the paper roll while lightly pressing the left paper roll holder outward...
Operation Manual
Page 20
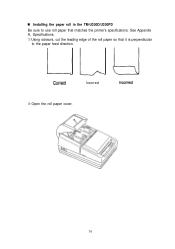
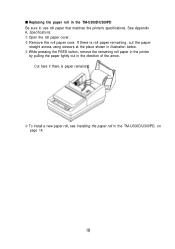
n Installing the paper roll in the TM-U300D/U300PD Be sure to use roll paper that it is perpendicular to the paper feed direction. See Appendix A, Specifications. ΠUsing scissors, cut the leading edge of the roll paper so that matches the printer's specifications. L Incorrect Open the roll paper cover. 14
n Installing the paper roll in the TM-U300D/U300PD Be sure to use roll paper that it is perpendicular to the paper feed direction. See Appendix A, Specifications. ΠUsing scissors, cut the leading edge of the roll paper so that matches the printer's specifications. L Incorrect Open the roll paper cover. 14
Operation Manual
Page 23
... scissors at the place shown in illustration below. Ž While pressing the FEED switch, remove the remaining roll paper in the printer by pulling the paper lightly out in the TM-U300C/U300PC, on page 11. 17 If there is paper remaini To install a new paper roll, see Installing the paper ...roll paper remaining, cut the paper go- See Appendix A, Specifications. Œ Open the take-up device cover. Remove the take -up spool from the printer. (If it is necessary, cut the paper straight across using the tear-off edge.) Then remove the roll paper core. ing to use roll paper...
... scissors at the place shown in illustration below. Ž While pressing the FEED switch, remove the remaining roll paper in the printer by pulling the paper lightly out in the TM-U300C/U300PC, on page 11. 17 If there is paper remaini To install a new paper roll, see Installing the paper ...roll paper remaining, cut the paper go- See Appendix A, Specifications. Œ Open the take-up device cover. Remove the take -up spool from the printer. (If it is necessary, cut the paper straight across using the tear-off edge.) Then remove the roll paper core. ing to use roll paper...
Operation Manual
Page 24
... paper straight across using scissors at the place shown in illustration below. Ž While pressing the FEED button, remove the remaining roll paper in the printer by pulling the paper lightly out in the direction of the arrow. If there is paper remainin To install a new paper roll, see Installing... the paper roll in the TM-U300D/U300PD Be sure to use roll paper that matches the printer's specifications. s Replacing the paper roll in the TM-U300D/U300PD, on page 14.
... paper straight across using scissors at the place shown in illustration below. Ž While pressing the FEED button, remove the remaining roll paper in the printer by pulling the paper lightly out in the direction of the arrow. If there is paper remainin To install a new paper roll, see Installing... the paper roll in the TM-U300D/U300PD Be sure to use roll paper that matches the printer's specifications. s Replacing the paper roll in the TM-U300D/U300PD, on page 14.
Operation Manual
Page 26
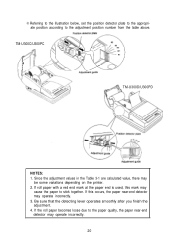
... paper near -end detector may operate incorrectly. 20 Be sure that the detecting lever operates smoothly after you finish the adjustment. 4. TM-U300C/U300PC TM-U300D/U300PD NOTES: 1. Since the adjustment values in the Table 3-1 are calculated value, there may cause the paper to the adjustment... position number from the table above. If this mark may be some variations depending on the printer. 2. Referring to the illustration ...
... paper near -end detector may operate incorrectly. 20 Be sure that the detecting lever operates smoothly after you finish the adjustment. 4. TM-U300C/U300PC TM-U300D/U300PD NOTES: 1. Since the adjustment values in the Table 3-1 are calculated value, there may cause the paper to the adjustment... position number from the table above. If this mark may be some variations depending on the printer. 2. Referring to the illustration ...

Operation Manual
Page 29
The DIP switches are used to set the printer to perform various functions l The TM-U300C/U300D DIP switches are numbered SW-1 to SW-10 and the TM-U300PC/U300PD DIP switches are numbered SW-1 to SW-8, from left to right as shown in the illustration below, the DIP switches are on when ...up and off and then on the printer. l Changes made with...
The DIP switches are used to set the printer to perform various functions l The TM-U300C/U300D DIP switches are numbered SW-1 to SW-10 and the TM-U300PC/U300PD DIP switches are numbered SW-1 to SW-8, from left to right as shown in the illustration below, the DIP switches are on when ...up and off and then on the printer. l Changes made with...
Operation Manual
Page 30
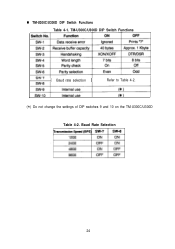
TM-U300C/U300D DIP Switch Functions Baud rate selection Refer to Table 4-2. *( ) Do not change the settings of DIP switches 9 and 10 on the TM-U300C/U300D Table 4-2. n TM-U300C/U300D DIP Switch Functions Table 4-1. Baud Rate Selection 24
TM-U300C/U300D DIP Switch Functions Baud rate selection Refer to Table 4-2. *( ) Do not change the settings of DIP switches 9 and 10 on the TM-U300C/U300D Table 4-2. n TM-U300C/U300D DIP Switch Functions Table 4-1. Baud Rate Selection 24
Operation Manual
Page 31
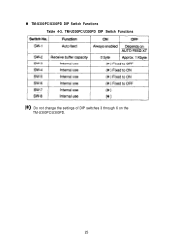
n TM-U300PC/U300PD DIP Switch Functions Table 4-3. TM-U300PC/U300PD DIP Switch Functions (* ) Do not change the settings of DIP switches 3 through 6 on the TM-U300PC/U300PD. 25
n TM-U300PC/U300PD DIP Switch Functions Table 4-3. TM-U300PC/U300PD DIP Switch Functions (* ) Do not change the settings of DIP switches 3 through 6 on the TM-U300PC/U300PD. 25
Operation Manual
Page 32
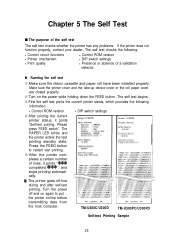
...printer status, it prints " * * * completed * * * ", and stops printing automatically. * The printer goes off and on again to restart test printing. After the printer... completes a certain number of the self test The self test checks whether the printer has any problems. If the printer ...142; First the self test prints the current printer status, which provides the following : l Control circuit functions l Printer mechanism l Print quality l Control ROM version... to put the printer on the power while holding down the FEED button. Make sure the printer cover and the take...
...printer status, it prints " * * * completed * * * ", and stops printing automatically. * The printer goes off and on again to restart test printing. After the printer... completes a certain number of the self test The self test checks whether the printer has any problems. If the printer ...142; First the self test prints the current printer status, which provides the following : l Control circuit functions l Printer mechanism l Print quality l Control ROM version... to put the printer on the power while holding down the FEED button. Make sure the printer cover and the take...
Operation Manual
Page 36
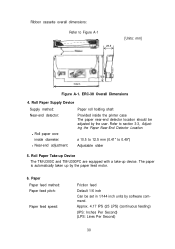
...) (continuous feeding) (IPS: Inches Per Second) (LPS: Lines Per Second) 30 ERC-38 Overall Dimensions 4. Roll Paper Take-up Device The TM-U300C and TM-U300PC are equipped with a take-up by software command. Paper Paper feed method: Paper feed pitch: Paper feed speed: Friction feed Default 1/6 inch... Device Supply method: Near-end detector: l Roll paper core inside diameter: l Near-end adjustment: Paper roll holding shaft Provided inside the printer case The paper near-end detector location should be set in 1/144 inch units by the paper feed motor. 6. The paper is automatically taken...
...) (continuous feeding) (IPS: Inches Per Second) (LPS: Lines Per Second) 30 ERC-38 Overall Dimensions 4. Roll Paper Take-up Device The TM-U300C and TM-U300PC are equipped with a take-up by software command. Paper Paper feed method: Paper feed pitch: Paper feed speed: Friction feed Default 1/6 inch... Device Supply method: Near-end detector: l Roll paper core inside diameter: l Near-end adjustment: Paper roll holding shaft Provided inside the printer case The paper near-end detector location should be set in 1/144 inch units by the paper feed motor. 6. The paper is automatically taken...
Operation Manual
Page 39
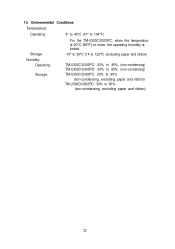
10. Environmental Conditions Temperature: Operating: 5° to 40°C (41° to 104°F) Storage: For the TM-U300C/U300PC, when the temperature is 30°C (86°F) or more, the operating humidity is limited. -10° to 50°C (14 to 122°F) (excluding paper and ribbon) Humidity: Operating: Storage: TM-U300C/U300PC: 20% to 80% (non-condensing) TM-U300D/U300PD: 30% to 85% (non-condensing) TM-U300C/U300PC: 20% to 90% (non-condensing, excluding paper and ribbon) TM-U300D/U300PD: 30% to 90% (non-condensing, excluding paper and ribbon) 33
10. Environmental Conditions Temperature: Operating: 5° to 40°C (41° to 104°F) Storage: For the TM-U300C/U300PC, when the temperature is 30°C (86°F) or more, the operating humidity is limited. -10° to 50°C (14 to 122°F) (excluding paper and ribbon) Humidity: Operating: Storage: TM-U300C/U300PC: 20% to 80% (non-condensing) TM-U300D/U300PD: 30% to 85% (non-condensing) TM-U300C/U300PC: 20% to 90% (non-condensing, excluding paper and ribbon) TM-U300D/U300PD: 30% to 90% (non-condensing, excluding paper and ribbon) 33


