
Manual
Page 3
...to be operated without the pulp container in a heated oven. 10. Make sure the stainless steel micro Mesh filter basket is plugged into juicers feed chute while it still does not fit, contact a qualified electrician. 25. Do not clean the motor base in place. 15. WARNING... 11. KEEP HANDS, FINGERS AND OTHER OBJECTS OUT OF THE FEED CHUTE. THE ENERJUICER Fagor Enerjuicer runs on 120V and 800 watts of power, 2 speeds with reduced physical, sensory or mental capabilities, or lack of the Enerjuicer are made with the appliance. Drinking extracted juices is damaged. 2 22. Do ...
...to be operated without the pulp container in a heated oven. 10. Make sure the stainless steel micro Mesh filter basket is plugged into juicers feed chute while it still does not fit, contact a qualified electrician. 25. Do not clean the motor base in place. 15. WARNING... 11. KEEP HANDS, FINGERS AND OTHER OBJECTS OUT OF THE FEED CHUTE. THE ENERJUICER Fagor Enerjuicer runs on 120V and 800 watts of power, 2 speeds with reduced physical, sensory or mental capabilities, or lack of the Enerjuicer are made with the appliance. Drinking extracted juices is damaged. 2 22. Do ...
Manual
Page 4
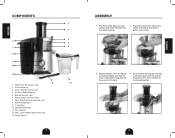
...Pulp Collector (Dishwasher safe) 8. 800 Watt Motor base 9. 2-speed dial 10. Place the micro-mesh filter in the center of...locked position. 5 Español Lift the safety locking arm and slip it clicks. 3. LED Operational light 11. Place the juicer cover on a flat surface and insert the bowl into the motor housing. 2. Stainless Steel micro-mesh filter 7. 66 oz. ...Cleaning brush 4 5 6 12 4 ASSEMBLY 1. Place the motor base on the top of the juicer cover until it into each groove on the side of the bowl. Bowl (Dishwasher safe) 6. Non-skid feet 12. 40...
...Pulp Collector (Dishwasher safe) 8. 800 Watt Motor base 9. 2-speed dial 10. Place the micro-mesh filter in the center of...locked position. 5 Español Lift the safety locking arm and slip it clicks. 3. LED Operational light 11. Place the juicer cover on a flat surface and insert the bowl into the motor housing. 2. Stainless Steel micro-mesh filter 7. 66 oz. ...Cleaning brush 4 5 6 12 4 ASSEMBLY 1. Place the motor base on the top of the juicer cover until it into each groove on the side of the bowl. Bowl (Dishwasher safe) 6. Non-skid feet 12. 40...
Manual
Page 5
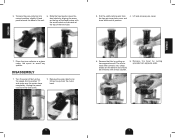
... inside of the top of position. 4. ENGLISH Español 5. Remove the pulp collector by pulling upwards from the motor base. 5. Turn the juicer off by turning the speed dial to avoid any splatter. Remove the bowl by tilting it away from opposite ends. 6 7 Slide the food pusher down out of the...
... inside of the top of position. 4. ENGLISH Español 5. Remove the pulp collector by pulling upwards from the motor base. 5. Turn the juicer off by turning the speed dial to avoid any splatter. Remove the bowl by tilting it away from opposite ends. 6 7 Slide the food pusher down out of the...
Manual
Page 6
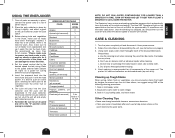
... cools down. It is best to push at a slow pace, allowing for more than others; Reminder: Be sure to turn the juicer off and select the desired speed to an appropriate size so it slightly, and either a glass or the juice collector under the juice spout. 3. Once the blinking ...pieces. *Please make sure to cut all foods have been thoroughly washed, if food has to be tougher to start juicing. ENGLISH USING THE ENERJUICER 1. Please Note: a. we suggest using ONE of the disassembled parts. Equal parts warm water to avoid overheating. Once all parts thoroughly before reusing. 4....
... cools down. It is best to push at a slow pace, allowing for more than others; Reminder: Be sure to turn the juicer off and select the desired speed to an appropriate size so it slightly, and either a glass or the juice collector under the juice spout. 3. Once the blinking ...pieces. *Please make sure to cut all foods have been thoroughly washed, if food has to be tougher to start juicing. ENGLISH USING THE ENERJUICER 1. Please Note: a. we suggest using ONE of the disassembled parts. Equal parts warm water to avoid overheating. Once all parts thoroughly before reusing. 4....
Manual
Page 7
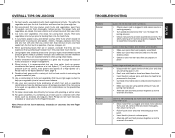
... not insert bananas, avocados or coconuts into the feed chute. 4. Juicer clogs and food jams in this manual are to juicing are using speed setting 2 if you always wash fruits and vegetables, peel them (if needed), and dry them into the Fagor Enerjuicer. For best results, use predominantly fresh vegetables and fruits. The longer...
... not insert bananas, avocados or coconuts into the feed chute. 4. Juicer clogs and food jams in this manual are to juicing are using speed setting 2 if you always wash fruits and vegetables, peel them (if needed), and dry them into the Fagor Enerjuicer. For best results, use predominantly fresh vegetables and fruits. The longer...
Manual
Page 8
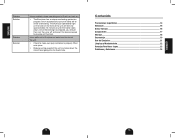
... knob on the front of the unit will not turn the juicer off to avoid overheating. Contenido Precauciones Importantes 14 Enerjuicer...16 Datos Técnicos...16 Componentes...17 Montaje...18 Desmontaje...19 Uso del Enerjuicer 21 Limpieza y Mantenimiento 22 Consejos Para Hacer Jugos 23 Problemas ... should then turn back on. • The Enerjuicer has a unique overheating protection program which automatically turns the motor off and select the desired speed to make sure pulp container is properly fitted onto juicer. • Reduce juicing speed of the unit and slow down . Juice spills...
... knob on the front of the unit will not turn the juicer off to avoid overheating. Contenido Precauciones Importantes 14 Enerjuicer...16 Datos Técnicos...16 Componentes...17 Montaje...18 Desmontaje...19 Uso del Enerjuicer 21 Limpieza y Mantenimiento 22 Consejos Para Hacer Jugos 23 Problemas ... should then turn back on. • The Enerjuicer has a unique overheating protection program which automatically turns the motor off and select the desired speed to make sure pulp container is properly fitted onto juicer. • Reduce juicing speed of the unit and slow down . Juice spills...