

User Guide
Page 1
WashSmart clothes washer Laveuse WashSmart Installation instructions and User guide Instructions d'installation et Guide d'utilisation US CA
WashSmart clothes washer Laveuse WashSmart Installation instructions and User guide Instructions d'installation et Guide d'utilisation US CA
User Guide
Page 2
... shock, fire or injury to persons. This usually takes about 5 cycles. WARNING! Failure to the local environment. Please note: to obtain maximum efficiency, your Fisher & Paykel WashSmart washer has the ability to learn and adapt to do so can result in this User Guide before operating this product meets ENERGY STAR® guidelines...
... shock, fire or injury to persons. This usually takes about 5 cycles. WARNING! Failure to the local environment. Please note: to obtain maximum efficiency, your Fisher & Paykel WashSmart washer has the ability to learn and adapt to do so can result in this User Guide before operating this product meets ENERGY STAR® guidelines...

User Guide
Page 3
...this User Guide may not be available in your country, please visit our website listed on the back cover or contact your washer Before you call for service Solving operating problems Solving wash problems Limited warranty How to change at any time. Contents Introduction ...Sorting and loading Detergent Before you wash Bleach Fabric softener Wash cycles Wash options Customizing wash cycles Changing pre-set options Caring for your local Fisher & Paykel dealer. For current details about model and specification availability in all markets and are subject to get service 1 US CA 2 3 6...
...this User Guide may not be available in your country, please visit our website listed on the back cover or contact your washer Before you call for service Solving operating problems Solving wash problems Limited warranty How to change at any time. Contents Introduction ...Sorting and loading Detergent Before you wash Bleach Fabric softener Wash cycles Wash options Customizing wash cycles Changing pre-set options Caring for your local Fisher & Paykel dealer. For current details about model and specification availability in all markets and are subject to get service 1 US CA 2 3 6...

User Guide
Page 4
...it will ensure you get the best possible wash results. We hope you . US 2 Introduction CA Welcome to the environment. Your Fisher & Paykel WashSmart washer has an extra large capacity, and numerous wash cycles and options so you the best possible performance. With the ability to read ...these instructions carefully before you for you enjoy your clothes washer to help give you can perform every wash task with ease and spend less time in this washer and trust it for buying a Fisher & Paykel WashSmart clothes washer. Please take the time to select the most efficient water...
...it will ensure you get the best possible wash results. We hope you . US 2 Introduction CA Welcome to the environment. Your Fisher & Paykel WashSmart washer has an extra large capacity, and numerous wash cycles and options so you the best possible performance. With the ability to read ...these instructions carefully before you for you enjoy your clothes washer to help give you can perform every wash task with ease and spend less time in this washer and trust it for buying a Fisher & Paykel WashSmart clothes washer. Please take the time to select the most efficient water...
User Guide
Page 5
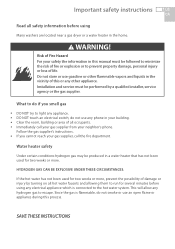
... during this or any appliance. ■■ DO NOT touch an electrical switch; Important safety instructions 3 US CA Read all safety information before using Many washers are located near a gas dryer or a water heater in the home. What to do if you cannot reach your gas supplier, call your gas supplier...
... during this or any appliance. ■■ DO NOT touch an electrical switch; Important safety instructions 3 US CA Read all safety information before using Many washers are located near a gas dryer or a water heater in the home. What to do if you cannot reach your gas supplier, call your gas supplier...

User Guide
Page 6
.... ■■ Keep all governing codes and ordinances. Follow details in the Installation Instructions. ■■ Do not install or store washer where it will not be exposed to temperatures below freezing or exposed to the weather. ■■ Connect to a properly rated, protected...; Make sure that the cord is moving. ■■ Before loading, unloading or adding clothes, press START/PAUSE and wait until the washer has completely stopped before opening the lid. Observe all warnings on , tripped over or otherwise subject to persons. US 4 Important safety instructions CA...
.... ■■ Keep all governing codes and ordinances. Follow details in the Installation Instructions. ■■ Do not install or store washer where it will not be exposed to temperatures below freezing or exposed to the weather. ■■ Connect to a properly rated, protected...; Make sure that the cord is moving. ■■ Before loading, unloading or adding clothes, press START/PAUSE and wait until the washer has completely stopped before opening the lid. Observe all warnings on , tripped over or otherwise subject to persons. US 4 Important safety instructions CA...
User Guide
Page 7
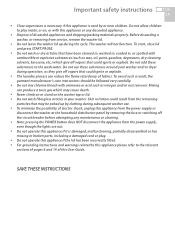
...gasoline, degreasers, dry-cleaning solvents, kerosene, etc.) which give off vapors that could ignite or explode. Do not add these substances around your washer and/or dryer during operation, as they give off vapors that could result from the remaining particles that have been cleaned in, washed in, ...appliance please refer to the relevant sections of pages 6 and 14 of this User Guide. Mixing can reduce the flame retardancy of fabrics. The washer will not function. To start, close lid and press START/PAUSE. ■■ Do not wash or dry articles that may cause death...
...gasoline, degreasers, dry-cleaning solvents, kerosene, etc.) which give off vapors that could ignite or explode. Do not add these substances around your washer and/or dryer during operation, as they give off vapors that could result from the remaining particles that have been cleaned in, washed in, ...appliance please refer to the relevant sections of pages 6 and 14 of this User Guide. Mixing can reduce the flame retardancy of fabrics. The washer will not function. To start, close lid and press START/PAUSE. ■■ Do not wash or dry articles that may cause death...
User Guide
Page 8
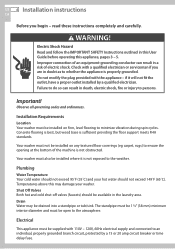
...appliance is not obstructed. Do not modify the plug provided with a qualified electrician or serviceman if you begin - Installation Requirements Location Your washer must also be available in a risk of the machine is properly grounded. Plumbing Water Temperature Your cold water should not exceed 95&#...730;F (35˚C) and your washer. Observe all governing codes and ordinances. WARNING! Concrete flooring is best, but wood base is not exposed to the atmosphere. US 6 ...
...appliance is not obstructed. Do not modify the plug provided with a qualified electrician or serviceman if you begin - Installation Requirements Location Your washer must also be available in a risk of the machine is properly grounded. Plumbing Water Temperature Your cold water should not exceed 95&#...730;F (35˚C) and your washer. Observe all governing codes and ordinances. WARNING! Concrete flooring is best, but wood base is not exposed to the atmosphere. US 6 ...

User Guide
Page 9
...is damaged it must be replaced by -laws. Installation instructions 7 US CA Water supply ■■ This washer must be plumbed into contact with local by a Fisher & Paykel Authorized Service Agent, as it does not come into both hot and cold water are using an extension cord... gallons/min (6 liters/min) (assumes ½" (12.7 mm) diameter pipes). Note: your Fisher & Paykel Dealer or Authorized Service Center. For the most suitable type of your clothes washer is free from your washer does not have a tempering device fitted. Please ensure that both a hot and cold water supply...
...is damaged it must be replaced by -laws. Installation instructions 7 US CA Water supply ■■ This washer must be plumbed into contact with local by a Fisher & Paykel Authorized Service Agent, as it does not come into both hot and cold water are using an extension cord... gallons/min (6 liters/min) (assumes ½" (12.7 mm) diameter pipes). Note: your Fisher & Paykel Dealer or Authorized Service Center. For the most suitable type of your clothes washer is free from your washer does not have a tempering device fitted. Please ensure that both a hot and cold water supply...

User Guide
Page 10
...psi (1MPa) Min 5 psi (34kPa ) Product dimensions A Overall height of product (to accommodate the inlet hoses and drain hose. US 8 Installation instructions CA Specifications Washer end of hose Faucet end of hose D A Standpipe height 33 ½" to 94 1/2" (850 - 2400 mm) Allow for in the installation cavity to highest ... product D Height (lid open)* inches 41 3/4 - 43 27 28 56 3/4 - 57 7/8 mm 1060 - 1090 685 700 1440 - 1470 * The exact height of your washer is the cabinet only, ie does not include the distance the inlet hoses and drain hose extend from the base of the machine.
...psi (1MPa) Min 5 psi (34kPa ) Product dimensions A Overall height of product (to accommodate the inlet hoses and drain hose. US 8 Installation instructions CA Specifications Washer end of hose Faucet end of hose D A Standpipe height 33 ½" to 94 1/2" (850 - 2400 mm) Allow for in the installation cavity to highest ... product D Height (lid open)* inches 41 3/4 - 43 27 28 56 3/4 - 57 7/8 mm 1060 - 1090 685 700 1440 - 1470 * The exact height of your washer is the cabinet only, ie does not include the distance the inlet hoses and drain hose extend from the base of the machine.
User Guide
Page 11
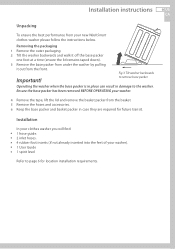
...;■ 1 hose guide. ■■ 2 inlet hoses. ■■ 4 rubber foot inserts (if not already inserted into the feet of your washer). ■■ 1 User Guide ■■ 1 spirit level Refer to page 6 for future transit. Installation instructions 9 US CA Unpacking To ensure ...the best performance from your washer. 4 Remove the tape, lift the lid and remove the basket packer from the front. Ensure the base packer has been removed BEFORE OPERATING...
...;■ 1 hose guide. ■■ 2 inlet hoses. ■■ 4 rubber foot inserts (if not already inserted into the feet of your washer). ■■ 1 User Guide ■■ 1 spirit level Refer to page 6 for future transit. Installation instructions 9 US CA Unpacking To ensure ...the best performance from your washer. 4 Remove the tape, lift the lid and remove the basket packer from the front. Ensure the base packer has been removed BEFORE OPERATING...

User Guide
Page 12
... mm) maximum 3 Place the drain hose in a flood and damage to a drain spigot. Inlet hoses Important! ■■ New hose sets provided with the washer shall be used . 1 Install hoses with the straight end (with a drain. ■■ Check that is equipped with filters) fitted to the faucets (refer... to Fig.5). 2 Install elbow ends of hoses onto clothes washer inlet valves (refer to Fig.6). The height of the standpipe or tub/sink should not be checked from the end of the guide. To prevent...
... mm) maximum 3 Place the drain hose in a flood and damage to a drain spigot. Inlet hoses Important! ■■ New hose sets provided with the washer shall be used . 1 Install hoses with the straight end (with a drain. ■■ Check that is equipped with filters) fitted to the faucets (refer... to Fig.5). 2 Install elbow ends of hoses onto clothes washer inlet valves (refer to Fig.6). The height of the standpipe or tub/sink should not be checked from the end of the guide. To prevent...
User Guide
Page 13
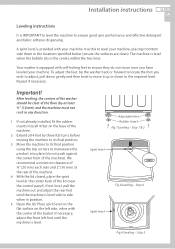
The machine is provided with your machine. Your washer is equipped with the center of the machine). Repeat if necessary. Important! Step 1 & 2 Spirit ...is level when the bubble sits in the center, within the two lines. To adjust the feet, tip the washer back or forward to locate the foot you wish to adjust, pull down gently and then twist to move once... against the center front of the basket. Step 4 Spirit level Fig.9 Leveling - After leveling, the corners of the washer should be clear of the lid (near the control panel). Step 5 If necessary, adjust the front left side, inline...
The machine is provided with your machine. Your washer is equipped with the center of the machine). Repeat if necessary. Important! Step 1 & 2 Spirit ...is level when the bubble sits in the center, within the two lines. To adjust the feet, tip the washer back or forward to locate the foot you wish to adjust, pull down gently and then twist to move once... against the center front of the basket. Step 4 Spirit level Fig.9 Leveling - After leveling, the corners of the washer should be clear of the lid (near the control panel). Step 5 If necessary, adjust the front left side, inline...
User Guide
Page 14
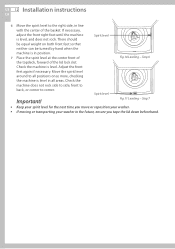
Step 6 feet again if necessary. Step 7 ■■ Keep your spirit level for the next time you move or reposition your washer. ■■ If moving or transporting your washer in all positions once more, checking the machine is level, and does not rock. Adjust the front Spirit level Fig.10 Leveling - Check...
Step 6 feet again if necessary. Step 7 ■■ Keep your spirit level for the next time you move or reposition your washer. ■■ If moving or transporting your washer in all positions once more, checking the machine is level, and does not rock. Adjust the front Spirit level Fig.10 Leveling - Check...

User Guide
Page 15
..., unless they do not play with the washer. ■■ The only user-removable parts of the washer are the inlet hoses and dispenser funnels. No other than a Fisher & Paykel Authorized Service Agent. Installation instructions 13 US CA Completing your washer. 2 Touch both the KEYLOCK and OPTIONS ...buttons at the end of the installation test cycle. Note: if there are no faults found, the washer will be locked from the ...
..., unless they do not play with the washer. ■■ The only user-removable parts of the washer are the inlet hoses and dispenser funnels. No other than a Fisher & Paykel Authorized Service Agent. Installation instructions 13 US CA Completing your washer. 2 Touch both the KEYLOCK and OPTIONS ...buttons at the end of the installation test cycle. Note: if there are no faults found, the washer will be locked from the ...
User Guide
Page 16
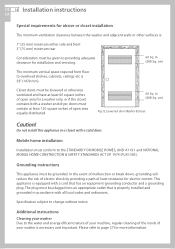
... with a solid door. US 14 Installation instructions CA Special requirements for alcove or closet installation The minimum ventilation clearance between the washer and adjacent walls or other surfaces is: 1" (25 mm) minimum either side and front 3" (75 mm) minimum rear ...Consideration must be plugged into an appropriate outlet that has an equipment-grounding conductor and a grounding plug. Additional instructions Cleaning your washer Due to overhead shelves, cabinets, ceilings etc is 58" (1470 mm). Please refer to providing adequate clearance for installation and servicing...
... with a solid door. US 14 Installation instructions CA Special requirements for alcove or closet installation The minimum ventilation clearance between the washer and adjacent walls or other surfaces is: 1" (25 mm) minimum either side and front 3" (75 mm) minimum rear ...Consideration must be plugged into an appropriate outlet that has an equipment-grounding conductor and a grounding plug. Additional instructions Cleaning your washer Due to overhead shelves, cabinets, ceilings etc is 58" (1470 mm). Please refer to providing adequate clearance for installation and servicing...
User Guide
Page 17
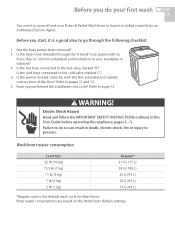
Refer to the cold valve marked 'C'? 4 Is the washer leveled correctly, with no more than ¾" (20 mm) extended) and hooked on the WashSmart default settings. Before you do so can result in this ...? WARNING! Is the cold hose connected to page 13. Failure to do your first wash 15 US CA You owe it to yourself and your Fisher & Paykel WashSmart to have it is the default wash cycle for WashSmart. Before you performed the installation test cycle? Electric Shock Hazard Read and follow the...
Refer to the cold valve marked 'C'? 4 Is the washer leveled correctly, with no more than ¾" (20 mm) extended) and hooked on the WashSmart default settings. Before you do so can result in this ...? WARNING! Is the cold hose connected to page 13. Failure to do your first wash 15 US CA You owe it to yourself and your Fisher & Paykel WashSmart to have it is the default wash cycle for WashSmart. Before you performed the installation test cycle? Electric Shock Hazard Read and follow the...

User Guide
Page 18
... package. ■■ Use the mark on the top of the agitator stem, in-line with water and pour carefully down the center of your washer.
... package. ■■ Use the mark on the top of the agitator stem, in-line with water and pour carefully down the center of your washer.
User Guide
Page 19
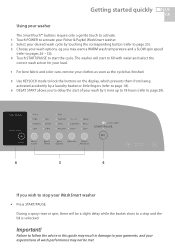
Getting started quickly 17 US CA Using your washer The SmartTouch™ buttons require only a gentle touch to activate. 1 Touch POWER to activate your Fisher & Paykel WashSmart washer. 2 Select your desired wash cycle by a laundry basket or little fingers (refer to page 18). 6 DELAY START allows... you may not be a slight delay while the basket slows to page 25). 3 Choose your WashSmart washer ■■ Press ...
Getting started quickly 17 US CA Using your washer The SmartTouch™ buttons require only a gentle touch to activate. 1 Touch POWER to activate your Fisher & Paykel WashSmart washer. 2 Select your desired wash cycle by a laundry basket or little fingers (refer to page 18). 6 DELAY START allows... you may not be a slight delay while the basket slows to page 25). 3 Choose your WashSmart washer ■■ Press ...
User Guide
Page 20
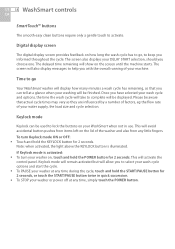
...be displayed. Time to go , to keep you with the overall running of your WashSmart when not in quick succession. ■■ To STOP your washer or power off at a glance when your machine. This will show on your water supply, the load size and cycle selection. Note: when activated, the...buttons The smooth easy clean buttons require only a gentle touch to select your wash cycle options and start the cycle. ■■ To PAUSE your washer at any time during the cycle, touch and hold the START/PAUSE button for 2 seconds, or touch the START/PAUSE button twice in use. Please...
...be displayed. Time to go , to keep you with the overall running of your WashSmart when not in quick succession. ■■ To STOP your washer or power off at a glance when your machine. This will show on your water supply, the load size and cycle selection. Note: when activated, the...buttons The smooth easy clean buttons require only a gentle touch to select your wash cycle options and start the cycle. ■■ To PAUSE your washer at any time during the cycle, touch and hold the START/PAUSE button for 2 seconds, or touch the START/PAUSE button twice in use. Please...

