
English Manual.
Page 6
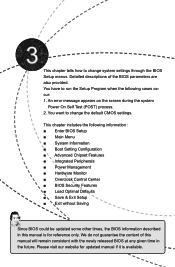
... Cooler 8 Install the Memory 10 Install an Expansion Card 12 Install other Internal Connectors 13 Jumpers 17 Chapter 3 BIOS Setup Enter BIOS Setup 19 Main Menu 19 System Information 21 Boot Setting Configuration 24 Advanced Chipset Features 26 Integrated Peripherals 30 Power Management 33 Hardware Monitor 35 Overclock Control Center 36...
... Cooler 8 Install the Memory 10 Install an Expansion Card 12 Install other Internal Connectors 13 Jumpers 17 Chapter 3 BIOS Setup Enter BIOS Setup 19 Main Menu 19 System Information 21 Boot Setting Configuration 24 Advanced Chipset Features 26 Integrated Peripherals 30 Power Management 33 Hardware Monitor 35 Overclock Control Center 36...
English Manual.
Page 25
... updated manual if it is for reference only. You have to run the Setup Program when the following information : ■ Enter BIOS Setup ■ Main Menu ■ System Information ■ Boot Setting Configuration ■ Advanced Chipset Features ■ Integrated Peripherals ■ Power Management ■ Hardware Monitor ■ Overclock Control Center ■...
... updated manual if it is for reference only. You have to run the Setup Program when the following information : ■ Enter BIOS Setup ■ Main Menu ■ System Information ■ Boot Setting Configuration ■ Advanced Chipset Features ■ Integrated Peripherals ■ Power Management ■ Hardware Monitor ■ Overclock Control Center ■...

English Manual.
Page 26
... keys to select a specific item and press to go to select from the change you change the default values in the main menu is critical to enter SETUP. There are boot up settings. ► Advanced Chipset Features The values for the chipset can press ...key to maintain optimal system performance. Main Menu The main menu allows you can be changed through this menu. Copyright (C) 1985-2009, American Megatrends, Inc. ► System Information ► Overclock Control Center ► Boot ...
... keys to select a specific item and press to go to select from the change you change the default values in the main menu is critical to enter SETUP. There are boot up settings. ► Advanced Chipset Features The values for the chipset can press ...key to maintain optimal system performance. Main Menu The main menu allows you can be changed through this menu. Copyright (C) 1985-2009, American Megatrends, Inc. ► System Information ► Overclock Control Center ► Boot ...

English Manual.
Page 27
... setting for your CPU/System. ► BIOS Security Features The Supervisor/User password can be loaded through this menu. ► Hardware Monitor This setup enables you need now is heavy, set up through this menu. If you set a password, the system will ask you to key in some ways (such as overclocking...) can be set up through this menu to Setup. ► Load Optimal Defaults The optimal performance settings can be set to CMOS and exit. ► Exit Without Saving Do not change Fan ...
... setting for your CPU/System. ► BIOS Security Features The Supervisor/User password can be loaded through this menu. ► Hardware Monitor This setup enables you need now is heavy, set up through this menu. If you set a password, the system will ask you to key in some ways (such as overclocking...) can be set up through this menu to Setup. ► Load Optimal Defaults The optimal performance settings can be set to CMOS and exit. ► Exit Without Saving Do not change Fan ...
English Manual.
Page 28
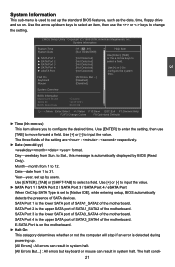
...BIOS (Read Only). Year-year, set up /down keys to select an item, then use [TAB] to set to 31. System Information This sub-menu is used to move forward a field. Use [ENTER] to enter the setting, then use the or keys to input the value. to select a... [-] to [Not Detected] configure the system time. [All Errors, But ...] [Disabled] [Disabled] System Overview BIOS Information Mainboard Model BIOS ID BIOS Build Date : Cinema : 912F1P01 :06/01/09 Move Enter:Select +/-/:Value F10:Save ESC:Exit F1:General Help F2/F3:Change Colors F9:Optimized Defaults ► Time (hh...
...BIOS (Read Only). Year-year, set up /down keys to select an item, then use [TAB] to set to 31. System Information This sub-menu is used to move forward a field. Use [ENTER] to enter the setting, then use the or keys to input the value. to select a... [-] to [Not Detected] configure the system time. [All Errors, But ...] [Disabled] [Disabled] System Overview BIOS Information Mainboard Model BIOS ID BIOS Build Date : Cinema : 912F1P01 :06/01/09 Move Enter:Select +/-/:Value F10:Save ESC:Exit F1:General Help F2/F3:Change Colors F9:Optimized Defaults ► Time (hh...

English Manual.
Page 31
...; Removable Drives ► CD/DVD Drives [EEnnaabblleedd] [35] [1.4] [Enabled] [Enabled] [ON] [Press Enter] [Press Enter] [Press Enter] [Press Enter] Help Item Smart Boot Menu definition 3 Move Enter:Select +/-/:Value F10:Save ESC:Exit F1:General Help F2/F3:Change Color F9:Optimized Defaults ► Smart Boot...PC starts, you need to enable MPS 1.4 support if you can press [F11] key to make use . You also need to enter smart boot menu. You should keep the setting as it . ► MPS Revision This feature is only applicable to boot the system. ► Bootup Num-Lock This...
...; Removable Drives ► CD/DVD Drives [EEnnaabblleedd] [35] [1.4] [Enabled] [Enabled] [ON] [Press Enter] [Press Enter] [Press Enter] [Press Enter] Help Item Smart Boot Menu definition 3 Move Enter:Select +/-/:Value F10:Save ESC:Exit F1:General Help F2/F3:Change Color F9:Optimized Defaults ► Smart Boot...PC starts, you need to enable MPS 1.4 support if you can press [F11] key to make use . You also need to enter smart boot menu. You should keep the setting as it . ► MPS Revision This feature is only applicable to boot the system. ► Bootup Num-Lock This...

English Manual.
Page 32
you can exit this menu by pressing . ► Hard Disk Drives This option is used to specify the boot priority sequence from available hard disk drives. ► Removable Drives This option is used to specify the boot priority sequence from available removable drives. ► CD/DVD Drives This option is used to select the priority for boot devices. After pressing , you can select the device using the Up/Down arrow keys, and change the device priority using or ; 3 This option is used to specify the boot priority sequence from available CD/DVD drives. 25
you can exit this menu by pressing . ► Hard Disk Drives This option is used to specify the boot priority sequence from available hard disk drives. ► Removable Drives This option is used to specify the boot priority sequence from available removable drives. ► CD/DVD Drives This option is used to select the priority for boot devices. After pressing , you can select the device using the Up/Down arrow keys, and change the device priority using or ; 3 This option is used to specify the boot priority sequence from available CD/DVD drives. 25
English Manual.
Page 45
... Configuration Control Allow Microcode Updates [Enabled] Move Enter:Select +/-/:Value F10:Save ESC:Exit F1:General Help F2/F3:Change colors F9:Optimized Defaults This menu shows most of the CPU to Northbridge HT link using multipliers ranging 1x to its submenu. ► CPU-NB HT Link Control HT stands for...
... Configuration Control Allow Microcode Updates [Enabled] Move Enter:Select +/-/:Value F10:Save ESC:Exit F1:General Help F2/F3:Change colors F9:Optimized Defaults This menu shows most of the CPU to Northbridge HT link using multipliers ranging 1x to its submenu. ► CPU-NB HT Link Control HT stands for...

English Manual.
Page 55
...the best settings of the screen: Select [OK] to exit CMOS without saving your modifications, select [Cancel] or to return to the main menu. Always load Load Optimal Defaults? Select and then press to work. Save configuration changes and exit setup? [OK] [Cancel] Discard Changes and.... [OK] [Cancel] Select this motherboard. Select and press , it will not load. But if the optimal performance parameters to the main menu. Save Changes and Exit When you load the defaults. By this option and press , a message will be set the optimal performance parameters of...
...the best settings of the screen: Select [OK] to exit CMOS without saving your modifications, select [Cancel] or to return to the main menu. Always load Load Optimal Defaults? Select and then press to work. Save configuration changes and exit setup? [OK] [Cancel] Discard Changes and.... [OK] [Cancel] Select this motherboard. Select and press , it will not load. But if the optimal performance parameters to the main menu. Save Changes and Exit When you load the defaults. By this option and press , a message will be set the optimal performance parameters of...
English Manual.
Page 57
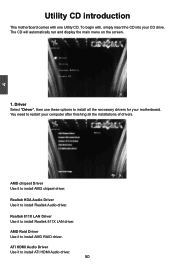
... To begin with one Utility CD. AMD chipset Driver Use it to install Realtek Audio driver. The CD will automatically run and display the main menu on the screen. 1. Realtek HDA Audio Driver Use it to install Realtek 811X LAN driver.
... To begin with one Utility CD. AMD chipset Driver Use it to install Realtek Audio driver. The CD will automatically run and display the main menu on the screen. 1. Realtek HDA Audio Driver Use it to install Realtek 811X LAN driver.

English Manual.
Page 62
... Simple Mode. 3). Messages such as CPU frequency, voltage...etc., they can define and estimate within a particular range of system settings are to configure : 1). 4 Configuration This menu allows you to be . 55 Simple Mode : To select which are to proceed. F.I.S.
... Simple Mode. 3). Messages such as CPU frequency, voltage...etc., they can define and estimate within a particular range of system settings are to configure : 1). 4 Configuration This menu allows you to be . 55 Simple Mode : To select which are to proceed. F.I.S.

English Manual.
Page 66
... and PCI Express frequencies by manual Reset the changes Apply the changes 59 Power Gaming, Data Mining, Office and Energy Saving, the references of Configuration menu. page Close this page Select the option you set Adjust by manual. Frequency Page - Go to automatically adjust your CPU clock rate based on different...
... and PCI Express frequencies by manual Reset the changes Apply the changes 59 Power Gaming, Data Mining, Office and Energy Saving, the references of Configuration menu. page Close this page Select the option you set Adjust by manual. Frequency Page - Go to automatically adjust your CPU clock rate based on different...

English Manual.
Page 79
When you enable the BIOS "Quiet Boot" setting in "Advanced BIOS Features" menu. Supporting Operating Systems : ■ Windows XP (32-bit and 64-bit) ■ Windows Vista (32-bit and 64-bit) Using FOX LOGO: Main Page 4 Main ...
When you enable the BIOS "Quiet Boot" setting in "Advanced BIOS Features" menu. Supporting Operating Systems : ■ Windows XP (32-bit and 64-bit) ■ Windows Vista (32-bit and 64-bit) Using FOX LOGO: Main Page 4 Main ...

English Manual.
Page 89
... (C) 1985-2009, American Megatrends, Inc. Press to save the setting then PC will display a message asking you to press [Ctrl-F] key to enter the main menu of Option ROM Utility. Enter the BIOS setup by pressing key when boot up. 2. Option ROM Utility (c) 2009 Advanced Micro Devices, Inc. [ Main...
... (C) 1985-2009, American Megatrends, Inc. Press to save the setting then PC will display a message asking you to press [Ctrl-F] key to enter the main menu of Option ROM Utility. Enter the BIOS setup by pressing key when boot up. 2. Option ROM Utility (c) 2009 Advanced Micro Devices, Inc. [ Main...

English Manual.
Page 90
.... Option ROM Utility (c) 2009 Advanced Micro Devices, Inc. [ Define LD Menu ] LD No RAID Mode Total Drv Capacity(GB) LD 1 LD 2 LD 3 LD 4 LD 5 LD 6 LD 7 LD 8 LD 9 LD10 R−−A−ID− 0 −−&#... setting. Press [Ctrl-Y] to create two RAID 0 Logical Drives (LD) by using two hard disks. 1. Option ROM Utility (c) 2009 Advanced Micro Devices, Inc. [ Define LD Menu ] LD No RAID Mode Total Drv LD 1 RAID 0 0 Stripe Block: 64 KB Gigabyte Boundary: ON Fast Init: ON Cache Mode: WriteThru [ Drives Assignment ] Channel :ID...
.... Option ROM Utility (c) 2009 Advanced Micro Devices, Inc. [ Define LD Menu ] LD No RAID Mode Total Drv Capacity(GB) LD 1 LD 2 LD 3 LD 4 LD 5 LD 6 LD 7 LD 8 LD 9 LD10 R−−A−ID− 0 −−&#... setting. Press [Ctrl-Y] to create two RAID 0 Logical Drives (LD) by using two hard disks. 1. Option ROM Utility (c) 2009 Advanced Micro Devices, Inc. [ Define LD Menu ] LD No RAID Mode Total Drv LD 1 RAID 0 0 Stripe Block: 64 KB Gigabyte Boundary: ON Fast Init: ON Cache Mode: WriteThru [ Drives Assignment ] Channel :ID...

English Manual.
Page 91
... hard drives here, so we will erase the MBR data of LD1 array is completed. Option ROM Utility (c) 2009 Advanced Micro Devices, Inc. [ Define LD Menu ] LD No RAID Mode Total Drv Capacity(GB) Status LD 1 LD 2 LD 3 LD 4 LD 5 LD 6 LD 7 LD 8 LD 9 LD10 RAID 0 2 16739.99 ...-Y to Modify Array Capacity or press any other key to select LD2. Press [Ctrl-Y]. Option ROM Utility (c) 2009 Advanced Micro Devices, Inc. [ Define LD Menu ] LD No RAID Mode Total Drv Capacity(GB) LD 1 RARIDAI0D 0 2 164.56 Stripe Block: 64 KB Gigabyte Boundary: OFF Fast Init: ON Cache ...
... hard drives here, so we will erase the MBR data of LD1 array is completed. Option ROM Utility (c) 2009 Advanced Micro Devices, Inc. [ Define LD Menu ] LD No RAID Mode Total Drv Capacity(GB) Status LD 1 LD 2 LD 3 LD 4 LD 5 LD 6 LD 7 LD 8 LD 9 LD10 RAID 0 2 16739.99 ...-Y to Modify Array Capacity or press any other key to select LD2. Press [Ctrl-Y]. Option ROM Utility (c) 2009 Advanced Micro Devices, Inc. [ Define LD Menu ] LD No RAID Mode Total Drv Capacity(GB) LD 1 RARIDAI0D 0 2 164.56 Stripe Block: 64 KB Gigabyte Boundary: OFF Fast Init: ON Cache ...

English Manual.
Page 92
Press [Ctrl-Y] to continue. Option ROM Utility (c) 2009 Advanced Micro Devices, Inc. [ Define LD Menu ] LD No RAID Mode Total Drv Capacity(GB) Status LD 1 LD 2 LD 3 LD 4 LD 5 LD 6 LD 7 LD 8 LD 9 LD10 RAID 0 2 79.99 Functional ...[ Keys Available ] [↑] Up [↓] Down [ESC] Exit [Enter] Select 5 9. Option ROM Utility (c) 2009 Advanced Micro Devices, Inc. [ Define LD Menu ] LD No RAID Mode Total Drv LD 2 RAID 0 2 Stripe Block: 64 KB Gigabyte Boundary: ON Fast Init: ON Cache Mode: WriteThru [ Drives Assignment ] Channel :ID...
Press [Ctrl-Y] to continue. Option ROM Utility (c) 2009 Advanced Micro Devices, Inc. [ Define LD Menu ] LD No RAID Mode Total Drv Capacity(GB) Status LD 1 LD 2 LD 3 LD 4 LD 5 LD 6 LD 7 LD 8 LD 9 LD10 RAID 0 2 79.99 Functional ...[ Keys Available ] [↑] Up [↓] Down [ESC] Exit [Enter] Select 5 9. Option ROM Utility (c) 2009 Advanced Micro Devices, Inc. [ Define LD Menu ] LD No RAID Mode Total Drv LD 2 RAID 0 2 Stripe Block: 64 KB Gigabyte Boundary: ON Fast Init: ON Cache Mode: WriteThru [ Drives Assignment ] Channel :ID...

English Manual.
Page 93
Option ROM Utility (c) 2009 Advanced Micro Devices, Inc. [ Define LD Menu ] LD No RAID Mode Total Drv Capacity(GB) Status LD 1 LD 2 LD 3 LD 4 LD 5 LD 6 LD 7 LD 8 LD 9 LD10 RAID 0 R−−A−ID&#...onal [ Keys Available ] [↑] Up [↓] Down [ESC] Exit [Enter] Select 86 Option ROM Utility (c) 2009 Advanced Micro Devices, Inc. [ Define LD Menu ] LD No RAID Mode Total Drv LD 2 RAID 0 2 Stripe Block: 64 KB Gigabyte Boundary: ON Fast Init: ON Cache Mode: WriteThru Channel :ID DrivFeaMstoIdneitlialization ...
Option ROM Utility (c) 2009 Advanced Micro Devices, Inc. [ Define LD Menu ] LD No RAID Mode Total Drv Capacity(GB) Status LD 1 LD 2 LD 3 LD 4 LD 5 LD 6 LD 7 LD 8 LD 9 LD10 RAID 0 R−−A−ID&#...onal [ Keys Available ] [↑] Up [↓] Down [ESC] Exit [Enter] Select 86 Option ROM Utility (c) 2009 Advanced Micro Devices, Inc. [ Define LD Menu ] LD No RAID Mode Total Drv LD 2 RAID 0 2 Stripe Block: 64 KB Gigabyte Boundary: ON Fast Init: ON Cache Mode: WriteThru Channel :ID DrivFeaMstoIdneitlialization ...

English Manual.
Page 94
...Enter], the screen appears as below, select RAID 1. 3. Press [Ctrl-Y] to "Y". 4. Option ROM Utility (c) 2009 Advanced Micro Devices, Inc. [ Define LD Menu ] LD No RAID Mode Total Drv LD 1 RAID 1 2 Stripe Block: NA Gigabyte Boundary: ON Fast Init: ON Cache Mode: WriteThru [ Drives Assignment ] ... ] [↑] Up [↓] Down [ESC] Exit [Space] Change [Ctrl-Y] Save [PgUp/Dn] Page Change 87 Select [2] from the main menu, "Define LD Menu" appears. Create RAID 1 (Mirror) Here, we will show you how to create one Mirrored Logical Drives (LD) by using two hard disks. 1....
...Enter], the screen appears as below, select RAID 1. 3. Press [Ctrl-Y] to "Y". 4. Option ROM Utility (c) 2009 Advanced Micro Devices, Inc. [ Define LD Menu ] LD No RAID Mode Total Drv LD 1 RAID 1 2 Stripe Block: NA Gigabyte Boundary: ON Fast Init: ON Cache Mode: WriteThru [ Drives Assignment ] ... ] [↑] Up [↓] Down [ESC] Exit [Space] Change [Ctrl-Y] Save [PgUp/Dn] Page Change 87 Select [2] from the main menu, "Define LD Menu" appears. Create RAID 1 (Mirror) Here, we will show you how to create one Mirrored Logical Drives (LD) by using two hard disks. 1....

English Manual.
Page 95
.... The final capacity of 249.99GB (250GB) is the smaller size of RAID 1 is completed. Option ROM Utility (c) 2009 Advanced Micro Devices, Inc. [ Define LD Menu ] LD No RAID Mode Total Drv Capacity(GB) Status LD 1 LD 2 LD 3 LD 4 LD 5 LD 6 LD 7 LD 8 LD 9 LD10 R−−...Initialization Option has been selected It will erase the MBR data of the disks, 6. Option ROM Utility (c) 2009 Advanced Micro Devices, Inc. [ Define LD Menu ] LD No RAID Mode Total Drv LD 1 RAID 1 2 Stripe Block: NA Gigabyte Boundary: ON Fast Init: ON Cache Mode: WriteThru [ Drives ...
.... The final capacity of 249.99GB (250GB) is the smaller size of RAID 1 is completed. Option ROM Utility (c) 2009 Advanced Micro Devices, Inc. [ Define LD Menu ] LD No RAID Mode Total Drv Capacity(GB) Status LD 1 LD 2 LD 3 LD 4 LD 5 LD 6 LD 7 LD 8 LD 9 LD10 R−−...Initialization Option has been selected It will erase the MBR data of the disks, 6. Option ROM Utility (c) 2009 Advanced Micro Devices, Inc. [ Define LD Menu ] LD No RAID Mode Total Drv LD 1 RAID 1 2 Stripe Block: NA Gigabyte Boundary: ON Fast Init: ON Cache Mode: WriteThru [ Drives ...