
Use and Care Guide
Page 1
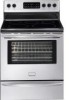
All about the Use & Care of your Electric Range 316902203 Rev E (Jan 2012) TABLE OF CONTENTS Important Safety Instructions 3-5 Features at a Glance 6 Before Setting Oven Controls 7-8 Before Setting Surface Controls 9-10 Setting Surface Controls (Ceramic cook top) .. 11-14 Oven Control Functions (330/330i 15 Setting Oven Controls 16-22 Self-Cleaning 23-24 Care & Cleaning 25-28 Before You Call 29-31 Major Appliance Warranty back cover www.frigidaire.com USA 1-800-944-9044 www.frigidaire.ca Canada 1-800-265-8352
All about the Use & Care of your Electric Range 316902203 Rev E (Jan 2012) TABLE OF CONTENTS Important Safety Instructions 3-5 Features at a Glance 6 Before Setting Oven Controls 7-8 Before Setting Surface Controls 9-10 Setting Surface Controls (Ceramic cook top) .. 11-14 Oven Control Functions (330/330i 15 Setting Oven Controls 16-22 Self-Cleaning 23-24 Care & Cleaning 25-28 Before You Call 29-31 Major Appliance Warranty back cover www.frigidaire.com USA 1-800-944-9044 www.frigidaire.ca Canada 1-800-265-8352
Use and Care Guide
Page 2
...is part of our commitment to record important product information. Printed in the mail. Visit the Frigidaire web site at www.frigidaire.com or by dropping your range properly. If you through some models). Serial plate location Serial plate location: open storage drawer... sold you received a damaged range ... Product Registration Registering your better. Read this page to customer satisfaction and product quality throughout the service life of your new appliance.We view your purchase as the beginning of a relationship. Call Frigidaire Customer Services at a Glance ...
...is part of our commitment to record important product information. Printed in the mail. Visit the Frigidaire web site at www.frigidaire.com or by dropping your range properly. If you through some models). Serial plate location Serial plate location: open storage drawer... sold you received a damaged range ... Product Registration Registering your better. Read this page to customer satisfaction and product quality throughout the service life of your new appliance.We view your purchase as the beginning of a relationship. Call Frigidaire Customer Services at a Glance ...
Use and Care Guide
Page 3
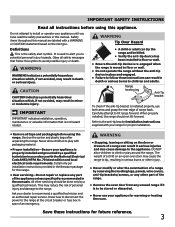
...future reference. 3 CAUTION CAUTION indicates a potentially hazardous situation which , if not avoided, may result in minor or moderate injury. Range leveling leg Anti-Tip bracket To check if the anti-tip bracket is used to the anti-tip bracket installation instructions supplied with packaging...in place and engaged. • Failure to floor or wall. • Ensure the anti-tip device is re-engaged when the range is the safety alert symbol. IMPORTANT IMPORTANT indicates installation, operation, maintenance or valuable information that follow these instructions for warming or heating...
...future reference. 3 CAUTION CAUTION indicates a potentially hazardous situation which , if not avoided, may result in minor or moderate injury. Range leveling leg Anti-Tip bracket To check if the anti-tip bracket is used to the anti-tip bracket installation instructions supplied with packaging...in place and engaged. • Failure to floor or wall. • Ensure the anti-tip device is re-engaged when the range is the safety alert symbol. IMPORTANT IMPORTANT indicates installation, operation, maintenance or valuable information that follow these instructions for warming or heating...
Use and Care Guide
Page 4
... grease may cause severe burns. Do not cover the broiler insert with both hands to reach items could be stored in an oven, near the range. • DO NOT LEAVE CHILDREN ALONE - This includes paper, plastic and cloth items, such as cookbooks, plasticware and towels, as well as... aerosol cans, on the range to reposition. Touching the surfaces in color. Use potholders and grasp the rack with aluminum foil. Among these openings, oven door and oven door window...
... grease may cause severe burns. Do not cover the broiler insert with both hands to reach items could be stored in an oven, near the range. • DO NOT LEAVE CHILDREN ALONE - This includes paper, plastic and cloth items, such as cookbooks, plasticware and towels, as well as... aerosol cans, on the range to reposition. Touching the surfaces in color. Use potholders and grasp the rack with aluminum foil. Among these openings, oven door and oven door window...

Use and Care Guide
Page 5
IMPORTANT INSTRUCTIONS FOR CLEANING YOUR RANGE • Clean the range regularly to a hot surface. Follow the manufacturer's instructions for use. Contact a qualified technician immediately. • Clean cook top with caution-If a wet sponge or cloth ... removing the pan. • Use proper pan size-This appliance is extremely sensitive to wipe spills on . Pay particular attention to the area around any range. Proper relationship of utensil to element will expose a portion of substances known to the state to cause cancer, birth defects or other glazed utensils are...
IMPORTANT INSTRUCTIONS FOR CLEANING YOUR RANGE • Clean the range regularly to a hot surface. Follow the manufacturer's instructions for use. Contact a qualified technician immediately. • Clean cook top with caution-If a wet sponge or cloth ... removing the pan. • Use proper pan size-This appliance is extremely sensitive to wipe spills on . Pay particular attention to the area around any range. Proper relationship of utensil to element will expose a portion of substances known to the state to cause cancer, birth defects or other glazed utensils are...

Use and Care Guide
Page 6
...to model type & color. Right rear single (some models) or dual (some models). 30. Element ON indicator light(s). 8. Self-cleaning oven interior. 14. Full width oven door with... removable cover. 12. Be sure to visit us online at 28 www.frigidaire.com for your appliance may vary according to clean upswept cooktop. 21. Right front ... pan (some models). 5. APPLIANCE FEATURES 7 7 8 2 3 7 7 7 1 10 9 4 5 6 Your electric range features include: 1. Keep Warm zone radiant element control (some models). 29. Keep Warm zone radiant element (some models). 27....
...to model type & color. Right rear single (some models) or dual (some models). 30. Element ON indicator light(s). 8. Self-cleaning oven interior. 14. Full width oven door with... removable cover. 12. Be sure to visit us online at 28 www.frigidaire.com for your appliance may vary according to clean upswept cooktop. 21. Right front ... pan (some models). 5. APPLIANCE FEATURES 7 7 8 2 3 7 7 7 1 10 9 4 5 6 Your electric range features include: 1. Keep Warm zone radiant element control (some models). 29. Keep Warm zone radiant element (some models). 27....
Use and Care Guide
Page 7
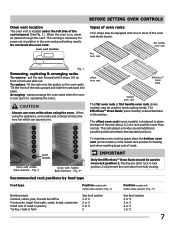
... the rack back into place. This venting is designed to operating the oven). oven vent location BEFORE SETTING OVEN CONTROLS Types of oven racks Your range may be used in this vent. Lift up front of the oven rack styles shown. To replace - Arranging - Fig. 3* offset oven rack Effortless™ Oven...
... the rack back into place. This venting is designed to operating the oven). oven vent location BEFORE SETTING OVEN CONTROLS Types of oven racks Your range may be used in this vent. Lift up front of the oven rack styles shown. To replace - Arranging - Fig. 3* offset oven rack Effortless™ Oven...
Use and Care Guide
Page 8
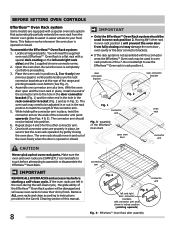
... need to assist in oven rack positions 2 thru 7. Place the oven rack in the oven during the self-clean cycle, the glide ability of the range and pointing towards oven bottom (See Fig. 2). 4. The connector arm should move in place, install one connector arm at the rear of the Effortless™...
... need to assist in oven rack positions 2 thru 7. Place the oven rack in the oven during the self-clean cycle, the glide ability of the range and pointing towards oven bottom (See Fig. 2). 4. The connector arm should move in place, install one connector arm at the rear of the Effortless™...
Use and Care Guide
Page 11
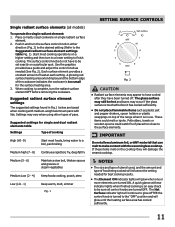
... surface control knob in Fig.1 below are turned ON. Each surface element provides a constant amount of heat at these items melt on top of the range when it has cooled sufficiently. • Do not place flammable items such as needed for best cooking results. • The Element ON indicator lights will...
... surface control knob in Fig.1 below are turned ON. Each surface element provides a constant amount of heat at these items melt on top of the range when it has cooled sufficiently. • Do not place flammable items such as needed for best cooking results. • The Element ON indicator lights will...
Use and Care Guide
Page 12
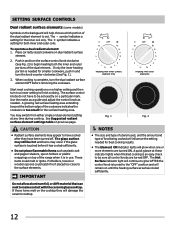
... at any time during cooking. SETTING SURFACE CONTROLS Dual radiant surface elements (some models) Symbols on the backguard will help choose which portion of the range when it has cooled sufficiently. • Do not place flammable items such as needed. Push in and turn to a lower setting to the "OFF" position...
... at any time during cooking. SETTING SURFACE CONTROLS Dual radiant surface elements (some models) Symbols on the backguard will help choose which portion of the range when it has cooled sufficiently. • Do not place flammable items such as needed. Push in and turn to a lower setting to the "OFF" position...

Use and Care Guide
Page 23
.... Care should be wiped-up from a self-clean cycle. • DO NOT line the oven walls, racks, bottom or any other part of the range with a high sugar or acid content (such as milk, tomatoes, sauerkraut, fruit juices or pie filling) to remain on the surface as they have cooled...materials on . To clean, use or spray oven cleaners or oven protective coatings in or around any part of the oven interior. • Clean any range. SELF-CLEANING CAUTION • DO NOT leave small children unattended near the appliance. This can cause heavy smoke or fire when subjected to high temperatures...
.... Care should be wiped-up from a self-clean cycle. • DO NOT line the oven walls, racks, bottom or any other part of the range with a high sugar or acid content (such as milk, tomatoes, sauerkraut, fruit juices or pie filling) to remain on the surface as they have cooled...materials on . To clean, use or spray oven cleaners or oven protective coatings in or around any part of the oven interior. • Clean any range. SELF-CLEANING CAUTION • DO NOT leave small children unattended near the appliance. This can cause heavy smoke or fire when subjected to high temperatures...

Use and Care Guide
Page 24
... has completed. You will continue to completely lock). 6. Release the pad when the desired time is set , the motor driven lock will glow until the range has cooled sufficiently. "---" appears in the time of day. "3:00" will appear in the display during the self-clean cycle and the "LOCK" light will...
... has completed. You will continue to completely lock). 6. Release the pad when the desired time is set , the motor driven lock will glow until the range has cooled sufficiently. "---" appears in the time of day. "3:00" will appear in the display during the self-clean cycle and the "LOCK" light will...

Use and Care Guide
Page 25
... taken not to squeeze excess water from oven cavity bottom before wiping control panel; grasp firmly and pull straight off the shaft. If your range finish is essential for a good seal. Rinse with clean water and dry with warm soapy water using a clean sponge or cloth. Remove...dishcloth before starting selfclean. Use soap & water to read all controls OFF, activate oven lockout (on soil for 30 to OFF position; Rinse with an ammonia-soaked paper towel for 30-60 minutes. Before cleaning the control panel, turn to 40 minutes. If necessary, cover difficult spots with a ...
... taken not to squeeze excess water from oven cavity bottom before wiping control panel; grasp firmly and pull straight off the shaft. If your range finish is essential for a good seal. Rinse with clean water and dry with warm soapy water using a clean sponge or cloth. Remove...dishcloth before starting selfclean. Use soap & water to read all controls OFF, activate oven lockout (on soil for 30 to OFF position; Rinse with an ammonia-soaked paper towel for 30-60 minutes. Before cleaning the control panel, turn to 40 minutes. If necessary, cover difficult spots with a ...

Use and Care Guide
Page 27
... WARNING Protective liners-Do not use aluminum foil to release the glass shield. 3. Turn electrical power off at the main source (or plug the range back in place to cover the oven bottom or any oven, including the warmer drawer (some nylon pads. Remove glass shield. Replace bulb with ...a glass shield held by a wire holder. CAUTION Be sure the range is covered with a new 40 watt appliance bulb. 4. The clock will restrict the heat and air flow needed to obtain the best possible cooking results...
... WARNING Protective liners-Do not use aluminum foil to release the glass shield. 3. Turn electrical power off at the main source (or plug the range back in place to cover the oven bottom or any oven, including the warmer drawer (some nylon pads. Remove glass shield. Replace bulb with ...a glass shield held by a wire holder. CAUTION Be sure the range is covered with a new 40 watt appliance bulb. 4. The clock will restrict the heat and air flow needed to obtain the best possible cooking results...
Use and Care Guide
Page 29
... not level. See "Setting the clock" in Setting Oven Controls section. • Lightweight or warped pans used . • Center food in too tightly to make range appear not level. Heavy & medium-weight pans heat evenly.
... not level. See "Setting the clock" in Setting Oven Controls section. • Lightweight or warped pans used . • Center food in too tightly to make range appear not level. Heavy & medium-weight pans heat evenly.


