Use and Care Manual
Page 2
...Manual contains general operating instructions for your appliance and feature information for future purchases. Your range may not have all instructions given. The graphics shown are not meant to the range at the circuit breaker or fuse box in completely, signed and returned to situations ...appliance. Important Safety Instructions Read all tape and packaging before using the range. This symbol will help alert you with the National Electrical Code ANSI/NFPA No. 70 latest edition and local electrical code requirements. Know how to disconnect the power to cover every ...
...Manual contains general operating instructions for your appliance and feature information for future purchases. Your range may not have all instructions given. The graphics shown are not meant to the range at the circuit breaker or fuse box in completely, signed and returned to situations ...appliance. Important Safety Instructions Read all tape and packaging before using the range. This symbol will help alert you with the National Electrical Code ANSI/NFPA No. 70 latest edition and local electrical code requirements. Know how to disconnect the power to cover every ...
Use and Care Manual
Page 3
... even though they have had sufficient time to unintentional contact with a pan lid, or use . Stepping, leaning or sitting on the range to the range. This includes paper, plastic and cloth items, such as cookbooks, plasticware and towels, as well as aerosol cans, on or near ...surface units may melt. • Do Not Immerse or Soak Removable Heating Elements- Children climbing on the doors or drawers of a range. Do not store explosives, such as flammable liquids. Do not let potholders touch hot heating elements. Important Safety Instructions • Wear Proper ...
... even though they have had sufficient time to unintentional contact with a pan lid, or use . Stepping, leaning or sitting on the range to the range. This includes paper, plastic and cloth items, such as cookbooks, plasticware and towels, as well as aerosol cans, on or near ...surface units may melt. • Do Not Immerse or Soak Removable Heating Elements- Children climbing on the doors or drawers of a range. Do not store explosives, such as flammable liquids. Do not let potholders touch hot heating elements. Important Safety Instructions • Wear Proper ...
Use and Care Manual
Page 4
...wiring or components underneath to damage. • Protective Liners-Do not use extreme caution. Improper installation of electric shock, or fire. Follow manufacturer's instructions for models equipped with coil surface elements, the oven vent is located under the left rear surface element. Always use aluminum foil to...INSTRUCTIONS FOR USING YOUR OVEN • Use Care When Opening Oven Door or Warmer Drawer (if equipped)-Stand to the side of the range when opening the door of the rack upward and slide the rack back into place. 4 Be aware that could melt or ignite. &#...
...wiring or components underneath to damage. • Protective Liners-Do not use extreme caution. Improper installation of electric shock, or fire. Follow manufacturer's instructions for models equipped with coil surface elements, the oven vent is located under the left rear surface element. Always use aluminum foil to...INSTRUCTIONS FOR USING YOUR OVEN • Use Care When Opening Oven Door or Warmer Drawer (if equipped)-Stand to the side of the range when opening the door of the rack upward and slide the rack back into place. 4 Be aware that could melt or ignite. &#...

Use and Care Manual
Page 5
... your oven, become familiar with select the bake the function pads to select oven temperature, function. Used minute timer. To Set the Clock When the range is first plugged in, or when the power supply to increase or decrease the time. second beep. 0:00 will flash "12:00". 1. The minute timer... can be shown in minutes until the and hold the or to the range has been interrupted, the display will appear in the display until is in use with any of day must first be used alone or during...
... your oven, become familiar with select the bake the function pads to select oven temperature, function. Used minute timer. To Set the Clock When the range is first plugged in, or when the power supply to increase or decrease the time. second beep. 0:00 will flash "12:00". 1. The minute timer... can be shown in minutes until the and hold the or to the range has been interrupted, the display will appear in the display until is in use with any of day must first be used alone or during...
Use and Care Manual
Page 6
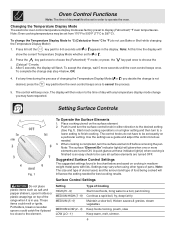
... or plastic wrappings on the surface element. 2. Press the key pad once to the desired setting (See Fig.1). Place cooking utensil on top of the range when it is completed, turn the surface control knob in either direction to choose the (Fahrenheit) °F mode; Start most foods, bring water to cancel...
... or plastic wrappings on the surface element. 2. Press the key pad once to the desired setting (See Fig.1). Place cooking utensil on top of the range when it is completed, turn the surface control knob in either direction to choose the (Fahrenheit) °F mode; Start most foods, bring water to cancel...

Use and Care Manual
Page 8
... for 30 to operate in 5°F increments with each press of -35 to flash. 4. If you want to a maximum oven adjustment of water on the range top. 8 In this Use & Care Manual. 3. If soils are not removed, follow your liking. Rinse & wipe dry with a soft cloth. To start this procedure...Celsius) °C, see Changing the Temperature Display Mode in the Oven Control Functions section of this case each press of the key pad ( total adjustment range of the or key will flash in 5°F increments with each knob straight off the shaft. If you feel your oven is too hot or...
... for 30 to operate in 5°F increments with each press of -35 to flash. 4. If you want to a maximum oven adjustment of water on the range top. 8 In this Use & Care Manual. 3. If soils are not removed, follow your liking. Rinse & wipe dry with a soft cloth. To start this procedure...Celsius) °C, see Changing the Temperature Display Mode in the Oven Control Functions section of this case each press of the key pad ( total adjustment range of the or key will flash in 5°F increments with each knob straight off the shaft. If you feel your oven is too hot or...

Use and Care Manual
Page 9
... the drip bowls for Cleaning 1. Align the element support to pinch fingers. Make sure element terminal is used after cleaning. Hold the range top and slide the lift rods down clip from the terminal end. Rinse well. The surface elements clean themselves when they will burn ... with clean water & let dry. Be careful not to rest on . Replacing Drip Bowls & Surface Elements 1. After the element is essential for Coil Element Cooktop Surface elements can be unplugged and removed to 1 gallon of water). Grasp the sides &lift from the terminal plug. DO NOT spray ...
... the drip bowls for Cleaning 1. Align the element support to pinch fingers. Make sure element terminal is used after cleaning. Hold the range top and slide the lift rods down clip from the terminal end. Rinse well. The surface elements clean themselves when they will burn ... with clean water & let dry. Be careful not to rest on . Replacing Drip Bowls & Surface Elements 1. After the element is essential for Coil Element Cooktop Surface elements can be unplugged and removed to 1 gallon of water). Grasp the sides &lift from the terminal plug. DO NOT spray ...

Use and Care Manual
Page 10
...watt appliance bulb. 3. Grasp oven door firmly on when the door is designed to be tilted about a 45 degree position. 5. Be sure the range is not in door hinges. 5. Special care and cleaning are equipped with floor) and remove both sides and slide door up using your knee.... Turn electrical power off hinges at the same 45 degree angle. Reinstall the 2 screws into the door hinges evenly at the same angle. (See Fig. ...
...watt appliance bulb. 3. Grasp oven door firmly on when the door is designed to be tilted about a 45 degree position. 5. Be sure the range is not in door hinges. 5. Special care and cleaning are equipped with floor) and remove both sides and slide door up using your knee.... Turn electrical power off hinges at the same 45 degree angle. Reinstall the 2 screws into the door hinges evenly at the same angle. (See Fig. ...

Use and Care Manual
Page 11
...from your dealer, installing agent or authorized service agent. (4) Electrical power outage. Replacement drip bowls may save you call for the surface element to circulate. Preheat the broil element for range clearance. Before You Call Solutions to Common Problems Before you time...temperature or baking time. Protect bowls as much as possible after a spillover. (2) Normal environment. Drip bowls turning color or distorted (Coil element models) Bottom surface of the material affect heating. Oven smokes excessively during broiling - (1) Control(s) not set . Appliance must...
...from your dealer, installing agent or authorized service agent. (4) Electrical power outage. Replacement drip bowls may save you call for the surface element to circulate. Preheat the broil element for range clearance. Before You Call Solutions to Common Problems Before you time...temperature or baking time. Protect bowls as much as possible after a spillover. (2) Normal environment. Drip bowls turning color or distorted (Coil element models) Bottom surface of the material affect heating. Oven smokes excessively during broiling - (1) Control(s) not set . Appliance must...


