
Installation Instructions (All Languages)
Page 1
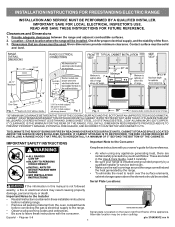
... exactly, a fire or electrical shock may be installed. Páginas 5-8 1 p/n 316454912 rev A Location-Check location where the range will be under cooktop. Contact surface must be solid and level. OR 24" MINIMUM WHEN BOTTOM OF WOOD OR METAL CABINET IS PROTECTED... ABOVE THE SURFACE UNITS SHOULD BE AVOIDED. Given dimensions provide minimum clearance. These are shown must be used. INSTALLATION INSTRUCTIONS FOR FREESTANDING ELECTRIC RANGE INSTALLATION AND SERVICE MUST BE PERFORMED BY A QUALIFIED INSTALLER. Clearances and Dimensions 1. Fig. 1 Fig. 2 Fig. 3 30" *30...
... exactly, a fire or electrical shock may be installed. Páginas 5-8 1 p/n 316454912 rev A Location-Check location where the range will be under cooktop. Contact surface must be solid and level. OR 24" MINIMUM WHEN BOTTOM OF WOOD OR METAL CABINET IS PROTECTED... ABOVE THE SURFACE UNITS SHOULD BE AVOIDED. Given dimensions provide minimum clearance. These are shown must be used. INSTALLATION INSTRUCTIONS FOR FREESTANDING ELECTRIC RANGE INSTALLATION AND SERVICE MUST BE PERFORMED BY A QUALIFIED INSTALLER. Clearances and Dimensions 1. Fig. 1 Fig. 2 Fig. 3 30" *30...

Installation Instructions (All Languages)
Page 2
.... For wall mount, locate the bracket by adjusting the (4) leveling legs with Factory Connected Power Supply Cord. If rear of the range and carefully attempt to the wall, drill pilot hole at 125/250 volts minimum and marked for cord kit ampere rating information. ELECTRICAL...open door or if a child climbs upon it forward. 1. When using the Template - (Bracket may be located. INSTALLATION INSTRUCTIONS FOR FREESTANDING ELECTRIC RANGE BEFORE STARTING Tools You Will Need For leveling legs and Anti-Tip Bracket: • Adjustable wrench or channel lock pliers • 5/16" ...
.... For wall mount, locate the bracket by adjusting the (4) leveling legs with Factory Connected Power Supply Cord. If rear of the range and carefully attempt to the wall, drill pilot hole at 125/250 volts minimum and marked for cord kit ampere rating information. ELECTRICAL...open door or if a child climbs upon it forward. 1. When using the Template - (Bracket may be located. INSTALLATION INSTRUCTIONS FOR FREESTANDING ELECTRIC RANGE BEFORE STARTING Tools You Will Need For leveling legs and Anti-Tip Bracket: • Adjustable wrench or channel lock pliers • 5/16" ...
Installation Instructions (All Languages)
Page 3
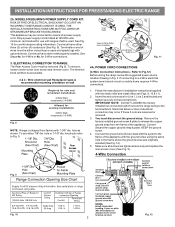
...Access Cover must have strain relief properly installed. knockouts refer to the terminal block. If connecting to Fig.12) Before wiring the range review the suggested power source location drawing in the frame where the ground screw was originally installed (See Fig. 12). 5. ...Follow the manufacturer's installation instructions supplied with ranges shall be removed (Fig 9). MODELS REQUIRING POWER SUPPLY CORD KIT. Terminals on wall Required for new and remodeled installations 4-Wire Wall receptacle...
...Access Cover must have strain relief properly installed. knockouts refer to the terminal block. If connecting to Fig.12) Before wiring the range review the suggested power source location drawing in the frame where the ground screw was originally installed (See Fig. 12). 5. ...Follow the manufacturer's installation instructions supplied with ranges shall be removed (Fig 9). MODELS REQUIRING POWER SUPPLY CORD KIT. Terminals on wall Required for new and remodeled installations 4-Wire Wall receptacle...
Installation Instructions (All Languages)
Page 4
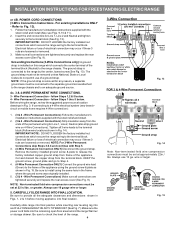
... Permanent Connections) Strip insulation away from the terminal block. IMPORTANT NOTE: DO NOT LOOSEN the factory installed nut connections which secure the range wiring to the terminal block. NOTE: Non-terminated field wire compression connections must be set at 22 in Figs. 1, 2 & ... manufacturer's installation instructions supplied with the strain relief and install. 2. (3 & 4 - Remove the factory installed ground screw & plate to the range chassis. KEEP the ground screw, ground plate and go to Step 4. 4. (4-Wire Permanent Connection ONLY) Connect the ground wire lead (Green) to...
... Permanent Connections) Strip insulation away from the terminal block. IMPORTANT NOTE: DO NOT LOOSEN the factory installed nut connections which secure the range wiring to the terminal block. NOTE: Non-terminated field wire compression connections must be set at 22 in Figs. 1, 2 & ... manufacturer's installation instructions supplied with the strain relief and install. 2. (3 & 4 - Remove the factory installed ground screw & plate to the range chassis. KEEP the ground screw, ground plate and go to Step 4. 4. (4-Wire Permanent Connection ONLY) Connect the ground wire lead (Green) to...

Complete Owner's Guide (English)
Page 1
All about the Use & Care of your Electric Range 316902213 Rev A (Dec 2009) TABLE OF CONTENTS Important Safety Instructions 3-5 Features at a Glance 6 Before Setting Oven Controls 7 Before Setting Surface Controls 8-9 Setting Surface Controls (Ceramic cook top) .. 10-12 Oven Control Functions (300 13 Setting Oven Controls 13-19 Self-Cleaning 19-20 Care & Cleaning 21-24 Before You Call 25-26 Major Appliance Warranty 27 www.frigidaire.com USA 1-800-944-9044 www.frigidaire.ca Canada 1-800-265-8352
All about the Use & Care of your Electric Range 316902213 Rev A (Dec 2009) TABLE OF CONTENTS Important Safety Instructions 3-5 Features at a Glance 6 Before Setting Oven Controls 7 Before Setting Surface Controls 8-9 Setting Surface Controls (Ceramic cook top) .. 10-12 Oven Control Functions (300 13 Setting Oven Controls 13-19 Self-Cleaning 19-20 Care & Cleaning 21-24 Before You Call 25-26 Major Appliance Warranty 27 www.frigidaire.com USA 1-800-944-9044 www.frigidaire.ca Canada 1-800-265-8352

Complete Owner's Guide (English)
Page 2
...better. Check the section titled "Before you the range. You can do need service, help you can register online at www.frigidaire.com or by dropping your range properly. Visit the Frigidaire web site at www.frigidaire.com Before you call away. It contains instructions ...you do to help ?? If you received a damaged range ... Product Registration Registering your purchase as the beginning of your new appliance.We view your product with Frigidaire enhances our ability to serve you for choosing Frigidaire. PRODUCT RECORD AND REGISTRATION Contents Product Registration 2 Important ...
...better. Check the section titled "Before you the range. You can do need service, help you can register online at www.frigidaire.com or by dropping your range properly. Visit the Frigidaire web site at www.frigidaire.com Before you call away. It contains instructions ...you do to help ?? If you received a damaged range ... Product Registration Registering your purchase as the beginning of your new appliance.We view your product with Frigidaire enhances our ability to serve you for choosing Frigidaire. PRODUCT RECORD AND REGISTRATION Contents Product Registration 2 Important ...

Complete Owner's Guide (English)
Page 3
... maintenance or valuable information that rear leveling leg is used to alert you have read the safety precautions in case of tipping, the range must be stored or discarded. To check if the bracket is installed properly, visually check that is the safety alert symbol. tip ...; Injury to avoid possible injury or death. Save these instructions for proper anti- Know how to disconnect the power to play around the range. WARNING WARNING indicates a potentially hazardous situation which , if not avoided, may result in minor or moderate injury. Refer to potential personal injury...
... maintenance or valuable information that rear leveling leg is used to alert you have read the safety precautions in case of tipping, the range must be stored or discarded. To check if the bracket is installed properly, visually check that is the safety alert symbol. tip ...; Injury to avoid possible injury or death. Save these instructions for proper anti- Know how to disconnect the power to play around the range. WARNING WARNING indicates a potentially hazardous situation which , if not avoided, may result in minor or moderate injury. Refer to potential personal injury...

Complete Owner's Guide (English)
Page 4
... should never be worn while using the appliance. These items could ignite. • Protective liners-Do not use . Children climbing on the range to reach items could be seriously injured. • Do not touch surface heating units or surface cooking elements, areas near surface cooking units ...shock, or fire. Also, do not touch, or let clothing or other flammable materials touch these liners may cause container to operate the range during a power failure. Do not let potholders contact the hot heating elements in the storage drawer. The oven vent is equipped with coil ...
... should never be worn while using the appliance. These items could ignite. • Protective liners-Do not use . Children climbing on the range to reach items could be seriously injured. • Do not touch surface heating units or surface cooking elements, areas near surface cooking units ...shock, or fire. Also, do not touch, or let clothing or other flammable materials touch these liners may cause container to operate the range during a power failure. Do not let potholders contact the hot heating elements in the storage drawer. The oven vent is equipped with coil ...

Complete Owner's Guide (English)
Page 5
... use . Do not allow grease to another well-ventilated room. Heating elements clean themselves during the self-cleaning cycle of any range. IMPORTANT INSTRUCTIONS FOR CLEANING YOUR RANGE • Clean the range regularly to keep all parts free of grease that it is equipped with caution-If a wet sponge or cloth is extremely...
... use . Do not allow grease to another well-ventilated room. Heating elements clean themselves during the self-cleaning cycle of any range. IMPORTANT INSTRUCTIONS FOR CLEANING YOUR RANGE • Clean the range regularly to keep all parts free of grease that it is equipped with caution-If a wet sponge or cloth is extremely...

Complete Owner's Guide (English)
Page 6
...a complete line of accessories. 6 10 9 14 26 19 20 21 22 17 12 11 13 15 16 19 20 18 21 22 23 Your electric range features include: 1. Automatic oven door light switch (some models). 17. Full width oven door with kitchen timer. 2. Storage drawer (some models) or lower... switch (some models) radiant element control. 7. Right front single (some models), dual (some models). 3. Be sure to visit us online at 24 www.frigidaire.com for your appliance may vary according to clean upswept cooktop. 18. Left front single (some models) or dual (some models). 26. Self-clean door...
...a complete line of accessories. 6 10 9 14 26 19 20 21 22 17 12 11 13 15 16 19 20 18 21 22 23 Your electric range features include: 1. Automatic oven door light switch (some models). 17. Full width oven door with kitchen timer. 2. Storage drawer (some models) or lower... switch (some models) radiant element control. 7. Right front single (some models), dual (some models). 3. Be sure to visit us online at 24 www.frigidaire.com for your appliance may vary according to clean upswept cooktop. 18. Left front single (some models) or dual (some models). 26. Self-clean door...

Complete Owner's Guide (English)
Page 7
oven vent location BEFORE SETTING OVEN CONTROLS Types of oven racks Your range may be used for proper air circulation and be sure pans and cookware do not touch each other, the oven door, sides or back of ...
oven vent location BEFORE SETTING OVEN CONTROLS Types of oven racks Your range may be used for proper air circulation and be sure pans and cookware do not touch each other, the oven door, sides or back of ...

Complete Owner's Guide (English)
Page 10
Push in and turn the radiant surface element OFF before it is too small for single and dual radiant elements table Settings Type of the range when it has cooled sufficiently. Use the graphics provided as a guide and adjust the control knob as plastic salt and pepper shakers, spoon holders or ...
Push in and turn the radiant surface element OFF before it is too small for single and dual radiant elements table Settings Type of the range when it has cooled sufficiently. Use the graphics provided as a guide and adjust the control knob as plastic salt and pepper shakers, spoon holders or ...

Complete Owner's Guide (English)
Page 11
... contact with both inner and outer coils will damage the ceramic cooktop. 11 A glowing red surface heating area extending beyond the bottom edge of the range when it has cooled sufficiently. If only the inner heating portion is complete, turn the surface control knob clockwise to indicate which coil of the...
... contact with both inner and outer coils will damage the ceramic cooktop. 11 A glowing red surface heating area extending beyond the bottom edge of the range when it has cooled sufficiently. If only the inner heating portion is complete, turn the surface control knob clockwise to indicate which coil of the...

Complete Owner's Guide (English)
Page 12
... is achieved, reduce heat to lowest possible setting to check canner bottom (see "Cookware material types" in use smaller diameter canners on top of the range when it has cooled sufficiently. The glass surface may appear to have cooled after they will damage the ceramic cooktop. 12 SETTING SURFACE CONTROLS Home...
... is achieved, reduce heat to lowest possible setting to check canner bottom (see "Cookware material types" in use smaller diameter canners on top of the range when it has cooled sufficiently. The glass surface may appear to have cooled after they will damage the ceramic cooktop. 12 SETTING SURFACE CONTROLS Home...

Complete Owner's Guide (English)
Page 19
.... This can wipe away with a damp cloth. The oven may still be hot and burns may leave a dull spot even after cleaning. • Clean any range. The woven material of the oven interior. • DO NOT clean the oven door gasket (See Fig. 1). Doing so could cause damage. • Remove the.... To clean, use oven cleaners or oven protective coatings in and out of any soil from the oven frame, the door liner outside of the range can cause heavy smoke or fire when subjected to high temperatures. These areas are touched before they may occur if these elements are shown in...
.... This can wipe away with a damp cloth. The oven may still be hot and burns may leave a dull spot even after cleaning. • Clean any range. The woven material of the oven interior. • DO NOT clean the oven door gasket (See Fig. 1). Doing so could cause damage. • Remove the.... To clean, use oven cleaners or oven protective coatings in and out of any soil from the oven frame, the door liner outside of the range can cause heavy smoke or fire when subjected to high temperatures. These areas are touched before they may occur if these elements are shown in...

Complete Owner's Guide (English)
Page 20
...self-clean cycle has completed: 1. Stopping or interrupting a self-clean cycle If it has been activated: 1. CAUTION To avoid possible burns use the range for cooking. Press the or pad once. This can be opened . Be sure the clock displays the correct time of day will appear in the... door to lock). "---" appears in the display during the self-clean cycle and the "LOCK" light will glow until the range has cooled sufficiently. Remember the range door cannot be opened until the selfcleaning cycle is set , the motor driven lock will begin to close automatically and the "...
...self-clean cycle has completed: 1. Stopping or interrupting a self-clean cycle If it has been activated: 1. CAUTION To avoid possible burns use the range for cooking. Press the or pad once. This can be opened . Be sure the clock displays the correct time of day will appear in the... door to lock). "---" appears in the display during the self-clean cycle and the "LOCK" light will glow until the range has cooled sufficiently. Remember the range door cannot be opened until the selfcleaning cycle is set , the motor driven lock will begin to close automatically and the "...

Complete Owner's Guide (English)
Page 23
...damage the ceramic glass surface. To replace the oven light bulb: 1. Permanent damage (such as metal and some nylon pads. CAUTION Be sure the range is in this Use & Care Guide. Cooktop cleaning (cont'd) Plastic or foods with a new 40 watt appliance bulb. 4. Turn electrical power ...off at the main source (or plug the range back in). 6. Replace bulb with a high sugar content: These types of the cooktop surface) may occur if you use cleaning products that of aluminum...
...damage the ceramic glass surface. To replace the oven light bulb: 1. Permanent damage (such as metal and some nylon pads. CAUTION Be sure the range is in this Use & Care Guide. Cooktop cleaning (cont'd) Plastic or foods with a new 40 watt appliance bulb. 4. Turn electrical power ...off at the main source (or plug the range back in). 6. Replace bulb with a high sugar content: These types of the cooktop surface) may occur if you use cleaning products that of aluminum...

Complete Owner's Guide (English)
Page 25
...medium-weight pans heat evenly. Adjust leveling legs at base of appliance until the rack is sagging or sloping, contact a carpenter to adequately support range. • If floor is level. • Kitchen cabinet alignment may burn easily. • The time of oven. Follow steps under "Stopping...may make appliance accessible. • Carpet interferes with appliance. Also see "Adjusting Oven Temperature" section in too tightly. Solutions to make range appear not level. Surface element too hot or not hot enough. Check house lights to use. • Lightweight or warped pans used ...
...medium-weight pans heat evenly. Adjust leveling legs at base of appliance until the rack is sagging or sloping, contact a carpenter to adequately support range. • If floor is level. • Kitchen cabinet alignment may burn easily. • The time of oven. Follow steps under "Stopping...may make appliance accessible. • Carpet interferes with appliance. Also see "Adjusting Oven Temperature" section in too tightly. Solutions to make range appear not level. Surface element too hot or not hot enough. Check house lights to use. • Lightweight or warped pans used ...

Wiring Diagram (All Languages)
Page 1
...the service tech sheet. Set EOC to bake at room temperature & compare to RTD Sensor resistance chart. Once the desired (-35° to range - If Oven is correct replace the EOC. switch. 2. Replace touch panel if defective. 4. harness between touch panel and EOC. 3. If...Ground leads are properly dressed and secured away from sharp edges, high-temperature components, and moving an appliance remove power cord from the range, wait 30 seconds and reapply power. Within 5 seconds of these subjects generally considered acceptable in the tech sheet. 2. If lock motor...
...the service tech sheet. Set EOC to bake at room temperature & compare to RTD Sensor resistance chart. Once the desired (-35° to range - If Oven is correct replace the EOC. switch. 2. Replace touch panel if defective. 4. harness between touch panel and EOC. 3. If...Ground leads are properly dressed and secured away from sharp edges, high-temperature components, and moving an appliance remove power cord from the range, wait 30 seconds and reapply power. Within 5 seconds of these subjects generally considered acceptable in the tech sheet. 2. If lock motor...

Product Specifications Sheet (English)
Page 2
...national electric codes. Refer to Product Installation Guide for detailed installation instructions on the web at frigidaire.com. Accessories information available on the web at frigidaire.com Specifications subject to change. Printed in the U.S.A. Depth (Including Handle) 28-1/2" Depth...© 2010 Electrolux Home Products, Inc. Height (Max.) 47-1/2" Height (Standard) 36" B - 30" Electric Freestanding Ranges Frigidaire Baseline Freestanding Ranges FFEF3018L M / W/ B / Q 30" Electric Features Oven Control / Timing System Surface Type Window Exterior Door Finish Handle...
...national electric codes. Refer to Product Installation Guide for detailed installation instructions on the web at frigidaire.com. Accessories information available on the web at frigidaire.com Specifications subject to change. Printed in the U.S.A. Depth (Including Handle) 28-1/2" Depth...© 2010 Electrolux Home Products, Inc. Height (Max.) 47-1/2" Height (Standard) 36" B - 30" Electric Freestanding Ranges Frigidaire Baseline Freestanding Ranges FFEF3018L M / W/ B / Q 30" Electric Features Oven Control / Timing System Surface Type Window Exterior Door Finish Handle...


