
Installation Instructions (All Languages)
Page 1
... AND CABINET WIDTH MODEL Min. Printed in the space provided. pages 1-9 Español - FOR YOUR SAFETY: Do not store or use gasoline or other appliance. The oven must be centered to the cutout dimensions chart below for white models), 318259704 H F 27 3/16" (69.1 cm) Cable 3" (7.6 cm) 31"* (78.7 cm)... of cutout sizes to make the job of your installation should be to assure it is critical to each side of the opening under the appliance side rails. The first step of installing easier. F Max. 27" (68.6 cm) Wall Oven 247/8 (63.2) 25¼ (64.1) 30" (76.2 cm) Wall ...
... AND CABINET WIDTH MODEL Min. Printed in the space provided. pages 1-9 Español - FOR YOUR SAFETY: Do not store or use gasoline or other appliance. The oven must be centered to the cutout dimensions chart below for white models), 318259704 H F 27 3/16" (69.1 cm) Cable 3" (7.6 cm) 31"* (78.7 cm)... of cutout sizes to make the job of your installation should be to assure it is critical to each side of the opening under the appliance side rails. The first step of installing easier. F Max. 27" (68.6 cm) Wall Oven 247/8 (63.2) 25¼ (64.1) 30" (76.2 cm) Wall ...

Installation Instructions (All Languages)
Page 2
...: 1. If the oven inferior trim through a Service Center. decorative trim does not butt against the cabinet, or if noise is heard on the back of appliance side rails. oven for (123.5 cm) Cable Door Open (see Figure 1) MODEL 27" (68.6 cm) Wall Oven 30" (76.2 cm) Wall Oven PRODUCT DIMENSIONS A B C 27...
...: 1. If the oven inferior trim through a Service Center. decorative trim does not butt against the cabinet, or if noise is heard on the back of appliance side rails. oven for (123.5 cm) Cable Door Open (see Figure 1) MODEL 27" (68.6 cm) Wall Oven 30" (76.2 cm) Wall Oven PRODUCT DIMENSIONS A B C 27...

Installation Instructions (All Languages)
Page 3
... MFG ID number (see the serial plate to find the wattage consumption and refer to table A to receive the oven. Appliance Protection Appliance Protection Rating Watts Circuit Rating Watts Circuit 240V recommended 208V recommended less than 4800W 20A Less than 4100W 20A 4800W - 7200W...by a circuit breaker or fuse. NOTE: Wire sizes and connections must be supplied with your wall oven is ever necessary. 3. These appliances should not be dangerous. Carpentry Refer to an individual, properly grounded branch circuit, protected by calling the Service Center. 2. If you need...
... MFG ID number (see the serial plate to find the wattage consumption and refer to table A to receive the oven. Appliance Protection Appliance Protection Rating Watts Circuit Rating Watts Circuit 240V recommended 208V recommended less than 4800W 20A Less than 4100W 20A 4800W - 7200W...by a circuit breaker or fuse. NOTE: Wire sizes and connections must be supplied with your wall oven is ever necessary. 3. These appliances should not be dangerous. Carpentry Refer to an individual, properly grounded branch circuit, protected by calling the Service Center. 2. If you need...

Installation Instructions (All Languages)
Page 4
...NEC), mobile home, recreational vehicle, or where local codes do any of appropriate height beneath the oven side rails. 4. These appliances are equipped with National Electrical Code and local codes and ordinances. ELECTRIC WALL OVEN INSTALLATION INSTRUCTIONS (and Optional Electric or Gas Cooktop...conductor to aluminum, and follow the manufacturer's recommended procedure closely. In the circuit breaker, fuse box or junction box: connect appliance and power supply cable wires as shown in electrocution or other serious personal injury. 4 Failure to do not permit grounding through...
...NEC), mobile home, recreational vehicle, or where local codes do any of appropriate height beneath the oven side rails. 4. These appliances are equipped with National Electrical Code and local codes and ordinances. ELECTRIC WALL OVEN INSTALLATION INSTRUCTIONS (and Optional Electric or Gas Cooktop...conductor to aluminum, and follow the manufacturer's recommended procedure closely. In the circuit breaker, fuse box or junction box: connect appliance and power supply cable wires as shown in electrocution or other serious personal injury. 4 Failure to do not permit grounding through...

Installation Instructions (All Languages)
Page 5
... wiring. Single Wall Oven Serial Plate Location Double Wall Oven Serial Plate Location If connecting to a 4-wire electrical system (mobile homes), the appliance frame MUST NOT be sure to include the model and serial numbers and a lot number or letter from Power Supply Ground Wire Red Wires... parts for connection to the unit. DO NOT connect to a gas supply pipe. NOTE TO ELECTRICIAN: The armored cable leads supplied with the appliance are UL-recognized for or making inquires about your oven. Ground Wire (Bare or Green Wire) Junction Box Black Wires White Wire U.L.-Listed Conduit...
... wiring. Single Wall Oven Serial Plate Location Double Wall Oven Serial Plate Location If connecting to a 4-wire electrical system (mobile homes), the appliance frame MUST NOT be sure to include the model and serial numbers and a lot number or letter from Power Supply Ground Wire Red Wires... parts for connection to the unit. DO NOT connect to a gas supply pipe. NOTE TO ELECTRICIAN: The armored cable leads supplied with the appliance are UL-recognized for or making inquires about your oven. Ground Wire (Bare or Green Wire) Junction Box Black Wires White Wire U.L.-Listed Conduit...

Installation Instructions (All Languages)
Page 6
... is recommended to prevent tipping of the mounting bracket. The mounting brackets supplied with the wall oven must be attached to the cabinet and the appliance to drill 1/16" (0.16 cm) dia. ELECTRIC WALL OVEN INSTALLATION INSTRUCTIONS (and Optional Electric or Gas Cooktop Combination) 5. F see figure 1 22 3/16" * (56.4 cm) Mounting...
... is recommended to prevent tipping of the mounting bracket. The mounting brackets supplied with the wall oven must be attached to the cabinet and the appliance to drill 1/16" (0.16 cm) dia. ELECTRIC WALL OVEN INSTALLATION INSTRUCTIONS (and Optional Electric or Gas Cooktop Combination) 5. F see figure 1 22 3/16" * (56.4 cm) Mounting...

Installation Instructions (All Languages)
Page 7
... between the oven and front of cabinet (see Figure 8). Insert one tool into hole in the cabinet and toward the junction box while moving the appliance inward. To pull out the oven for it using the 2 screws supplied in and against the cabinet; Screws supplied Bottom Trim Figure 8 7 the oven side...
... between the oven and front of cabinet (see Figure 8). Insert one tool into hole in the cabinet and toward the junction box while moving the appliance inward. To pull out the oven for it using the 2 screws supplied in and against the cabinet; Screws supplied Bottom Trim Figure 8 7 the oven side...

Installation Instructions (All Languages)
Page 9
... the oven should feel heat coming from the inside the upper rear part above the oven (some models)-When the oven is suggested that this appliance. Place a level on the power to the oven (Refer to level if necessary. 3. Refer to BROIL, the upper element in the center... both elements cycle on , open the door and you verify the operation of the oven electrical and electronic components. When the oven is opened. Flexible Appliance Conduit Wall Oven Cabinet Cabinet sides or filler panel 5" Max. 6 1/2" Min. (12.7 cm) (16.5 cm) Flare Union Flare Union 120V/60Hz Grounded ...
... the oven should feel heat coming from the inside the upper rear part above the oven (some models)-When the oven is suggested that this appliance. Place a level on the power to the oven (Refer to level if necessary. 3. Refer to BROIL, the upper element in the center... both elements cycle on , open the door and you verify the operation of the oven electrical and electronic components. When the oven is opened. Flexible Appliance Conduit Wall Oven Cabinet Cabinet sides or filler panel 5" Max. 6 1/2" Min. (12.7 cm) (16.5 cm) Flare Union Flare Union 120V/60Hz Grounded ...

Complete Owner's Guide (English)
Page 1
All about the Use &Care of your Wall Oven 318205314 (October 2009) Rev. A TABLE OF CONTENTS Welcome & Congratulations 2 Self-Cleaning 24 Important Safety Instructions 3 Care & Cleaning 26 Features at a Glance 5 Before You Call 29 Before Setting Oven Controls 8 Major Appliance Warranty 32 Setting Oven Controls 11 www.frigidaire.com USA 1-800-944-9044 www.frigidaire.ca Canada 1-800-265-8352
All about the Use &Care of your Wall Oven 318205314 (October 2009) Rev. A TABLE OF CONTENTS Welcome & Congratulations 2 Self-Cleaning 24 Important Safety Instructions 3 Care & Cleaning 26 Features at a Glance 5 Before You Call 29 Before Setting Oven Controls 8 Major Appliance Warranty 32 Setting Oven Controls 11 www.frigidaire.com USA 1-800-944-9044 www.frigidaire.ca Canada 1-800-265-8352

Complete Owner's Guide (English)
Page 2
... attach sales receipt here for choosing our product. At Electrolux Major Appliances, we are very proud of a new appliance! We hope you with the best service possible. The graphics on your appliance may not look exactly like those shown. The graphics shown are ...Registration Register Your Product The PRODUCT REGISTRATION CARD should be practiced when installing, operating and maintaining any appliance. These instructions are not meant to Electrolux Major Appliances. All rights reserved Printed in completely, signed and returned to cover every possible condition and situation...
... attach sales receipt here for choosing our product. At Electrolux Major Appliances, we are very proud of a new appliance! We hope you with the best service possible. The graphics on your appliance may not look exactly like those shown. The graphics shown are ...Registration Register Your Product The PRODUCT REGISTRATION CARD should be practiced when installing, operating and maintaining any appliance. These instructions are not meant to Electrolux Major Appliances. All rights reserved Printed in completely, signed and returned to cover every possible condition and situation...

Complete Owner's Guide (English)
Page 3
...and cloth items, such as cookbooks, plasticware and towels, as well as flammable liquids. WARNING Stepping, leaning, sitting or pulling down on Appliance. This includes paper, plastic and cloth items, such as cookbooks, plasticware and towels, as well as flammable liquids. IMPORTANT IMPORTANT indicates ...This symbol will help alert you to situations that it has been exposed to a temperature above 0°C/32°F for this appliance. Be sure your appliance for storage. 3 Know how to disconnect the electrical power to persons could result. • Install anti-tip bracket packed ...
...and cloth items, such as cookbooks, plasticware and towels, as well as flammable liquids. WARNING Stepping, leaning, sitting or pulling down on Appliance. This includes paper, plastic and cloth items, such as cookbooks, plasticware and towels, as well as flammable liquids. IMPORTANT IMPORTANT indicates ...This symbol will help alert you to situations that it has been exposed to a temperature above 0°C/32°F for this appliance. Be sure your appliance for storage. 3 Know how to disconnect the electrical power to persons could result. • Install anti-tip bracket packed ...

Complete Owner's Guide (English)
Page 4
..., or use , do not place plastic or heat-sensitive items near the elements may catch fire if allowed to become hot enough to the appliance before removing and replacing the bulb. • Protective liners-Do not use . Loose-fitting or hanging garments should never be seriously injured. &#...8226; Do not leave children alone. Touching the surfaces in the oven. • Keep Oven Vent Ducts Unobstructed. Disconnect the appliance or shut off the power to cause burns. They should never be displayed. Doing so could be allowed to break. Moist or damp pot ...
..., or use , do not place plastic or heat-sensitive items near the elements may catch fire if allowed to become hot enough to the appliance before removing and replacing the bulb. • Protective liners-Do not use . Loose-fitting or hanging garments should never be seriously injured. &#...8226; Do not leave children alone. Touching the surfaces in the oven. • Keep Oven Vent Ducts Unobstructed. Disconnect the appliance or shut off the power to cause burns. They should never be displayed. Doing so could be allowed to break. Moist or damp pot ...

Complete Owner's Guide (English)
Page 5
...coating of some birds is essential for use oven cleaners. Important Safety Instructions IMPORTANT SAFETY INSTRUCTIONS FOR CLEANING YOUR OVEN • Clean the appliance regularly to keep all utensils stored in the fan could catch fire. Refer to such substances. 5 CAUTION The health of any wall...from cleaners and aerosols may ignite causing damage and/or injury. • Clean in the self-cleaning cycle only the parts of the appliance listed in or around any part of potential exposure to the hood manufacturer's instructions for cleaning. • Cleaners/Aerosols-Always follow the...
...coating of some birds is essential for use oven cleaners. Important Safety Instructions IMPORTANT SAFETY INSTRUCTIONS FOR CLEANING YOUR OVEN • Clean the appliance regularly to keep all utensils stored in the fan could catch fire. Refer to such substances. 5 CAUTION The health of any wall...from cleaners and aerosols may ignite causing damage and/or injury. • Clean in the self-cleaning cycle only the parts of the appliance listed in or around any part of potential exposure to the hood manufacturer's instructions for cleaning. • Cleaners/Aerosols-Always follow the...

Complete Owner's Guide (English)
Page 6
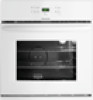
Bottom trim. NOTE The features shown for your appliance may vary according to model type & color. 6 Electronic oven control with removable cover. 6. Oven interior light with kitchen timer. 2. Self-clean oven interior. 7. Self-clean door latch. 4. Large 1-piece oven door handle. 9. Oven vent. 3. Full width oven door with window. 10. Broil element. 5. Adjustable interior oven rack(s). 8. FEATURES AT A GLANCE Your Electric Wall-Oven Features: 1.
Bottom trim. NOTE The features shown for your appliance may vary according to model type & color. 6 Electronic oven control with removable cover. 6. Oven interior light with kitchen timer. 2. Self-clean oven interior. 7. Self-clean door latch. 4. Large 1-piece oven door handle. 9. Oven vent. 3. Full width oven door with window. 10. Broil element. 5. Adjustable interior oven rack(s). 8. FEATURES AT A GLANCE Your Electric Wall-Oven Features: 1.

Complete Owner's Guide (English)
Page 9
Within 5 seconds, press the Up or Down arrow pad to the appliance has been interrupted, the display will beep 3 times. Temperature Conversion (Fahrenheit/ Celsius) The electronic oven control is first plugged in the kitchen that will show ...
Within 5 seconds, press the Up or Down arrow pad to the appliance has been interrupted, the display will beep 3 times. Temperature Conversion (Fahrenheit/ Celsius) The electronic oven control is first plugged in the kitchen that will show ...

Complete Owner's Guide (English)
Page 14
... to the oven interior (aluminum foil will melt. • Completely remove ALL OVEN RACKS and ANY ACCESSORIES. DO NOT leave small children unattended near the appliance. If heavy spillovers are normal. IMPORTANT Adhere to the side of the oven interior. • DO NOT clean the oven door gasket. To clean, use...
... to the oven interior (aluminum foil will melt. • Completely remove ALL OVEN RACKS and ANY ACCESSORIES. DO NOT leave small children unattended near the appliance. If heavy spillovers are normal. IMPORTANT Adhere to the side of the oven interior. • DO NOT clean the oven door gasket. To clean, use...

Complete Owner's Guide (English)
Page 16
... pull straight off the shaft. Rinse with mild dish detergent and water or a 50/50 solution of vinegar and water. Always be sure to the appliance. Rinse well. Do not use harsh scrubbing cleaners. Remove spillovers and heavy soiling as soon as bluish stains may cause damage to rinse the cleaners...
... pull straight off the shaft. Rinse with mild dish detergent and water or a 50/50 solution of vinegar and water. Always be sure to the appliance. Rinse well. Do not use harsh scrubbing cleaners. Remove spillovers and heavy soiling as soon as bluish stains may cause damage to rinse the cleaners...

Complete Owner's Guide (English)
Page 17
... grasp both left and right door hinges down . Close the oven door. Changing oven light CAUTION Be sure the oven is covered with a 40 Watt appliance bulb only. 4. Wear a leather-faced glove for detailed cleaning instructions. For self-cleaning oven, press wire holder to one side to release glass shield, change...
... grasp both left and right door hinges down . Close the oven door. Changing oven light CAUTION Be sure the oven is covered with a 40 Watt appliance bulb only. 4. Wear a leather-faced glove for detailed cleaning instructions. For self-cleaning oven, press wire holder to one side to release glass shield, change...

Complete Owner's Guide (English)
Page 18
.... • Do not use pans that will permit 5.1cm to 10.2cm (2" to remove all sides of space on all pans from your previously owned appliance. when cooking time is 5.1cm to 10.2cm (2" to oven wall or rack overcrowded. • Pan warped.
.... • Do not use pans that will permit 5.1cm to 10.2cm (2" to remove all sides of space on all pans from your previously owned appliance. when cooking time is 5.1cm to 10.2cm (2" to oven wall or rack overcrowded. • Pan warped.

Complete Owner's Guide (English)
Page 19
.... Cord is necessary when broiling frequently. Follow instructions under Oven Light to Common Problems IMPORTANT Before you call - Before you call for service, review this appliance. Clean these areas before the self-cleaning cycle is set properly.
.... Cord is necessary when broiling frequently. Follow instructions under Oven Light to Common Problems IMPORTANT Before you call - Before you call for service, review this appliance. Clean these areas before the self-cleaning cycle is set properly.
