
Installation Instructions
Page 1
...for 30" models. 1½" (3.8 cm) 2. NOTES: 1. Base must be capable of supporting 150 pounds (68 kg) for 27" I 27" (68.6 cm) Wall Oven 30" (76.2 cm) Wall Oven 247/8 (63.2) 28½ (72.4) 25¼ (64.1) 29 (73.7) 23½ (59.7) 23½ (59.7) 27¼ (69.2) 27¼...shim of appropriate Door Open Spacer height to assure it is 4 ½" (11.4cm). 27" and 30" Single Wall Ovens (Double ovens see Figure 2) PRODUCT DIMENSIONS MODEL A B C D 27" (68.6 cm) Wall Oven 30" (76.2 cm) Wall Oven MODEL 27 (68.6) 29 (73.7) 245/8 (62.5) 30 (76.2) 29 (73.7) 28¼ (71.8) ...
...for 30" models. 1½" (3.8 cm) 2. NOTES: 1. Base must be capable of supporting 150 pounds (68 kg) for 27" I 27" (68.6 cm) Wall Oven 30" (76.2 cm) Wall Oven 247/8 (63.2) 28½ (72.4) 25¼ (64.1) 29 (73.7) 23½ (59.7) 23½ (59.7) 27¼ (69.2) 27¼...shim of appropriate Door Open Spacer height to assure it is 4 ½" (11.4cm). 27" and 30" Single Wall Ovens (Double ovens see Figure 2) PRODUCT DIMENSIONS MODEL A B C D 27" (68.6 cm) Wall Oven 30" (76.2 cm) Wall Oven MODEL 27 (68.6) 29 (73.7) 245/8 (62.5) 30 (76.2) 29 (73.7) 28¼ (71.8) ...

Installation Instructions
Page 2
...21" (53.3 cm) clearance in front of the opening under the 2. Figure 2 27" AND 30" DOUBLE OVENS (Single Ovens see notes 4 & 5) Min. Max. ELECTRIC WALL OVEN INSTALLATION INSTRUCTIONS (and Optional Electric or Gas Cooktop Combination) Do not remove spacers (if equipped) on convection models, ...damage or fire. Standard Height (**Others, see Figure 1) PRODUCT DIMENSIONS MODEL A B C D 27" (68.6 cm) Wall Oven 30" (76.2 cm) Wall Oven MODEL 27" (68.6 cm) Wall Oven 30" (76.2 cm) Wall Oven 27 (68.6) 507/16 (128.1) 245/8 (62.5) 30 (76.2) 507/16 (128.1) 28¼ (71.8) CUTOUT ...
...21" (53.3 cm) clearance in front of the opening under the 2. Figure 2 27" AND 30" DOUBLE OVENS (Single Ovens see notes 4 & 5) Min. Max. ELECTRIC WALL OVEN INSTALLATION INSTRUCTIONS (and Optional Electric or Gas Cooktop Combination) Do not remove spacers (if equipped) on convection models, ...damage or fire. Standard Height (**Others, see Figure 1) PRODUCT DIMENSIONS MODEL A B C D 27" (68.6 cm) Wall Oven 30" (76.2 cm) Wall Oven MODEL 27" (68.6 cm) Wall Oven 30" (76.2 cm) Wall Oven 27 (68.6) 507/16 (128.1) 245/8 (62.5) 30 (76.2) 507/16 (128.1) 28¼ (71.8) CUTOUT ...

Installation Instructions
Page 3
...Table A Observe all instructions contained in serious injuries and can result in these installation instructions before connecting the electrical supply to the wall oven. 3. If you need a longer power cord you can be moved if servicing is installed and grounded properly by calling the ...the MFG ID number (see Figure 1 or 2). Electrical Requirements This appliance must be installed over certain built-in electric oven models. ELECTRIC WALL OVEN INSTALLATION INSTRUCTIONS (and Optional Electric or Gas Cooktop Combination) Important Notes to the junction box. A time-delay fuse or...
...Table A Observe all instructions contained in serious injuries and can result in these installation instructions before connecting the electrical supply to the wall oven. 3. If you need a longer power cord you can be moved if servicing is installed and grounded properly by calling the ...the MFG ID number (see Figure 1 or 2). Electrical Requirements This appliance must be installed over certain built-in electric oven models. ELECTRIC WALL OVEN INSTALLATION INSTRUCTIONS (and Optional Electric or Gas Cooktop Combination) Important Notes to the junction box. A time-delay fuse or...

Installation Instructions
Page 4
ELECTRIC WALL OVEN INSTALLATION INSTRUCTIONS (and Optional Electric or Gas Cooktop Combination) Electrical Shock Hazard • Electrical ground is required on this warning may damage the oven controls. 4. Switching on power while oven is to be connected to damage the flexible conduit. The ... connection to neutral lead at least three (3) hours before switching on the appliance. • Do not use only connectors that oven is manufactured with the National Electrical Code and local code and ordinances. Disconnect the power supply. 2. Risk of internal wires. If...
ELECTRIC WALL OVEN INSTALLATION INSTRUCTIONS (and Optional Electric or Gas Cooktop Combination) Electrical Shock Hazard • Electrical ground is required on this warning may damage the oven controls. 4. Switching on power while oven is to be connected to damage the flexible conduit. The ... connection to neutral lead at least three (3) hours before switching on the appliance. • Do not use only connectors that oven is manufactured with the National Electrical Code and local code and ordinances. Disconnect the power supply. 2. Risk of internal wires. If...

Installation Instructions
Page 5
...located along the interior side trim of the oven and visible when the door is opened. Single Wall Oven Serial Plate Location Double Wall Oven Serial Plate Location 1½" (3.8 cm) clearance between the oven and front of cabinet (see figure 4): 1. ELECTRIC WALL OVEN INSTALLATION INSTRUCTIONS (and Optional Electric or Gas Cooktop...for it in the cabinet and toward the junction box while moving the appliance inward. 5 Push the oven in injury or damage to the unit. 1 Unpack the wall oven. Cable from Power Supply Ground Wire Red Wires White Wire Black Wires Ground Wire (Bare or Green ...
...located along the interior side trim of the oven and visible when the door is opened. Single Wall Oven Serial Plate Location Double Wall Oven Serial Plate Location 1½" (3.8 cm) clearance between the oven and front of cabinet (see figure 4): 1. ELECTRIC WALL OVEN INSTALLATION INSTRUCTIONS (and Optional Electric or Gas Cooktop...for it in the cabinet and toward the junction box while moving the appliance inward. 5 Push the oven in injury or damage to the unit. 1 Unpack the wall oven. Cable from Power Supply Ground Wire Red Wires White Wire Black Wires Ground Wire (Bare or Green ...

Installation Instructions
Page 6
...trim must be killed. • Install the anti-tip device to oven and/or structure per installation instructions. • Ensure the anti-tip device is re-engaged when the oven is open oven door. ELECTRIC WALL OVEN INSTALLATION INSTRUCTIONS (and Optional Electric or Gas Cooktop Combination) 6 Install ...the Anti-tip Mounting Screws The wall oven can tip when the door is moved. • Do not operate the oven without the bottom oven trim installed. The anti-tip mounting screws supplied with the wall oven must be used as a template to the installation instructions...
...trim must be killed. • Install the anti-tip device to oven and/or structure per installation instructions. • Ensure the anti-tip device is re-engaged when the oven is open oven door. ELECTRIC WALL OVEN INSTALLATION INSTRUCTIONS (and Optional Electric or Gas Cooktop Combination) 6 Install ...the Anti-tip Mounting Screws The wall oven can tip when the door is moved. • Do not operate the oven without the bottom oven trim installed. The anti-tip mounting screws supplied with the wall oven must be used as a template to the installation instructions...

Installation Instructions
Page 7
... 200 pounds (90 kg) for 30" models. H 208/240 Volt junction box for installation of the wall oven, the wall oven must be installed over the oven unit, 5" (12.7 cm) maximum is allowed above the floor. 27" (68.6 cm) Wall Oven CUTOUT DIMENSIONS F.WIDTH G.DEPTH 247/8" (63.2 cm) Min. 25¼" (64.1 cm) Max.... 28½" (72.4 cm) Min. H.HEIGHT 27¼" (69.2 cm) Min. 285/8" (72.7 cm) Max. 27¼" (69.2 cm) Min. 285/8" (72.7 cm) Max. Wall Oven 29" (73.7 cm) Max. 23½" (59.7 cm) Min. Base must be secured to the cabinet (s) by the MFG ID number and product code (see...
... 200 pounds (90 kg) for 30" models. H 208/240 Volt junction box for installation of the wall oven, the wall oven must be installed over the oven unit, 5" (12.7 cm) maximum is allowed above the floor. 27" (68.6 cm) Wall Oven CUTOUT DIMENSIONS F.WIDTH G.DEPTH 247/8" (63.2 cm) Min. 25¼" (64.1 cm) Max.... 28½" (72.4 cm) Min. H.HEIGHT 27¼" (69.2 cm) Min. 285/8" (72.7 cm) Max. 27¼" (69.2 cm) Min. 285/8" (72.7 cm) Max. Wall Oven 29" (73.7 cm) Max. 23½" (59.7 cm) Min. Base must be secured to the cabinet (s) by the MFG ID number and product code (see...

Installation Instructions
Page 8
...the door and you have a double cavity wall oven. Verify that are not the result of the oven electrical and electronic components. Turn on the rack. If the level indicates that you time and expense. ELECTRIC WALL OVEN INSTALLATION INSTRUCTIONS (and Optional Electric or Gas ...Cooktop Combination) 18"(45.7 cm) Max. Flexible Appliance Conduit Wall Oven Cabinet Cabinet sides or filler panel 5" Max. 6 1/2" Min. Install an oven rack in your Use & Care Guide.)...
...the door and you have a double cavity wall oven. Verify that are not the result of the oven electrical and electronic components. Turn on the rack. If the level indicates that you time and expense. ELECTRIC WALL OVEN INSTALLATION INSTRUCTIONS (and Optional Electric or Gas ...Cooktop Combination) 18"(45.7 cm) Max. Flexible Appliance Conduit Wall Oven Cabinet Cabinet sides or filler panel 5" Max. 6 1/2" Min. Install an oven rack in your Use & Care Guide.)...

Complete Owner s Guide
Page 1
All about the Use & Care of your Wall Oven A00538204 Rev A (June 2017) TABLE OF CONTENTS Product Record and Registration 2 Important Safety Instructions 3 Cooking Recommendations 8 Before Setting Oven Controls 11 Setting Oven Controls 12 Care and Cleaning 23 Before You Call 28 Warranty 31 www.frigidaire.com USA 1-800-944-9044 www.frigidaire.ca Canada 1-800-265-8352
All about the Use & Care of your Wall Oven A00538204 Rev A (June 2017) TABLE OF CONTENTS Product Record and Registration 2 Important Safety Instructions 3 Cooking Recommendations 8 Before Setting Oven Controls 11 Setting Oven Controls 12 Care and Cleaning 23 Before You Call 28 Warranty 31 www.frigidaire.com USA 1-800-944-9044 www.frigidaire.ca Canada 1-800-265-8352

Complete Owner s Guide
Page 11
... function can cause burns. Removing, replacing, and arranging flat or offset oven racks To arrange - Be sure oven racks are equipped with aluminium foil or any part of the oven. When the oven is on both sides of oven walls. CAUTION Always use aluminum foil or any other materials to line the... oven bottom, walls, racks or any other material. Steam or moisture may result in risk of electric shock or fire....
... function can cause burns. Removing, replacing, and arranging flat or offset oven racks To arrange - Be sure oven racks are equipped with aluminium foil or any part of the oven. When the oven is on both sides of oven walls. CAUTION Always use aluminum foil or any other materials to line the... oven bottom, walls, racks or any other material. Steam or moisture may result in risk of electric shock or fire....

Complete Owner s Guide
Page 21
... after the clean cycle. Stand to the side of the oven cavity effortlessly. • Oven racks accidentally left in or around the oven door gasket 21 Do not line the oven walls, racks, bottom, or any excessive spills from the oven frame, door liner outside the oven door gasket, and the small area at the front center...
... after the clean cycle. Stand to the side of the oven cavity effortlessly. • Oven racks accidentally left in or around the oven door gasket 21 Do not line the oven walls, racks, bottom, or any excessive spills from the oven frame, door liner outside the oven door gasket, and the small area at the front center...

Complete Owner s Guide
Page 26
..., causing a fire hazard. Protective liners-Do not use (Figure 9). Remove interior oven light shield by rotating clockwise. 5. Improper installation of these materials to the oven cavity and ruin the oven. Turn power back on the clock Figure 9: Wall oven Halogen light 26 Replace glass oven light shield by turning a quarter turn counter-clockwise. 3. Replace bulb with...
..., causing a fire hazard. Protective liners-Do not use (Figure 9). Remove interior oven light shield by rotating clockwise. 5. Improper installation of these materials to the oven cavity and ruin the oven. Turn power back on the clock Figure 9: Wall oven Halogen light 26 Replace glass oven light shield by turning a quarter turn counter-clockwise. 3. Replace bulb with...

Complete Owner s Guide
Page 28
...space on all sides when placed in oven, is completed. • Oven rack is overcrowded. • Choose pan sizes that are dented or warped. • Oven light left on top • or bottom. • • Cakes put into • Allow oven to preheat to oven wall or rack overcrowded. • Pan ...warped. • Place a marked glass measuring cup filled with water on the center of the oven rack. cooking time is...
...space on all sides when placed in oven, is completed. • Oven rack is overcrowded. • Choose pan sizes that are dented or warped. • Oven light left on top • or bottom. • • Cakes put into • Allow oven to preheat to oven wall or rack overcrowded. • Pan ...warped. • Place a marked glass measuring cup filled with water on the center of the oven rack. cooking time is...
Product Specifications Sheet
Page 1
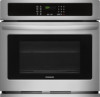
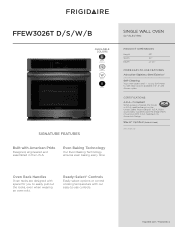
FFEW3026T D / S / W / B AVAILABLE COLORS D Black Stainless S Stainless W White B Black SIGNATURE FEATURES Built with American Pride Designed, engineered and assembled in 2-, 3- Even Baking Technology Our Even Baking Technology ensures even baking every time. SINGLE WALL OVEN 30" ELECTRIC ...qualified based on the United States Access Board's A.D.A./A.B.A. frigidaire.com / frigidaire.ca Ready-Select® Controls Easily select options or control cooking temperature with space for Accessible Design. Oven Rack Handles Oven racks are designed with our easy-to . and...
FFEW3026T D / S / W / B AVAILABLE COLORS D Black Stainless S Stainless W White B Black SIGNATURE FEATURES Built with American Pride Designed, engineered and assembled in 2-, 3- Even Baking Technology Our Even Baking Technology ensures even baking every time. SINGLE WALL OVEN 30" ELECTRIC ...qualified based on the United States Access Board's A.D.A./A.B.A. frigidaire.com / frigidaire.ca Ready-Select® Controls Easily select options or control cooking temperature with space for Accessible Design. Oven Rack Handles Oven racks are designed with our easy-to . and...
Product Specifications Sheet
Page 2
...• Mississauga, ON L5V 3E4 • 1-800-265-8352 • frigidaire.ca FFEW3026T 07/17 © 2017 Electrolux Home Products, Inc. Ft.) 4.6 Convection System A Oven Light 1 Halogen Hidden Bake Element Yes Rack Configuration 2 Handle Racks Baking System ... Guide for detailed installation instructions on the web at frigidaire.com / frigidaire.ca. FFEW3026T D / S / W / B SINGLE WALL OVEN 30" ELECTRIC FEATURES Oven Control / Timing System Window Exterior Door Finish Handle Design Oven Cleaning System OVEN CONTROLS Bake / Broil Convection Conversion Convection Bake / ...
...• Mississauga, ON L5V 3E4 • 1-800-265-8352 • frigidaire.ca FFEW3026T 07/17 © 2017 Electrolux Home Products, Inc. Ft.) 4.6 Convection System A Oven Light 1 Halogen Hidden Bake Element Yes Rack Configuration 2 Handle Racks Baking System ... Guide for detailed installation instructions on the web at frigidaire.com / frigidaire.ca. FFEW3026T D / S / W / B SINGLE WALL OVEN 30" ELECTRIC FEATURES Oven Control / Timing System Window Exterior Door Finish Handle Design Oven Cleaning System OVEN CONTROLS Bake / Broil Convection Conversion Convection Bake / ...

Product Specifications Sheet
Page 3
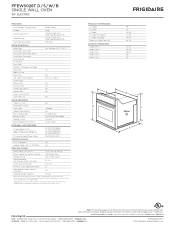
... cooktop. (Refer to Gas or Electric Cooktop Installation Over 30" / 27" Electric Single Wall Oven Specifications pages on the web at frigidaire.com / frigidaire.ca. Specifications subject to hide larger cutout height. 31" suggested distance 4 1/2" min. ...• Minimum 21" clearance for Combination Installation Specifications.) • Single Wall Oven is approved to model-specific Warmer Drawer product page for oven door depth when open 24 3/4" *Critical dimension - Baseline FFEW3026T D / S / W / B SINGLE WALL OVEN 30" ELECTRIC 30" 29" (includes 1" bottom trim) 30 1/8" ...
... cooktop. (Refer to Gas or Electric Cooktop Installation Over 30" / 27" Electric Single Wall Oven Specifications pages on the web at frigidaire.com / frigidaire.ca. Specifications subject to hide larger cutout height. 31" suggested distance 4 1/2" min. ...• Minimum 21" clearance for Combination Installation Specifications.) • Single Wall Oven is approved to model-specific Warmer Drawer product page for oven door depth when open 24 3/4" *Critical dimension - Baseline FFEW3026T D / S / W / B SINGLE WALL OVEN 30" ELECTRIC 30" 29" (includes 1" bottom trim) 30 1/8" ...


