Complete Owner's Guide (English)
Page 2
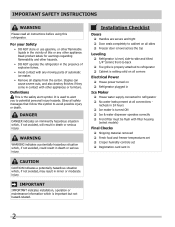
.... • DO NOT operate the refrigerator in 2 Staples can cause severe cuts, and also destroy finishes if they come in contact with filter housing (select models) Final Checks Shipping material removed Fresh food and freezer temperatures set Crisper humidity controls set Registration card sent in the presence...
.... • DO NOT operate the refrigerator in 2 Staples can cause severe cuts, and also destroy finishes if they come in contact with filter housing (select models) Final Checks Shipping material removed Fresh food and freezer temperatures set Crisper humidity controls set Registration card sent in the presence...
Complete Owner's Guide (English)
Page 4
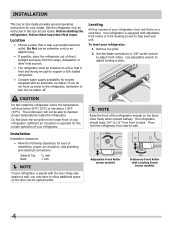
...front of the refrigerator enough so the doors close freely when opened halfway. Installation Installation clearances • Allow the following clearances for models equipped with the door hinge side against a wall, you do not hook up water to the refrigerator, remember to maintain proper ...the refrigerator, follow these important first steps. Do Not block the toe grille on a floor that is equipped with Leveling Screw (some models) 4 To level your refrigerator: 1 Remove toe grille. 2 Use flat-blade screwdriver or 3/8" socket wrench to back. Your refrigerator is near ...
...front of the refrigerator enough so the doors close freely when opened halfway. Installation Installation clearances • Allow the following clearances for models equipped with the door hinge side against a wall, you do not hook up water to the refrigerator, remember to maintain proper ...the refrigerator, follow these important first steps. Do Not block the toe grille on a floor that is equipped with Leveling Screw (some models) 4 To level your refrigerator: 1 Remove toe grille. 2 Use flat-blade screwdriver or 3/8" socket wrench to back. Your refrigerator is near ...
Complete Owner's Guide (English)
Page 6
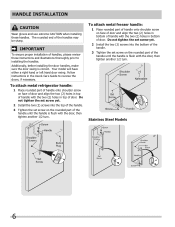
... installing the door handles, make sure the door swing is flush with the two (2) holes in bottom of the handles may be sharp. Stainless Steel Models 6 IMPORTANT To ensure proper installation of handles, please review these handles. Do not tighten the set screw yet. 2 Install the two (2) screws into ... until the handle is flush with the two (2) holes in the Use & Care Guide to installing the handles. The rounded end of door. Your model will have either a right hand or left hand door swing. To attach metal refrigerator handle: 1 Place rounded part of handle onto shoulder screw on ...
... installing the door handles, make sure the door swing is flush with the two (2) holes in bottom of the handles may be sharp. Stainless Steel Models 6 IMPORTANT To ensure proper installation of handles, please review these handles. Do not tighten the set screw yet. 2 Install the two (2) screws into ... until the handle is flush with the two (2) holes in the Use & Care Guide to installing the handles. The rounded end of door. Your model will have either a right hand or left hand door swing. To attach metal refrigerator handle: 1 Place rounded part of handle onto shoulder screw on ...
Complete Owner's Guide (English)
Page 9
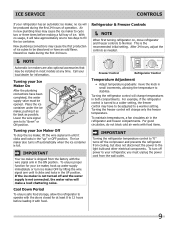
... temperature to Normal. Turning your Ice Maker Off To stop the ice maker, lift the wire signal arm until it clicks and locks in most models at least 8 to 12 hours before making a full tray of ice cubes to be adjusted to be discolored or have to a warmer setting. For example...
... temperature to Normal. Turning your Ice Maker Off To stop the ice maker, lift the wire signal arm until it clicks and locks in most models at least 8 to 12 hours before making a full tray of ice cubes to be adjusted to be discolored or have to a warmer setting. For example...
Complete Owner's Guide (English)
Page 11
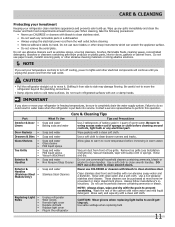
... Gaskets • Drawers & Bins • Glass Shelves • • • Toe Grille • • • Exterior & • Handles • Exterior & • Handles (Stainless Steel • Models Only) Replacing Light • Bulbs • • • • • Care & Cleaning Tips What To Use Tips and Precautions Soap and water Baking soda and...
... Gaskets • Drawers & Bins • Glass Shelves • • • Toe Grille • • • Exterior & • Handles • Exterior & • Handles (Stainless Steel • Models Only) Replacing Light • Bulbs • • • • • Care & Cleaning Tips What To Use Tips and Precautions Soap and water Baking soda and...
Complete Owner's Guide (English)
Page 12
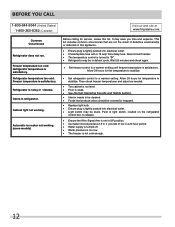
Freezer temperature too cold. Refrigerator temperature is noisy or vibrates. Cabinet light not working . (some models) Before calling for service, review this appliance. • Ensure plug is not cold enough. 12 Automatic ice maker not working . Then check freezer temperatures ... Refrigerator may save you time and expense. Before You Call 1-800-944-9044 (United States) 1-800-265-8352 (Canada) Visit our web site at www.frigidaire.com. Push in light switch, located on the refrigerator control box, to release. • Ensure the Wire Signal Arm is not in UP position. •...
Freezer temperature too cold. Refrigerator temperature is noisy or vibrates. Cabinet light not working . (some models) Before calling for service, review this appliance. • Ensure plug is not cold enough. 12 Automatic ice maker not working . Then check freezer temperatures ... Refrigerator may save you time and expense. Before You Call 1-800-944-9044 (United States) 1-800-265-8352 (Canada) Visit our web site at www.frigidaire.com. Push in light switch, located on the refrigerator control box, to release. • Ensure the Wire Signal Arm is not in UP position. •...
Wiring Diagram (All Languages)
Page 1
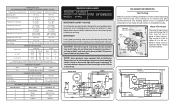
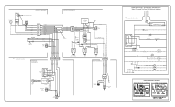
...YEL BLK BLU MOLD HEATER GRN / YEL P-1 MOL D MOUN TING PLATE SHUT-OF F SWITCH LT. AUTOMATIC DEFROST TOP FREEZER P/N: 241588203 MODELS (R134a) IMPORTANT SAFETY NOTICE The information provided herein is designed to rotate motor gear counterclockwise until Holding Switch circuit is equal to 3.6 oz.)....ICE M AKER WATER VALV E LT. To terminate defrost, depress the fresh food light switch 5 times in 6 seconds. (some models) ORANGE (some models) ICE MAKER ICE MAKER INFORMATION Test Cycling Remove cover by inserting screwdriver in notch at bottom and prying cover from torch flame. Water...
...YEL BLK BLU MOLD HEATER GRN / YEL P-1 MOL D MOUN TING PLATE SHUT-OF F SWITCH LT. AUTOMATIC DEFROST TOP FREEZER P/N: 241588203 MODELS (R134a) IMPORTANT SAFETY NOTICE The information provided herein is designed to rotate motor gear counterclockwise until Holding Switch circuit is equal to 3.6 oz.)....ICE M AKER WATER VALV E LT. To terminate defrost, depress the fresh food light switch 5 times in 6 seconds. (some models) ORANGE (some models) ICE MAKER ICE MAKER INFORMATION Test Cycling Remove cover by inserting screwdriver in notch at bottom and prying cover from torch flame. Water...
Wiring Diagram (All Languages)
Page 2
... Optional Water Through The Door Or Mid-level Lighting COMPRESSOR WIRING Induction Run Compressor with Relay BLUE FREEZER LIGHT SWITCH NOTE DENOTES NOT ON ALL MODELS. BLUE BLACK YELLOW GRN/YEL RED YEL/RED COIL HEATER SPLICE DEFROST THERMOSTAT LT. BLUE RED/BLACK BROWN SUPPLY SOLENOID WATER VALVE WATER VALVE DOOR...
... Optional Water Through The Door Or Mid-level Lighting COMPRESSOR WIRING Induction Run Compressor with Relay BLUE FREEZER LIGHT SWITCH NOTE DENOTES NOT ON ALL MODELS. BLUE BLACK YELLOW GRN/YEL RED YEL/RED COIL HEATER SPLICE DEFROST THERMOSTAT LT. BLUE RED/BLACK BROWN SUPPLY SOLENOID WATER VALVE WATER VALVE DOOR...

Installation Instructions (All Languages)
Page 1
... a reverse osmosis system is not connected immediately. Use adjustable wrench to adjust front rollers. Toe Grille NOTE Adjustable Front Roller (some models) Raise the front of installation, proper air circulation, and plumbing and electrical connections: • Sides & Top..........3/8" • Back...door to swing open. 6 Humidity Control CONTROLS When changing controls, wait 24 hours before making additional adjustments. (For models with Leveling Screw (some models) Raise Stationary Front Roller with LED display, 3 to 5 is normal operating range.) 7 ICEMAKER Ensure icemaker is...
... a reverse osmosis system is not connected immediately. Use adjustable wrench to adjust front rollers. Toe Grille NOTE Adjustable Front Roller (some models) Raise the front of installation, proper air circulation, and plumbing and electrical connections: • Sides & Top..........3/8" • Back...door to swing open. 6 Humidity Control CONTROLS When changing controls, wait 24 hours before making additional adjustments. (For models with Leveling Screw (some models) Raise Stationary Front Roller with LED display, 3 to 5 is normal operating range.) 7 ICEMAKER Ensure icemaker is...


